Combining Screens from Multiple Applications
PUBLISHED
![]()
![]()
Dependencies
- Tizen Studio 1.1 and Higher
Content
- Porting a Screen
- Adding a User View for the Ported View
- Designing the Ported View
- Adding View Transitions
Related Info
Due to the project migration features of the UI Builder, you can reuse the screens of your existing applications and the Tizen Studio samples by porting their screens to your new application. You can create screens by using EFL code or the UI Builder, or by porting screens from other applications. The basic principles of migrating an EFL application to the UI Builder and creating screens using the UI Builder are introduced in Migrating Projects for UI Builder.
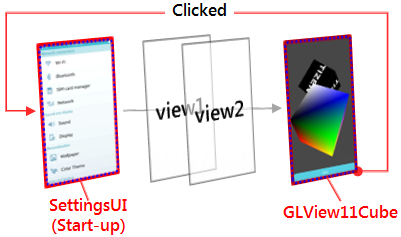
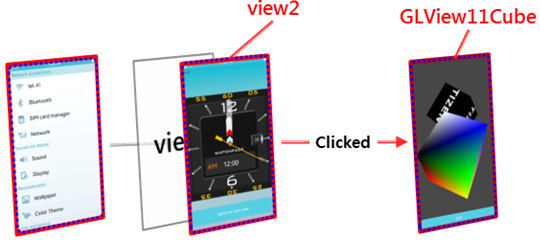
This topic shows how to add screens from other applications to existing applications. The example is based on the SettingsUIwithUIB project created in Converting to a UI Builder Project. A screen from the GLView11Cube sample application is ported to the SettingsUIwithUIB application.
Figure: Combining screens from multiple applications

Porting a Screen
To port a GLView11Cube project screen to the SettingsUIwithUIB project:
-
Create the GLView11Cube sample application project:
- In Tizen Studio, go to File > New > Tizen Project.
- Select the Sample project type, Mobile v2.4 profile and version, and the Native Application application type.
- In the list of samples, select Graphics > GLView11Cube.

- Click Next, give the project a name and ID, and click Finish.
-
Port the GLView11Cube screen to the SettingsUIwithUIB project:
- Copy the related files in the
inc,src, andressubfolders.
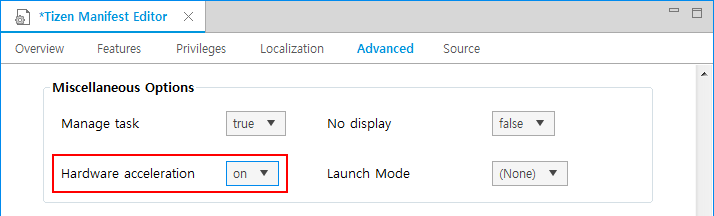
- Set hardware acceleration on in the SettingsUIwithUIB project's manifest file as it is in the GLView11Cube project.
- Copy the related files in the
Adding a User View for the Ported View
To add a user view for the ported GLView11Cube application screen through the User View Manager:
- Right-click the SettingsUIwithUIB project in the Project Explorer view and select User View Manager.
- Add a glview11cube view.
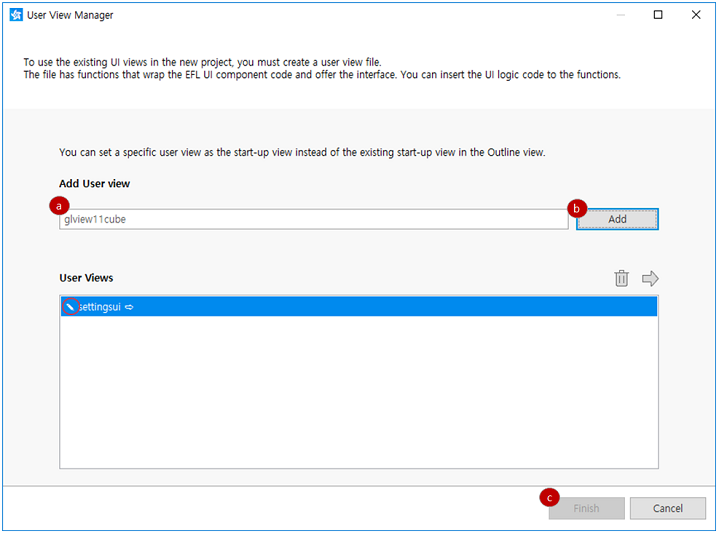
- Enter glview11cube in the field as a name for the new user view.
- Click Add.
- Click Finish.
The pencil (![]() ) icon in the list refers to an existing user view. If you remove an existing user view, the logic based on that view is also removed. This cannot be undone.
) icon in the list refers to an existing user view. If you remove an existing user view, the logic based on that view is also removed. This cannot be undone.
Designing the Ported View
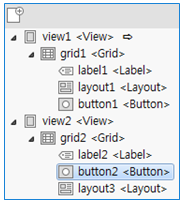
The following figure shows the new view structure when the core UI components of the GLView11Cube screen are changed to those of the UI Builder.
Figure: GLView11Cube view structure
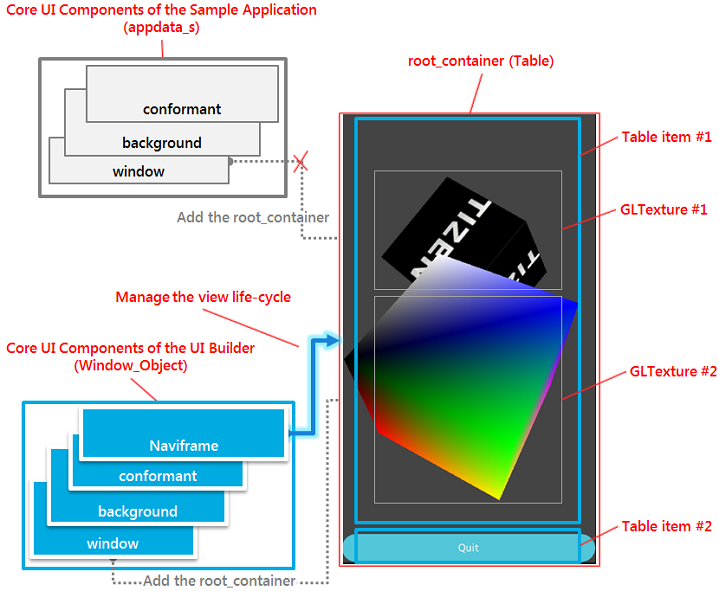
The GLView11Cube application (single screen) does not have the naviframe in the core UI component layer. Thus, the UI components that make up the screen are connected to the first Elementary window object. Similarly, the UI Builder view system also creates the root_container through the window; however, it defines the structure to manage the view in the naviframe of the window object.
To design the ported view, you must modify the ported source file (SettingsUIwithUIB/src/glview11cube.c) and the new user view file (SettingsUIwithUIB/src/user_view/uib_glview11cube_view.c).
To modify the ported file (SettingsUIwithUIB/src/glview11cube.c):
- In the Project Explorer view, open the
glview11cube.cfile. - To use the
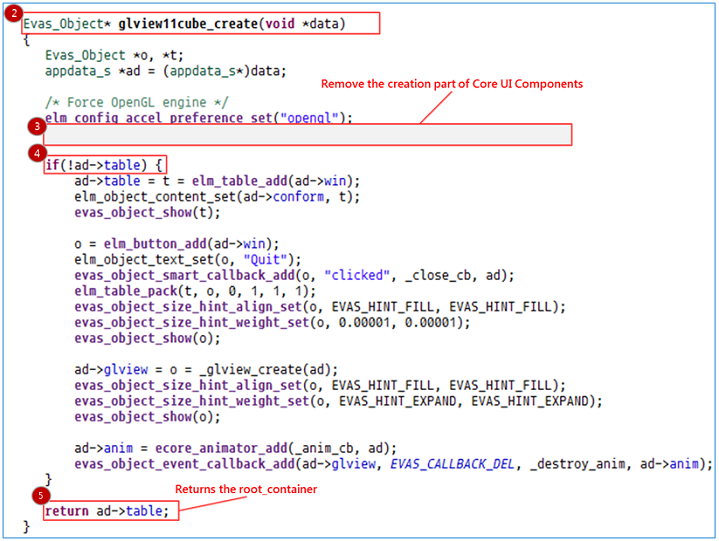
app_create()function as the constructor of theroot_container, make the following change to the function prototype.

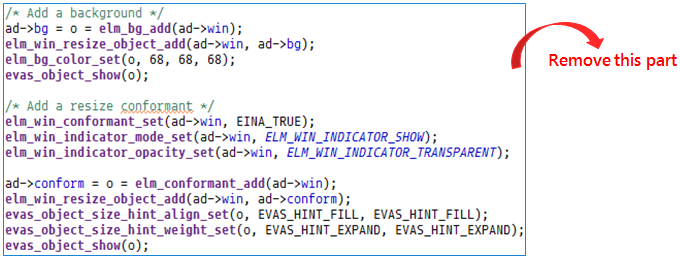
- To use the UI Builder window object, remove the creation part of the core UI component in the
glview11cube_create()function.
- Add a conditional statement that prevents the
root_containerfrom being duplicated, which happens when you transition between the views in the UI Builder view system. - Change the return value from the
booltypetrueto theEvas_Object*typetable. - Remove the
main()function from theglview11cube.cfile, as it is not needed anymore.
The following figure shows the modified definition of the glview11cube_create() function.
Figure: Modified glview11cube_create() function
To modify the new user view file (SettingsUIwithUIB/src/user_view/uib_glview11cube_view.c):
- Include the
glview11cube.hfile for referencing the UI component structure (appdata_s). - Define the
appdata_sstructure asadto be used in theglview11cube_create()function. - Add a declaration for calling an external function.
- Assign the UI Builder's window object to the
adstructure. - Pass the UI Builder's window object as a parameter to the
glview11cube_create()function and assign the createdglviewobject to the view context'sroot_container. At runtime, the GLView11Cube screen is displayed through theroot_container.
Figure: Designing the GLView11Cube view

Adding View Transitions
To implement view transitions to and from the ported view:
-
To switch from the GLView11Cube view to the SettingsUI view (start-up view):
Figure: Transitioning from the ported view
- Include the
uib_util.hheader file at the top of theglview11cube.cfile.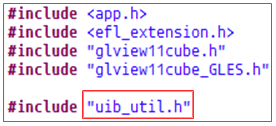
- Modify the
_close_cb()function by replacing theui_app_exit()function with theuib_util_push_view()function.The
uib_util_push_view()function is a view transition function provided by the UI Builder view system.
- Include the
-
To switch from view2 to the GLView11Cube view:
Figure: Transitioning to the ported view
- In the UI Builder Outline view, select the button2 item.
- In the Properties view, click
 and
and  to add a new
 clickedevent.
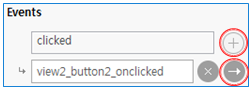
The
uib_view2_event_handler.cfile is opened. - In the
view2_button2_onclicked()function, call theuib_util_push_view()function to switch to the GLView11Cube view.

- In the UI Builder Outline view, select the button2 item.
Figure: SettingsUIwithUIB event flow
