Using Extended Emulator Features
PUBLISHED
![]()
![]()
Dependencies
- Tizen Studio 1.0 and Higher
Content
The emulator features can be extended in many ways. With the emulator, you can:
- Use multi-point touch
- Share a directory
- Use a camera
- Use network features
- Use custom skin layout
- Use EventCast
- Start the emulator with a configuration file
You can also familiarize yourself with the emulator directory structure.
Using Multi-point Touch
To create a multi-point touch effect in the emulator, press and hold the Ctrl key (Command key in macOS), while mouse-clicking on the emulator screen.
Adding a Touch Point
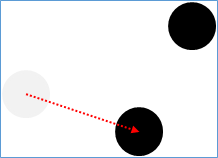
To add a touch point on the emulator screen, press and hold the Ctrl key (Command key in macOS) and mouse-click a point on the screen.
You can add touch points up to the maximum amount of multi-point touches. To get the maximum amount, use the System::SystemInfo::GetValue() method with the MultiPointTouchCount key.
Figure: Adding a touch point

Moving an Existing Point
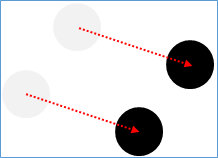
To move an existing point one by one, press and hold the Ctrl key (Command key in macOS), mouse-click an existing point, and move it to another location on the screen.
Figure: Moving an existing point
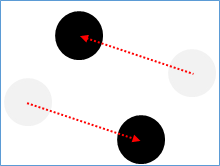
To move all existing points together, press and hold the Ctrl (Command in macOS) and Shift keys, mouse-click an existing point, and move it to another location on the screen.
Figure: Moving all existing points
To move 2 existing points symmetrically together, press and hold the Ctrl (Command in macOS) and Alt keys, mouse-click an existing point, and move it to another location on the screen.
Figure: Symmetrically moving 2 existing points
Ending the Multi-point Touch
To end the multi-point touch, release the Ctrl key (Command key in macOS). The touched points on the emulator screen are invalidated, and the next screen touch event is read as a new event, not part of the previous multi-point touch event.
Figure: Invalidating touched points

Sharing a Directory
You can share a directory between the emulator and your computer:
- Run the Emulator Manager and click Create or Edit.
- In the File Sharing section of the VM property, enable the Sharing button and select a directory to share.
- Start the emulator.
The host computer's directory is shown as
/mnt/hostin the emulator.
You can also add a shared directory in the Emulator Control Panel (ECP):
- Start the emulator.
- Right-click the emulator and select Control Panel .
- Select the Host Directory Sharing tab.
- Add or remove the host computer directory.
Using a Camera
With the emulator, you can develop an application using the Camera API. The emulator provides a virtual camera. The virtual camera simulates frames by using the image files in a host computer or using the computer Webcam.
You can use an animated GIF image file. The emulator provides an image file that can be used as a default.
In addition, you can host a Webcam as if it were a device camera.
Before running the application, install a USB-connected Webcam or embedded Webcam on your computer. On Linux, the Webcam feature uses libv4l-0. If you do not have it on your computer, this feature does not work properly. You can check the feature status with the following command:
$ dpkg -l | grep libv4l-0
- The Webcam must support video4linux2. (Currently, only
/dev/video0is supported.) - Multiple instances of the emulator can be launched, but only a single emulator instance can use the camera feature.
- Depending on the Webcam in use, the emulator camera feature may not work properly.
The following table lists the host Webcam features.
Table: Webcam features
| Feature | Detail | Notes |
|---|---|---|
| FPS | 30 fps | - |
| Preview image format | YUYV I420 YV12 |
- |
| Capture image format | YUYV I420 YV12 JPEG |
- |
| Preview resolution | QSIF: 160 x 120 QCIF: 176 x 144 QVGA: 320 x 240 CIF: 352 x 288 VGA: 640 x 480 |
- |
| Capture resolution | QSIF: 160 x 120 QCIF: 176 x 144 QVGA: 320 x 240 CIF: 352 x 288 VGA: 640 x 480 |
- |
| Attributes | Brightness Contrast |
Unsupported attributes can return an error. For example, the camera_start_focusing() method returns an error. |
Using Network Features
The Tizen Emulator provides 2 network backend types: NAT-based TCP/IP communication and a bridged network. By default, the NAT-based network is used. You can configure the network backend type in Emulator Manager > Network Configuration.
The emulator is based on the QEMU virtual machine. The NAT type exploits the QEMU user networking (SLIRP) and the bridge type uses tap networking. For more information on networking, see QEMU Networking documentation.
Proxy Configuration
The emulator provides 3 methods of proxy configuration. They can be configured in Emulator Manager > Network Configuration:
- No proxy: does not use the proxy configuration.
- Use host proxy: sets the same proxy value that the host uses.
- Use manual proxy: sets manually a proxy value different from the host.
- Localhost
- 127.0.0.1/8
- 10.0.2.0/24
Automatic proxy configuration is not supported due to licensing issues.
NAT (Network Address Translation)
NAT is the default networking backend and has better usability than the other backends. The emulator supports TCP, UDP, and ping within a guest. However, a raw socket is not supported.
The emulator virtually provides a LAN (Local Area Network), such as the following:
- 10.0.2.2: Gateway, host machine
- 10.0.2.3: DNS (you can specify the emulator to use the host DNS IP when the emulator starts)
- 10.0.2.15: Emulator IP
Figure: Emulator NAT network architecture

Network Connections for NAT
Inbound connections from external to the emulator fail in the NAT backend. If you want to permit inbound connections and test, you must forward the port by using one of following methods:
- ECP (Emulator Control Panel)
You can add port forwarding by using the ECP. In the ECP > Network card, under Add port-forwarding, enter the ports to forward.
- SDB (Smart Development Bridge)
The SDB provides port forwarding as a command. For more
user,id=net0information in the SDB commands, see sdb forward. - Launch configuration on boot
You can forward the port upon booting the emulator by modifying the QEMU redirection option. The QEMU redirection option can be appended in the existing
-netdev user,id=net0option in the<TIZEN_STUDIO_DATA>/emulator/vms/<image name>/vm_launch.conffile with the following appending command:-netdev user,id=net0,hostfwd=[tcp|udp]:[<hostaddr>]:<hostport>-[<guestaddr>]:<guestport>
Redirect incoming TCP or UDP connections to the <hostport> host port to the <guestaddr> guest IP address on the <guestport> guest port. If the <guestaddr> is not specified, its value is 10.0.2.15 (default first address given by the built-in DHCP server).
You can also connect one emulator instance with another by using redirection. To set up redirection (where A and B are emulator instances):
- Set up the server on A, listening to
10.0.2.15:<ServerPort>. - On A, append the
,hostfwd tcp:127.0.0.1:<B's localPort>-:<A's serverPort>redirection option in thevm_launch.conffile. - On B, let the client connect to
10.0.2.2:<B's localPort>.
NoteThe appending value of the configuration file is removed when the user changes the VM setting on the Emulator Manager.
- Set up the server on A, listening to
Bridge (Bridged Network)
The bridge backend requires a dedicated IP for the emulator and you can communicate to an external network without any port forwarding. If you want to use one of the following, you can try the bridge backend:
- You want to permit an inbound connection with no port forwarding.
- Your application must send and receive broadcast/multicast packets, for example a DLNA (Digital Living Network Alliance) application.
- You want to use a firewall-free IP for the emulator.
- You want high performance from the network.
Figure: Emulator bridged network architecture

- Network bridging does not work when the underlying physical network device is a wireless device.
- On macOS, only a physical network device named
en0can be used for bridging.
When the Emulator Manager creates an emulator instance, it also checks the emulator IP and sets the properties of the bridged network in Emulator Manager > Network Configuration automatically.
If you have a DHCP (Dynamic Host Configuration Protocol) server on the network, you can configure the emulator IP using DHCP. If not, enter the IP address that you want to assign.
In the following host operating systems, you must configure the properties of the bridged network directly:
- Bridge configuration on macOS Mavericks and above:
- In the Apple menu, click System Preferences > Network.
- In the Action menu, click Manage Virtual Interfaces.
- Click Add (+) > New Bridge, and select the Ethernet interfaces to include in the bridge.
- Configure the TCP/IP for bridge, such as IP and DNS.
- Bridge configuration on Windows 8 and above:
- Click the Windows Start (
 ) > Control Panel. In the search box, enter "adapter", and click Network and Sharing Center > View network connections.
 - Right-click the physical network connection used for bridging, and click Properties.
- On the General tab (for a local area connection), click Internet Protocol (TCP/IP) > Properties.
- Click Obtain an IP address automatically to delete the IP configuration, and click OK. The IP configuration (IP address, subnet mask, and default gateway) is used for the configuration of the bridged network.
- While holding down the Ctrl key, select the network connection and the tap device that you want to include in the bridge. For example, tap1 and Local area connection.
- Right-click one of the selected network connections, and click Bridge Connections.
- Configure the TCP/IP of the Network bridge. Reuse the deleted TCP/IP configuration of step 4.
- Click the Windows Start (
Using Custom Skin Layout
The emulator skin consists of an <TIZEN_STUDIO>/platforms/<PLATFORM_VERSION>/<PROFILE>/emulator-resources/skins/<SKIN_NAME>/layout.xml XML meta file. The file defines layout-related information, such as skin image file name, display location, and the location of hardware keys.
The following example shows the content of the layout.xml layout file:
<?xml version="1.0" encoding="UTF-8"?>
<EmulatorUI xmlns="http://www.tizen.org/emulator/ui/layout">
   <layoutVersion>2.4</layoutVersion>
   <formList>
      <!--Skin mode definition-->
      <form name="Portrait">
         <display>
            <!--Display screen size and position-->
            <region left="30" top="81" width="480" height="800"/>
            <!--Rotate display screen by degree-->
            <angle>0</angle>
         </display>
         <!--Resource file name of the usual skin image-->
         <normalImage>default_0.png</normalImage>
         <!--Resource file name of the skin image when hardware key events occur-->
         <pressedImage>default_0_p.png</pressedImage>
         <keyList>
            <key name="Home"> <!--Optional-->
               <!--Hardware key region size and position-->
               <region left="233" top="882" width="74" height="74"/>
               <keycode>139</keycode> <!--Keycode value-->
               <!--This line is displayed when mouse hovers over hardware key region-->
               <tooltip>Home</tooltip>
               <!--Defined keyboard shortcut-->
               <shortcut>F1</shortcut>
            </key>
         </keyList>
         <hover>
            <!--RGB line color of the hardware key hover-->
            <color R="255" G="255" B="255"/>
         </hover>
      </form>
   </formList>
</EmulatorUI>
The emulator skin also contains a <TIZEN_STUDIO>/platforms/<PLATFORM_VERSION>/<PROFILE>/emulator-resources/skins/<SKIN_NAME>/info.ini property file. The file defines skin-related information, such as skin name and supported resolutions.
The following example shows the contents of the info.ini property file:
skin.name=Phone 480x800
resolution.width=480
resolution.height=800
To create your own skin layout:
- Create a new skin folder in the
<TIZEN_STUDIO>/platforms/<PLATFORM_VERSION>/<PROFILE>/emulator-resources/skinsfolder. - In the skin folder, define the content of the
layout.xmlandinfo.inifiles and include the required skin image files. -
Select the skin name in the Emulator Manager. You can also use the emulator start-up options in the command line.
The image defined in your modified XML meta file is displayed when the emulator is launched.
Using EventCast
You can simulate events on the emulator using the Emulator Control Panel (ECP). However, simulating sensor events with the ECP is not very intuitive or convenient. While you are simulating events, it is impossible to touch the emulator screen simultaneously. EventCast enables you to simulate sensor and touch events more intuitively using a real target device.
The following figure illustrates how the EventCast application on the target device gathers events and passes them to the emulator controller, which converts and hands them over to the Tizen platform. This is convenient if you do not have a Tizen mobile device.
Figure: EventCast architecture

EventCast provides the following features:
- Touch: Maximum number of touch points is 10
- Sensors: Accelerometer, gyroscope, geo-magnetic, proximity, and light
- Display: Getting images of the emulator and drawing them when using touch features
Prerequisites
When connecting through USB, ADB is required to make a connection. If you have already installed the Android™ SDK on the computer, ADB is located in the <installed Android SDK>/sdk/platform-tools folder. Otherwise, you can download only ADB or install the Android SDK.
To install ADB:
-
Ubuntu/macOS: Download ADB and then install it in the
/usr/bin folder.For more information, see ADB Fastboot Install.
-
Windows®: Download ADB and install it in the
C:\ADB folder.For more information, see ADB Fastboot for Windows.
When connecting through Wi-Fi, make sure that your Android device and computer are within the same AP.
Installing EventCaster
EventCaster is the application on the target device. It communicates with the Tizen Emulator through the TCP/IP protocol. It can connect to the emulator using USB or Wi-Fi.
You can download the EventCaster from Google Play (https://github.com/eventcaster/eventcaster.git) and install it manually.
Connecting EventCaster to the Emulator
To connect the EventCaster application to the emulator:
- Connect through USB:
- Locate the developer options.
On most devices running Android 3.2 or older, you can find the option under Settings > Applications > Development.
On Android 4.0 and newer, it is in Settings > Developer options.
NoteOn Android 4.2 and newer, the developer options are hidden by default. To make them available, go toSettings > About phoneand tapBuild number7 times. Return to the previous screen to find the developer options. - Enable USB debugging.
- Connect the device to a computer through USB.
- Launch the EventCaster.
- Start the server using a default port (7000) or enter the port number.
- Forward a TCP port using the
adb forwardcommand.For example, to forward the 7000 port in the application to the 1234 port in your computer:
adb forward tcp:1234 tcp:7000 - Launch the Tizen Emulator, and open the Emulator Control Panel (ECP) from the emulator context menu.
- Select the USB checkbox on the EventCast tab of the ECP.
- Enter the forwarded port number and click Connection on the ECP.
If the emulator connects to the application successfully, the Show Event button in the application is activated.
- Click Show Event. You can now send a sensor or touch value to the emulator.
- Locate the developer options.
- Connect through Wi-Fi:
- Enable Wi-Fi on device and select the Wi-Fi network.
- Connect the Android device to a network where you also have a computer running the emulator.
- Launch EventCaster and click Read WiFi.
The application gets the IP address of the connected network.
- Click Start Server.
- Select the Wi-Fi checkbox on the EventCast tab of the ECP.
- Enter the IP address and port number using EventCaster and then click Connect on the ECP.
If the emulator connects to the application successfully, the Show Event button in the application is activated.
- Click Show Event. You can now send a sensor or touch value to the emulator.
Starting an Emulator with a Configuration File
If you create an emulator instance using the Emulator Manager, a configuration file defining the emulator start-up options is generated (<TIZEN_STUDIO_DATA>/emulator/vms/<VM_NAME>/vm_launch.conf).
With the configuration file, you can launch the emulator in the command line:
./emulator --conf <configuration file>
The emulator binaries are located in the <TIZEN_STUDIO>/platforms/<PLATFORM_VERSION>/common/emulator/bin folder.
The configuration file consists of 2 sections:
- QEMU_OPTIONS section defines the qemu options, such as RAM, network, and devices.
- VARIABLES section defines the values for the qemu options.
You can override the defined qemu values on the emulator starting time. For example, to override the guest RAM size:
- The
-mqemu option (which sets the guest RAM size) and its value are written in the configuration file:[[VARIABLE]] ram=512 # define variable ram [[QEMU_OPTIONS]] -m ${ram} # use variable ram - To override the guest RAM size, start the emulator with the following command:
./emulator --conf <configuration file> --ram 1024
For more information on the start-up options, see QEMU Emulator User Documentation and the vm_launch.conf file.
The following example shows the configuration file:
[[VARIABLES]]
vm_name=mobile-vm
vms_path="/home/user/tizen-studio-data/emulator/vms"
image_arch=i386
drive="file=${vms_path}/${vm_name}/emulimg-${vm_name}.${image_arch},if=none,index=0,cache.no-flush=on"
swap="file=${vms_path}/${vm_name}/swap-${vm_name}.img,if=none,index=1"
skin_path="/home/user/tizen-studio/platforms/tizen-2.4/mobile/emulator-resources/skins/mobile-general-3btn"
display_resolution=480x800
display_pixel_density=233
process_num=4
ram=512
max_point=10
sensors=accel&geo&gyro&light&proxi&haptic&uv&press&hrm
jacks=earjack&charger&usb
network_proxy="http_proxy=1.2.3.4:123 https_proxy=1.2.3.4:123 ftp_proxy=1.2.3.4:123 socks_proxy=1.2.3.4:123"
bios_path="/home/user/tizen-studio/platforms/tizen-2.4/common/emulator/data/bios"
kernel="/home/user/tizen-studio/platforms/tizen-2.4/common/emulator/data/kernel/bzImage.${image_arch}"
kernel_log="${vms_path}/${vm_name}/logs/emulator.klog"
virt_cam_img_path0="/home/user/tizen-studio/tools/emulator/images/default-image2.gif"
wsi=vigs_wsi
host_ip=10.0.2.2
image_ver=1.0.4
profile=mobile
platform_version=tizen-2.4
append="vm_name=${vm_name} video=LVDS-1:${display_resolution}-32@60 dpi=${display_pixel_density} ${network_proxy} host_ip=${host_ip} console=ttyS0"

[[QEMU_OPTIONS]]
-drive ${drive},id=drive
-device virtio-blk-pci,drive=drive
-drive ${swap},id=swap
-device virtio-blk-pci,drive=swap
-enable-kvm
-device vigs,backend=gl,wsi=${wsi}
-device yagl,wsi=${wsi},protocol=23
-smp ${process_num}
-m ${ram}
-device virtio-maru-sensor-pci,sensors=${sensors}
-device maru-camera,index=0,path=${virt_cam_img_path0}
-device virtio-maru-nfc-pci
-netdev user,id=net0
-device virtio-net-pci,netdev=net0
-chardev file,path=${kernel_log},id=con0
-device isa-serial,chardev=con0
-device virtio-serial
### virtual console for unix socket client
#-chardev socket,path=/tmp/virtcon,server,nowait,id=virtcon0
#-device virtconsole,chardev=virtcon0
### virtual console for telnet client
#-chardev socket,port=2222,host=0.0.0.0,server,nowait,id=virtcon1
#-device virtconsole,chardev=virtcon1
-L ${bios_path}
-kernel ${kernel}
-append ${append}
-display maru_qt,rendering=onscreen,resolution=${display_resolution},dpi=${display_pixel_density}
-device virtio-maru-touchscreen-pci,max_point=${max_point}
-device AC97
-device virtio-maru-esm-pci
-device virtio-maru-hwkey-pci
-device virtio-maru-evdi-pci
-device virtio-maru-keyboard-pci
-device virtio-maru-vmodem-pci
-device virtio-maru-power-pci
-device codec-pci
-device maru-brightness
-nodefaults
-rtc base=utc
-M maru-x86-machine
-usb
-vga none
-device virtio-maru-jack-pci,jacks=${jacks}
Emulator Directory Structure
The following table describes the content of the emulator directory, located in the <TIZEN_STUDIO>/tools/emulator folder.
Table: Emulator directory content
| Folder or file | Description |
|---|---|
bin/emulator-manager |
Emulator Manager GUI |
bin/em-cli |
Emulator Manager CLI (Command Line Interface) |
bin/em-cli.jar |
Emulator Manager CLI executable |
bin/em-lib.jar |
Emulator Manager library |
bin/em-ui-3.0.jar |
Emulator Manager GUI executable |
bin/emulator-control-panel.jar |
Emulator Control Panel (ECP) |
bin/emulator-control-panel-cli.jar |
ECP CLI (Command Line Interface) |
bin/libecp.jar |
Profile-independent library for ECP |
bin/<LIBRARIES> |
Third party libraries, such as JNA, Protobuf, ARGS4J, JSON-simple, and JLINE |
storages/sdcard/sdcard_xxx.img |
.img files (base sdcard images) specific to the data size used by the Emulator Manager |
storages/swap/swap.img |
Disk image for swap |
The following table describes the platform image directories that are located in the <TIZEN_STUDIO>/platforms/<PLATFORM_VERSION>/<PROFILE>/emulator-images folder.
Table: Platform image directory content
| Name | Description |
|---|---|
<IMAGE_DIR> |
Platform image directory |
<IMAGE_DIR>/emulimg-<VERSION>.<ARCHITECTURE> |
Platform image, which represents an emulator root file system for x86 in the guest OS view |
<IMAGE_DIR>/info.ini |
File for specifying platform image information |
The following table describes the platform common directories that are located in the <TIZEN_STUDIO>/platforms/<PLATFORM_VERSION>/common/emulator folder.
Table: Platform common directory content
| Name | Description |
|---|---|
bin/ |
Binary files |
bin/emulator |
Emulator |
bin/emulator-x86_64 |
x86 emulator binary, including QEMU |
data/bios/ |
.bin files for initializing the guest OS |
data/kernel/ |
Kernel image for the guest Linux OS |
The following table describes the platform resource directories that are located in the <TIZEN_STUDIO>/platforms/<PLATFORM_VERSION>/<PROFILE>/emulator-resources folder.
Table: Platform resource directory content
| Name | Description |
|---|---|
plugins/ |
Plugins for profile |
plugins/ecp-plugin-<PROFILE>-<VERSION>.jar |
Plugin for the ECP |
plugins/ecp-plugin-<PROFILE>-<VERSION>.xml |
XML file for the ecp-plugin-<PROFILE>-<VERSION>.jar file configuration |
plugins/em-plugin-<PROFILE>.jar |
Plugin for the Emulator Manager |
skins/ |
Emulator skin images specific to the emulator resolution, and icons for the emulator option button and shortcut |
skins/<SKIN_NAME>/info.ini |
File for specifying emulator skin information |
skins/<SKIN_NAME>/layout.xml |
Metafile for the emulator skin layout |
template/<IMAGE_NAME>.xml |
XML file for default configuration of the virtual machine created by the Emulator Manager |
template/<IMAGE_NAME>-template.xml |
XML file for the template of the virtual machine created by the Emulator Manager |
The following table describes the directory structure of the user-specific files that are located in the <TIZEN_STUDIO_DATA>/emulator/vms folder.
Table: User directory content
| Name | Description |
|---|---|
.em.lock |
Lock file used for synchronization between VM operations, such as modify, delete, and launch |
.tizen-em-info |
Configuration file for the Emulator Manager |
emulator-manager.log |
Emulator Manager log file |
last-created_<PROFILE>.xml |
File for saving the VM properties that the user created last. When user creates a new VM next time, properties in this file are displayed as default. |
<VM_NAME>/ |
Target-specific images |
<VM_NAME>/emulimg-<VM_NAME>.<ARCHITECTURE> |
Writable <VM_NAME> image file |
<VM_NAME>/gui.property |
Hidden data for the emulator GUI |
<VM_NAME>/logs/ |
Log files (emulator and kernel logs) |
<VM_NAME>/swap-<VM_NAME>.img |
Swap image file |
<VM_NAME>/vm_config.xml |
Hardware configuration file |
<VM_NAME>/vm_launch.conf |
Emulator start-up options file (for more information, see Starting an Emulator with a Configuration File) |
<VM_NAME>/${USER}.lock |
Lock file used for synchronization between VM and ECP for set/get operations |