SceneJS – creating a JavaScript controlled, animated 3D character (part 1)
PUBLISHED
Introduction
In a world where multimedia content is expanding through the app markets and the web at an astonishing rate, a Tizen developer should have vast knowledge about the usage of the best multimedia content creation tools available in order to achieve the best possible user experience. You can surely account for that title the SceneJS library. The SceneJS JavaScript library alongside Three.js is one of the best 3D libraries for JavaScript utilizing WebGL. In this article we will show you how to use 3D models made in Blender to create a 3D character inside the SceneJS 3D environment.
Together with this article we have prepared for you a demo application named SceneJS_3D_OBJ_DEMO created with the Tizen SDK 2.3 (revision 1). After reading this article, please have an in depth view on the code of this application and play around with it, in order to get the most out of SceneJS.
What do we want to achieve?
We thought about taking our Lumber Jack hero (fig. 1) from the Phaser.js article and putting him into a 3D world of SceneJS. In order to do that, we have created a 3D model of our Lumber Jack hero in the Blender 3D authoring package.
![]()
Figure 1 – The 2D Lumber Jack from the Phaser.js article.
In our example application we have divided the character into six parts (head, body, left hand, right hand, left leg and right leg), later we have assembled him back in SceneJS and made him controllable with JavaScript. In our article we will show you how to get 3D models out of Blender (fig. 2).
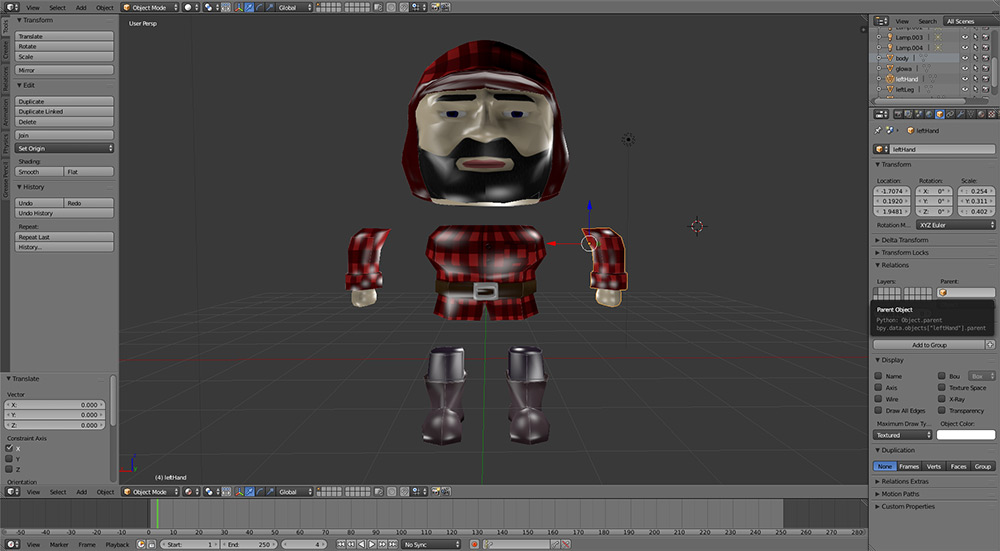
Figure 2 – Parts of the Lumber Jack inside Blender.
And then assemble them in SceneJS, like we did it in the example application with the 3D Lumber Jack (fig. 3). We also placed him in a skybox. We will explain what it is and also cover the process of creating a skybox in part 2 of this article.

Figure 3 – The complete Lumber Jack in SceneJS.
The workflow
If you want to broaden your knowledge about SceneJS then please do visit the official SceneJS website. Rembember that inside the attached ZIP file with the example application, you can find the whole source code from this workflow and the 3D models. In order to successfully create a 3D Blender model and then use it in SceneJS we need a proper and stable workflow. In our case it will be a 5 step process. We will focus specifically on the key points in order to achieve the desired effect as shown on Figure 3. Please note that steps from 1 to 3 will be covered in this article and steps 4 to 5 will be covered in the next article.
- Creation of a 3D model of our character in Blender. This is just partly in the scope of this article, but you can find great tutorials on how to create your own 3D models using Blender on the official Blender Wiki Tutorials section here.
- Exporting the 3D model parts to several Wavefront Objects (*.obj file format).
- The setup and basic explanation of the SceneJS library in Tizen.
- Simple creation of a skybox using the CubeTheSphere program and JavaScript.
- Importing the 3D models into SceneJS and animating them using the TweenMax.js library.
Step 1 - Creation of a 3D model
In order to show a model inside the SceneJS environment for Tizen, we need a 3D model mesh. You can build one yourself using 3D packages like Blender (it’s free), 3D Studio Max, Maya, Cinema4D, Lightwave and many more. In our example we have built several models using the free Blender software, which also has a neat and easy to learn tools for creating 3D assets. It’s worth mentioning for newcomers to 3D graphics that while building your 3D models you should avoid creating triangular meshes. Try building your mesh based on quads. The quad based topology is cleaner and also behaves much better visually in animation comparing to the triangular based meshes. You can also omit this point and go straight to the third point of our workflow if you want to use the 3D models provided with the sample application. They are stored in the models folder (as *.obj files) of the Tizen project along with textures (*.jpg) and object material library files (*.mtl). As said before, you can find a comprehensive guide to learn 3D modelling, UV mapping and texture creation in Blender here.
Step 2 - Exporting the Lumber Jack 3D model parts
We will show the OBJ model exporting process by the example of Blender v2.73, since it is free and anyone can easily obtain it from www.blender.org. Please remember that in our case we are exporting the Lumber Jack character model in parts, because we want to be able to control each 3D element directly from JavaScript. That means we are exporting only the models, textures and material data without any animations applied in the 3D packages they were created in. While exporting the models you must remember about the pivot points of the models. While using Blender and exporting the models to the OBJ format it is crucial to remember that the OBJ models’ pivot point is located in the Blender world center, not the pivot point of the model (in Blender called the origin). This is very important in the aspect of animating such model using JavaScript, because if you will perform for instance a rotation on such object then you will for sure get a bad result. So having the model placed in the right place it is the time to export it from Blender to use in SceneJS. You can do that by selecting the desired model, by right clicking it. Then click the File menu from the top bar. Next roll over on to the Export from the menu and finally click on the Wavefront (.obj) menu option. You will be transferred to a screen where you can choose where to save your model. There will be also an export options box located in the bottom left part of the screen. In order to export the model correctly to SceneJS, please set the export options as in the box represented on Figure 4. What we need to do is tick three additional options – Selection Only, Smooth Groups and Write Normals. The first option tells Blender to export only the selected model and not the whole Blender scene. The second and third options are responsible for exporting information about the type of smoothing and the lighting of the model. This data is necessary to be transferred in order to have the same results in SceneJS as in Blender. Please store the exported files together in the same directory.
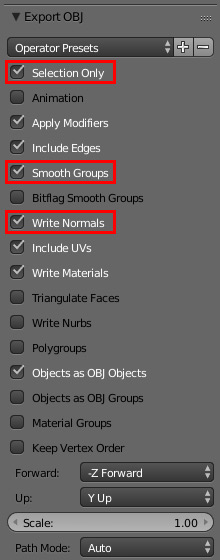
Figure 4 – The export box setting from Blender to SceneJS for OBJ models.
Step 3 - The SceneJS basics in Tizen
For importing our model to a Tizen Web Application we need a basic setup of SceneJS. But first you need to know that this library is based on hierarchized nodes. You can compare it in the web world in a way to cascading style sheets together with DOM (Document Object Model). So when you change the attributes of a parent node, then all the children of that node will be affected also if they are of the proper type. Of course parent nodes and child nodes can coexist together on the same level also.
Knowing that simple rule, you can start creating your basic SceneJS configuration. First of all you need to add the JavaScript code to your HTML document.
[…]

<script src="js/scenejs.js"></script>

[…]
The next thing to do is to setup the SceneJS library properly in your main.js file of your Tizen project. We will start by adding the plugins path for SceneJS. You will be using many of these plugins later in your work with SceneJS, so it is an important point in configuring this library. You can add the plugin path for SceneJS, like in the example below. It will point to the plugins folder inside the js folder.
[…]

SceneJS.setConfigs({
        pluginPath: "./js/plugins"
    });

[…]
Having done that, we need to finally setup our 3D scene in SceneJS. To achieve that, we should do few things. All of our steps are shown in the code listing below. We will start with creating a scene instance. A 3D scene needs a camera to look through and lights to lighten up the scene. As you can see we have put the camera as a child node of the scene node. Also the light node is a child of the camera node and the scene node. That is because, as said before, the camera node is the child of the scene node. As you can see the parameters of the nodes are quite self-explanatory and can be easily understood by anyone familiar with the basics of 3D graphics. For example the orbit type camera node has a pitch and yaw parameters which help us set its viewing angle towards the center of the SceneJS world. The lights node has parameters like colors which obviously can help you change the light color or a mode parameter which tells SceneJS what kind of light we want to use (point, directional, etc.). Every node can also have an id parameter, which can be later referenced in order to perform dynamic operations on that node or its parameters via JavaScript using the scene.getNode() function.
[…]

// ******** CREATE THE SCENE ********
    var scene = SceneJS.createScene({
        nodes: [

            // ******** CREATE THE ORBIT CAMERA ********
            {
                type: "cameras/orbit",
                yaw: 180,
                pitch: -20,
                zoom: 7,
                zoomSensitivity: 1,

                nodes: [

                    // ******** CREATE A LIGHT ********

                    {
                        type: "lights",
                        id: "myLight",
                        lights: [{

                                mode: "point",
                                color: {
                                    r: 1.0,
                                    g: 1.0,
                                    b: 1.0
                                },
                                diffuse: true,
                                specular: true,
                                pos: {
                                    x: 10,
                                    y: 20,
                                    z: -20
                                },
                                constantAttenuation: 0.2,
                                linearAttenuation: 0,
                                quadraticAttenuation: 0,
                                space: "world",

                                nodes: [{

                                    // HERE WE WILL PUT NODES WITH OUR MATERIALS AND MODELS

                                }]
                            }
                        ]
                    }
                ]
            }
        ]
[…]
The code above shows a simple and basic setup of SceneJS. If you run it, then you won’t get any results except a black screen. But the camera, lights and of course the scene will work. In order to see something you should put on the scene an object. We can demonstrate this by inserting a default teapot object, provided by the teapot.js plugin available by default from the plugins folder. As you may have guessed it will be also a node. But in order to see that object you need first to make a material node and then inside that node you will put a child node – with the object. The material will be applied onto the object node, therefore making it visible to the user. Also because we have applied earlier the orbit camera node, you can use the mouse or your finger on a mobile device to move the camera around the teapot and zoom the camera with the mouse wheel on a computer. Also the light node along with the material node will produce shadows and light blinks (speculars if set to true) on the surface of the object. Below you can see the code needed to put in the code above under the comment: // HERE WE WILL PUT NODES WITH OUR MATERIALS AND MODELS. This will insert in our scene a teapot with a blue material.
[…]

nodes:[ {
            type:"material",
            color:{ r:0.2, g:0.2, b:1.0 },

            nodes:[

             // A 3D teapot object
                     {
                         type:"geometry/teapot"
                     }
                  ]
               }
           ]

[…]
Summary
In the first part of the two articles we have showed you where to look in order to learn 3D model creation. Also we showed you how to export a Wavefront OBJ file to use with SceneJS. Finally we have explained how to create a basic setup of SceneJS. Also please note that the sample application shows you how to use the built in picking of 3D objects. That is very handy, for example in terms of creating 3D interfaces. In the sample application you can tap the 3D Lumber Jack and change the colour of his material. We hope that you like this article and that you will stay tuned for the second part of creating a JavaScript controlled and animated 3D character.