Game development with CraftyJS library - Follow-up
PUBLISHED
Introduction
This is the second article in series about CraftyJS on Tizen. In the first article, "Game development with CraftyJS library - introduction", framework's basics were explained. In this article some more advanced features like creating your own components, designing complex animations or playing audio files will be presented. These topics are illustrated with a sample application - game Quiz attached to this article.
Crafty
In the first article in the series we have presented two types of animations: Tween and Sprite Animation. Now we'll use them to create a more complex UI.
Animated button example
In our sample application every button is animated. Let's take the START button in the main menu as an example. The START button is green, with dark green text. When we press it, it turns blue with dark blue text. If we move our finger out of the button, without releasing our finger, it is supposed to turn green again. For handling touch events we will use the "Mouse" component. There are a few possible events it can listen to:
- MouseOver,
- MouseOut,
- MouseDown,
- MouseUp
- Click,
- DoubleClick,
- MouseMove.
The target for our application is a mobile device with a touch screen so we use only three of them: MouseDown, MouseOut and Click. Let's take a look at the code:
// START BUTTON
var startButton = Crafty.e("2D, DOM, startBtn, SpriteAnimation").attr({
    x : 455,
    y : 225
}).animate("press", [ [ 74, 0 ] ]).animate("release", [ [ 0, 0 ] ]);

var startText = Crafty.e("2D, DOM, startText, SpriteAnimation, Mouse").attr({
    x : 455,
    y : 225
}).animate("press", [ [ 0, 66 ] ]).animate("release", [ [ 0, 44 ] ]).bind(
        'MouseDown', function() {
            startButton.animate("press", 1, 0);
            startText.animate("press", 1, 0);
        }).bind('MouseOut', function() {
    startButton.animate("release", 1, 0);
    startText.animate("release", 1, 0);
}).bind('Click', function() {
    // start the game
});
As you can see we have two separate entities for the button: the background graphics (startButton) and the text (startText). They use sprites of the same size: startBtn and startText and have the same position. StartText was created later so it will be on the top of startButton. It means that the user will be able to click only on the StartText entity - we don't have to listen for events on the startButton entity.
The startButton has two animations declared: one for press and one for release events. They're simple, one frame animations responsible for changing the button's color. The startText entity has the same two animations and also holds all the logic responsible for triggering it. On the MouseDown event the "press" animations are triggered and on the MouseOut event we run the "release" animations. There's also an additional listener for the Click event, triggered when user actually clicks the button. Crafty enables you to format texts with CSS tags. When you use the "DOM" component you have a css() function available. Sample code below shows the formatting used for text on four answer buttons in the game scene:
answerText0 = Crafty.e("2D, DOM, Text, Mouse").attr({
    x : 55,
    y : 420,
    w : 560,
    h : 125
}).textFont({
    size : '20px'
}).css({
    "text-align" : "center",
    "font-size" : "50px",
    "font-family" : "Droid Sans",
    "font-weight" : "bold",
    "color" : "#ffffff",
    "vertical-align" : "middle",
    "padding-top" : "37px"
});
The css() function enables you to add CSS properties to any DOM element. It has one parameter: an object where the key is the style property and the value is style value. You can use either the CSS or the JavaScript notation (e.g. text-align or textAlign).
Creating animated clock
In the Quiz application we needed an animated clock. It shows how much time for a question you have left. It is shown on the picture below:
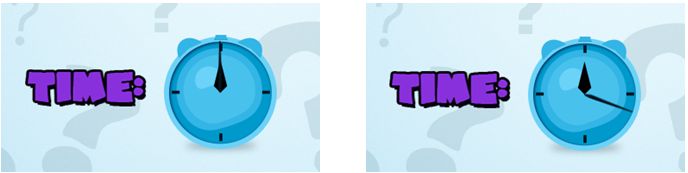
Fig. 1 Animated clock
For animating the clock we used two separate sprites: one for the background image and one for the moving clock hand.
// CLOCK
Crafty.e("2D, DOM, clock").attr({
    x : 1090,
    y : 40,
});

var clockHand = Crafty.e("2D, DOM, clockHand, Tween").origin(3, 60).attr({
    x : 1155,
    y : 48,
    w : 5,
    h : 60,
    rotation : 0
});
Note that we have to set an anchor point for the clockHand. By default the origin used for animations is set to the top left corner of the entity. We wanted to rotate our sprite around the bottom left point (0, 60). The clock hand doesn't start exactly in the bottom left point of the sprite so we added additional 3 pixels to the right: (3, 60). You can also use notation like "top left" etc.:
Crafty.e("2D, DOM, Tween").origin(x, y);
Crafty.e("2D, DOM, Tween").origin("top left");
Crafty.e("2D, DOM, Tween").origin("center");
Crafty.e("2D, DOM, Tween").origin("bottom left");
Crafty.e("2D, DOM, Tween").origin("middle right");
To make the clock hand rotate you can use a simple Tween animation. You have to set an initial rotation value to 0 and then change it by calling the clockHand.tween() function.
clockHand.tween({
    rotation : 360
}, quiz.config.timeForQuestion * Crafty.timer.getFPS());
In the code above a full 360 degrees rotate animation is defined. The quiz.config.timeForQuestion parameter indicates what is the maximum time for a single question (in seconds). It's set in the game options. As mentioned before, the Tween method takes as a parameter length of animation in frames. So we have to multiply time in seconds by the number of frames per second. You can get it with the Crafty.timer.getFPS() function. Note that it returns the target frame rate. The actual value may be different, depending on the hardware. We also want to know when the animation ends to show the game over screen. To do this a simple listener for TweenEnd event can be used:
clockHand.bind("TweenEnd", function() {
    // game over screen
});
Creating custom components
There are many useful components predefined in Crafty library. You can also download some more from the Internet, for example from http://craftycomponents.com/. Sometimes, however, it is useful to create your own, custom components that can be reused in different entities. We'll demonstrate it with an example. In the Quiz game, there are some scenes in which we want to easily hide or show part of the entities. For example, the exit game screen is a part of the game scene. Elements like "quit" or "resume" buttons become visible and clickable only when the user clicks the exit button in the top left corner of the screen. We hide them when the user clicks "resume". When showing/hiding these entities we also have to bring them forward/backward on the stage, so that the user can click them only when they're visible. We'll use the previous/next tip arrows in the help scene as the example. There are four hints. When the first hint is visible there should be only one arrow - "next hint". When the last hint is visible there should be only the left arrow - "previous hint". In the other cases we should see both arrows. You can see the help screen with both arrows on the picture below:

Fig. 2 Help screen
We can hide/show elements by changing their attributes:
// ARROWS
var leftArrow = Crafty.e("2D, DOM, arrowLeft, SpriteAnimation, Mouse").attr({
    x : 490,
    y : 400,
    z : 0,
    alpha : 0.01
});

// show entity
leftArrow.attr({
    z : 2,
    alpha : 1
});

// hide entity
leftArrow.attr({
    z : 0,
    alpha : 0.01
});
We manipulate the z index and alpha value. It isn't a really long piece of code, but, when used frequently, it can make code too long and not really clear. We'll show how to create a custom component that will make this code look better. Note: Alpha value for a hidden entity is set to 0.01 instead of 0, because of a bug of Crafty library. It is a known issue and should be solved in the next release. Let's go straight to the new components code:
// Define component "HideShow" (functions to hide/show entity by setting z and alpha values)
Crafty.c("HideShow", {
    hide : function() {
        this.attr({
            z : 0,
            alpha : 0.01
        });
    },

    show : function() {
        this.attr({
            z : 2,
            alpha : 1
        });
    }
});
Creating new components isn't difficult. You have to use the Crafty.c function with the new component's name and its body. In our case it has only two functions changing entity's properties: show() and hide(). Now you can use it like this:
// ARROWS
var leftArrow = Crafty
        .e("2D, DOM, arrowLeft, SpriteAnimation, HideShow, Mouse").attr({
            x : 490,
            y : 400,
            z : 0,
            alpha : 0.01
        });

leftArrow.show();// show entity
leftArrow.hide();// hide entity
The only thing you have to do is to add the "HideShow" component to the entity and you can use its functions. You can also use this component for other entities. Some examples will be shown later. There are also some conventions in writing your own components. Properties and methods that start with an underscore are private. You can create a method called init() that will be automatically called when the component is added to the entity. If you define a method with the same name as the component it will be used like a constructor. You can pass some configuration data to the component for each inheriting entity.
Transparent screens in scenes
We have two transparent screens in the game scene. The first one is shown when the user clicks the back button:
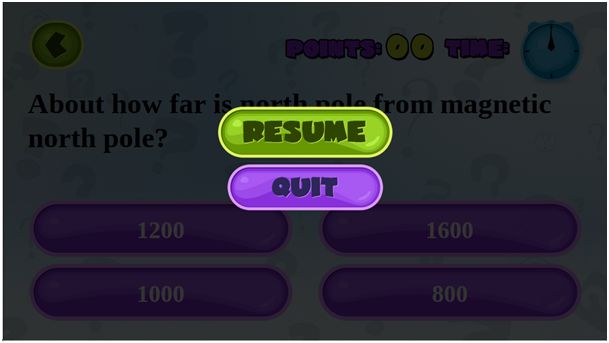
Fig. 3 Exit game screen
The second transparent screen is shown when the game is completed:
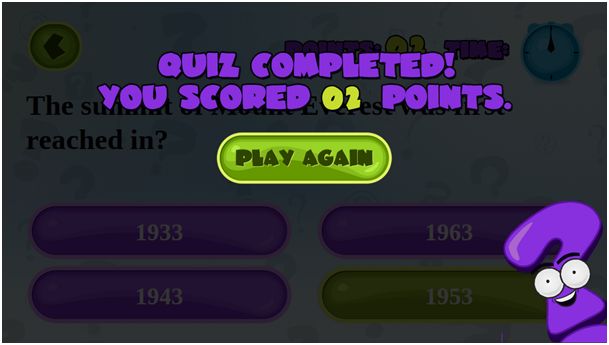
Fig. 4 Quiz completed screen
For simplicity we created all the elements of both screens and all the elements of the game main screen (clock, question, answers etc.) at the game scene initialization. All of the entities from the screens use our HideShow component and are hidden from the start. Both screens need a reasonable amount of code so we move them to separate files. We'll use the exit game screen as an example. Here is the code of this module (slightly simplified):
var exitGameScreen = function($) {

return {        dimRectangle : null,
        resumeButton : null,
        quitButton : null,
        resumeText : null,
        quitText : null,
        questionMark : null,

        initialize : function() {
            var that = this;

            // DIM RECTANGLE
            this.dimRectangle = Crafty.e("2D, DOM, Color, HideShow").attr({
                w : quiz.config.width,
                h : quiz.config.height,
                z : 0,
                alpha : 0.001
            }).color("black");

            // RESUME BUTTON
            this.resumeButton = Crafty.e("2D, DOM, startBtn, HideShow").attr({
                x : 455,
                y : 225,
                z : 0,
                alpha : 0.01
            });
            this.resumeText = Crafty.e("2D, DOM, resumeText, HideShow, Mouse")
                    .attr({
                        x : 455,
                        y : 225,
                        z : 0,
                        alpha : 0.01
                    });

            ...// quit button and question mark declarations (omitted in this code
            // sample)
        },

        // exit the scene screen
        show : function() {
            this.dimRectangle.attr({
                z : 1,
                alpha : 0.8
            });
            this.resumeButton.show();
            this.resumeText.show();
            this.quitText.show();
            this.questionMark.show();

            this.resumeText.bind('Click', function() {
                that.cancelExit();
            });

            this.quitText.bind('Click', function() {
                // quit the game
            });
        },

        // return to the game (from exit screen)
        cancelExit : function() {
            this.dimRectangle.hide();
            this.resumeButton.hide();
            this.quitButton.hide();
            this.resumeText.hide();
            this.quitText.hide();
            this.questionMark.hide();

            this.resumeText.unbind('Click');
            this.quitText.unbind('Click');
        },
    };
}($);
All the declarations of the entities used in the end screen are moved to this screen module. It is very convenient because it makes our screen reusable. Every entity is defined as invisible. Notice that they all use the HideShow component. For dimming effect we use a black rectangle covering the whole screen. We can't use the HideShow component's show() function here, as the "visible" rectangle has alpha of 0,8. To get a rectangle of a solid color we use a new component: Color. It is predefined in Crafty library and has only one function: color(). This method draws a solid color in the entire entity. There are also two methods defined: show() and cancelExit(). The show() method uses HideShow's show() method and manually sets alpha for the dimRectangle entity. It also binds Click event listeners for the buttons. It is important to bind these events here. You shouldn't do this earlier to prevent clicking invisible entities (if there are any other entities with the same/lower z index). The cancelExit() method is very similar. You hide all of the entities with hide() function and unbind all of the click events.
Playing audio files
Playing audio files in Crafty is very easy. First you have to load the file:
Crafty.audio.add("correctAnswer", "sounds/game_correct.wav");Then play it:
Crafty.audio.play("correctAnswer");That's the easiest way for short sounds. Crafty can also help you assure cross-browser compatibility. To do that three types of audio files will be required: mp3, ogg and wav. The best format will be chosen for each browser. You can add a single sound...
// adding a single sound
Crafty.audio.add("correctAnswer", [
        "sounds/game_correct.mp3",
        "sounds/game_correct.ogg",
        "sounds/game_correct.wav" ]);
...or many sounds at once:
// adding audio from an object
Crafty.audio.play("correctAnswer");
Crafty.audio.add({    correctAnswer : [ "sounds/game_correct.wav", "sounds/game_correct.mp3",
            "sounds/game_correct.ogg" ],
    wrongAnswer : [ "sounds/game_wrong.wav", "sounds/game_wrong.mp3",
            "sounds/game_wrong.ogg" ]
});
Now you don't have to worry about choosing the best audio format. You can simply call the Crafty.audio.play() function. The Crafty.audio.play() method takes three parameters:
- Id - sound id defined when adding the sound,
- repeatCount - how many times to repeat this sound (-1 for forever)
- volume - volume value between 0 and 1.
Only the first argument is obligatory, you can omit the other two. The default repeatCount and volume values are 0 and 1 respectively.
Summary
In this article some more complex animations were shown. You have learned how to create your own components and modules and use them to keep your code clean. Using audio in Crafty games was also demonstrated. In the next part of this series you will learn how to use databases in Tizen games ("Working with databases in Tizen - Activerecord.js library").