Creating a complete Currency Calculator application in AngularJS for Tizen – part 1
PUBLISHED
Introduction
In this series of articles we will focus on creating a full working application for the Tizen Platform. Our application will be built using the most popular and worldwide known by JavaScript developers, angular.js framework. The framework is rather old, but it is stable and reliable. If you need help with using it you can find information about it in the Internet, which can be found on forums, in tutorials and video tutorials. The community of angular.js is very big. The framework itself is used throughout the whole Internet and for building mobile applications. It is very versatile, reliable and used by many big companies in their key products. Therefore we decided to show how you can build a Currency Calculator application for a Tizen device using angular.js.
In order to get the most out of this article we presume the reader has very basic knowledge about Bootstrap, its classes and behavior, layout creation, CSS and its usage. Also the reader should poses basic knowledge about angular.js, two way data binding, controllers, directives, REST APIs and using the JSON data format in web applications.
The same application we will build in this series of articles is also available at the Tizen Store for free, so you can find it under the name Currency Calculator, download it and play around with it. So you can have a look for what we are aiming to create in our angular.js article series for Tizen. Also we have attached the source code of the application to this article, so you can see how we have built it.
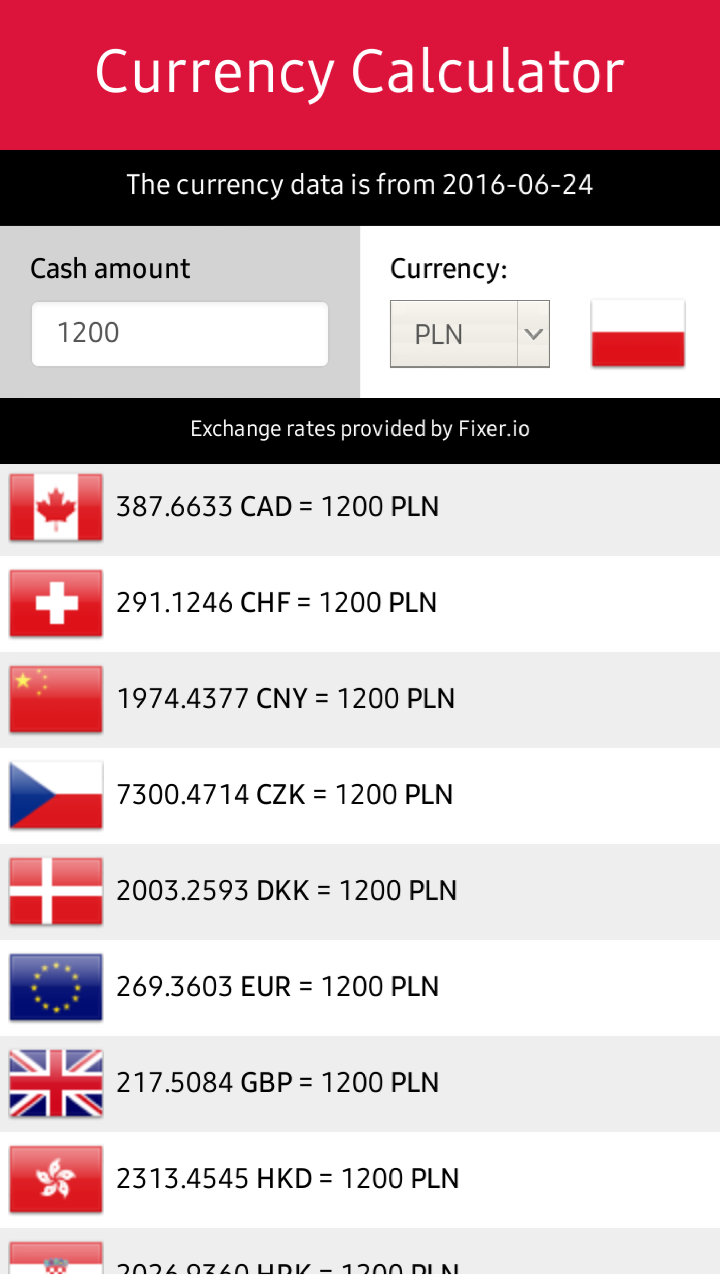
Figure 1 – The Currency Calculator application from the Tizen Store
Prerequisites – a currency API, the money.js library and others
The structure of the Currency Calculator project is very simple and will look like in the snippet below.
├── config.xml
├── css
├── fonts
├── iconCurrency.png
├── images
├── index.html
└── js
In order to create a Currency Calculator application in angular.js we first need to prepare by finding a proper currency exchange API and several libraries which will help us in our effort. The currency API that we have chosen for our application is http://fixer.io . We chose it because it is free and does not need any registering or putting keys inside the application. It provides average exchange rates between 31 currencies published by the European Central Bank for free. And as it is written on the APIs web page it is “…updated daily around 4PM CET”. You can easily fetch its data by typing in the browser the address below.
http://api.fixer.io/latest
As a response you will receive a JSON file with the currency rates.
{
    "base": "EUR",
    "date": "2016-06-29",
    "rates": {
        "AUD": 1.4911,
        "BGN": 1.9558,
        "BRL": 3.6216,
        "CAD": 1.4407,
        "CHF": 1.0854,
        "CNY": 7.368,
        "CZK": 27.114,
        "DKK": 7.4376,
        "GBP": 0.8255,
        "HKD": 8.6041,
        "HRK": 7.5273,
        "HUF": 316.95,
        "IDR": 14577.25,
        "ILS": 4.2793,
        "INR": 74.9693,
        "JPY": 113.85,
        "KRW": 1283.15,
        "MXN": 20.7331,
        "MYR": 4.4594,
        "NOK": 9.3065,
        "NZD": 1.5565,
        "PHP": 52.106,
        "PLN": 4.4261,
        "RON": 4.5253,
        "RUB": 71.0452,
        "SEK": 9.4311,
        "SGD": 1.4951,
        "THB": 39.028,
        "TRY": 3.2157,
        "USD": 1.109,
        "ZAR": 16.6016
    }
}
As you can see above we have acquired all the currency rates against the EUR – Euro currency value. Also we have information about the date when the rates have been updated and what is our base currency. EUR is set as a base currency by default. For our application we won’t need to change the base currency. We just need one call to the API to get the currency rates for the current day. Then we will store the data locally for further usage during the day. And if needed, we will recalculate the currency rates against our own chosen base currency. We will do it without making a call to the currency API by using the money.js library.
You can get the money.js library from here. It is a very helpful tool which recounts the amount of money using the provided currency exchange rates. It also helps you quickly set how precise the calculation of the rate should be. Below you can see a simple usage of the money.js library. It is really a time saver.
In this particular case it would convert the amount_of_money from Euro to United States Dollar and will set the precision of the result to 2.
[…]

var rate = fx(amount_of_money).from(“EUR”).to(“USD”).toFixed(2);

[…]
But before doing that you must provide the library with the current exchange rates. The easiest way is to assign them through the fx.rates property like below.
[…]

fx.rates = myCurrencyRates;

[…]
The acceptable format for fx.rates is a key value pair, name of the currency and its rate, just like fixer.io provides. So myCurrencyRates should look as in the following example.
[…]

myCurrencyRates = {"AUD": 1.4911,"BGN": 1.9558,"BRL": 3.6216 /* and so on… */ }

[…]
Knowing how to use the Fixer.io and the money.js library we can move on to setup the rest of the libraries for our project.
As you might suspect we will need to download also the angular.js library as we are building an angular.js application after all. You can get it here.
Additionally we will need additional modules for angular.js. One of them is responsible for handling the local storage in our web app (for storing curreny exchange rates when there will be no Internet connection) and is named ngStorage and is located at this web site. The other one will help us make our application prettier by adding animations. The angular-animate module can be downloaded here.
Our layout will be based upon Bootstrap, which can be obtained here. Also to make Bootstrap work properly we need to have in our project the jQuery library. You can download it here.
The last addition we want to have in our application is the lodash.js helper library. Lodash is great for handling data and will help us deal with sorting in our application. You can get it at this web site.
We should now create an index.html file which will be used as the starting point of our application. In the <head> section we should import all of the mentioned above libraries. The JavaScript imports in our application and our HTML should now look like in the snippet below.
[…]

<!DOCTYPE html>
<html>
<head>
    <meta charset="utf-8"/>
    <meta name="viewport" content="width=device-width, initial-scale=1.0, maximum-scale=1.0">
    <meta name="description" content="Currency Calculator"/>
    <title>Currency Calculator</title>
      <link rel="stylesheet" type="text/css" href="css/bootstrap.min.css"/>
    <link rel="stylesheet" type="text/css" href="css/style.css"/>
    <script src="js/jquery-2.1.4.min.js"></script>
    <script src="js/lodash.min.js"></script>
    <script src="js/bootstrap.min.js"></script>
    <script src="js/angular.min.js"></script>
    <script src="js/ngStorage.min.js"></script>
    <script src="js/angular-animate.min.js"></script>
    <script src="js/money.min.js"></script>
    <script src="js/app.js"></script>
</head>
<body>
</body>
</html>

[…]
As you can see above we have also imported the app.js file. It will store the JavaScript code of our application. So please create such file in your js directory also.
The layout and assets
Before doing any angular.js programming, our application first needs a layout. We want to achieve the same layout as in the figure 1 in the beginning of the article. As you can see the layout consists of a header with the application name, then beneath there is an information field about the currency rates' update date. Under that, there are two columns, one with an input field for the cash amount and the second one with a select box for changing the currency. Both fields have labels and the second one also has an image of the country flag of the selected currency. The biggest part of the screen is taken by the list of the calculated exchange rates based upon the typed in amount of money and the selected base currency.
Our basic index.html file at the time being will look like as in the listing below. Later we will add angular.js directives which will change how the HTML looks like.
<!DOCTYPE html>
<html>
<head>
    <meta charset="utf-8"/>
    <meta name="viewport" content="width=device-width, initial-scale=1.0, maximum-scale=1.0">
    <meta name="description" content="Currency Calculator"/>
    <title>Currency Calculator</title>
      <link rel="stylesheet" type="text/css" href="css/bootstrap.min.css"/>
    <link rel="stylesheet" type="text/css" href="css/style.css"/>
    <script src="js/jquery-2.1.4.min.js"></script>
    <script src="js/lodash.min.js"></script>
    <script src="js/bootstrap.min.js"></script>
    <script src="js/angular.min.js"></script>
    <script src="js/ngStorage.min.js"></script>
    <script src="js/angular-animate.min.js"></script>
    <script src="js/money.min.js"></script>
    <script src="js/app.js"></script>
</head>
<body>
  <div id="main">
    <div id="header" class="container-fluid">
      <h2 class="text-center">Currency Calculator</h2>
    </div>
    <div id="dateHeader" class="container-fluid blackHeader">
      <p class="text-center">The currency data is from</p>
      <p class="text-center">No Internet connection!</p>
      <p class="text-center"><a href="http://www.senojflags.com">Country flag</a> image from <a href="http://www.senojflags.com">Flags of all Countries</a></p>
    </div>
      <div class="container-fluid">
        <div class="row">
         <div id="leftColumn" class="col-xs-6">
            <div class="form-group">
          		  <label for="currency1">Cash amount</label>
          		  <input type="number" class="form-control" id="currency1" placeholder="type amount">
            </div>
       </div>
         <div id="rightColumn" class="col-xs-6">
             <div class="row">
               <label id="labelCash1" for="currencySelector">Currency:</label><br>
               <div class="col-xs-9">
                 <select id="currencySelector" class="form-control" name="category"></select>
               </div>
                 <div class="col-xs-3">
                 <img id="selectedFlag"></img>
               </div>
        </div>
       </div>
      </div>
    </div>
    <div id="providerHeader" class="container-fluid blackHeader">
      <p class="text-center">Exchange rates provided by Fixer.io</p>
    </div>
    <div id="infoText">
        <div id="textSuccess">Type in the cash amount and choose your currency to see the exchange rates!</div><br>
        <div><span class="glyphicon glyphicon-info-sign" aria-hidden="true"></span></div>
        <div id="textError">An error has occured!<br>Please check your Internet connection!</div><br>
        <div><span class="glyphicon glyphicon-remove" aria-hidden="true"></span></div>
    </div>
    <div id="currencylist">
         <div>
               <img id="rowFlag"></img>
        </div>
    </div>
</div>
</body>
</html>
The current index.html does not look very impressive (fig.2). But after applying angular.js logic, directives and styles, the application will be looking the same as on figure 1. But what really happened? How we have built the main layout skeleton?

Figure 2 – The Currency Calculator layout with Bootstrap classes, but without angular.js logic applied to it.
We have used HTML5 and many Bootstrap classes to create the layout. First of all inside the <div> with the main id we have inserted the whole content of our app. Next we have created inside of it another <div> with the header id. It will serve as the holder of the title of our application. We assigned to it a Bootstrap class called container-fluid. It will make any <div> element span across the whole view of your applications viewport. Also please note that in the <h2> tag we have specified the name of our application as well we have used another Bootstrap class text-center to, yes you’re thinking right, to center the text in our <div>.
[…]

<div id="main">
    <div id="header" class="container-fluid">
      <h2 class="text-center">Currency Calculator</h2>
    </div>
</div>

[…]
Beneath the header <div> we have created the dateHeader <div>. This one also has the container-fluid class assigned to it. And the blackHeader class for styling. It incorporates three paragraphs with the text-center classes applied to them. They will serve in our application as indicators about the date of the last currency exchange data the application has downloaded. Or when there is no Internet connection it will give proper information about it. Later we will also add in the first paragraph tag a two way data binding to the date of the currency exchange data provided by angular.js. In the third paragraph we need to include a link to the web page of the creator of the flags we are using in our application according to the terms of the flag license.
[…]

<div id="dateHeader" class="container-fluid blackHeader">
      <p class="text-center">The currency data is from</p>
      <p class="text-center">No Internet connection!</p>
      <p class="text-center"><a href="http://www.senojflags.com">Country flag</a> image from <a href="http://www.senojflags.com">Flags of all Countries</a></p>
</div>

[…]
Below the dateHeader <div> we have created a div with the container-fluid class applied to it. Later we create a div wih a row class. This tells Bootstrap to treat it as a row in the layout. And inside of it we have put again divs. There ids are leftColumn and rightColumn. Both have assigned the col-xs-6 class. What this class does it tells the divs to use 6 parts out of the 12 part grid layout of Bootstrap on mobile phone screen sizes. That is what xs stands for – extra small screen size. This class will ensure that both the rightColumn and the leftColumn divs are of the same width.
The leftColumn div will be used in our application to input the amount of money we would like to check the exchange currency rate for. It has inside of itself another div with the form-group class. Inside there is a label and an input field with the id of currency1 and the class form-control applied to it. It also has a specified placeholder which says “type amount”. We want our input field to show the type amount text when it is empty. We also need to specify the type of our field to number, as we will input only numbers into it.
As for the rightColumn div it also has a label inside of it. But it has also inside of it, on separate divs the col-xs-9 and col-xs-3 classes. As you see, the numbers 9 and 3 sum up to 12. So again we are using the twelve column Bootstrap layout for phone screens. And we also specify a row div. We needed these classes to divide the space between the select box and the image of the national flag representing the selected currency.
[…]

     <div class="container-fluid">
        <div class="row">
         <div id="leftColumn" class="col-xs-6">
            <div class="form-group">
              	  <label for="currency1">Cash amount</label>
          		  <input type="number" class="form-control" id="currency1" placeholder="type amount">
            </div>
       </div>
         <div id="rightColumn" class="col-xs-6">
             <div class="row">
               <label id="labelCash1" for="currencySelector">Currency:</label><br>
               <div class="col-xs-9">
                 <select id="currencySelector" class="form-control" name="category"></select>
               </div>
                 <div class="col-xs-3">
                 <img id="selectedFlag"></img>
               </div>
            </div>
        </div>
      </div>

[…]
Under the leftColumn and rightColumn divs we have a providerHeader div. inside there is a paragraph with centered information about the provider of the currency exchange API for our application. The contents of this div will be static. We have just attached to it the blackHeader class to make it the same in appearance as the dateHeader div earlier.
[…]

<div id="providerHeader" class="container-fluid blackHeader">
      <p class="text-center">Exchange rates provided by Fixer.io</p>
</div>

[…]
One of the last divs in our application is the infoText div. It will serve us as an information field about the state of the application. If the application has loaded the currency exchange data then the div will show a text and a Bootstrap glyphicon telling the user to type in the amount of currency. If there is no exchange data provided then the div will be populated with information telling the user to check the Internet connection. The first one has the id of textSuccess, while the other one textError. They both use very nice glyphicons provided by Bootstrap. Also as you have noticed they both use the aria-hidden attribute. This is because we don’t want to show the glyphicons on special screen-readers for persons with disabilities, because the glyphicons could be misleading on these devices for those people.
[…]

<div id="infoText">
        <div id="textSuccess">Type in the cash amount and choose your currency to see the exchange rates!</div><br>
            <div><span class="glyphicon glyphicon-info-sign" aria-hidden="true"></span></div>
        <div id="textError">An error has occured!<br>Please check your Internet connection!</div><br>
            <div><span class="glyphicon glyphicon-remove" aria-hidden="true"></span></div>
</div>

[…]
The last div in our application and the most important is the currencyList div. This div will serve us for showing the calculated cash amount for different currencies from our base currency. Rows of data will be generated by angular.js in this place. As for now you can only see that every row will incorporate an image of the flag representing the national currency.
[…]
<div id="currencylist">
<div>
<img id="rowFlag"></img> 
</div>
</div>
[…]
Lastly there is no layout in a web application without CSS. In our CSS, as you can see below, there is nothing special about it for the time being. We are styling all the divs and we use media queries to make the layout of our application fit the Z1 and Z3 Tizen devices. In later articles we will add some angular.js specific styles to our cascading style sheet.
html {
    width: 100%;
    height: 100%;
    overflow: hidden;
}

html body {
    position: absolute;
    padding: 0 px;
    background-color: #ffffff;
    color: #000000;
}

input {
  max-width: 220px;
}

select {
  max-width: 80px;
}

.container-fluid {
     padding:5;
}

.blackHeader{
   background-color: black;
   color: #ffffff;
   padding-top: 8px;
   padding-bottom: 0px;
   font-size: 75%;
}

#header {
   color: #ffffff;
   padding-bottom: 12px;
}

#leftColumn {
   padding-top: 12px;
   background-color: lightgrey;
}

#rightColumn {
   padding-top: 12px;
   background-color: white;
}

#labelCash1 {
  margin-left: 15px;
}

#currencySelector {
  width:150px;
}

#selectedFlag {
  margin-top: -7px;
  margin-left: -35px;
}

#rowFlag {
  margin-left: 4px;
}

.labelActive {
  background-color: crimson;
}

.labelInactive {
  background-color: grey;
}

@media (max-width: 350px)  { /* Z1 device layout */
  #currencyList {
    height: 280px;
  }

  #infoText {
    max-height: 280px;
  }

  #textError {
    margin-top: -30px;
  }

  #testSuccess {
    margin-top: -30px;
  }

  .glyphicon {
      font-size: 600%;
      margin-top: -10px;
  }
}

@media (min-width: 360px)  { /* Z3 device layout */
  #currencyList {
    height: 388px;
  }

  #infoText {
    height: 420px;
  }

  #textError {
    margin-top: -20px;
  }

  #textSuccess {
    margin-top: -20px;
  }

  .glyphicon {
      font-size: 600%;
      margin-top: 20px;
  }
}

#currencyList {
  	overflow: auto;
}

#currencyList::-webkit-scrollbar {
  width: 0;
}

#infoText {
  background-color: black;
  color: white;
  text-align: center;
  font-size: 150%;
  padding-left: 10%;
  padding-right: 10%;
  padding-top: 10%;
  padding-bottom: 90%;
}
Summary
In this article we have showed you what kind of application we will be creating using angular.js and Bootstrap for Tizen devices. We have showed you also the needed libraries to complete the Currency Calculator. We also explained what kind of data from an external API will be needed. Lastly we have showed you the basic HTML structure and the CSS of our application, still without any angular.js logic attached to it. In the next tutorial we will show you how to obtain and filter data from the external data API into our Currency Calculator application. Also please note that in the attachment you can find the whole complete application. You can play around with it and see more in depth the code and the things we did in this article.
We would also like to thank http://www.senojflags.com for the possibility to use their beautiful country flags for our article and the Currency Calculator application.