Canvas2D mobile web game development – implementation
PUBLISHED
Introduction
Before reading this article we recommend you to get familiar with the “Canvas2D mobile web game development – basics” where we introduced Canvas 2D API along with concepts of the game loop and the adaptive game loop. We also shortly described a basic web game architecture. A class diagram for sample application - Earth Guard - was presented. That’s why we recommend you to start with the previous article.
In this article, we will concentrate on the implementation side. We will show you in detail how game primitives are built, how to put them all together and place on a game board. We will also explain how to create a flexible level representation. As a sample application we will use Earth Guard 1.0.3.
NOTE: The sample application, attached to this article, requires a device supporting the DEVICE ORIENTATION event.
Game primitive types
In game module (./js/modules/game.js) there are different types of game primitives defined.
var objectTypes = {
    PLAYER : 1,
    PLAYER_MISSILE : 2,
    ENEMY : 4,
    ENEMY_MISSILE : 8,
    STAR : 16,
    EARTH : 32,
    HUD : 64,
    POWER_UP : 128,
    MSG : 256,
    OVERHEAT : 512
};
We did this to distinguish primitives that have graphical representation. Thanks to this approach, we can easily count the number of primitives of a given type that are currently on the board or define that primitive of a given type can collide only with primitive of other type. GameBoard class heavily relies on the above object types.
GameBoard class
GameBoard class (./js/classes/GameBoard.js) is a container class that aggregates many items in one game view. In some game frameworks this container is also called a scene. In case of our game architecture only one GameBoard object can be visible at a time. This approach simplifies the implementation. Below you can see that the GameBoard object can aggregate only Sprite objects instances as well as objects which classes inherit from Sprite class.

Fig 1: GameBoard class diagram
Responsibilities of the GameBoard class:
- Aggregation of primitives into one game view.
- Primitives number handling by a type. You can request the number of objects of each primitive type by calling (in this case we would like to know how many PLAYER objects are present on someBoard):
someBoard.cnt[game.getObjectTypes().PLAYER]
- Primitive z-order index management, while adding objects to a board. The lower the zIndex you set, the lower the primitive will be displayed. When you set a 0 zIndex to some objects, they will be overlapped by primitives with higher zIndex. For better understanding of zIndex concept please refer to the below code and image.
someBoard.add(somePrimitive, zIndex)
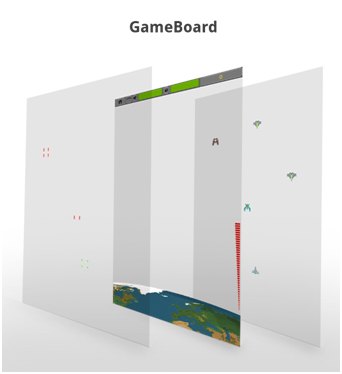
Fig 2: GameBoard zIndex concept. Missiles have the highest zIndex, HUD and Earth lower, while Enemies and Player Ship the lowest.
- Removal of all primitives from the board
someBoard.removeAll()
- Primitives removal from the board by a given type
someBoard.removeByTypes(game.getObjectTypes().PLAYER)
- Iterating through all the primitives in a given board. If you call the board’s iterate method the draw methods of all aggregated primitive’s will be invoked. It is worth mentioning that draw is a special method, because also the drawUnder method will be invoked before it and the drawOver method will be invoked after it. Why such thing happens will be described later on.
someBoard.iterate(“draw”)
- Collision detection between primitives. In the example below we detect the first collision between given enemy object and any of the player missiles on someBoard. By first collision I mean that in one game loop iteration only one collision is detected, even if many missiles overlaps with the enemy primitive.
someBoard.collide(enemy, game.getObjectTypes().PLAYER_MISSILE)

Fig 3: Only one GameBoard object can be visible at a time
Sprite class
Sprite class is defined in ./js/classes/Sprite.js and its main purpose is to use spriteSheet module (please refer the previous article: Canvas2D mobile web game development – basics for more information on sprites handling) in order to draw on Canvas the corresponding game primitive. Every game primitive, such as Enemy, PlayerShip and Explosion etc. inherits from the Sprite class. Below you can find a short description of Sprite class functionalities:
- Retrieves data from the spriteSheet module relevant to the given sprite, such as width, height, number of frames etc.
- Uses spriteSheet’s draw function to physically render primitives on canvas
- Defines stubs for drawUnder and drawOver methods that are usually overridden in classes that inherit from Sprite. The main purpose of those methods is to provide a possibility to render graphics over and under a given sprite in the same class. This is not a replacement for GameBoard’s z-index mechanism but rather an additional feature.
In our sample application there are no instances of Sprite class defined. We can say that Sprite is an abstract class in this project.
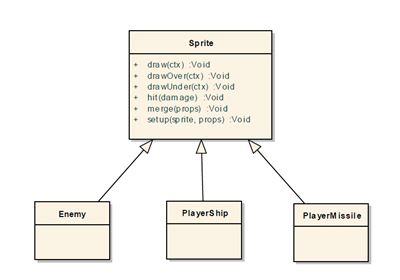
Fig 4: Sprite class diagram
Sample primitive design – PlayerMissile
Each primitive that inherits from a Sprite class needs to have a type defined. We must provide an implementation of a step method that is always invoked in the game loop before the draw method (for more information on the game loop, please refer to: Canvas2D mobile web game development – basics). The step method is always used to calculate new primitive’s position. The only parameter that is passed to each Step method is called dt. This parameter is very important, because it is used in all motion equations through the game to speed up or to slow down the movement. Please refer to the below code of PlayerMissile class:
"use strict";
var PlayerMissile = function(x, y) {
    this.type = game.getObjectTypes().PLAYER_MISSILE;
    this.setup('missile', {
        damage : 10
    });

    this.x = x - this.w / 2;
    // Use the passed in y as the bottom of the missile
    this.y = y - this.h;
    // y velocity of Player Missile
    this.vy = -700;

    /**
     * Function: - change the y position of the missile, - checks if the PlayerMissile isn't outside the board (if yes - removes the missile), - checks if the PlayerMissile collides with Enemy,
     *
     * @param dt
     */
    this.step = function(dt) {
        this.y += this.vy * dt;
        if (this.y < config.player.topOffset) {
            this.board.remove(this);
        }
        var collision = this.board.collide(this, game.getObjectTypes().ENEMY);
        if (collision) {
            collision.hit(this.damage);
            this.hit();
        }
    };
    /**
     * Function defines how collision with other object affects the PlayerMissile (it destroys the missile and removes it from board)
     */
this.hit = function() {
        this.board.add(new Explosion(this.x + this.w / 2, this.y + this.h, "explosion_yellow_small"), 100);
        this.board.remove(this);
    }
};
game.inherit(PlayerMissile, Sprite);
You can see that the first line in the step method is: this.y += this.vy * dt;
T in the following equations is the game loop period – this is explained in details in “Canvas2D mobile web game development – basics”.
This is a motion equation for Y axis, dt parameter is defined in game module (./js/game.js) as dt = T/1000. In our case T=2500, so dt = 2.5. We can write this motion equation as follows:
V(n+1) = V(n) – 700 * 2.5 = V(n) – 1750
If we increase the game period (and decrease the FPS) the dt factor in each motion equation increases, because we need to move objects further in each game step. The dt parameter allows us to smoothly change the game FPS and not to affect the primitive’s speed observed by the user.
Enemy class
The enemy class provides implementation for enemy primitive in the game. It defines what are the possible collisions with the enemy object and the enemy’s motion equations with parameters.
Each enemy object is described using two motion equations:
Vx(t)= A + B * sin(C*t+D)
Vy (t)= E + F * sin(G*t+H)
Please refer to the two below images, where visualization of above equations is provided.
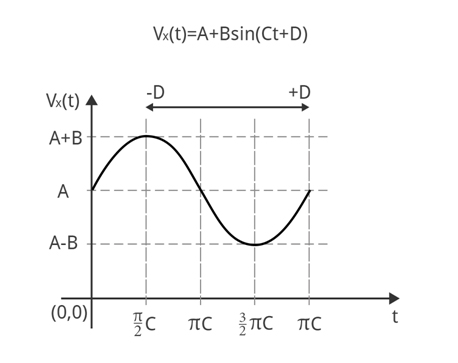
Fig 5: Vx(t) motion equation
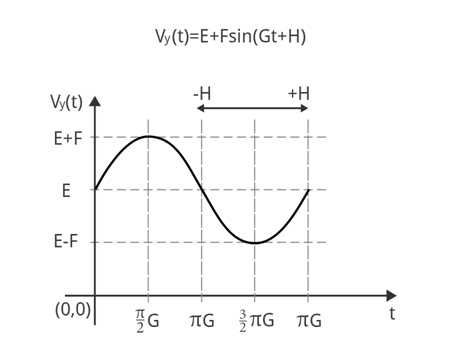
Fig 6: Vy(t) motion equation
By default each parameter for motion equations is equal to 0. You can override as many parameters as you need in order to create complex motion equations. In the enemy class the step method is responsible for calculating a new position of the enemy – it has two motion equations defined.
/**
 * Function changes the position and velocity of Enemy, fires missile
 * @param dt
 */
this.step = function(dt) {
    this.t += dt;
    this.vx = this.A + this.B * Math.sin(this.C * this.t + this.D);
    this.vy = this.E + this.F * Math.sin(this.G * this.t + this.H);

    this.x += this.vx * dt;
    this.y += this.vy * dt;

    if (this.reload <= 0 && Math.random() < this.firePercentage) {
        this.reload = this.reloadTime;
        if (this.missiles == 2){
            this.board.add(new EnemyMissile(this.x, this.y + this.h), 100);
            this.board.add(new EnemyMissile(this.x + this.w, this.y + this.h), 100);
        } else {
            this.board.add(new EnemyMissile(this.x + this.w / 2, this.y + this.h), 100);
        }
    }
    this.reload -= dt;
};
Enemy types
In Earth Guard there are many different types of Enemies defined – please refer to the ./js/config.js file. Each definition provides a basic enemy configuration that can be overridden in the level configuration that is explained below.
var enemies = {
        /**
         * Attributes of enemy:
         * x - initial position (this will be multiplied by a random factor)
         * sprite - sprite of enemy
         * A - constant horizontal velocity
         * B - strength of horizontal sinusoidal velocity
         * C - period of horizontal sinusoidal velocity
         * D - time shift of horizontal sinusoidal velocity
         * E - constant vertical velocity
         * F - strength of vertical sinusoidal velocity
         * G - period of vertical sinusoidal velocity
         * H - time shift of vertical sinusoidal velocity
         * health - number of hits needed to kill the enemy
         * damage - damage done to the PlayerShip object
         * missiles - number of missiles to fire by enemy
         * firePercentage - percent of the missiles to be accually fired
         * pointsHit - points added for hitting the enemy by player
         * pointsDestroy - points added for destroying the enemy by player
         */

    basic : {
        x : 100,
        sprite : 'enemy_purple',
        B : 100,
        C : 2,
        E : 100,
        health : 30,
        damage : 10,
        missiles : 2,
        firePercentage : 0.003,
        pointsHit : 15,
        pointsDestroy : 60
    },

    straight : {
        x : 100,
        sprite : 'enemy_ship',
        E : 200,
        health : 30,
        damage : 10,
        firePercentage : 0.001,
        pointsHit : 10,
        pointsDestroy : 40
    },

…
Sample enemy definition and visualization
Below we present part of the level definition for the 4th level in the Earth Guard game:
types : [ {
    basicType : enemies.basic,
    overrides : {
        x : 350,
        B : 200,
        C : 1,
        E : 55,
        firePercentage : 0.008
    }
} ],
The Y velocity: Vy(t) = 55. It means that the enemy will travel with a constant in time Y velocity equal to 55. The enemy movement for Vx(t)=0 is visible below.
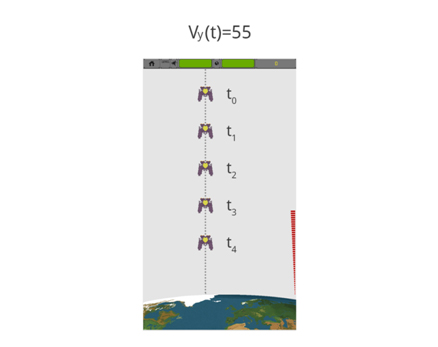
Fig 7: Vy(t)=55 with Vx(t)=0
If we add X velocity equal to: Vx(t)=200*sin(t) the movement will change into sinusoidal, which is presented on the below image.
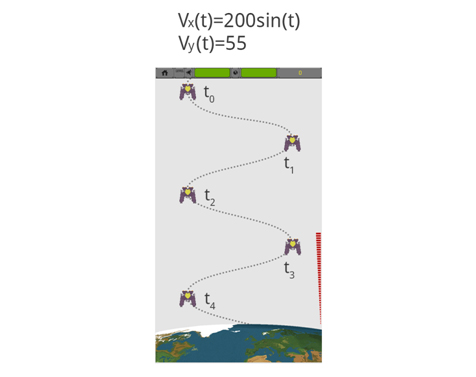
Fig 8: Vy(t)=55 with Vx(t)=200*sin(t)
Levels implementation
If you want your game to be more attractive for players you should think about various levels that differ in difficulty. From a developer point of view each level should be defined in a consistent way. You should also provide mechanisms for: starting, stopping and switching levels. In case of Earth Guard each level is limited by time. It means that the level will end regardless of the number of enemies displayed or killed. You can find the parameters that describe each level below (please refer: ./js/config.js):
{
period : 2300, //
// Array with enemies that will be displayed very "period" time
// In this case 2 enemies will be displayed each 2300msec.
types : [ {
    basicType : enemies.straight, // basic enemy type
    overrides : { // all motion parameters can be overridden here
        x : 650,
        E : 45
    }
}, {
    basicType : enemies.basic,
    overrides : {
        x : 400,
        B : 100,
        C : 1,
        E : 60
    }
} ],
duration : 90, // level duration in seconds
name : "Tighter...", // level name
powerUps : {
    number : 3 // number of power ups that will be displayed during the level
}
Besides the level definition and implementation you also need a mechanism for levels management. For this purpose levelManager module was created - ./js/modules/levelManager.js. This provides methods to:
- Start a certain level
- Stop a level
- Get levels array
- Get the currently processed level
- Get already passed levels
- Store already passed levels
Please find the code below.
"use strict";
var levelManager = function() {
    var levels = [];
    var alreadyPassedLevels = [];
    for ( var i = 0; i < config.levels.length - 1; i += 2) {
        var nextLevel = new Level(config.levels[i + 1]);
        nextLevel.num = i + 2;
        var thisLevel = new Level(config.levels[i]);
        thisLevel.num = i + 1;
        thisLevel.options.nextLevel = nextLevel;
        if (levels[i - 1])
            levels[i - 1].options.nextLevel = thisLevel;
        levels.push(thisLevel);
        levels.push(nextLevel);
    }

    return {
        init : function() {
            if (localStorage.getItem('levels')) {
                alreadyPassedLevels = $.parseJSON(localStorage.getItem('levels'));
            }
        },

        /**
         * Starts given level
         *
         * @param {Number} number
         * @returns {Boolean} true in case of success
         */

start : function(number) {
            if (typeof levels[number - 1] === "undefined") {
                game.log("ERROR: Unable to find level " + number);
                return false;
            } else {
                var currLevel = this.getCurrentLevel();
                if (currLevel)
                    currLevel.stop(true);
                levels[number - 1].start();
                return true;
            }
        },

      /**
         * Returns all levels
         *
         * @returns
         */

        getLevels : function() {
            return levels;
        },

        /**
         * Returns current active level
         *
         * @returns
         */

  getCurrentLevel : function() {
            for ( var i = 0; i < levels.length; i++) {
                if (levels[i].isRunning())
                    return levels[i];
            }
            return false;
        },

        /**
         * Method to force stop current level
         *
         * @returns
         */

        stopCurrentLevel : function() {
            var cl = levelManager.getCurrentLevel();
            if (cl) {
                cl.stop(true);
            }
        },

        /**
         * Stores already passed level in localStorage
         *
         * @param level
         * @returns
         */

        storePassedLevel : function(level) {
            if (alreadyPassedLevels.indexOf(level.num) === -1) {
                alreadyPassedLevels.push(level.num);
                localStorage.setItem('levels', JSON.stringify(alreadyPassedLevels));
                game.log("adding level");
            } else {
                game.log("not adding level");
            }
        },

        /**
         * Gets the levels that the player has already passed during previous games.
         *
         * @returns {Array} numbers of already passed levels
         */

        getAlreadyPassedLevels : function() {
            var alreadyPassed = $.parseJSON(localStorage.getItem('levels'));
            if (!alreadyPassed)
                alreadyPassed = [];
            if (config.allLevelsVisible) {
                var alreadyPassed = [];
                for ( var i = 1; i <= this.getLevels().length; i++) {
                    alreadyPassed.push(i);
                }
            }
            return alreadyPassed;
        }
    }
}();
Summary
In this article, we described a sample implementation of a mobile web game on Tizen platform. Now you know what are the main responsibilities of the GameBoard class, how to define game primitives and how to handle levels. This architecture can be easily reused in other mobile web games developed in future that do not use any game frameworks.