Cocos2d-html5 game framework in Tizen applications - Follow up
PUBLISHED
This is the continuation of the article about Cocos2d-html5. The previous part briefly described how Cocos2d-html5 works and introduced some basic elements, such as: sprites, layers and scenes. We will now focus on handling user input, playing sounds, running actions and more.
NOTE: The sample application, attached to this article, requires a device supporting the DEVICE ORIENTATION event.
Handling user input (desktop: keyboard, mobile: gyroscope)
Keyboard
Using keyboard input in Cocos2d-html5 applications is very simple. All that needs to be done is enabling the keyboard input in the layer that should receive the input. This is done by calling the setKeyboardEnabled method inside the layer:
layerThatshouldReveiceTheKeyboardInput.setKeyboardEnabled(true);
Now the information of which key has been pressed or released can be retrieved using these functions: onKeyDown and onKeyUp. When you add these functions to your level object they will be called each time a key is pressed or released. Both these functions have a pressed key type as function parameter, so you can easily determine which key was pressed by the user.
Here is a sample class that receives keyboard input:
classes.layers.Level = cc.Layer.extend({

    ctor : function() {
        this._super();
        this.setKeyboardEnabled(true);
        this.keyboardArrows = {
            left : false,
            right : false,
            up : false,
            down : false
        }
    },

    onKeyDown : function(key) {
        switch (key) {
        case 37:
            this.keyboardArrows.left = true;
            break;
        case 38:
            this.keyboardArrows.up = true;
            break;
        case 39:
            this.keyboardArrows.right = true;
            break;
        case 40:
            this.keyboardArrows.down = true;
            break;
        }
    },

    onKeyUp : function(key) {
        switch (key) {
        case 37:
            this.keyboardArrows.left = false;
            break;
        case 38:
            this.keyboardArrows.up = false;
            break;
        case 39:
            this.keyboardArrows.right = false;
            break;
        case 40:
            this.keyboardArrows.down = false;
            break;
        }
    }
});
Gyroscope
The gyroscope is supported on some of the Tizen devices and available through the Gyroscope API. This API is compatible with the W3C Draft documentation that can be found here:
http://dev.w3.org/geo/api/spec-source-orientation.html
The documentation may seem long and a little bit complicated at first glance, but it is very detailed and the API alone is very simple and clear. You will now learn how easily this API can be used to create a game that is controlled based on the device orientation.
In order to use the Gyroscope API you must register a “deviceorientation” listener:
window.addEventListener('deviceorientation', function(e) {
    var alpha = e.alpha;
    var beta = e.beta;
    var gamma = e.gamma;
});
As you can see this is a typical JavaScript asynchronous approach where whenever the orientation is changed the alpha, beta and gamma values are updated and passed in the orientation change event.
Alpha, beta and gamma values describe the orientation of the device.
Consider the following coordinates system:
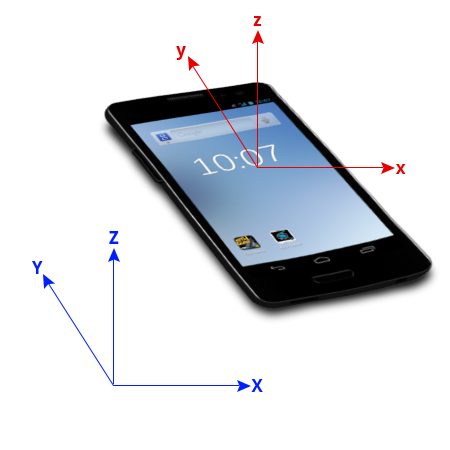 Fig 1: Device orientation
This is the device’s coordinates system according to which alpha, beta and gamma values are calculated.
If the device is rotated around its z axis, alpha is modified.
If the device is rotated around its x axis, beta is modified
If the device is rotated around its y axis, gamma is modified.
After you get the information on how the device orientation has changed you just need to assign the proper speed to the object based on the rotation.
Sounds
Cocos2d-html5 allows playing soundtracks in the background and as special effects. In order to play music files you must initialize AudioManager and enable music formats, just as follows:
cc.AudioEngine.getInstance().init("mp3,ogg,wav");Soundtracks that will be played should always be loaded earlier, just like other resources.
cc.Loader.shareLoader().preload([{
                type : "effect",
                src : "sounds/splat"
            }, {
                type : "bgm",
                src : "Resources/background"
            }]);
As you can see there are two sound types: effect and bgm. The first one is used to play short and small music files, like sound effects, whereas the second one is designed for long soundtracks. Both music tracks can coexist at the same time, so they do not interrupt each other.
Now that the music is loaded you can play it anytime you want. Simply call the playEffect function:
cc.AudioEngine.getInstance().playEffect("sounds/splat");Currently sounds are disabled in the game, but they can be easily turned on just by uncommenting the following line from the Level.js file.
// game.getAudio().playEffect("sounds/splat");
Actions - handling complex animations with effects
Actions work like giving orders to objects. You can tell an object to change its position, rotation, color, visibility or you can scale it. Objects that can be modified are cc.Node objects, like sprites, scenes and layers.
If you want to add an action to a sprite you have to follow these two simple steps:
- Find the necessary action class and create an instance of it.
var actionBy = cc.MoveBy.create(2, cc.p(80, 80));
- Execute this action on the sprite using the runAction function.
someSprite.runAction(actionBy);
Basic Actions
Here is a list of basic actions that change the image properties:
- Position
- cc.MoveBy
- cc.MoveTo
- cc.JumpBy
- cc.JumpTo
- cc.BezierBy
- cc.BezierTo
- cc.Place
- Scale
- cc.ScaleBy
- cc.ScaleTo
- Rotation
- cc.RotateBy
- cc.RotateTo
- Visible
- cc.Show
- cc.Hide
- cc.Blink
- cc.ToggleVisibility
- Opacity
- cc.FadeIn
- cc.FadeOut
- cc.FadeTo
- r, g, b
- cc.TintBy
- cc.TintTo
Apart from simple actions that change the image properties, some other actions can change the speed, direction and order of actions.
Ease actions
Some of the actions described above inherit from cc.IntervalAction. You can manipulate their speed and direction with actions listed below:
- cc.EaseIn
- cc.EaseOut
- cc.EaseInOut
- cc.Speed
- cc.EaseExponentialIn
- cc.EaseExponentialOut
- cc.EaseExponentialInOut
- cc.EaseSineIn
- cc.EaseSineOut
- cc.EaseSineInOut
- cc.EaseElasticIn
- cc.EaseElasticOut
- cc.EaseElasticInOut
- cc.EaseBounceIn
- cc.EaseBounceOut
- cc.EaseBounceInOut
- cc.EaseBackIn
- cc.EaseBackOut
- cc.EaseBackInOut
These actions accelerate other actions at the beginning, at the end or both. If you want to accelerate an action at the beginning, just create a cc.EaseIn object and inform the action which speed should be modified inside its constructor.
Composition
Moreover Cocos2d-x gives a possibility to create action queues, so that actions can run one after another or all at the same time.
Here is the full list of action sequences:
- cc.Sequence
The Sequence object executes actions one after another in the order they were passed to the object constructor. - cc.Spawn
The Spawn object runs all actions at the same time. The time of execution of the Spawn action is the time of the longest inner action. - cc.Repeat
The Repeat object executes inner actions a limited number of times. - cc.RepeatForever
The RepeatForever class is used to repeat actions forever.
Here is an example of how to use composition in your application:
var rep = cc.Repeat.create(actionBy, 5);
someSprite.runAction(rep);
Example
In the RunSnailRun application we used actions to create a fancy intro.
At the game startup a small game logo is displayed, then it is scaled to a bigger size and at the end there is a fast reverse scaling action that creates the illusion of a bouncing effect.
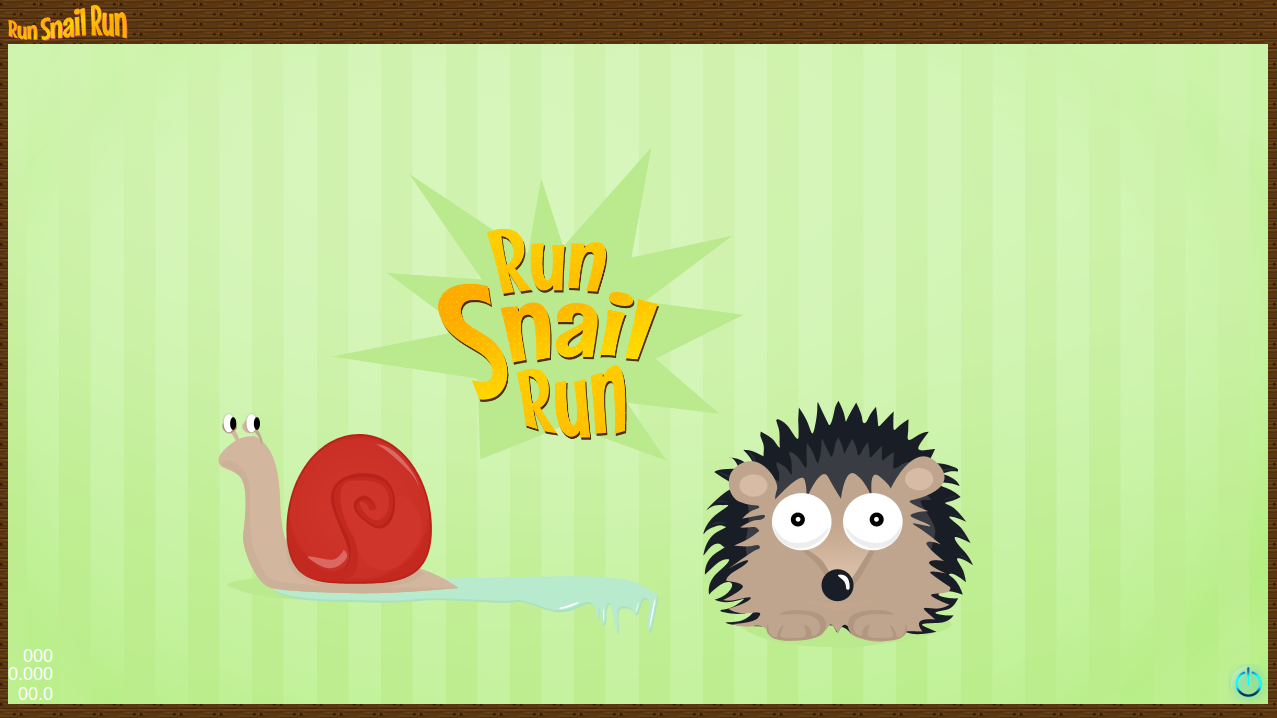
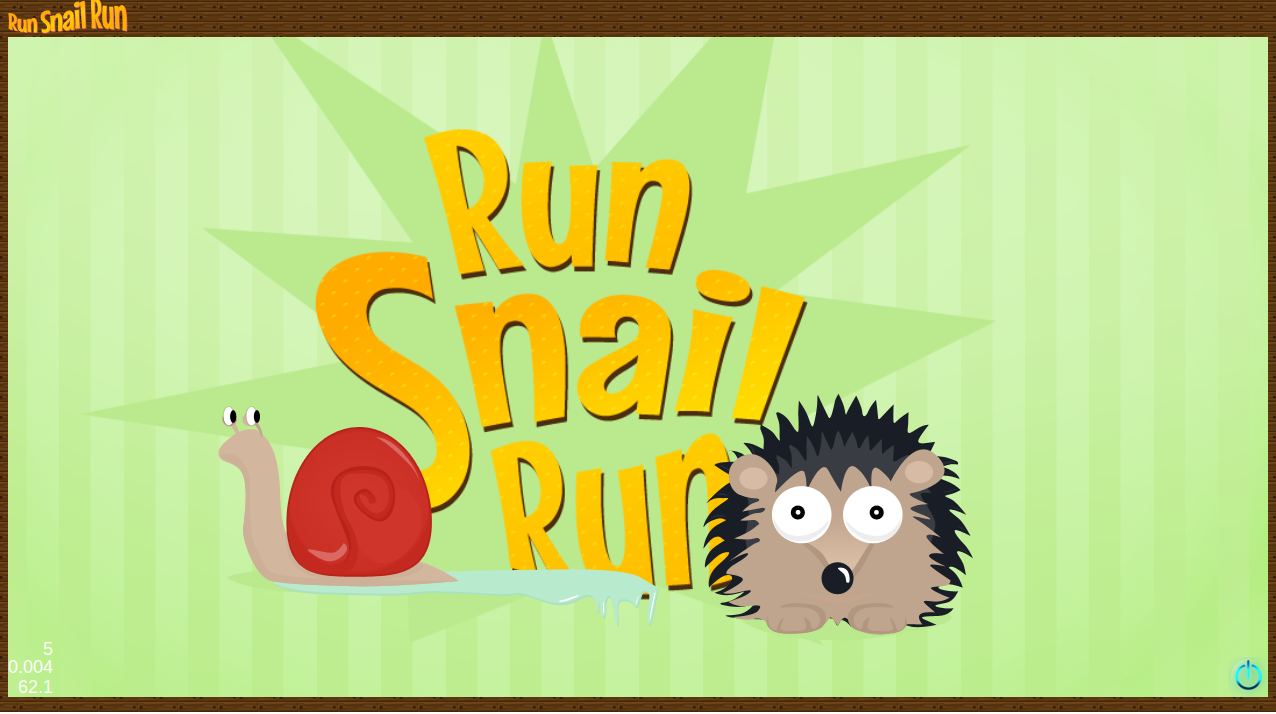 Fig 2: Bouncing effect
This effect was achieved as follows:
First the logo is scaled to its smaller size:
this.logo.setScale(0.1);
Then the action objects are created and assigned to the logo sprite:
this.logo.runAction(cc.Sequence.create(cc.EaseElasticOut.create(cc.ScaleTo.create(2, 1, 1), 0.5)));
As you can see, we used a cc.ScaleTo object to create the scaling effect, the cc.EaseElasticOut action to accelerate scaling at the end and reverts the direction at the same time. We also used the cc.Sequence class, but since there is only one action passed to this object it will not have much impact on the whole command. At the end the sequence object with all the inner actions is passed and executed on the logo sprite using the runAction function.
Grids
Cocos2d-x also enables some more advanced actions that use the grid property. The grid is a network of lines that cut the image into small, equal pieces.
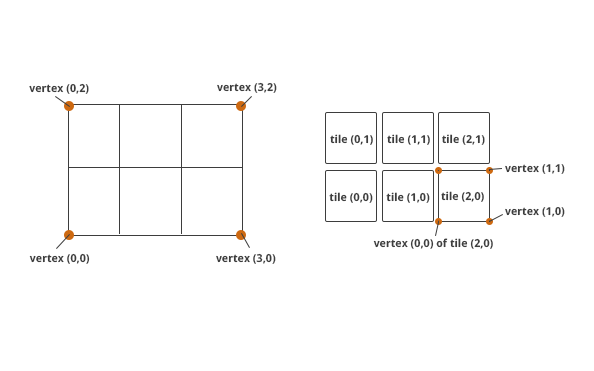 Fig 3: Cocos2d-html5 grid
After the image is divided into smaller pieces it can be easily modified by transforming vertices or tiles.
Simple rectangular box collision detection
In order to determine that objects have overlapped each other, Cocos2d-html5 provides a box collision detection mechanism. It can be used by calling the cc.rectIntersectRect(rectangle1, rectangle2) function. This method takes two rectangles as parameters and checks if they intersect each other.
In the RunSnailRun application collision detection is used to find out when the hedgehog catches a snail or stops it from walking on lettuce.
Here is the source code from the sample application showing how to use the box collision function:
collisionDetection : function() {
    for ( var i = 0; i < this.snails.length; i++) {
        if (cc.rectIntersectsRect(this.hedgehog.collideRect(), this.snails[i].collideRect())) {
            game.getAudio().playEffect("sounds/splat");
            this.removeChild(this.snails[i]);
            this.numberOfSnails--;
            this.snails.splice(i, 1);
            if (this.numberOfSnails === 0) {
                alert("You win!");
                game.changeScene(game.getScene('intro'));
                game.stopCountdown();
                this.removeCounter();
            }
        }
    }
}
The mechanism is very simple. For each snail and for the hedgehog a collision rectangle is created using the collideRect function.
collideRect : function() {
    var a = this.getContentSize();
    var p = this.getPosition();
    return cc.rect(p.x - a.width / 2, p.y - a.height / 2, a.width, a.height);
}
The collideRect function calculates the rectangle that surrounds the image, creates cc.rect object and returns it.
When both collision rectangles, for the snail and hedgehog, are created, they are passed to the cc.rectIntersectsRect method which determines if there is a collision or not. If objects overlap the snail is removed.
The same mechanism is used to check if the hedgehog has run into lettuce and should be stopped. The only difference is that instead of a snail rectangle, the lettuce rectangle is used.
Random Brownian movement
In the RunSnailRun application, the snails’ random movement is based on the Brownian motion. We decided to use this model because it is very chaotic and unpredictable. Although this stochastic process was born from the observation of moving particles suspended in a fluid and bombarded by fast-moving atoms, it is great for describing how small and uncertain about their lives snails madly and fearfully run around the backyard.
Brownian motion is also not that hard to describe mathematically and implement in an application. To learn more about the Brown movement implementation, check the move method inside the Snail class.
Summary
This article presented the Coco2d-html5 framework, its structure and how to use it. Basic elements, such as sprites, layers, scenes and other important elements were introduced and described. In order to help the reader understand how to create applications with Cocos2d-html5, a code snippet from the sample application RunSnailRun were included with a short description.
To learn more about game development please refer to the articles regarding box2d and Tiled Map Editor which are also based on the RunSnailRun application.