


Lesson 3
In this lesson we will talk about creating a standard emulator for wearable devices, managing it and about its standard applications.
Important:
To create Tizen emulator use emulator manager this should be installed via the Tizen Studio package manager. Make sure that you have the package Tizen SDK tools → Emulator manager installed in your computer. We talked about this in the lesson about Tizen Studio installing.
Run the emulator manager. This can be done in several ways. The first one is to search for an application with the name Emulator Manager directly in your operating system. The second way is to launch the manager straight from Tizen Studio. Let’s see how to use the second one. If you had not changed the standard panel’s layout in Tizen Studio, the button for launching the manager is in the upper right corner of the studio, in the Connection Explorer window.
It looks like this:
If you can not find this button or Connection Explorer, try to open it again. On the main panel chose Window → Show View → Connection Explorer. Also, you can reset the interface settings by selecting Window → Perspective → Reset Perspective... .
After launching, the main window of the emulator manager will open.
To create a new emulator, click the Create button.

After that, you will be offered to choose a platform for creating an emulator: mobile or wearable and the version of the platform.

Choose the version in dependence with the device that you want to emulate. In this case, the target device is Gear S2, which, at the moment (October 26, 2016), runs on the tizen-2.3.1 platform and has a round display, so choose wearable-2.3.1-circle (basic).
Then click Next.

Here you have to select a template for emulator settings. These settings include: the display resolution of the screen, the presence of various sensors (gyroscope, accelerometer, pedometer, etc.), and presence of cameras. You can use a standard template, or create your own.
Click the "+" button to create a new emulator template. You will see the window in which you can configure the settings that were mentioned above.

After standard or newly created template was selected, click Next.
The final step is to configure the emulator itself.
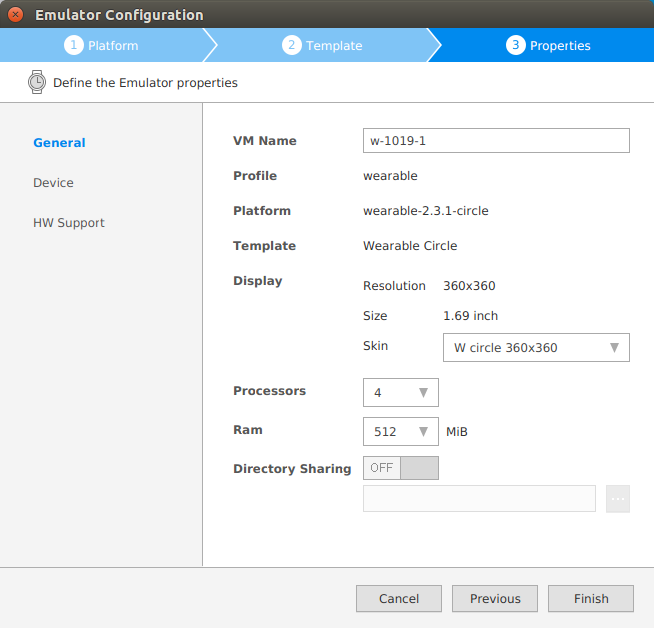
Here you can define such parameters as: name of the emulator, the number of processors, and so on. In the menu on the left, you can select the Device or HW Support category, where you can configure the simulations availability of the various sensors that are present in the selected template. After the configuration is complete, click Finish.
The emulator is created.

The emulator you have just created should appear in the list of available emulators. Select it and click Launch.
You can use multiple emulators to test your application’s functionality on various screen extensions, with different sensor configurations.
Important:
If you use standard themes for buttons, flags and other widgets in your applications, note that they may look differently on the emulator and on the real device. Since the standard themes on emulators and devices sometimes may vary.
Let's consider management of the emulator of a portable device with a round display.

This emulator has three hardware controllers: bezel, back button, home/ power button.
Bezel is a rotating ring around the display. To start the rotation, move the cursor to any place on the ring, hold down the left mouse button and move the cursor in any direction. Bezel imitates two signals: clockwise and counterclockwise rotation.
The Back button is the top button on the emulator, which is used to return to the previous screen. Swapping across the screen from top to bottom is an alternative action replacing the Back button. This action works on the device as well.
Important:
Since the swap on the top of the screen is used as an alternative to the Back button, in your application try to avoid putting controlling elements that work on the swap action at the very top of the display.
Home / Power button - the lower button on the emulator. It is used to return to the main screen (the screen with the dial). If you are already on the main screen, this button will perform the lock/unlock action of the screen. When you hold down the button for a couple of seconds, appears a message, which suggests you to turn off the power of the device. Perhaps in your application, you will use a display multiple touch, for example, to scale the displayed items, pinch-zoom action.

The device emulator allows you to emulate multiple presses on the display. To do so, press Shift on the keyboard and use the mouse cursor. When the cursor is pressed, the display will show circles indicating the current location of each cursor. Now you can drag these circles to emulate the movement of your fingers during a multiple tap. The maximum number of cursors depends on the device. On this emulator only 2 cursors are allowed.
The standard emulator contains two main menus: the first one is a menu with a dial and widget applications; the second is a menu with the standard applications and settings. In the image below: 1, 2 screens refer to the first, and 3, 4 - to the second menu. Navigation between the elements of each menu is done by using a bezel or horizontal swap on the screen of the emulator. Click the Home button from any emulator’s screen to return to the first menu with the dial window (1). To get to the menu with applications (3), you have to move cursor on the dial screen from the bottom edge - up. In the new emulator, in the second menu, by default, Settings is a singular application, but when you start installing your applications on the emulator their icons will appear next to the settings icon.

You can go to the settings and see what is available for changes.
To call the context menu with additional available actions, click on the emulator with right mouse button.

A bit about this menu:
Always On the Top – if you select this item, the emulator will stop overlapping by other windows of your operating system (in some versions of emulators this option is not available).
Rotate – use this item to select and change the orientation of the display to one of the 4 corners.
Advanced –includes 3 actions: make a screenshot, see the version of the emulator, and immediately shut down the emulator.
Shell – item for launching the console window for the emulator, where through commands, various system actions can be performed.
Control Panel – this item launches the emulator control panel. With it you can delete installed applications from the emulator, change the status of the battery level, status whether the charger is connected or not, and much more.