Using Rear Camera in Tizen Web Application
PUBLISHED
Introduction
In this tip document, an example is given on how to create simple camera (rear) app in Web application using Camera API. From SDK 2.4, you can select the front or rear camera using JavaScript. Facing Mode support helps us to use rear camera in Tizen Web application.
|
Type |
Tizen Web App |
|
SDK |
Tizen SDK 2.4 |
|
Tested on |
Samsung Z1 |
Structure of this example code is taken from Tizen online samples which have only front camera support and some features are added after modification.
The Camera sample application layout contains 2 screens: the main screen that shows the camera view, the preview screen that shows the camera preview.
Steps to create a simple camera app
Considering you are working on simple camera app, here is the brief summary of steps that we need to do to make things work:
Step 1: Initialization and adding privileges
First of all, in order to use the Camera API you need to add appropriate privileges in the config.xml of your application. You can easily do it by entering the privileges tab of your config.xml file, then please click the add button in the right corner of the window.
The config.xml should be modified as below.
<?xml version="1.0" encoding="UTF-8"?>
<widget xmlns:tizen="http://tizen.org/ns/widgets" xmlns="http://www.w3.org/ns/widgets" id="http://yourdomain/Camera" version="1.0.0" viewmodes="maximized">
    <tizen:application id="sEzBJJUebO.Camera" package="sEzBJJUebO" required_version="2.4"/>
    <content src="index.html"/>
    <feature name="http://tizen.org/feature/screen.size.all"/>
    <icon src="icon.png"/>
    <name>Camera</name>
    <tizen:privilege name="http://tizen.org/privilege/application.launch"/>
    <tizen:privilege name="http://tizen.org/privilege/filesystem.read"/>
    <tizen:privilege name="http://tizen.org/privilege/filesystem.write"/>
    <tizen:privilege name="http://tizen.org/privilege/content.read"/>
    <tizen:privilege name="http://tizen.org/privilege/content.write"/>
    <tizen:privilege name="http://tizen.org/privilege/mediacapture"/>
    <tizen:profile name="mobile"/>
    <tizen:setting screen-orientation="portrait" context-menu="disable" background-support="disable" encryption="disable" install-location="auto"/>
</widget>
Step 2: Creating UI Design
Preview screen is the main screen of this app. In the main screen there are some sections. Timer, Thumbnail and Buttons along with the camera snap. Another screen is Image view. In this application, pure CSS is used to design the layout. Please check the CSS code (style.css) from attachment.
Step 3: Accessing rear camera
By putting "environment" in facing mode parameter you can use rear camera in web application.
// declare what will be used by this application
        var options = {
            audio: true,
            video: true,
	     facingMode: "environment" // For Rear Camera. Without this parameter only front camera can be opened.
        };


        navigator.getUserMedia = navigator.getUserMedia ||
            navigator.webkitGetUserMedia;
        try {
            if (typeof (navigator.getUserMedia) === 'function') {
                // ask user to grant permissions to use media objects
                navigator.getUserMedia(options,
                    this.onCaptureVideoSuccess.bind(this),
                    this.onCaptureVideoError.bind(this));
            }
        } catch (e) {
            alert('navigator.getUserMedia() error.');
            console.error('navigator.getUserMedia() error: ' + e.message);
        }
Step 4: Start listening (from your event/button click/action)
$('shutter').mousedown(function onMouseDown() {
            $('shutter').addClass('active');
        }).mouseup(function onMouseUp() {
            $('shutter').removeClass('active');
        }).on('touchstart', function onTouchStart() {
            $('shutter').addClass('active');
        }).on('touchend', function onTouchEnd() {
            $('shutter').removeClass('active');
        });
And corresponding function is called when the event is generated.
        $('#shutter').on('touchstart', this.shutterTouched.bind(this));
And this function is the implementation when the event fired.
SelfCamera.prototype.shutterTouched = function shutterTouched() {
        if (this.previewLocked || this.shutterLocked) {
            return;
        }
        // if media is working
        if (this.isMediaWorking) {
            // start count down
            this.startCountdown();
        } else { // if media doesn't work display information message
            alert('To be able to take pictures you have to allow application ' +
                'to use your media. Please restart app and allow ' +
                'Self Camera to access media content.');
        }
    };
Run the sample code:
Now, build and run the attached example code. This is a simple camera app with timer and a capture button.
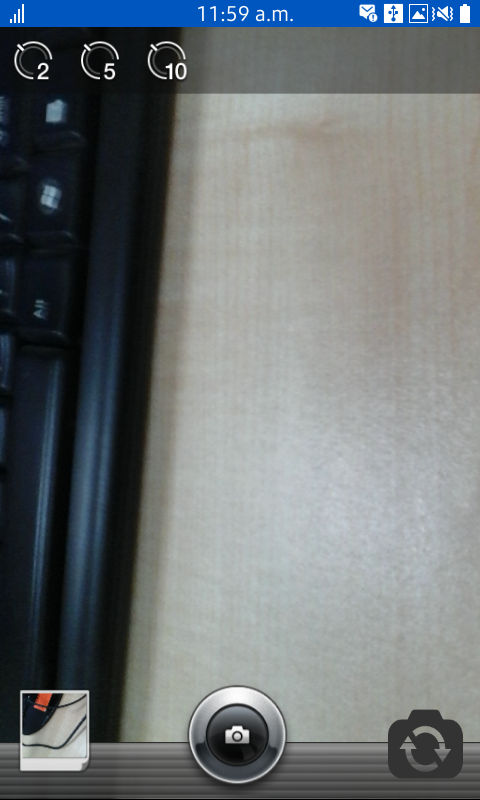
Fig 1: Rear Camera
Reference:
[1] https://developer.tizen.org/development/tools/download/release-notes/2.4-oct-22-2015
[2] https://www.w3.org/TR/mediacapture-streams/#constraints
[3] https://developer.tizen.org/development/tutorials/native-application/multimedia/camera
[4] https://developer.tizen.org/development/tutorials/web-application/w3chtml5supplementary-features/supplementary-features/camera-api-tizen-extension/task-camera
[5] https://developer.tizen.org/development/tutorials/web-application/w3chtml5supplementary-features/supplementary-features/camera-api-tizen-extension