Using LiveValidation JavaScript library
PUBLISHED
This article describes the LiveValidation JavaScript library and how to use it to validate forms filled out by users in real-time.
Introduction
LiveValidation is a lightweight JavaScript library for making real-time validations. It controls the form fields while the user is typing. The purpose of the library is to save the users' time and make the filling of forms' fields less daunting for them. A JavaScript validator doesn't replace the server-side validation that should be performed all the same.
The library makes validation easy, quick and powerful. Two versions of LiveValidation library are available: stand-alone (pure JavaScript) and Prototype. You can download them from this page. In this article we'll focus on the stand-alone version.
The library's documentation is available HERE. Some examples of its use can be found HERE.
How to work with the LiveValidation library
- First, we create an element that we want to validate:
<!-- index.html file -->
<label for="nick-input">Nick:</label>
<input type="text" id="nick-input" value="" class="LV_valid_field" />
Add the "LV_valid_field" class to an <input> element. As a user type, the field is validated. If the field's content doesn't meet the defined requirements, the element's class changes on the “LV_invalid_field”. It's important to define a CSS style for these two classes, e.g.
/* validation.css file */
.LV_valid_field {
    border: 1px solid rgba(0, 180, 0, 0.75);
}
.LV_invalid_field {
    border: 1px solid rgba(240, 0, 0, 0.75);
}
2. Next, we create a LiveValidation object instance for each element, e.g.
var validatedObj = new LiveValidation('nick-input', { validMessage: "Valid!"});The LiveValidation constructor takes as arguments: the string id of the element to validate and (optionally) an object containing options that can override defaults: validMessage, onValid, onInvalid, insertAfterWhatNode, onlyOnBlur, wait, onlyOnSubmit. The validMessage parameter means a message that is displayed if validation is successful (“Thankyou!” by default).
3. When we have the LiveValidation object, we can use the add() function to apply a suitable validation method and object containing its parameters that can override defaults:
validatedObj.add(Validate.method, methodParam);
The Validate class contains methods responsible for performing different types of validation. The add() function returns “true” or throws a Validate.Error object - that contains a failure message that is displayed as shown below (“Not valid!” message):
We can change the style of this message by defining the LV_valid, LV_invalid and LV_validation_message. It's required to use these strings for class names.
/* validation.css */
.LV_valid {
    color:rgba(0, 180, 0, 0.75);
}
.LV_invalid {
    color:rgba(240, 0, 0, 0.75);
}
.LV_validation_message{
    margin:0 0 0 2px;
}
Now, let’s describe the available validation methods. Their names are hyper-linked to the correct fragments of the documentation.
Presence
The method checks if a validated field contains a value different from an empty string, null, undefined, etc.
validatedObj.add(Validate.Presence);
Format
The method can validate a value (typed by a user) against some regular expression.
Let us assume that we want the user's name to start with a letter, contain letters and numeric values and have a length of 8-16 signs. Using a regular expression we can write this as:
/^[a-zA-Z][0-9a-zA-Z]{7,15}$/Now, we can use this pattern as parameter for the Validate.Format() method:
validatedObj.add(Validate.Format, {pattern: /^[a-zA-Z][0-9a-zA-Z]{7,15}$/});As you can see – validation works.
Numericality
The method is used to check if a validated value is numeric and whether it is:
- an integer,
- a specific number,
- a number bigger/smaller than specified,
- within a range of numbers,
or a combination of the above.
We want to check if the user types an integer within a range (1, 30). We do it as follows:
validatedObj.add(Validate.Numericality, { minimum: 1, maximum: 30, onlyInteger: true });
Length
The length of a typed value can also be validated using the Length() method. You can set the minimum, maximum or the range of a value's length (minimum AND maximum).
validatedObj.add(Validate.Length, {minimum: 3, maximum: 25});
Acceptance
The method checks if a value is equal to “true”. Very useful while checking if a user accepted some terms, etc.
<!-- index.html file -->
<label for="accept-input">Accept:</label>
<input type="checkbox" id="accept-input" value="1" class="checkbox" />
var validatedObj = new LiveValidation('accept-input', { validMessage: "OK!"});
validatedObj.add(Validate.Acceptance);
Confirmation
The method validates if a specified value matches the given one. It can be very useful e.g. in case of password confirmation. It's mandatory to set the match parameter of the method.
<label for="pass-input">Password:</label>
<input type="text" id="pass-input" value="" class="LV_valid_field" />
<label for="confpass-input">Confirm password:</label>
<input type="text" id="confpass-input" value="" class="LV_valid_field" />
var validatedObj = new LiveValidation('confpass-input', { validMessage: "Valid!"});
validatedObj.add(Validate.Confirmation, { match: 'pass-input' });
The method validates if an email address typed by the user is valid.
validatedObj.add(Validate.Email);
There are some other useful validation methods like Custom, Inclusion, Exclusion, now.
Sample application
Our sample application uses the standalone version of the LiveValidation library.
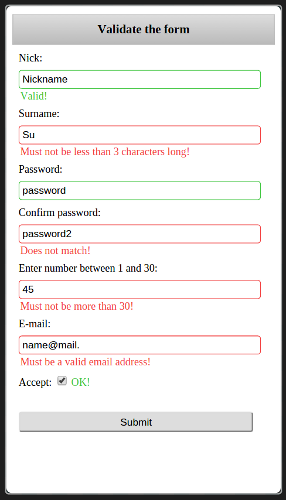
Figure 1 LiveValidation sample application screen shot
Summary
We hope this article has shown how you can use the LiveValidation library in your Tizen Web application. Use it to make your form's validation more easy, quick and powerful.