Navigation using Naviframe
PUBLISHED
Introduction
Naviframes are containers which are useful for implementing interfaces with several screens having a previous/next relationship. This tip document shows how to create an application with a simple naviframe. In this sample app, the naviframe has three views to depcit connections among them.
· The first view only contains a title with 2 buttons in header area, and some UI components in content area. The Prev button is used to terminate the application, and Next button opens the second view.
· The second view contains same thing in header area as first one and some text in the content area with a layout.
· The third view contains a title with a back button in header area, a tabbar below the title, and some text in the content area. The back button is used to move back to first view.
Step-1: Creating Data Structure for UI
Create appdata data structure using the code below and use this to manage the UI elements of the application.
typedef struct appdata {
	Evas_Object *win;
	Evas_Object *conform;
	Evas_Object *label;
	Evas_Object *nf;
} appdata_s;
Step-2: Create Naviframe
In this step, the naviframe is created with elm_naviframe_add() function. The elm_naviframe_prev_btn_auto_pushed_set() function is called to automatically create a back button for all views except the first. It emits the need to manually add a back button to second view to allow the user to return to first view.
static Evas_Object *
create_naviframe(Evas_Object *parent)
{
   Evas_Object *nf;
   nf = elm_naviframe_add(parent);

   // Add back button automatically on naviframe views when created
   // This API cannot affect naviframe views already created
   elm_naviframe_prev_btn_auto_pushed_set(nf, EINA_TRUE);

   return nf;
}
Step-3: Add Naviframe
Call necessary functions to add the naviframe.
// Add the naviframe

ad->nf = create_naviframe(ad->conform);
elm_object_content_set(ad->conform, ad->nf);
Step-4: Creating the First View
Create the first view with first_page() function and push the view to show it on screen. After that, create two buttons for the view with callbacks for clicked event. The buttons are added on both sides of naviframe title area. When clicked, left Prev button terminates the application, and right Next button pushes the second view to show it on screen. For the content area, set a layout with UI elements like entry and button.
static void
first_page(void *data)
{
	appdata_s *ad = data;
	Evas_Object *content, *btn;
	Elm_Object_Item *nf_it;

	Evas_Object *box;
	box = elm_box_add(ad->nf);
	elm_box_horizontal_set(box, EINA_FALSE);
	elm_box_homogeneous_set(box, EINA_TRUE);
	evas_object_size_hint_weight_set(box, EVAS_HINT_EXPAND, EVAS_HINT_EXPAND);
	evas_object_size_hint_align_set(box, EVAS_HINT_FILL, EVAS_HINT_FILL);
	evas_object_show(box);
	elm_win_resize_object_add(ad->nf, box);

	Evas_Object * entry = elm_entry_add(box);
	elm_object_text_set(entry,"entry");
	evas_object_show(entry);
	object_pack(box,entry,0.0,1.0,-1.0,0.9);

	Evas_Object * btn1 = elm_button_add(box);
	elm_object_text_set(btn1,"Click Here");
	evas_object_show(btn1);
	object_pack(box,btn1,0.0,1.0,-1.0,1.0);


	// Push the first view
	nf_it = elm_naviframe_item_push(ad->nf, "Using Naviframe", NULL, NULL, box, NULL);

	// Set left button on the title
	btn = elm_button_add(ad->nf);
	elm_object_style_set(btn, "naviframe/title_left");
	elm_object_item_part_content_set(nf_it, "title_left_btn", btn);
	elm_object_text_set(btn, "Prev");
	evas_object_smart_callback_add(btn, "clicked", prev_btn_clicked_cb, ad->nf);

	// Set right button on the title
	btn = elm_button_add(ad->nf);
	elm_object_style_set(btn, "naviframe/title_right");
	elm_object_item_part_content_set(nf_it, "title_right_btn", btn);
	elm_object_text_set(btn, "Next");
	evas_object_smart_callback_add(btn, "clicked", second_page_cb, ad->nf);

	// Set a callback for when a naviframe view is popped (hidden from the screen)
	elm_naviframe_item_pop_cb_set(nf_it, naviframe_pop_cb, ad->nf);
}
Step-5: Adding First View to the Naviframe
Add the First View through the code given below:
// Create the first view
first_page(ad);
Step-6: Pop up the current view
The prev_btn_clicked_cb() callback pops current view. When the view is popped, naviframe_pop_cb() callback is triggered with popped item and terminates the application. In this sample application, naviframe_pop_cb() callback is changed for the second view to make this concept clear.
// Left button click callback
static void
prev_btn_clicked_cb(void *data, Evas_Object *obj, void *event_info)
{
   Evas_Object *nf = data;
   elm_naviframe_item_pop(nf);
}

// View pop callback
// If the callback returns EINA_FALSE, item popping is canceled and item is not deleted
static Eina_Bool
naviframe_pop_first_view_cb(void *data, Elm_Object_Item *it)
{
	ui_app_exit();
    return EINA_FALSE;
}
//customized callback for the other view (except the first view)
static Eina_Bool
naviframe_pop_cb(void *data, Elm_Object_Item *it)
{
    return EINA_TRUE;
}
Step-7: Creating Second View
The second_page_cb() callback creates second view and pushes it to the screen. For the content area, set a layout with simple text in it.
static void
second_page_cb(Evas_Object *nf)
{
	   Evas_Object *content, *btn;
	   Elm_Object_Item *nf_it;

	   // Set nocontents layout
	   content = elm_layout_add(nf);
	   elm_layout_theme_set(content, "layout", "nocontents", "default");
	   elm_object_part_text_set(content, "elm.text", "Second Page" );
	   // Push the first view
	   nf_it = elm_naviframe_item_push(nf, "Using Naviframe", NULL, NULL, content, NULL);

	   // Set left button on the title
	   btn = elm_button_add(nf);
	   elm_object_style_set(btn, "naviframe/title_left");
	   elm_object_item_part_content_set(nf_it, "title_left_btn", btn);
	   elm_object_text_set(btn, "Prev");
	   evas_object_smart_callback_add(btn, "clicked", prev_btn_clicked_cb, nf);

	   // Set right button on the title
	   btn = elm_button_add(nf);
	   elm_object_style_set(btn, "naviframe/title_right");
	   elm_object_item_part_content_set(nf_it, "title_right_btn", btn);
	   elm_object_text_set(btn, "Next");
	   evas_object_smart_callback_add(btn, "clicked", third_page_cb, nf);


	   // Set a callback for when a naviframe view is popped (hidden from the screen)
	   elm_naviframe_item_pop_cb_set(nf_it, naviframe_pop_cb, nf);

}
Step-8: Creating Third View
As second view, the third view can be created by calling third_page_cb() callback. Create a toolbar below title area, and for content area, set a layout with simple text in it. Since the elm_naviframe_prev_btn_auto_pushed_set() function is used when creating the naviframe, a back button is automatically added to this view. While pushing the view, tabbar style is used.
static void
third_page_cb(Evas_Object *nf1)
{
	Evas_Object *content, *tabbar, *nf = nf1;
	Elm_Object_Item *nf_it;

	// Set nocontents layout
	content = elm_layout_add(nf);

	// Push the second view with tabbar style
	nf_it = elm_naviframe_item_push(nf, "Using tabbar", NULL, NULL, content, "tabbar");

	// Create and set a toolbar into the tabbar part
	tabbar = create_tabbar_with_title(nf);
	elm_object_item_part_content_set(nf_it, "tabbar", tabbar);

}
Step-9: Creating the toolbar
Create the toolbar and append 2 items into it using the create_tabbar_with_title() function. When the toolbar is located under naviframe title area, the tabbar_with_title style can be used.
static Evas_Object*
create_tabbar_with_title(Evas_Object *parent)
{
   Evas_Object *toolbar;
   toolbar = elm_toolbar_add(parent);
   elm_object_style_set(toolbar, "tabbar_with_title");
   elm_toolbar_shrink_mode_set(toolbar, ELM_TOOLBAR_SHRINK_EXPAND);
   elm_toolbar_transverse_expanded_set(toolbar, EINA_TRUE);
   elm_toolbar_item_append(toolbar, NULL, "Tab1", NULL, parent);
   elm_toolbar_item_append(toolbar, NULL, "Tab2", NULL, parent);
   elm_toolbar_select_mode_set(toolbar, ELM_OBJECT_SELECT_MODE_ALWAYS);

   return toolbar;
}
Running the sample application
Now, the attached sample application is capable of making navigation between three pages. Build and run this sample application and get familiar with the functionalities of Naviframe.
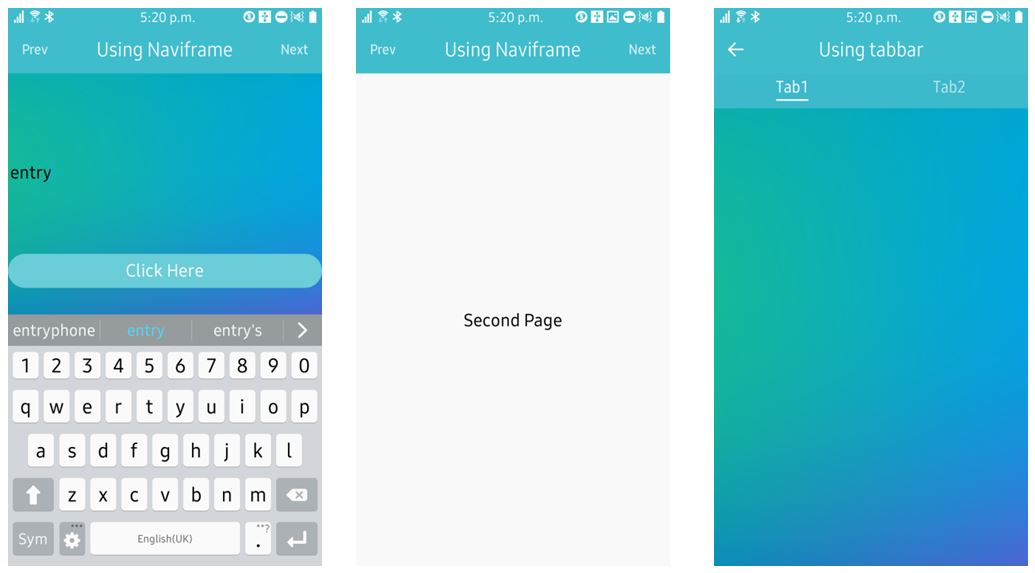
Figure: Three views of Naviframe