Introduction to Angular 2 in Tizen
PUBLISHED
Introduction
Throughout the last years AngularJS was considered probably the most popular JavaScript framework around. It is very versatile and was used all over the planet in many industries to create stunning web applications. But as time passed, we got information about the new Angular 2 coming our way. And yes, if you look on the chart below (fig.1) the interest about Angular 2 has increased and will get even higher in the upcoming future. That is why we have dedicated this article to introduce Tizen developers to Angular 2. The current version of the framework, while writing this article, is rc.5. In this article we will show you how to setup a simple Angular 2 project.
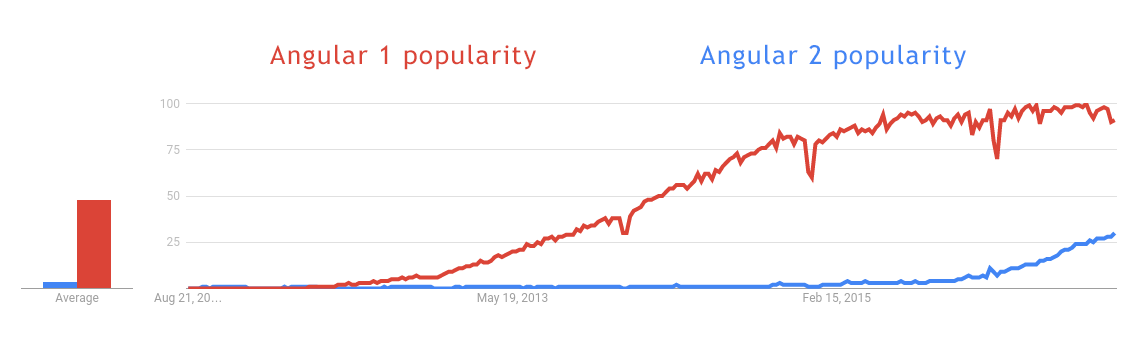
Figure 1 – Angular 1 and Angular 2 popularity
Angular 2 philosophy
The first thing which needs to be mentioned is that Angular 2 differs much from its predecessor. It is not a typical MVC framework as we know it. The second Angular is based upon components. Everything in this framework is a component and components can nest other components. This way of organizing web applications is very handy.
Another change is the programming language. Although we can program in vanilla JavaScript or Dart in Angular 2, the best choice is to code using TypeScript. Why this language? Because it is a strong typed programming language and will give us the best control and flexibility over coding our Angular 2 project. Dart is not so popular and in vanilla JavaScript we would have to write a lot of code. TypeScript seems to be the perfect choice, as it seems to be a well-established industry standard nowadays.
Preparing the environment
Before doing any setup of Angular 2 we expect you to be familiar and have installed Node.js on your computer. The Node Package Manager is essential in web development nowadays. If you do not have it installed then please be sure to check this web page in order to install npm.
Having done that, you can install the angular-cli module, which will speed up the creation of your Angular 2 applications. It is based on the ember-cli. You can install the angular-cli by typing the following command in your console.
npm install –g angular-cli
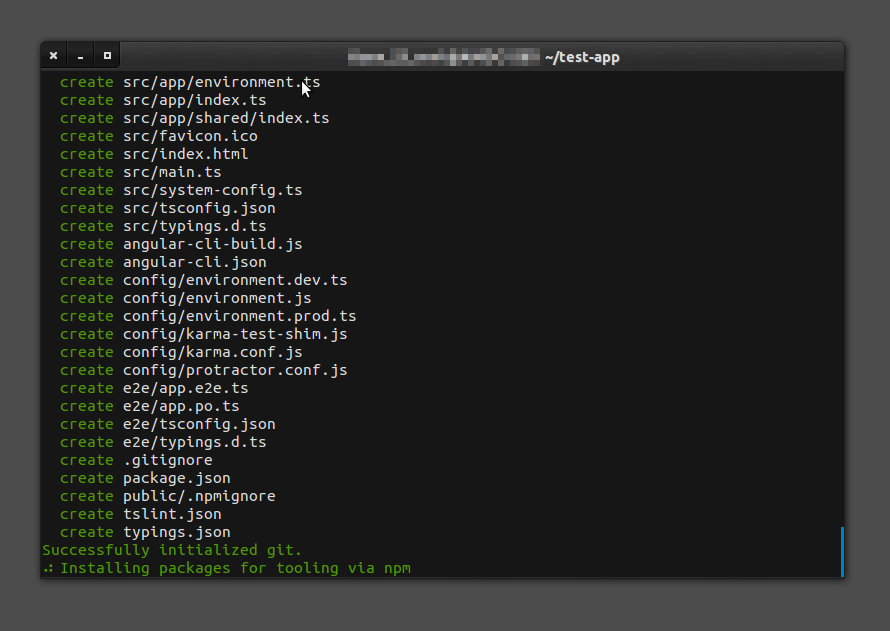
Figure 2 – Installing the angular-cli
After some time the angular-cli should install and then you will be ready to create a template for an Angular 2 application.
To do so, just utilize the command below. As you can see we will use the ng command for that. If you want to check the other commands of the ng module, just type ng in the console.
ng new your-angular-2-app-title
The structure of your project should look like on figure 3.
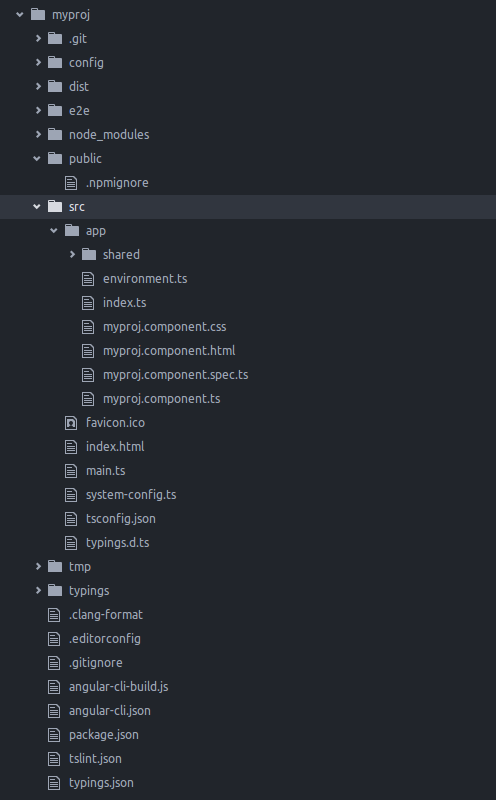
Figure 3 – Angular 2 app template structure from angular-cli
As you can see above your Angular 2 project consists of many folders and files. Looking from the top is the .git directory which has files responsible, as you might have guessed, connected to GIT. Beneath there is the config folder which holds configuration files for the application environment, as well as karma and protractor code testing libraries. The dist folder contains files for distribution. Here are placed all the compiled JavaScript files from TypeScript source files. In the next folder called e2e we can find configuration for end-to-end tests and for the TypeScript compiler. Beneath that folder we have one called the node_modules folder, which is quite self-explanatory. It stores the local node modules used in this particular project. Then we have the public folder which, as the name says, stores public files, for example a public CSS which can contain global styles for the modules in our application. The next one called src holds our TypeScript source code. In this folder we are creating and editing files in which we write our application code. Here you will find the index.html file, as well as the favicon. In the app subfolder you will see that the angular-cli has created an index.ts file for our app and our first component. You can also see that there are HTML, CSS and TS files created for that main component automatically. As for the tmp folder, it holds temporary data when compiling from TypeScript to JavaScript. The last typings folder stores the type definitions.
After creating our template project we need to go into the folder of our application and start a localhost server. It will serve our application on port 4200 and will reload our app every time we make a change. To start the server you just need to type in
ng serve
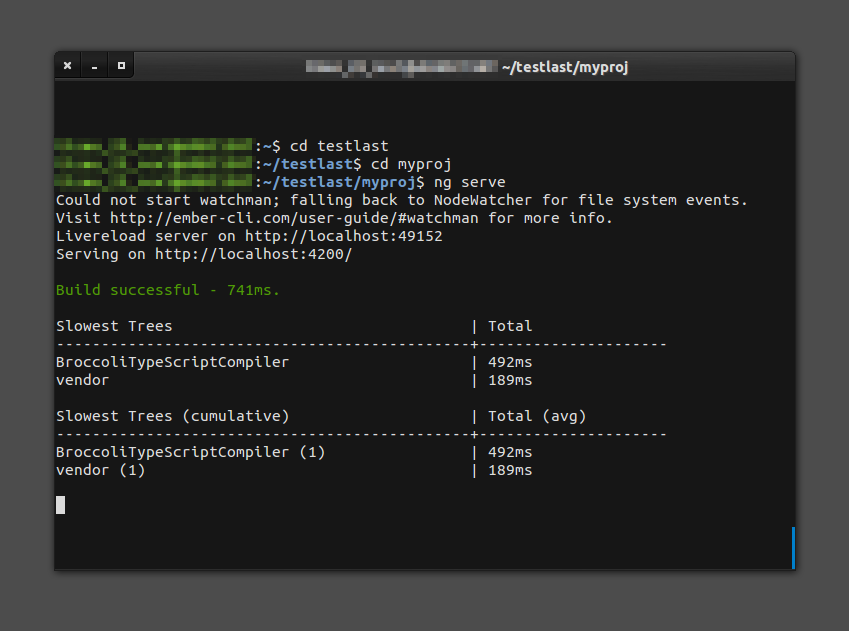
Figure 4 – Running the live server
After that just open up your web browser and go to:
http://localhost:4200/
You should see on the screen a text saying your-angular-2-app-title works! If this is the case then you are ready to go and start creating your Angular 2 projects for Tizen.
The quick component overview
As we have stated before Angular 2 applications consist of components. Below you can see the myproj.component.ts file.
import { Component } from '@angular/core';

@Component({
  moduleId: module.id,
  selector: 'myproj-app',
  templateUrl: 'myproj.component.html',
  styleUrls: ['myproj.component.css']
})
export class MyprojAppComponent {
  title = 'myproj works!';
}
As you can see above the first line imports the component object from the core of Angular 2. That is why in the next line we can use the @Component decorator. In the decorator the module.id needs to be specified, so we can resolve relative urls for templates and styles. But it is not of importance for us at this moment. The selector specifies how the HTML tag of our component will look like when we want to put it in another component. In our case the tag will look like this - <myproj></myproj>. The templateUrl points us to the HTML file template of our component. And styleUrls directs us to the CSS responsible for styling our component. But remember that also in the public folder of our Angular 2 project you can specify a global CSS style file for the whole project and then on the level of components you can alter their looks a bit for the specific component, thus saving a lot of time. The last part of the template component is the export part. Here we are writing the logic, variables, functions, code of our component. They will be used by our component template. Also by the specified name, in our case MyprojAppComponent, we can import this component in other different files.
As for the myproj.component.html file, when you have a look at it, then you will notice that it only shows the code written below.
<h1>
  {{title}}
</h1>
It means that via an expression it displays the title name “myproj works!” from the exports in our myproj.component.ts file. At this time the myproj.component.css file remains empty. You can play around and assign some styles to see how the component changes.
Summary
In this article we showed you how you can start your adventure with Angular 2 and Tizen. We have showed you how to setup a template Angular 2 project using the angular-cli. Then we have described how an Angular 2 project is structured and at the end we made a little overview of the main application component. We hope that this article will be helpful for you in familiarizing yourself with Angular 2 in Tizen.