Launching Tizen applications on Android platform
PUBLISHED
Prerequisites
All applications attached to this article require Android devices with Android version 2.2 or higher.
Introduction
Prior to launching your Tizen HTML5 application on the Android platform you need to follow the development process for scalable application UI described in details in the “Keeping high portability of your Tizen web applications” article. If you do not follow these steps the UI of your application will not scale on various Android devices. You can say that the UI scaling is not mandatory, because it can be done by the Android platform itself. Infact it’s not a recommend approach, as it may produce undesirable artifacts when Android upscales or downscales your application.
There are many approaches for launching HTML5 applications (Tizen web applications) on the Android platform. The most common are:
- To build a project using PhoneGap/Cordova. Using this approach you can create an HTML5 application and PhoneGap automatically creates a native build for different hardware platforms such as: Android, iOS, Windows Mobile, bada. PhoneGap provides its own API which is a bridge between JavaScript and the native platform API.
- To create your own wrapper application and embed the HTML5 application inside.
- To use a certain framework in order to create the HTML5 application. Usually these frameworks provide a tool to build the application for some native platforms – this includes Android. A good example for such a framework is Sencha Touch
In this article we will guide you on how to use the 1st and 2nd approach in order to launch the previously developed Earth Guard 1.0.3 application on Android devices. You can find two projects attached to this article:
- EarthGuardPhoneGapExample, corresponding to 1st approach.
- AndroidEarthGuard, corresponding to 2nd approach
We will also try to point out the advantages and disadvantages of both.
For the 1st and 2nd approaches the concept behind embedding an HTML5 application in an Android native application is similar. The only difference is that PhoneGap provides classes that act as wrappers for native Android API classes.
The HTML5 application is embedded in a WebView object instance which is inside the Android Activity. The HTML5 application can communicate with the Java Android wrapper using for example an instance of the WebAppInterface class. Communication in the opposite direction is possible through the WebView.
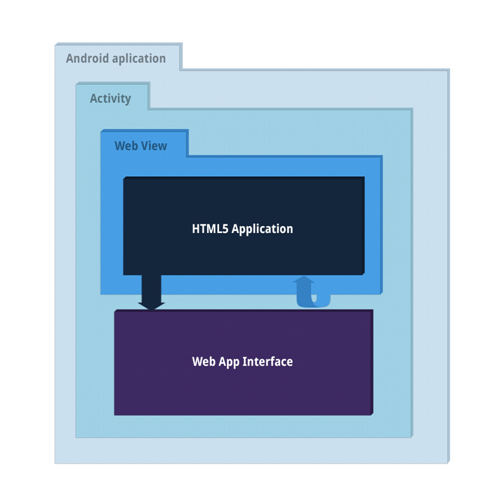 Fig 1: Basic concept behind an HTML5 application embedded in Android application.

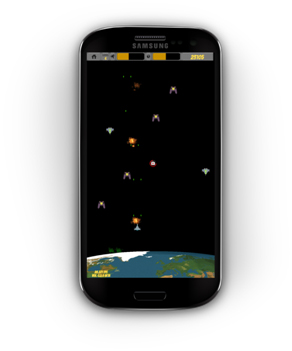 Fig 2: Earth Guard on Samsung Galaxy S3
Building a Tizen HTML5 application for Android using PhoneGap/Cordova
In our opinion the easiest way to start with PhoneGap is to use an example blueprint application that is attached to the PhoneGap package. You can download the newest Cordova package from the download site. The PhoneGap example application for Android can be found in . /lib/android/example.
If you decide to use the blueprint example as a starting point for your application, please follow the steps below:
- Make sure that you have Java, Android SDK and Ant installed. Installation of this software is not in the scope of this article.
- Please update your environmental variable - PATH to include the following programs: android, ant, adb.
- In your PhoneGap directory go to ./phonegap/lib/android and copy the example folder to any location.
- Rename the ./example/assets/www to ./example/assets/www_org
- Create new directory ./example/assets/www.
- Copy your HTML5 application to ./example/assets/www. The only requirement at this point is to have a valid HTML5 index.html file. You do not need any CSS or JavaScript files.
- Move to the ./example/cordova directory
- Execute the following command in shell: android update project -p../ --target android-17
- Clean the project ./clean
- Build the project ./build
- Connect an Android device with Android OS >= 2.1
- Launch the application: ./run
- By now you should have your application up and running on your Android device. Your index.html file will be rendered on screen.
Unfortunately this is just the beginning of a long journey, which will finish in fully running the Earth Guard game on your Android device.
You should import your Android project into your Android Eclipse IDE. In order to do so please follow these steps:
- Launch Eclipse IDE with Android SDK installed
- Go to File->New->Project->Android Project from Existing Code and import your previously created Android PhoneGap application (Example application)
- From the context menu in the Package Explorer select cordovaExample project and go to Properties ->Android where you should choose the newest Android API version available. In my case it’s Android 4.2
You can now develop, debug and deploy your Android PhoneGap application from the Eclipse IDE.
You can debug the Android PhoneGap application using console.log invocations inside the JavaScript application. You should observe the LogCat with tag:cordova set to filter debug messages. Unfortunately you will not be able to see and explore the full objects’ properties, but only the simple string messages are available on LogCat.
At this point your application is unable to use any part of the PhoneGap API, so you are using just half of its capabilities. The full documentation for the PhoneGap API can be found here. The next step is to include the cordova-2.5.0.js file in your index.html. This enables you to use the PhoneGap API in the application. There is just one mandatory change that you need to perform in your application’s source code – deviceready event listener registration. Please refer to the ./assets/www/js/main.js file:
document.addEventListener("deviceready", function() {
    if (view.checkEnviroment()) {
        game.inputHandler = inputHandler();
        levelManager.init();
        view.resize();
        view.setPowerState("SCREEN_BRIGHT");
        game.initialize();
    }
}, true);
The deviceready event is triggered by the Cordova WebView when it finishes initialization, so every action in your HTML5 application should be done after this event has been triggered. Otherwise you won’t be able to use any part of the PhoneGap API.
Unfortunately this is just what’s mandatory but to provide a full UX for Earth Guard on Android we should:
- Handle the Activity life cycle
- Handle the device back button
- Handle the exit button
- Block orientation change – the sample application does not support landscape view
Handle the application lifecycle and the back button
Handling the application life cycle and back button is just a matter of binding appropriate events in the phoneGapHandler module (./assets/www/js/modules/phoneGapHandler.js). Please refer to the code below:
/**
 * Module responsible for handling all phoneGap functionalities for application
 */

"use strict";
var phoneGapHandler = function() {
    var _init = function() {
        /**
         * Cordova back button handler
         */
        document.addEventListener("backbutton", menu.toggle, false);
        /**
         * Cordova application life cycle handling
         */
        document.addEventListener("pause", game.onHidden, false);
        document.addEventListener("resume", game.onVisible, false);
    };
    return {
        init : _init
    };
}();
Handle the exit button
You need to provide a separate PhoneGap API call in order to close the application. Please refer to the exit method in the game module (./assets/www/modules/game.js):
exit : function() {
    // Tizen exit handler
    if (typeof tizen !== "undefined" && tizen.application) {
        if (confirm("Exit?")) {
            var app = tizen.application.getCurrentApplication();
            app.exit();
        }

    // PhoneGap exit handler
    } else if (typeof navigator.app.exitApp !== "undefined") {
        navigator.app.exitApp();
    } else {
        alert("Not supported");
    }
},
Block orientation change
The app orientation can be fixed to portrait in the AndroidManifest.xml file. Please find the appropriate code below:
<activity android:name="cordovaExample" android:label="@string/app_name"
        android:theme="@android:style/Theme.Black.NoTitleBar"
        android:configChanges="orientation|keyboardHidden|keyboard|screenSize|locale"
        android:screenOrientation="portrait">
Building Tizen HTML5 application for Android using your own Java wrapper
This approach is a bit more difficult but gives you more flexibility. You can decide which Android APIs to expose inside your HTML5 application and vice versa, but you need to implement them yourself. We will not describe in detail how to create a new Android project and how to add a WebView and WebAppInterface into MainActivity. Separate tutorials on this can be found at http://developer.samsung.com/android.
If you decide to build your own Java Android wrapper for an HTML5 application you need to consider the following issues:
- Providing an interface between the Java wrapper and HTML5 application and vice versa
- Handling console.log messages from the JS application and forwarding them to LogCat
- Handling the back button
- Handling the Android application lifecycle
- Handling power management
Providing interface between Java wrapper and HTML5 application and vice versa
We can provide a bi directional communication between the Java application and HTML5 application. It is up to us to decide which parts of the Android API should be exposed for HTML5 application. In our case this API is defined in the ./src/com/Samsung/srpol/androidearthguard/WebAppInterface.java file:
/**
 * Method available in JS application
 */

@JavascriptInterface
public void exitApplication() {
    mActivity.finish();
}

/**
 * Method available in JS application
 */
@JavascriptInterface
public void setScreenOn(boolean screenOn) {
    mActivity.setScreenOn(screenOn);
}
These two methods are available inside the HTML5 application in the Android namespace. This namespace is defined inside Android wrapper in MainActivity:
@SuppressLint("SetJavaScriptEnabled")
private void initWebView() {
    …
    // Provides Android namespace in JS application
    mWebView.addJavascriptInterface(mWebAppInterface, "Android");
    …
}
We use methods defined in this namespace inside our HTML5 application in game module:
exit : function() {
…
        Android.exitApplication();
…
},
And in the view.js module:
setPowerState : function(type) {
…
        Android.setScreenOn((type === "SCREEN_BRIGHT") ? true : false);
…
},
Each method from the HTML5 application can be invoked inside of the Java wrapper, in order to do so you should use the WebView.loadUrl method.
An example is included in ./src/com/Samsung/srpol/androidearthguard/MainActivity.java:
public boolean onKeyDown(int keyCode, KeyEvent event) {
    // Back button handler
    if ((keyCode == KeyEvent.KEYCODE_BACK)) {
        Log.d(this.getClass().getName(), "back button pressed");
        mWebView.loadUrl("javascript:menu.toggle()");
        return false;
    }
    return super.onKeyDown(keyCode, event);
}
Handling console.log messages from JS application and forwarding them to LogCat
Without an appropriate debugging mechanism console.log messages in our HTML5 application will not be displayed on LogCat. You need to forward console.log messages to LogCat:
mWebView.setWebChromeClient(new WebChromeClient() {
    public boolean onConsoleMessage(ConsoleMessage cm) {
        Log.d(getString(R.string.js_console_tag),
                "[EarthGuard]: " + cm.message() + " -> line("
                        + cm.lineNumber() + ") of " + cm.sourceId());
        return true;
    }
});
Each message from the sample application is tagged using the [EarthGuard] string so you can easily filter it using the tag box in LogCat.
Handling the back button
It is up to you to decide, whether you wish to handle the back button in your application or not. In the Earth Guard sample application we decided to attach a menu toggle method to the Android back button. Please refer to the code below:
@Override
public boolean onKeyDown(int keyCode, KeyEvent event) {
    // Back button handler
    if ((keyCode == KeyEvent.KEYCODE_BACK)) {
        Log.d(this.getClass().getName(), "back button pressed");
        mWebView.loadUrl("javascript:menu.toggle()");
        return false;
    }
    return super.onKeyDown(keyCode, event);
}
Handling the Android application life cycle
The Android Activity life cycle is complex – it is described in details here. Fortunately our HTML5 application should handle only a part of it:
- When the Activity is sent to background we should invoke the game.onHidden() method
- When the Activity is sent to foreground we should invoke the game.onVisible() method
Please refer to the code below:
/**
 * Triggers game.onVisible() method in JS application
 *
 */

@Override
protected void onResume() {
    super.onResume();
    Log.d(this.getClass().getName(), "Main activity onResume()");
    mWebView.loadUrl("javascript:game.onVisible()");
    if (mScreenOn) {
        mWakeLock.acquire();
    }
}

/**
 * Triggers game.onHidden() method in JS application
 *
 */

@Override
protected void onPause() {
    super.onPause();
    Log.d(this.getClass().getName(), "Main activity onPause()");
    mWebView.loadUrl("javascript:game.onHidden()");
    if (mWakeLock.isHeld()) {
        mWakeLock.release();
    }
}
Handling power management
To prevent screen dimming while playing the game you have to implement power management. In the Earth Guard game the PowerManager class and its wake locks were used. It requires a special permission in the manifest file:
<uses-permission android:name="android.permission.WAKE_LOCK" />
Using wake locks can significantly increase the power consumption so it should be used only when it is necessary. In the Earth Guard game we want to prevent the screen from dimming while the user is in game view. All the logic regarding power management is in the MainActivity. The only function available from the JavaScript part is the setScreenOn(Boolean screenOn) method.
/**
 * Method available in JS application. Switch on/off preventing the screen from dimming
 *
 * @param screenOn
 *            true if we want to prevent the screen from dimming, false if we want to release it
 */

@JavascriptInterface
public void setScreenOn(boolean screenOn) {
    mActivity.setScreenOn(screenOn);
}
It calls the setScreenOn() method of MainActivity, which will be described later.
While implementing power management we added two additional fields to our mainActivity class:
private PowerManager.WakeLock mWakeLock;
private boolean mScreenOn = false;
The first one, mWakeLock, is a WakeLock object that will be used. The second one is a flag indicating whether the screen should be forced to stay on. Its value is set by the setScreenOn function mentioned above.
Using wake locks is fairly simple. You have to create an instance of the WakeLock class and then use two available functions:
- acquire(),
- release().
protected void onCreate(Bundle savedInstanceState) {
    ...
    PowerManager pm = (PowerManager) getSystemService(Context.POWER_SERVICE);
    mWakeLock = pm.newWakeLock(PowerManager.SCREEN_BRIGHT_WAKE_LOCK,
            "MainActivity");
    ...
}
The newWakeLock(int levelAndFlags, String tag) function gets two parameters. The first one specifies the wake lock level and optional flags. There are 4 levels possible:
- PARTIAL_WAKE_LOCK,
- FULL_WAKE_LOCK,
- SCREEN_DIM_WAKE_LOCK,
- SCREEN_BRIGHT_WAKE_LOCK
In EarthGuard we used the SCREEN_BRIGHT_WAKE_LOCK flag. It ensures that the screen is on, at full brightness and cannot be dimmed. The second argument in the newWakeLock function is a flag used for debugging purposes.
We can now use the acquire() and release() functions.
public void setScreenOn(boolean screenOn) {
    mScreenOn = screenOn;
    if (screenOn && !mWakeLock.isHeld()) {
        mWakeLock.acquire();
    } else if (!screenOn &&
            mWakeLock.isHeld()) {
        mWakeLock.release();
    }

}
The setScreenOn method takes one parameter, screenOn. When we want to prevent the screen from dimming (screenOn true) we use the mWakeLock.acquire()method. Before we do this we have to check if it isn’t already active with the mWakeLock.isHeld()method. To release the wake lock we use the mWakeLock.release()method.
It is also important to properly handle wake locks when the application goes into the background and when it is resumed.
@Override
protected void onResume() {
    super.onResume();
    ...
    if (mScreenOn) {
        mWakeLock.acquire();
    }
}

@Override
protected void onPause() {
    super.onPause();
    ...
    if (mWakeLock.isHeld()) {
        mWakeLock.release();
    }
}
In onResume() we check if the wake lock should be turned on (mScreenOn flag set to true) and, if so, acquire it. In the onPause() function we check if the wake lock is active and, if yes, release it.
Summary
|
Only Android |
Device API available in HTML5 application |
Minimum Android version |
Recommended Android version |
Interface from Java to HTML5 application |
|
|
Dedicated Java Wrapper |
YES |
NO(*) |
2.2 API8 |
4.2 API17 |
YES |
|
PhoneGap/Cordova approach |
NO |
YES |
2.1 API7 |
4.2 API17 |
NO |
Table illustrating the comparison of the PhoneGap approach and the dedicated wrapper approach
(*) – you should provide it by yourself
In our opinion there are certain cases for which the dedicated Java wrapper is better than PhoneGap:
- If you decide to launch your HTML5 application only on Android device
- If you wish to provide some specific features form the Android API to your HTML5 application
In any other case we recommend you to use the PhoneGap approach.