JavaScript HTML DOM vs ActionScript Display List
PUBLISHED
Introduction
The main purpose of this article is to familiarise flash developers with the concept of DOM (Document Object Model) which plays in HTML a similar role as the display list in ActionScript. The DOM allows you to create and display visual objects, but represents a different approach than the display list. If you have ever dealt with XML in ActionScript, you probably used some of the DOM methods. In this article we will describe how to use the DOM and create basic HTML elements and effects. Next, we will shortly introduce you to the graphics and multimedia.
What is DOM?
DOM stands for the Document Object Model. It is an Application Programming Interface (API) for HTML documents. More precisely, it's a group of interfaces which are implemented by HTML elements. Some interfaces are common to all elements, other are specific for a few of them. The DOM describes the logical structure of a document and defines how a document can be accessed and manipulated. It's created by the browser engine during the process of parsing HTML text file. Such file contains elements which define the document structure, but elements can be also related to text semantics, multimedia embedding or linking to external files. In contrast, the flash document - SWF is a binary file and contains mostly pure graphic elements: bitmap and vector data.
When you worked with the Flash authoring evironment you were probably accustomed to the timeline concept. HTML document doesn’t have a timeline, however it can be simulated by scripting.
Both types of documents have a tree structure with a root node, parents and children. To better understand the HTML it’s important to know its structure and how this structure is translated into JavaScript. Let’s compare hierarchical models of DOM and the display list.
| Display List | DOM |
| Stage ↧ Root (Instance of the main class of the SWF file) ↧ DisplayObjectContainer (e.g. MovieClip, Sprite) ↧ (...) ↧ DisplayObject (e.g. Shape, Bitmap) |
window
↧ document ↧ document.documentElement (HTML) ↧ ↧
document.head (HEAD) document.body (BODY)
↧ ↧
e.g. TITLE, META, LINK, SCRIPT... e.g. DIV, A, P, CANVAS, text...
|
We can collate body with the flash root, a container where you place the content. And we can collate html with stage, the top object in the hierachy.
HTML structure and example
Through this article we will discuss a simple HTML document, which contains a green block element with a question in paragraph and some special characters, presenting suits of cards. On the following image you can see: on the left side a raw HTML and on the right the same HTML document with an atttached CSS file.
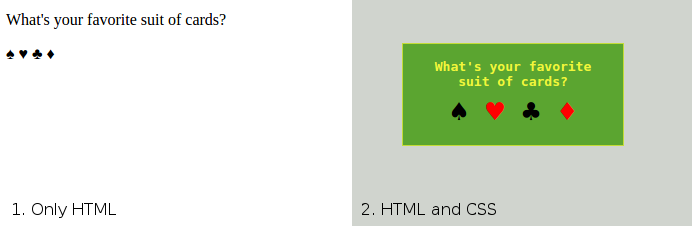
In the following code you can see all HTML elements used in creating this image, the CSS file will be listed further.
<!DOCTYPE html>
<html>
<head>
<title>Do you play cards?</title>
<meta charset="UTF-8">
<meta name="viewport" content="width=device-width, initial-scale=1.0">
<script src="js/main.js" type="text/javascript"></script>
<link href="css/main.css" rel="stylesheet" >
</head>
<body>
<div id="board">
<p>What's your favorite suit of cards?</p>
<p id="cards"> <span>♠</span><span>♥</span><span>♣</span><span>♦</span></p>
</div>
</body>
</html>
In the first line there is declaration of the document type. In the example above it informs browser that this is HTML5 document. Head section usually contains informations about charset, author, page title and meta data e.g. how device should scale page content, data for search engines, links to JavaScript and CSS files. The body section is the place where you put the main content: html elements, text, entities.
HTML elements
There are many html elements with different roles, some have limited occurence to some place in the structure, other are restricted to be contained only by some specific elements. The full list of HTML5 elements, grouped by functions can be found here. All HTML elements implement the HTMLElement and Element interfaces which have methods and properties typical for HTML elements (e.g. style, className, classList, innerHTML) and Node interface which is characteristic for the DOM manipulating (and contains methods and properties like e.g. firstChild, appendChild, insertBefore).
Events
The list of all events can be found here, also it could be useful to become familiar with DOM event architecture. You can assign event handlers using the addEventListener method.
target.addEventListener(type, listener[, useCapture]);
Where:
- type - name of the event
- listener - function which is called when the event occurs
- useCapture - default value is false and then listener is executed in the bubbling phase, if true in the capturing phase
Key events can be attached to window objects, then you can gather all the key clicks. In the snippet listed below we assign a listener to the window object, to catch all the keyup events.
window.addEventListener('keyup',function(evt){
    var p = document.createElement('p');
    p.style.margin = '1px';
    p.style.padding = '2px';
    p.style.background = '#ccc';
    p.style.float = 'left';
    p.style.cursor = 'pointer';
    p.innerHTML = String.fromCharCode(evt.keyCode);
    document.body.appendChild(p);
    p.addEventListener('click',function(evt){
        document.body.removeChild(this);
            console.log('p click');
    });
});
var useCapture = false;
document.addEventListener('click',function(evt){
    console.log('document click');
},useCapture);
document.addEventListener('click',function(evt){
    console.log('window click');
});

/*
useCapture = true
    document click
    p click
    window click

useCapture = false
    p click
    document click
    window click

*/
When you change the value of the useCapture variable, you can see how this parameter works and that the order of triggering the click event is different.
Styling
You, as a flash developer, might be familar with styles and CSS (Cascading Style Sheets). Flash supports some subset of CSS in text fields and components but in HTML it is a much larger topic. Basically CSS is a kind of language used to describe the look of HTML documents. You can define the size, position, colors of elements, as well as text formatting. Definitely it's something you should be familiar with. You may refer to the official CSS specifications or MDN CSS guide. The following CSS code defines the look of our HTML example:
body {
    background:#d0d4ce;
}
#board {
    position: absolute;
    left:50px;
    top:50px;
    background:#5ba530;
    cursor: pointer;
    width:200px;
    padding: 10px;
    border: 1px solid rgba(240, 246, 59, 0.7);
    -webkit-user-select: none;
    overflow: auto;
}
#board p {
    font: bold 13px/1.2em monospace;
    color:#f0f63b;
    text-align:center;
    margin: 5px;
}
#cards {
    position:relative;
    font-size: 30px!important;
    -webkit-transform-style:preserve-3d;
    -webkit-perspective: 1000px;
}
#cards span {
    position:relative;
    display:inline-block;
    padding:0 4px;
    -webkit-transform:rotateY(0deg);
}
#cards span:nth-child(n) {
    color:black;
}
#cards span:nth-child(2n) {
    color:red;
}
#cards span.flipped {
    -webkit-animation-name: flipped;
    -webkit-animation-duration: 1s;
}
@-webkit-keyframes flipped {
	0% {
		-webkit-transform:rotateY(0deg);
	}
	100% {
		-webkit-transform:rotateY(360deg);
	}
}
You can see the so called selectors (e.g. "#cards", "#cards span"), specyfing to which element(s) are applied the styles defined in the curly brackets.
Position and size
The most important concept regarding size and positioning of the HTML elements is the Box Model. Generally, any HTML element can be considered as a box. This box consists of: a margin, border, padding and the actual content. These properties alltogether make up the total size of an element. When you set the width and the height property, you modify the size of the content area only. You can change this behaviour using box-sizing.
Position of an element can be set to relative or to absolute or can be set to fixed. It is set through the properties like top, left, right and bottom. You can also move elements to the top or the bottom using the z-index property. The size and position of the element can also be set through JavaScript. In the following example we log properties related to the element position and size. When you click on the paragraph element its width is changed. In Tizen SDK use debug launch mode to see all console logs.
var cards = document.querySelector('#board');
cards.addEventListener('click', function (evt) {
    evt.stopPropagation();
	console.log('offset width, height: ' + this.offsetWidth + ', ' + this.offsetHeight);
	console.log('client width, height: ' + this.clientWidth + ', ' + this.clientHeight);
	console.log('offset top, left: ' + this.offsetTop + ', ' + this.offsetLeft);
	console.log('client top, left: ' + this.clientTop + ', ' + this.clientLeft);
	console.log('scroll width, height: ' + this.scrollWidth + ', ' + this.scrollHeight);
	console.log('scroll top, left: ' + this.scrollTop + ', ' + this.scrollLeft);
	console.log(this.getBoundingClientRect());
});

document.querySelector('#board p').addEventListener('click', function () {
   if (this.style.width === '500px') {
       this.style.width = 'auto';
   } else {
       this.style.width = '500px';
   }
});

cards.addEventListener('scroll', function (evt) {
	console.log('scroll width, height: ' + cards.scrollWidth + ', ' + cards.scrollHeight);
	console.log('scroll top, left: ' + cards.scrollTop + ', ' + cards.scrollLeft);
});
Properties with offset are related to the total width, with size of the content, padding, srolls and borders. Those related to the client are related to the dimension of the visible content width and padding. When actual content is wider than the set by the CSS width property and overflow is set to auto the scrollable element will be enabled for scrolling. You can read or set the scroll position or read the scroll width.
Loading
Preloaders are an important part of all flash applications. The main purpose of using them is to start the application when all the required content is loaded. In their simplest form, preloaders check the loading progress of the main document and generate an event when loading is completed. Regarding HTML, we have two types of events related to document loading. First and the most popular uses the window load event, the second is the document event DOMContentLoaded. The difference between them is the time when they are triggered. The DOMContentLoaded is loaded when a document is parsed and the DOM is ready, so we can call the methods on all its elements. The window load method can be triggered sometimes a bit later. Especially when the page contains images which can delay the document loading process. When you will decide to use some framework or library, you can also use its loading handler.
document.addEventListener('DOMContentLoaded', function(evt){
    console.log('JavaScript: DOM Ready');
});

window.addEventListener('load', function(evt){
    console.log('JavaScript: Loaded');
});

$(function(){
    console.log('jQuery: DOM Ready');
});

window.addEvent('domready', function() {
    console.log('MooTools: DOM Ready');
});
Selecting elements
Selecting elements is the most common function when scripting in HTML. You select an element when you want to assing some event handlers to it, change its style, content or just remove or replace it. There are several ways in which you can do that. The simplest way is to set the id attribute of the desired element and use the document.getElementById or document.querySelector method. There are also libraries which make this easier. In the following examaple we are selecting the span elements and asign to them a click handler. We use JavaScript together with two popular libraries jQuery and MooTools. In the click handler we toggle the class of the span element.
/* pure JavaScript */
[].slice.apply(document.querySelectorAll('#cards span')).forEach(function (el) {
    el.addEventListener('click', function () {
        this.classList.toggle('flipped');
    });
});

/* jQuery */
$('#cards span').each(function () {
    $(this).on('click', function () {
        $(this).toggleClass('flipped');
    });
});

/* MooTools */
Array.each($$('#cards span'), function (el) {
    $$(el).addEvent('click', function () {
        $$(this).toggleClass('flipped');
    });
});
All three methods allow to use the CSS selectors, which are the most convenient way of selecting elements. The selector '#cards span' means that we want to find all the span elements, placed inside the one which id attribute is equal to 'cards'. CSS class flipped is responsible for the animation of an element. More about selecting elements can be read in the following article - "Selectors API and classList property".
Animations
You can animate HTML elements using the CSS special properties or you can change the element style properties over time. You can make simple animations using the CSS transitions and more complex thanks to the animation. We use animation to flip suit of cards in our example.
[].slice.apply(document.querySelectorAll('#cards span')).forEach(function (el) {
    el.addEventListener('click', function (evt) {
        evt.stopPropagation();
    	if(!this.classList.contains('flipped')) {
            this.classList.add('flipped');
            this.addEventListener('webkitAnimationEnd',function animationComplete(){
            	this.addEventListener('webkitAnimationEnd',animationComplete);
            	this.classList.remove('flipped');
            });
    	}
    });
});
In the following snippet we move a div element, changing its position over time using the window.requestAnimationFrame. You can also use the setInterval or setTimeout, however requestAnimationFrame has better performance.
window.addEventListener('click',function startAnimation(evt){
    cards.targetX = evt.pageX;
    cards.targetY = evt.pageY;
    moveBoard();
});
function moveBoard() {
    var dx = (cards.targetX - cards.offsetLeft)*0.2;
    var dy = (cards.targetY - cards.offsetTop)*0.2 ;

    cards.style.left = (cards.offsetLeft + dx) + 'px';
    cards.style.top = (cards.offsetTop + dy)+'px';

    if(Math.abs(dx)<0.5 && Math.abs(dy)<0.5) {
        cards.style.left = cards.targetX+'px';
        cards.style.top =  cards.targetY+'px';
    } else {
        window.requestAnimationFrame(moveBoard);
    }
}
There are also some special libraries for animation, which have a (mentioned earlier) timeline and allow to group a sequence of animations. Those libraries are for example - TweenJS and GSAP. Of course MooTools and jQuery also have some features and can be extended using plug-ins in order to support more advanced animations.
SVG (2D vector graphics)
SVG (Scalable Vector Graphics) as the name suggests is an element that allows to embed vector graphics. The newest specification has broad support across all modern browsers. In SVG you can apply filters, masks, transformations and animations to graphics elements.
You can create graphics using special SVG tags. You can also use some JavaScript libraries (e.g. svg.js, snap.svg) and create SVG content dynamically. Example of an SVG animated element:
<svg xmlns="http://www.w3.org/2000/svg" xmlns:xlink="http://www.w3.org/1999/xlink" width="430" height="230">
    <circle cx="30" cy="30" r="25" style="stroke: none; fill: #ff0000;">
        <animate attributeName="cx" attributeType="XML" from="30" to="400" begin="0s" dur="5s" fill="remove" repeatCount="1" />
        <animate attributeName="cy" attributeType="XML" from="30" to="200" begin="0s" dur="2.5s" fill="remove" repeatCount="1" />
        <animate attributeName="cy" attributeType="XML" from="200" to="30" begin="2.5s" dur="2.5s" fill="remove" repeatCount="1" />
        <animate attributeName="cx" attributeType="XML" from="400" to="30" begin="5s" dur="5s" fill="remove" repeatCount="1" />
    </circle>
</svg>
JavaScript code, using svg.js, which will create the same SVG as an animated element:
var draw = SVG(document.body).size(430, 230)
var circ = draw.circle(30, 30).attr({ fill: '#f00' });
circ.animate(2500,'=',0).move(200,200).after(function(){
    circ.animate(2500,'=',0).move(400,30).after(function(){
        circ.animate(2500,'=',0).move(30,30);
    });
});
Canvas (2D bitmap graphics)
The canvas element allows to draw any shapeand get context to create 2D or 3D graphics. However, we use the word canvas regarding 2D graphics. The canvas element is responsible for creating bitmap graphics - CanvasRenderingContext2D.
var canvas = document.querySelector('#output');
var ctx = canvas.getContext('2d');

var begX=30;
var begY=30;

function animate1() {
    ctx.clearRect(0, 0, canvas.width, canvas.height);
    ctx.beginPath();
    ctx.arc(begX++, begY++, 30, 0, Math.PI*2, true);
    ctx.closePath();
    ctx.fillStyle='#FF0000';
    ctx.fill();
    if(begX>200) {
        animate2();
    } else {
         window.requestAnimationFrame(animate1);
    }
}
function animate2() {
    ctx.clearRect(0, 0, canvas.width, canvas.height);
    ctx.beginPath();
    ctx.arc(begX++, begY--, 30, 0, Math.PI*2, true);
    ctx.closePath();
    ctx.fillStyle='#FF0000';
    ctx.fill();
    if(begY>30) {
        window.requestAnimationFrame(animate2);
    } else {
        animate3();
    }
}
function animate3() {
    ctx.clearRect(0, 0, canvas.width, canvas.height);
    ctx.beginPath();
    ctx.arc(begX--, begY, 30, 0, Math.PI*2, true);
    ctx.closePath();
    ctx.fillStyle='#FF0000';
    ctx.fill();
    if(begX>30) {
        window.requestAnimationFrame(animate3);
    }
}

animate1();
Instead of pure JavaScript you can also use some specialized libraries, which are simpler to use and have built-in support of animations e.g. FabricJS, bHive.
WebGL (3D graphics)
WebGL also uses the canvas element by using different context types. WebGL is a quite new specification, but has good support across all modern browsers. You can use pure JavaScript - "WebGL Tutorial", tutorial SceneJS part 1, part 2 to build 3D graphics, but much more convenient is to use libraries like: three.js, SceneJS.
Video and audio
There are two special elements responsible for video and audio playback. The following snippet shows the simplest way to embed video and audio:
<p>Example video (mp4 video file)</p>
<video width="400" controls>
      <source src="http://vjs.zencdn.net/v/oceans.mp4" type="video/mp4">
</video>

<p>Example mp3 (2ROCK radio, mp3 streaming)</p>
<audio controls>
      <source src="http://streaming.radionomy.com/2ROCK" type="audio/mpeg">
</audio>
You can also use some special libraries like Video.js, which have additional features, e.g. allows to skin player. You can find more libraries in this "HTML5 Video Player Comparison". The tutorial "HTML5 Video" explains the basics how to use the video tag and the article "Video on the web" can extend your knowledge about things related to video like containers and codecs.
Summary
We hope this article together with another one, titled "JavaScript vs ActionScript" will give flash developers and begginers a basic understanding of some fundamental concepts of JavaScript and will be a good point towards developing for the Tizen platform. In the next step you can move to some more advanced materials like creating games using JavaScript engines - PixiJS, PhaserJS or frameworks like BackboneJS.