Creating a simple Mars Lander game using the Kinetic.js library.
PUBLISHED
Introduction
If you want to create a web game nowadays, you will surely have to use the <canvas> HTML5 element in your project. The <canvas> DOM element is essential to use for game projects, unfortunately it lacks a good abstraction layer targeted especially for games and canvas based multimedia applications. All over the web you can find many canvas libraries helping manage the <canvas> element. But one of the most interesting libraries is the Kinetic.js library. It has a rich API, enabling you to create shapes, animated sprites, draggable objects, layers, animations, transitions, text layers and many more. Although it doesn’t support WebGL, but still it is a “must know” library for any web game developer.
This article describes the most important steps in creation of a simple lander game engine, named “Mars Lander” using the Kinetic.js library. We will show you the basic concepts behind creation of such game with Kinetic for the Tizen platform. The article will focus on the most specific functionalities of the Kinetic.js and the Mars Lander game. For further clues how to build the game, please refer to the sample application MarsLander.wgt provided with this article, which has been tested on the Tizen SDK 2.2.1.
You can obtain additional information about this library at http://kineticjs.com/ and the complete documentation for the library can be found here: http://kineticjs.com/docs/ .
Setting up Kinetic.js
In order to setup Kinetic for a Tizen project, first you need to download it from the official web page and unpack the archive. Then put the kinetic-vX.X.X.min.js (where X is the version number) library into your Tizen project js library folder. The next thing to do is to add the library to your <script> tag in the index.html document.
<script src="js/kinetic-v5.1.0.min.js"></script>
That is all in terms of integrating the library with your Tizen project. Having done that, we can move further. The second important thing in our game project will be ensuring that we can easily access the requestAnimationFrame() function. Many libraries for canvas do it by themselves, but in Kinetic.js we have to ensure that everything is running smoothly by ourselves. We can do that with the simple JavaScript code below.
window.requestAnimationFrame = window.requestAnimationFrame || window.mozRequestAnimationFrame || window.webkitRequestAnimationFrame || window.oRequestAnimationFrame;
Although Tizen uses the webkitRequestAnimationFrame() and we could use the prefixed function, but it is still better to use this universal code to ensure that we won’t have any problems accessing this important function in a simpler, non-prefixed way.
Developing the Mars Lander game - preparations
What we want to accomplish is a game engine which is enabling the player to control a lander which must land on a landing pad on the surface of Mars. From the graphical assets we need now a background, an animation sprite of the lander craft and a graphic of the landing pad. We will also have to implement a kind of HUD for the player in order to inform him about various parameters of the lander, but this can be done with Kinetics’ text fields and fonts available in the system. Particularly we want to achieve an effect similar to the Mars Lander game screens in figure 1.
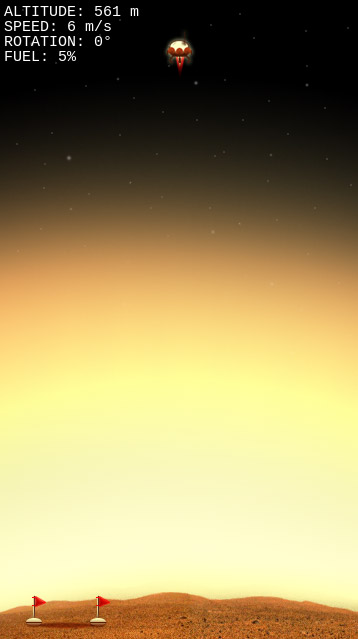
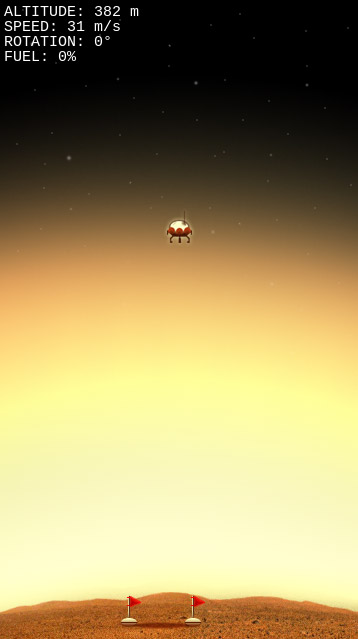
Figure 1 – preview of the MarsLander.wgt application (2 random landings in different stages).
As you can see on the screenshots we need to show in the HUD information about the status of the lander. Those will be altitude, speed, rotation and the fuel level inside the lander. They will be crucial later in determining if the lander has crashed or has landed successfully. But we need to start by accessing the accelerometer controls and converting the readouts to a proper format for the Mars Lander game. The following code will do the trick for us.
[…]

var accelerationX, accelerationY;
var intX, intY, intZ;

[…]

window.addEventListener("devicemotion", accelerometerUpdate, true);

function accelerometerUpdate(event) {

    	        var accelerationX = event.accelerationIncludingGravity.x;
		var accelerationY = event.accelerationIncludingGravity.y;
		var accelerationZ = event.accelerationIncludingGravity.z;

			intX = Math.floor(accelerationX);
			intY = Math.floor(accelerationY) - 3;
			intZ = Math.floor(accelerationZ);

    }

[…]
We need to add a listener to the window object. It will listen for the devicemotion event and then invoke the accelerometerUpdate function. It will also pass in an object with the acceleration from the accelerometer installed in the device to the function's body. Then we can store and use those readouts to manipulate the behavior of our lander. You have probably noticed the “-3” on the Y axis. We need to do it in order to set a more comfortable position of the phone for the user in order to start the lander's breaking thruster.
Loading the game assets
The next step is to load our graphical assets using Kinetic.js. Unfortunately Kinetic.js doesn’t have an internal function for loading up multiple graphical assets. In a normal situation it can load one asset at a time, by invoking an onload() handler function for the asset. Then when the loading of the asset is complete we can tell Kinetic.js to add that asset to the stage. But in order to load up many assets at the same time we can use the following code.
[…]

var images = {}; // this empty object will hold later our loaded images

[…]

var sources = { // we define here the list of our assets to load
            bg: 'images/bg.png',
            lander: 'images/landerspritesheet.png',
            landingpad: 'images/landingpad.png'
          };

    loadImages(sources); // we start here the loading process

    function loadImages(sources) { // this function will load our assets

        var loadedImages = 0;
        var numImages = 0;
        for(var src in sources) {
          numImages++;
        }
        for(var src in sources) {
          images[src] = new Image();
          images[src].onload = function() {
            if(++loadedImages >= numImages) {

            	buildGame();

            }
          };
          images[src].src = sources[src];

        }
      }

function buildGame() {

[…]

}

[…]
All the work happens in the loadImages() function. We pass in the object with the source paths of the assets in key-value pairs. Then we iterate with the first loop through the sources object to determine how many images must be loaded in order to launch the game. Then we iterate with the second loop to actually start the loading process of each asset. Also we assign the onload() callback to every asset. And when the asset has been loaded the if statement checks if the loadedImages variable is higher or equal to the total number of images (numImages). If it is not, the function loads another image, but if it is true then the function starts the buildGame() function in which we can easily add our assets to the game stage, without worrying about the loading status of the images.
Creating game objects and placing the assets on the stage
Now it is finally the time to use Kinetic.js to compose the stage of our game and prepare the game objects. All of this needs to be done inside the buildGame() function. For a starter we can create the game stage. The following code does the trick. We need to specify in the container parameter the id of the <div> in which Kinetic.js will create dynamically a <canvas> object we will draw on. This is a neat feature indeed. Most of other canvas rendering engines need a created earlier <canvas> DOM element. The next step is to specify the width and height of the game. You can get it form the gameWidth and gameHeight parameters, which earlier were acquired from the window.innerWidth and window.innerHeight.
[…]

stage = new Kinetic.Stage({
        container: 'container',
        width: gameWidth,
        height: gameHeight
      });

[…]
The next thing to do is to setup layers for different assets of our game with Kinetic.js. We will have separate layers for the background, game objects, the landing pad and the ui HUD. Later we will add our assets on those layers, and then the layers to our game stage. The following code in the MarsLander.wgt creates the necessary layers.
[…]

        backGroundLayer = new Kinetic.Layer();
        gameLayer = new Kinetic.Layer();
	padLayer = new Kinetic.Layer();
	uiLayer = new Kinetic.Layer();

[…]
Having created the layers we can finally insert the background of the game - our first asset on the backGroundLayer. This simple code will create our asset in Kinetic.js
[…]

background = new Kinetic.Image({
    	                x: 0,
		        y: 0,
		        image: images.bg,
		        width: 360,
		        height: 640
	       });

	       backGroundLayer.add(background);

[…]
It is worth mentioning that you have to pass in the x and y coordinates of the graphic asset to be shown, the width and height and the source. In this case as we have loaded our assets in the images object we need to call the images.bg to retrieve the loaded background asset. The last step to do is to add our background to the backGroundLayer. Of course if you run your code now, nothing will happen since we don’t have a render loop in our program. But before creating the render loop we need to create both JavaScript classes for our lander and for the landing pad. To see how the landing pad class is created please refer to the MarsLander.wgt source code attached to this article. Also while creating the Ship class, we will show how to create an animated sprite in Kinetic.js. We assume that you know the basic principles of object oriented programming so we will focus more on creating sprites in Kinetic.js. Below you can see how our Ship class looks like. We have omitted the getter / setter section because it is self-explanatory and can be viewed in the source code of the game.
[…]

function Ship(_x, _y) { // our lander ship class

    		this.lander = new Kinetic.Sprite({
	           x: _x,
	           y: _y,
	           image: images.lander,
	           animation: 'propulsion_off',
	           animations: {
	             propulsion_off: [
	               // x, y, width, height
                        0,0,33,61
	             ],
	             propulsion_on: [
	               // x, y, width, height
	               33,0,33,61,
	               66,0,33,61,
	               99,0,33,61
	             ]
	           },
	           frameRate: 25,
	           frameIndex: 0
	         });

    		gameLayer.add(this.lander);
    		this.lander.start();


[…]
![]()
Figure 2 – preview of the landerspritesheet.png
As you can see the function which serves as a class for our ship object accepts only two parameters x and y. The Mars Lander will be placed on those x and y coordinates only at the time we instantiate it on the stage. You can see in the above code that creating an animated sprite in Kinetic.js is similar to creating a static image. The difference is only in the object creation (new Kinetic.Sprite) and in additional variables. For example the variable animation tells Kinetic which animation the sprite should play by default. The animations variable setups the animations based on the images.lander spritesheet (figure2) assigned earlier in the image parameter. And as you can easily see we have two animation arrays for our lander. The ‘propulsion_on’ and ‘propulsion_off’ animations. Inside them you describe the cut off coordinates from the spritesheet for every frame, by setting its x, y positions and width and height. You should also specify the frame rate (speed) of the animation and from which frame the animation should start with the frameIndex parameter. Then you need to add the lander sprite to the gameLayer. And you start animating the sprite using the start() function. In the code below you can see an exaggerated example how we can handle the animation in our Ship class with the setThrust() method. We just invoke the animation() function with the specific animation name as a parameter we want the sprite to play for us. Simple as that.
[…]
        	this.setThrust = function(_thrust) {

    			switch(_thrust) {

	    			case "up":
	    				this.lander.animation('propulsion_on');
	    			break;

	    			case "down":
	    				this.lander.animation('propulsion_off');
	    			break;
    			}
    		}
    }

[…]
Creating the HUD
We also need the game HUD – text fields with information about the current flight state of our lander. In order to create one we need to learn how Kinetic.js creates text fields. And it is as simple as creating Kinetic.Image() and Kinetic.Sprite() earlier. Look at the example below from MarsLander.wgt
[…]

meters = new Kinetic.Text({
          x: 5,
    	  y: 5,
    	  text: '',
    	  fontSize: 15,
    	  fontFamily: 'Courier',
    	  fill: 'white'
    	});

[…]
As you can see creating text fields is very easy and the parameters of the Kinetic.Text() object are almost the same like in plain CSS. You can manipulate the x and y position, the size of the text , font type and font color (fill). Also please note that you can dynamically change the text layers’ text value by invoking a setText(“your text”) function on the text object. In the MarsLander.wgt we have shown how to create a complete HUD for the game including the altitude, speed, rotation and fuel displays. Please look inside the game code to get more insights about that topic.
Let’s move the game
As for now we couldn’t see the results of our coding, because the layers holding our assets haven’t been added to the stage we have created earlier. Now we can add those layers to the stage by using the add() method and specyfing a Kinetic.js layer we want to add. Also the game didn’t have a render loop. In order to achieve rendering in Kinetic.js we need to setup a classical render loop like in most of other rendering engines. Therefore we need to make a draw() function which will be started once and invoked by the requestAnimationFrame() function all the time in order to perform logical and rendering operations in our game.
[…]

     stage.add(backGroundLayer);
     stage.add(padLayer);
     stage.add(gameLayer);
     stage.add(uiLayer);

[…]

function draw() {

     /* Your game logic, sprite, image movement goes here */

	backGroundLayer.batchDraw();
	padLayer.batchDraw();
	gameLayer.batchDraw();
        uiLayer.batchDraw();

	requestAnimationFrame(draw);
}

draw(); // run this only once and it will call itself all the time with requestAnimationFrame().

[…]
You probably have noticed that in the code above, inside the render loop there are names of the Kinetic.js layers we have earlier created for holding the game assets on the stage. We need to execute in that render loop the batchDraw() function on every layer, so we can tell Kinetic to render that specific layer. Now our game starts to “move”. In order to check the game logic behind the steering and physics of the lander please look inside the MarsLander.wgt source code as this wasn’t specifically the topic of this article. And please do study carefully the source codes of the game including the comments next to the important lines of code so you can understand how Kinetic.js can be used in gaming.
Summary
This article describes how to use Kinetic.js in web game development for the Tizen Platform. It has been shown how to setup the stage, load the assets into the game, create images and sprites. You also read how to create a basic render loop for Kinetic and how to batch render the Kinetic layers. We hope that you have found this article useful in terms of creating game content for the web and the Tizen platform. For more information please refer to the official Kinetic.js website. Also please take your time to carefully study the source code of the game in order to get the most of this article.