Accessing Heart Rate Monitor (HRM) Sensor data for Native applications
PUBLISHED
What is Heart Rate Monitor Sensor?
The Heart Rate Monitor (HRM) sensor measures a person's heart rate in real time.
Tizen provides interfaces and methods to manage sensor data from various sensors on the device. The main purpose of a sensor is to provide a value for the relevant parameter. In native application development, accessing the gear’s Heart Rate Monitor (HRM) sensor data is quite straight forward. The main obstacles with reading from the HRM are getting the right permissions and utilization of Sensor API.
We will demonstrate how to manage HRM sensor, retrieve information from the sensor, get the changed value and show in a simple wearable app.
This simple app contains a UI that has two buttons: ‘Start’ & ‘Stop’ and a Label that will show the HRM Sensor data.
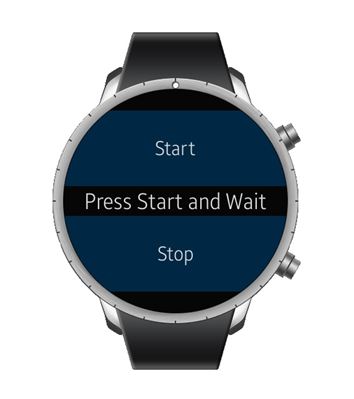
Fig 1: UI of the app
Steps to create a simple Native application
Step-1: Add header
To use the functions and data types of the Sensor API (in mobile and wearable applications), include the header file in your application:
#include <sensor.h>
Step-2: Initialization
In the tizen-manifest.xml, the required privileges should be added:
http://tizen.org/privilege/healthinfo
Step-3: Check if sensor is supported and get a handle for the sensor
sensor_type_e type = SENSOR_HRM;
sensor_h sensor;

bool supported;
int error = sensor_is_supported(type, &supported);
if (error != SENSOR_ERROR_NONE) {
    dlog_print(DLOG_ERROR, LOG_TAG, "sensor_is_supported error: %d", error);
    return;
}

if(supported){
    dlog_print(DLOG_DEBUG, LOG_TAG, "HRM is%s supported", supported ? "" : " not");
    sprintf(out,"HRM is%s supported", supported ? "" : " not");
    elm_object_text_set(event_label, out);
}
Step-4: Create an event listener for your sensor
// creating an event listener
error = sensor_create_listener(sensor, &listener);
if (error != SENSOR_ERROR_NONE) {
    dlog_print(DLOG_ERROR, LOG_TAG, "sensor_create_listener error: %d",error);
    return;
}
Step-5: Registering sensor event
void on_sensor_event(sensor_h sensor, sensor_event_s *event, void *user_data){
    // Select a specific sensor with a sensor handle
    sensor_type_e type;
    sensor_get_type(sensor, &type);

    switch (type) {
    case SENSOR_HRM:
    	dlog_print(DLOG_INFO, LOG_TAG, "%d" , event->values[0]);
    	char a[100];
    	sprintf(a,"%f", event->values[0]);
    	elm_object_text_set(event_label, a);
    	break;
    default:
        dlog_print(DLOG_ERROR, LOG_TAG, "Not an HRM event");
    }
}
- Table: Measurement data detected by the HRM sensor
| Measurement | Type | Range |
| values[0]: Beats per minute | Float |
Min. value = 0, Max. value = 220 |
Step-6: Register callback for sensor value change
// Callback for sensor value change
error = sensor_listener_set_event_cb(listener, min_interval, on_sensor_event, user_data);
if (error != SENSOR_ERROR_NONE) {
    dlog_print(DLOG_ERROR, LOG_TAG, "sensor_listener_set_event_cb error: %d", error);
    return;
}
Step-7: Start the sensor listener
error = sensor_listener_start(listener);
Step-8: When the “Start” button is pressed, the sensor start callback event is called.
start = _new_button(ad, box, "Start", _sensor_start_cb);
Step-9: When the “Stop” button is pressed, the sensor stop callback event is called.
stop = _new_button(ad, box, "Stop", _sensor_stop_cb);
Step-10: Stop the sensor listener.
error = sensor_listener_stop(listener);
Step-11: Finally, destroy listener event.
error = sensor_destroy_listener(listener);
After running the sample code, you will be able to see as screenshots below:
Please check attachment for sample code.

Fig 2: When the start button is pressed, the HRM data is shown
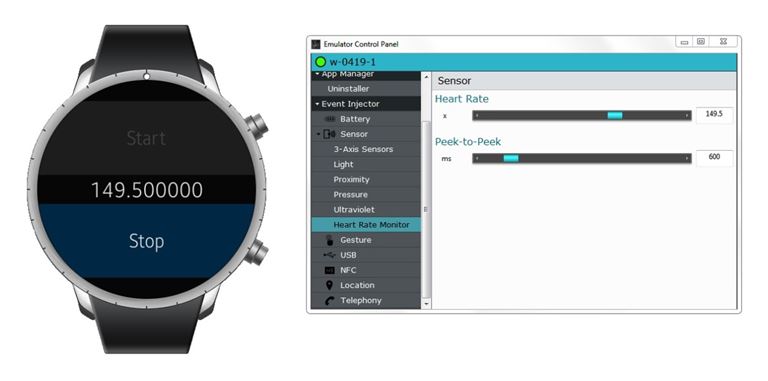
Fig 3: The output changes, when the value is changed from Control panel
Useful references
https://developer.tizen.org/development/tutorials/native-application/sys...
https://developer.tizen.org/development/api-guides/native-application/sy...