Sample Game using HTML5 Canvas
PUBLISHED
Overview
This article demonstrates the development of a sample game using HTML5 canvas. The goal of the game is to control little angel & jump on the two kinds of platforms - orange (regular ones) and green (super high jump springboards). The game ends when the angel falls down to the bottom of the screen. There are five parts in developing this game. They are
1. Creating Background
2. Creating Characters and Animations
3. Controls
4. Creating Platforms and Collisions
5. Scrolling and Game states
1 Creating Background
This part of the article explains how to draw the background using "Canvas" drawing functions. A canvas is a rectangular area on an HTML page, and it is specified with the <canvas> element. To draw the background first create a index.html and style.css as shown below
index.html
 <div data-role="page">
        <div data-role="header" data-position="fixed">
            <h1>Stairs game</h1>
        </div>

        <div data-role="content">
           <canvas id="c" >< /canvas>
           <audio id="soundEfx" src="gameover.mp3" style="display: none;"></audio >
		   <audio id="game_id" src="Game.mp3" style="display: none;">< /audio>
           <audio id="jump_id" src="jumping.mp3" style="display: none;"></audio >
        </div>

        <div data-role="footer" data-position="fixed">
          </div>
style.css
body {
    margin:0px;
    padding:0px;
    text-align:center;
  }

  canvas{
    outline:0;
    border:1px solid #000;
    margin-left: auto;
    margin-right: auto;
  }
Now the Canvas with unique id ('c') is ready, so that user can start drawing a clear background with a particular colour.
    var width = 320,
        height = 500,
        c = document.getElementById('c'),
        ctx = c.getContext('2d');

        c.width = width;
        c.height = height;

     var clear = function(){
        ctx.fillStyle = '#d0e7f9';
        ctx.clearRect(0, 0, width, height);
        ctx.beginPath();
        ctx.rect(0, 0, width, height);
        ctx.closePath();
        ctx.fill();
}
In the above code 'width', 'height' variables are width and height of the canvas respectively. The variables 'c.width' and 'c.height' are setting the canvas size. The object 'getContext("2d")' is a built-in HTML5 object, which has methods for drawing paths, boxes, circles, text, images, and more. In the above code "ctx.rect(0, 0, width, height)" will draw the rectangle from point (0, 0) to (width, height) covering whole canvas and "ctx.fill()" will fill the rectangle with the colour specified using "ctx.fillstyle" variable.
Now the user can see a single coloured background which is boring, so draw some clouds( not regular clouds, but simple, semitransparent circles imitating clouds) on the background. First draw some circles at random places of canvas, each with different size and transparency and keep all the information about circles in an array.
var howManyCircles = 10, circles = [];

for (var i = 0; i < howManyCircles; i++)
        circles.push([Math.random() * width, Math.random() * height, Math.random() * 100, Math.random() / 2]);

var DrawCircles = function(){
        for (var i = 0; i < howManyCircles; i++) {
                ctx.fillStyle = 'rgba(255, 255, 255, ' + circles[i][3] + ')';
                ctx.beginPath();
                ctx.arc(circles[i][0], circles[i][1], circles[i][2], 0, Math.PI * 2, true);
                ctx.closePath();
                ctx.fill();
        }
};
In the above code the "circles" array consists of 'x' and 'y' positions, radius(from 0-100) and transparency(from 0-0.5) of the circle. In "DrawCircles" function ctx.arc(circles[i][0], circles[i][1], circles[i][2], 0, Math.PI * 2, true) is used to draw arcs (circles, or parts of circles) where the first two arguments are 'x' and 'y' co-ordinates, the third and fourth arguments are 'StartAngle' and 'EndAngle' of the 'arc'. For circle the 'EndAngle' is always "PI*2".
Create another function with one 'Number' type argument, which moves clouds down given number of pixels. When particular circle disappears under the canvas, it will move it on the top with changed position X, radius and transparency
var MoveCircles = function(e){
        for (var i = 0; i < howManyCircles; i++) {
                if (circles[i][1] - circles[i][2] > height) {
                        circles[i][0] = Math.random() * width;
                        circles[i][2] = Math.random() * 100;
                        circles[i][1] = 0 - circles[i][2];
                        circles[i][3] = Math.random() / 2;
                }
                else {
                        circles[i][1] += e;
                }
        }
};
Create the main "GameLoop" function and call every other function inside it.
var GameLoop = function(){
        clear();
        DrawCircles();
        MoveCircles(5);
        gLoop = setTimeout(GameLoop, 1000 / 50);
}

GameLoop();
2 Creating Characters and Animations
Create an object ('player') representing main character with all necessarily methods and attributes.
var player = new (function(){
        var that = this;
        that.image = new Image();

        that.image.src = "angel.png"
        that.width = 65;
        that.height = 95;
        that.frames = 1;
        that.actualFrame = 0;
        that.X = 0;
        that.Y = 0;

        that.setPosition = function(x, y){
                that.X = x;
                that.Y = y;
        }

        that.interval = 0;
        that.draw = function(){
                try {
                        ctx.drawImage(that.image, 0, that.height * that.actualFrame, that.width, that.height, that.X, that.Y, that.width, that.height);
                }
                catch (e) {
                };
                }
})();
player.setPosition(~~((width-player.width)/2), ~~((height - player.height)/2));
In the above code create new object based on function and assign its return value to the 'player' variable. Now create new Image and set it's source to the 'angel.png'(download it from the widget file uploaded at the end of this document). Set the 'width' and 'height' of the image to 65 and 95 pixels respectively. In 'that.draw()' function, ctx.drawImage(that.image, 0, 0, that.width, that.height, that.X, that.Y, that.width, that.height) will cut source image and paste it into destination one (canvas). The method player.setposition(~~((width-player.width)/2), ~~((height - player.height)/2)) will move the player to the centre of the screen. The symbol '~~' returns nearest lower integer from given float, which is equivalent to Math.floor(). Now "GameLoop()" will be updated with "player.draw()" method.
var GameLoop = function(){
        clear();
        MoveCircles(5);
        DrawCircles();
        player.draw();
        gLoop = setTimeout(GameLoop, 1000 / 50);
}
3 Controls
This part of the article explains about 'jumping' and 'falling' of 'player'. To define 'jumping' and 'falling' properties expand 'player' object with few more attributes.
 that.isJumping = false;
        that.isFalling = false;
        that.jumpSpeed = 0;
        that.fallSpeed = 0;

    that.jump = function() {
                if (!that.isJumping && !that.isFalling) {
                        that.fallSpeed = 0;
                        that.isJumping = true;
                        that.jumpSpeed = 17;
                }
        }

        that.checkJump = function() {
                var jmp_sound = document.getElementById("jump_id");
        	    jmp_sound.play();
                that.setPosition(that.X, that.Y - that.jumpSpeed);
                that.jumpSpeed--;
                if (that.jumpSpeed == 0) {
                        that.isJumping = false;
                        that.isFalling = true;
                        that.fallSpeed = 1;
                }

        }

        that.fallStop = function(){
                that.isFalling = false;
                that.fallSpeed = 0;
                that.jump();
        }

        that.checkFall = function(){
                if (that.Y < height - that.height) {
                        that.setPosition(that.X, that.Y + that.fallSpeed);
                        that.fallSpeed++;
                } else {
                        that.fallStop();
                }
        }
        player.setPosition(~~((width-player.width)/2), ~~((height - player.height)/2));
        player.jump();
In the above code state of the object is described by bool variables i.e; whether the player object is rising or falling? Each jumping & falling should have its speed values. The jumping of the player was initiated by 'that.jump' method. When 'jumping' action was initiated by 'jump()' method, initiative is taken by 'that.checkjump()' method. In the function 'that.checkjump()' that.setPosition(that.X, that.Y - that.jumpSpeed) will move object by number of pixels equal to current value of 'jumpSpeed'. The method 'that.checkFall()' will check whether the object meets the bottom of the screen. If the object doesn't meets the bottom of the screen then its position will be changed and fall speed will increase or else 'fallstop()' method will be called. The method 'that.fallStop()' will prevent the player from falling and will initiate to jump again. Now update the "GameLoop" function.
var GameLoop = function(){
        var game_sound = document.getElementById("game_id");
		game_sound.play();
        clear();
        MoveCircles(5);
        DrawCircles();
                if (player.isJumping)
                        player.checkJump();
                if (player.isFalling)
                        player.checkFall();
        player.draw();
        gLoop = setTimeout(GameLoop, 1000 / 50);
}
The 'player' can move sideways only. It jumps automatically, up/down movement depends on platforms. User can only command angel to move left or right. One more time it could be achieved by extending the player object with additional methods.
var player = new(function(){
		that.moveLeft = function(){
                if (that.X > 0) {
                        that.setPosition(that.X - 5, that.Y);
				}
		}
		that.moveRight = function(){
                if (that.X + that.width < width) {
                        that.setPosition(that.X + 5, that.Y);
				}
		}
});
Now bind the above functions to 'touch' events.
document.ontouchmove = function(e){
    	e.preventDefault();
    	   var touch = e.targetTouches[0];
    	   var out = {x:0, y:0};
    	   out.x = touch.pageX;
           out.y = touch.pageY;

    	if (player.X + c.offsetLeft > out.x) {
    		player.moveLeft();

    	} else if (player.X + c.offsetLeft < out.x) {
    		player.moveRight();
    	}
    }
4 Creating Platforms and Collisions
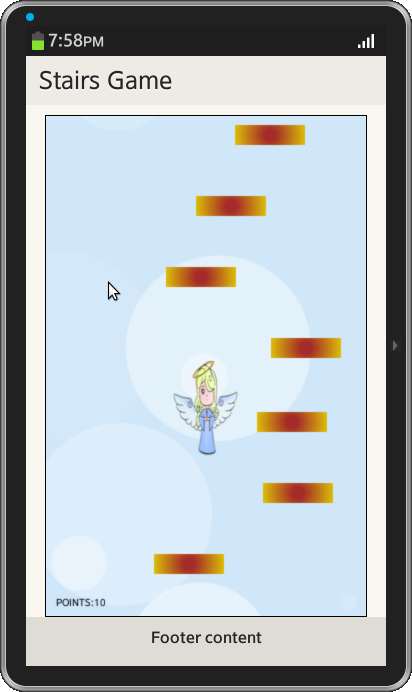
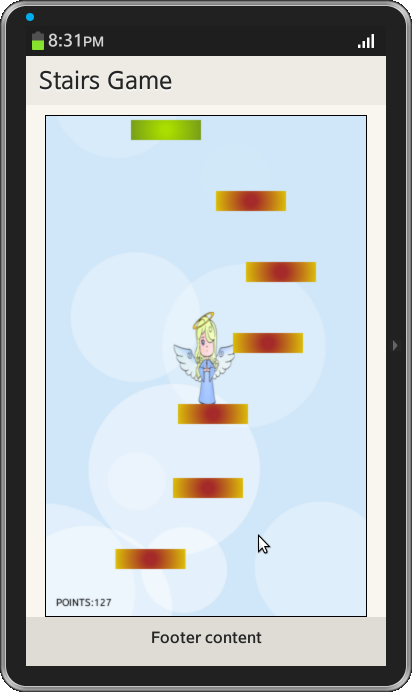
The player character is able to jump on two types of platforms, one is ordinary one (orange) and another is green one which gives extra speed and hyper-ultra-high jump. There are always seven platforms on the screen at a time. Now create platforms
var Platform = function(x, y, type){
                var that=this;

                that.firstColor = '#FF8C00';
                that.secondColor = '#EEEE00';
                that.onCollide = function(){
                        player.fallStop();
                };

                if (type === 1) {
                        that.firstColor = '#AADD00';
                        that.secondColor = '#698B22';
                        that.onCollide = function(){
                                player.fallStop();
                                player.jumpSpeed = 50;
                        };
                }

                that.x = ~~ x;
                that.y = y;
                that.type = type;

                that.draw = function(){
                        ctx.fillStyle = 'rgba(255, 255, 255, 1)';
                        var gradient = ctx.createRadialGradient(that.x + (platformWidth/2), that.y + (platformHeight/2), 5, that.x + (platformWidth/2), that.y + (platformHeight/2), 45);
                        gradient.addColorStop(0, that.firstColor);
                        gradient.addColorStop(1, that.secondColor);
                        ctx.fillStyle = gradient;
                        ctx.fillRect(that.x, that.y, platformWidth, platformHeight);
                };
                return that;
            };
In the above code function takes 'x' and 'y' positions and 'platform type'. If platform type is different than '1', set the color to 'orange' and call 'fallStop' method. It 'type' is equal to '1' platform colour is set to 'green' set jumpSpeed to '50'. After such an operation 'checkJump()' method will takes substituted '50' instead of default '17'(set in jump() method).
Now it's necessary to create function which will generate all that platform stuff and put it into platforms[] array. After that it will be nice to draw the platforms on the screen.
var nrOfPlatforms = 7,
	platforms = [],
	platformWidth = 70,
	platformHeight = 20;

var generatePlatforms = function(){
var position = 0, type;
	for (var i = 0; i < nrOfPlatforms; i++) {
		type = ~~(Math.random()*5);
		if (type == 0)
			type = 1;
		else
			type = 0;
		platforms[i] = new Platform(Math.random() * (width - platformWidth), position, type);
		if (position < height - platformHeight)
			position += ~~(height / nrOfPlatforms);
	}
};
Platform must be drawn on each frame, so updating GameLoop() is a must.
var GameLoop = function(){
	platforms.forEach(function(platform){
	platform.draw();
	});
};
Now platforms are created with two different colours but there is no interaction between angel and the platforms. But one small function 'checkCollision()' will handle everything.
var checkCollision = function(){
        platforms.forEach(function(e, ind){
                if (
                (player.isFalling) &&
                (player.X < e.x + platformWidth) &&
                (player.X + player.width > e.x) &&
                (player.Y + player.height > e.y) &&
                (player.Y + player.height < e.y + platformHeight)
                ) {
                        e.onCollide();
                }
        })
        }
Finally update the "GameLoop" with 'checkCollision' function.
var GameLoop = function(){
        var game_sound = document.getElementById("game_id");
		game_sound.play();
        clear();
        DrawCircles();
        MoveCircles(5);
                if (player.isJumping)
                        player.checkJump();
                if (player.isFalling)
                        player.checkFall();

         platforms.forEach(function(platform){
                platform.draw();
        });
        checkCollision();

        player.draw();
        gLoop = setTimeout(GameLoop, 1000 / 50);
}
5 Scrolling and Game states
This part of the article explains how the 'player character' will use the platforms. When the 'player' jump over the screen height, then stop him in the middle of the screen and move background and platforms in the opposite direction. To achieve this modify 'that.checkJump()' function.
that.checkJump = function() {
	if (that.Y > height*0.4) {

	    //if player is under about half of the screen - let him move

		that.setPosition(that.X, that.Y - that.jumpSpeed);
	}
	else {
		if (that.jumpSpeed > 10)
			points++;
			MoveCircles(that.jumpSpeed * 0.5);
			platforms.forEach(function(platform, ind){
				platform.y += that.jumpSpeed;

				if (platform.y > height) {
					var type = ~~(Math.random() * 5);
					if (type == 0)
						type = 1;
					else
						type = 0;
					platforms[ind] = new Platform(Math.random() * (width - platformWidth), platform.y - height, type);
				}
			});
}
When the platform moves outside the screen generate another one on the top, but not directly on 0-y, because there must be distance between the platforms. So first calculate how far it goes under the bottom, subtract the value from total height and generate platform on that Y with random X. To make everything harder give movement ability to some platforms. The higher the character will be, the faster platforms will move. To achieve this, first implement very simple points system, and after that modify a little Platform object and GameLoop() part responsible for drawing platforms.
var points = 0,
var Platform = function(x, y, type){
	that.isMoving = ~~(Math.random() * 2); //first, check if platform will be able to move (1) or not (0)
	that.direction= ~~(Math.random() * 2) ? -1 : 1;
};

var GameLoop = function(){
        clear();
        MoveCircles(5);
        DrawCircles();

        if (player.isJumping) player.checkJump();
        if (player.isFalling) player.checkFall();

        player.draw();
        //moving player.draw() above drawing platforms will draw player before, so platforms will be drawn over him. It looks better that way because sometimes angel 'sinks' in the platform with his legs.

        platforms.forEach(function(platform, index){
                if (platform.isMoving) {     //if platform is able to move
                        if (platform.x < 0) {
                                platform.direction = 1;
                        }
                        else if (platform.x > width - platformWidth) {
                                platform.direction = -1;
                        }
                                platform.x += platform.direction * (index / 2) * ~~(points / 100);
                        }
                platform.draw();
        });
}
Increasing points should be implement in 'player.checkJump()', after checking if player is in the middle of the screen
that.checkJump = function() {
	if (that.Y > height*0.4) {
        that.setPosition(that.X, that.Y - that.jumpSpeed);
	} else {
	if (that.jumpSpeed > 10) points++;
        MoveCircles(that.jumpSpeed * 0.5);
 }
Now its time to end the game. For this "GameOver()" function has to be written and also slight modification is required for "GameLoop()" function.
var state = true;
var GameLoop = function(){
if (state)
        gLoop = setTimeout(GameLoop, 1000 / 50);
}
var GameOver = function(){
    state = false;
     clearTimeout(gLoop);
     clear();
        ctx.fillStyle = "Black";
        ctx.font = "10pt Arial";
        ctx.fillText("GAME OVER", width / 2 - 60, height / 2 - 50);
        ctx.fillText("YOUR RESULT:" + points, width / 2 - 60, height / 2 - 30);
    }, 100);
};
Now determine when to stop the game and display 'GameOver' Screen. For this modify player's 'checkfall()' method
that.checkFall = function(){
    if (that.Y < height - that.height) {
        that.setPosition(that.X, that.Y + that.fallSpeed);
        that.fallSpeed++;
    } else {
        if (points == 0)
        that.fallStop();
        else
            GameOver();
    }
}
Screen Shots