使用HTML5 Canvas的示例游戏
PUBLISHED
概述
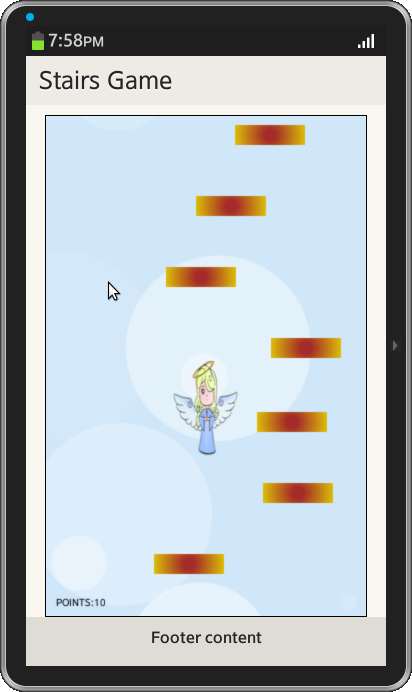
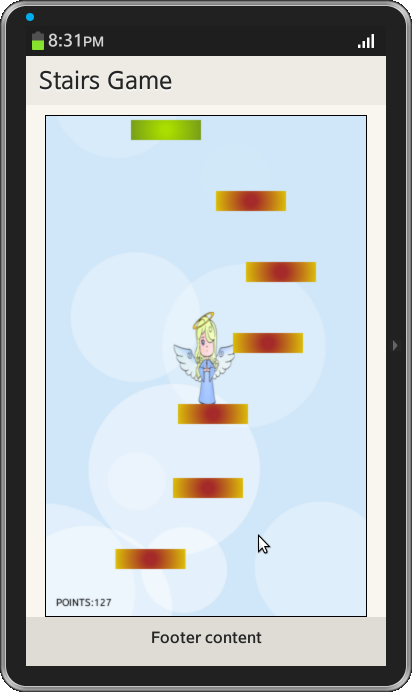
本文演示了如何用HTML5 canvas开发一个示例游戏。 该游戏的目标是要控制小天使,并且在两种平台之间跳跃,即是橙色 (通用颜色)和绿色(特别高的跳板)。 当天使掉到屏幕底部的时候,游戏就结束了。 开发这个游戏有五个部分。 他们是
1. 创建背景
2. 创建人物和动画
3. 控制
4. 创建平台和冲突
5. 滚动和游戏状态
1 创建背景
文章的这一部分解释如何用"Canvas"作画函数来画背景。 一个canvas就是在一个HTML页面上的一个矩形区域,用<canvas>元素指定。 要画背景首先要创建一个index.html和style.css,如下所示
index.html
 <div data-role="page">
        <div data-role="header" data-position="fixed">
            <h1>Stairs game</h1>
        </div>

        <div data-role="content">
           <canvas id="c" >< /canvas>
           <audio id="soundEfx" src="gameover.mp3" style="display: none;"></audio >
		   <audio id="game_id" src="Game.mp3" style="display: none;">< /audio>
           <audio id="jump_id" src="jumping.mp3" style="display: none;"></audio >
        </div>

        <div data-role="footer" data-position="fixed">
          </div>
style.css
body {
    margin:0px;
    padding:0px;
    text-align:center;
  }

  canvas{
    outline:0;
    border:1px solid #000;
    margin-left: auto;
    margin-right: auto;
  }
现在带有唯一id('c')的Canvas已经准备好了,因此用户可以用一种特定的颜色画一个干净的背景。
    var width = 320,
        height = 500,
        c = document.getElementById('c'),
        ctx = c.getContext('2d');

        c.width = width;
        c.height = height;

     var clear = function(){
        ctx.fillStyle = '#d0e7f9';
        ctx.clearRect(0, 0, width, height);
        ctx.beginPath();
        ctx.rect(0, 0, width, height);
        ctx.closePath();
        ctx.fill();
}
在上面的代码中,'width', 'height'变量分别是canvas的宽度和高度。 变量'c.width'和'c.height'用来设置canvas的大小。 'getContext("2d")'对象是一个内置的HTML5对象,它有用于画路径,盒子,圆,图像以及更多东西的方法。 在上面的代码中,"ctx.rect(0, 0, width, height)"会画从点(0, 0)到(width, height)的矩形,该矩形能覆盖整个canvas,"ctx.fill()"会用"ctx.fillstyle"变量用指定的颜色来填充该矩形。
现在用户可以看见一个单调颜色的背景,这个是枯燥的,于是我们在背景上面画一些云(不是通常的云,但是简单和半透明的像圆圈的云)。 首先随机在canvas上面画一些圆圈,每个都有不同大小和透明度,并将圆圈的所有信息都保存在一个数组。
var howManyCircles = 10, circles = [];

for (var i = 0; i < howManyCircles; i++)
        circles.push([Math.random() * width, Math.random() * height, Math.random() * 100, Math.random() / 2]);

var DrawCircles = function(){
        for (var i = 0; i < howManyCircles; i++) {
                ctx.fillStyle = 'rgba(255, 255, 255, ' + circles[i][3] + ')';
                ctx.beginPath();
                ctx.arc(circles[i][0], circles[i][1], circles[i][2], 0, Math.PI * 2, true);
                ctx.closePath();
                ctx.fill();
        }
};
在上面的代码中,"circles"数组包含'x'和'y'的位置,圆圈的半径(从0-100)和透明度(从0-0.5)。 在"DrawCircles"函数中 ctx.arc(circles [i][0], circles[i][1], circles[i][2] , 0, Math.PI * 2, true) 用于画弧线(圆圈,或部分圆圈),这里前两个参数是'x'和'y'座标,第三和第四个参数是'arc'的'StartAngle'和'EndAngle'。 对于圆圈来说,'EndAngle'总是"PI*2"。
另外创建带有一个'Number'类型参数的函数,该参数将云移动到给定的像素数。 当特殊的圆在canvas下面消失时,这会将它移到上面,随时修改位置X,半径和透明度。
var MoveCircles = function(e){
        for (var i = 0; i < howManyCircles; i++) {
                if (circles[i][1] - circles[i][2] > height) {
                        circles[i][0] = Math.random() * width;
                        circles[i][2] = Math.random() * 100;
                        circles[i][1] = 0 - circles[i][2];
                        circles[i][3] = Math.random() / 2;
                }
                else {
                        circles[i][1] += e;
                }
        }
};
创建主要的"GameLoop"函数,并在其中调用每一个其他函数。
var GameLoop = function(){
        clear();
        DrawCircles();
        MoveCircles(5);
        gLoop = setTimeout(GameLoop, 1000 / 50);
}

GameLoop();
2 创建人物和动画
创建一个对象 ('player')代表主要人物,带有所有必须的方法和属性。
var player = new (function(){
        var that = this;
        that.image = new Image();

        that.image.src = "angel.png"
        that.width = 65;
        that.height = 95;
        that.frames = 1;
        that.actualFrame = 0;
        that.X = 0;
        that.Y = 0;

        that.setPosition = function(x, y){
                that.X = x;
                that.Y = y;
        }

        that.interval = 0;
        that.draw = function(){
                try {
                        ctx.drawImage(that.image, 0, that.height * that.actualFrame, that.width, that.height, that.X, that.Y, that.width, that.height);
                }
                catch (e) {
                };
                }
})();
player.setPosition(~~((width-player.width)/2), ~~((height - player.height)/2));
在上面的代码中,基于函数创建新的对象,并将该函数的返回值赋给'player'变量。 现在创建新的图像并设置其来源为'angel.png'(从本文最后上传的控件文件中下载)。 将图像的'width'和'height'分别设置为65和95像素。 在'that.draw()'函数中,ctx.drawImage(that.image, 0, 0, that.width, that.height, that.X, that.Y, that.width, that.height)将会剪切源图像并且粘贴到目的地(canvas)。 这个方法 player.setposition(~~((width-player.width)/2), ~~((height - player.height)/2))会将玩家移动到屏幕中央。 符号'~~'返回离给定的浮点数最近的较小整数,它等于Math.floor()。 现在"GameLoop()"将会被"player.draw()"方法更新。
var GameLoop = function(){
        clear();
        MoveCircles(5);
        DrawCircles();
        player.draw();
        gLoop = setTimeout(GameLoop, 1000 / 50);
}
3 控制
文章的这个部分解释了'player'的'jumping'和'falling'。 要定义'jumping'和'falling'属性,则要用更多的属性去扩展'player'对象。
 that.isJumping = false;
        that.isFalling = false;
        that.jumpSpeed = 0;
        that.fallSpeed = 0;

    that.jump = function() {
                if (!that.isJumping && !that.isFalling) {
                        that.fallSpeed = 0;
                        that.isJumping = true;
                        that.jumpSpeed = 17;
                }
        }

        that.checkJump = function() {
                var jmp_sound = document.getElementById("jump_id");
        	    jmp_sound.play();
                that.setPosition(that.X, that.Y - that.jumpSpeed);
                that.jumpSpeed--;
                if (that.jumpSpeed == 0) {
                        that.isJumping = false;
                        that.isFalling = true;
                        that.fallSpeed = 1;
                }

        }

        that.fallStop = function(){
                that.isFalling = false;
                that.fallSpeed = 0;
                that.jump();
        }

        that.checkFall = function(){
                if (that.Y < height - that.height) {
                        that.setPosition(that.X, that.Y + that.fallSpeed);
                        that.fallSpeed++;
                } else {
                        that.fallStop();
                }
        }
        player.setPosition(~~((width-player.width)/2), ~~((height - player.height)/2));
        player.jump();
在上面的代码中,对象的状态由布尔变量描述,比如玩家对象是上升还是下降?每次跳跃和下落应该有其速度值。 玩家的跳跃由'that.jump'方法来初始化。 当'jumping'动作由'jump()'方法初始化后,主动权就交给了'that.checkjump()'方法。 在函数'that.checkjump()' 中,that.setPosition(that.X, that.Y - that.jumpSpeed) 会移动物体,将其像素点数等于'jumpSpped'的目前的数值。 'that.checkFall()'方法将会检查物体是否到了屏幕底部。 如果物体没有碰到屏幕底部,那么它的位置会被改变,并且下落速度会增加,否则'fallstop()'方法会被调用。 'that.fallStop()'方法会阻止玩家下落,并且会重新初始化跳跃过程。 现在更新"GameLoop"函数。
var GameLoop = function(){
        var game_sound = document.getElementById("game_id");
		game_sound.play();
        clear();
        MoveCircles(5);
        DrawCircles();
                if (player.isJumping)
                        player.checkJump();
                if (player.isFalling)
                        player.checkFall();
        player.draw();
        gLoop = setTimeout(GameLoop, 1000 / 50);
}
‘player'只可以横向移动。 它是自动移动的,上下移动是跟随平台的。 用户只能命令天使向左或向右移动。 还有一个,它可以通过以额外的方法扩展玩家对象来达成。
var player = new(function(){
		that.moveLeft = function(){
                if (that.X > 0) {
                        that.setPosition(that.X - 5, that.Y);
				}
		}
		that.moveRight = function(){
                if (that.X + that.width < width) {
                        that.setPosition(that.X + 5, that.Y);
				}
		}
});
现在绑定上面的函数到'touch'事件。
document.ontouchmove = function(e){
    	e.preventDefault();
    	   var touch = e.targetTouches[0];
    	   var out = {x:0, y:0};
    	   out.x = touch.pageX;
           out.y = touch.pageY;

    	if (player.X + c.offsetLeft > out.x) {
    		player.moveLeft();

    	} else if (player.X + c.offsetLeft < out.x) {
    		player.moveRight();
    	}
    }
4 创建平台和冲突
玩家人物能够在两种类型的平台之间跳跃,一个是普通的平台(橙色),另一个是绿色的平台,它提供额外的速度和超高的跳跃。 每个时刻在屏幕上总是有7个平台。 现在创建平台
var Platform = function(x, y, type){
                var that=this;

                that.firstColor = '#FF8C00';
                that.secondColor = '#EEEE00';
                that.onCollide = function(){
                        player.fallStop();
                };

                if (type === 1) {
                        that.firstColor = '#AADD00';
                        that.secondColor = '#698B22';
                        that.onCollide = function(){
                                player.fallStop();
                                player.jumpSpeed = 50;
                        };
                }

                that.x = ~~ x;
                that.y = y;
                that.type = type;

                that.draw = function(){
                        ctx.fillStyle = 'rgba(255, 255, 255, 1)';
                        var gradient = ctx.createRadialGradient(that.x + (platformWidth/2), that.y + (platformHeight/2), 5, that.x + (platformWidth/2), that.y + (platformHeight/2), 45);
                        gradient.addColorStop(0, that.firstColor);
                        gradient.addColorStop(1, that.secondColor);
                        ctx.fillStyle = gradient;
                        ctx.fillRect(that.x, that.y, platformWidth, platformHeight);
                };
                return that;
            };
在上面的代码中,函数使用'x'和'y'座标和'platform type'。 如果平台类型不同于'1',那么将颜色设置成'orange'并呼叫'fallStop'方法。 如果'type'等于'1',那么平台颜色会设置成'green',并设置jumpSpeed到'50'。 在这个操作后,'checkJump()'方法会用'50'替换默认值'17'(在jump()方法中设置)。
现在有必要创建函数,该函数会生成所有的平台,并将它放到platforms[]数组中。 在这以后,在屏幕上面画平台就容易了。
var nrOfPlatforms = 7,
	platforms = [],
	platformWidth = 70,
	platformHeight = 20;

var generatePlatforms = function(){
var position = 0, type;
	for (var i = 0; i < nrOfPlatforms; i++) {
		type = ~~(Math.random()*5);
		if (type == 0)
			type = 1;
		else
			type = 0;
		platforms[i] = new Platform(Math.random() * (width - platformWidth), position, type);
		if (position < height - platformHeight)
			position += ~~(height / nrOfPlatforms);
	}
};
平台必须画在每一帧上,于是必须要更新GameLoop()。
var GameLoop = function(){
	platforms.forEach(function(platform){
	platform.draw();
	});
};
现在已经创建了两个不同颜色的平台,但是在天使和平台之间还没有交互。 但是一个小的函数'checkCollision()'会解决所有问题。
var checkCollision = function(){
        platforms.forEach(function(e, ind){
                if (
                (player.isFalling) &&
                (player.X < e.x + platformWidth) &&
                (player.X + player.width > e.x) &&
                (player.Y + player.height > e.y) &&
                (player.Y + player.height < e.y + platformHeight)
                ) {
                        e.onCollide();
                }
        })
        }
最后,用'checkCollision'函数来更新”GameLoop“。
var GameLoop = function(){
        var game_sound = document.getElementById("game_id");
		game_sound.play();
        clear();
        DrawCircles();
        MoveCircles(5);
                if (player.isJumping)
                        player.checkJump();
                if (player.isFalling)
                        player.checkFall();

         platforms.forEach(function(platform){
                platform.draw();
        });
        checkCollision();

        player.draw();
        gLoop = setTimeout(GameLoop, 1000 / 50);
}
5 滚动和游戏状态
文章的这个部分解释了'player character'会如何使用平台。 当'player'跳出屏幕的高度,则在屏幕中间停止他,并按相反方向移动背景和平台。 这样就要修改'that.checkJump()'函数。
that.checkJump = function() {
	if (that.Y > height*0.4) {

	    //if player is under about half of the screen - let him move

		that.setPosition(that.X, that.Y - that.jumpSpeed);
	}
	else {
		if (that.jumpSpeed > 10)
			points++;
			MoveCircles(that.jumpSpeed * 0.5);
			platforms.forEach(function(platform, ind){
				platform.y += that.jumpSpeed;

				if (platform.y > height) {
					var type = ~~(Math.random() * 5);
					if (type == 0)
						type = 1;
					else
						type = 0;
					platforms[ind] = new Platform(Math.random() * (width - platformWidth), platform.y - height, type);
				}
			});
}
当平台移动到屏幕外面时,在顶部另外产生一个,但不是直接在 0-y,这是因为在平台之间必须有距离。 所以首先计算它离开底部有多远,从总的高度中减去这个值,并在那个Y上以随机的X产生平台。要使其更难,就让一些平台可以移动。 人物处的位置更高,平台就移动得更快。 要达到这个目标,首先实现很简单的点阵系统,在那以后,修改一点负责画平台的Platform对象和GameLoop()的部分。
var points = 0,
var Platform = function(x, y, type){
	that.isMoving = ~~(Math.random() * 2); //first, check if platform will be able to move (1) or not (0)
	that.direction= ~~(Math.random() * 2) ? -1 : 1;
};

var GameLoop = function(){
        clear();
        MoveCircles(5);
        DrawCircles();

        if (player.isJumping) player.checkJump();
        if (player.isFalling) player.checkFall();

        player.draw();
        //moving player.draw() above drawing platforms will draw player before, so platforms will be drawn over him. It looks better that way because sometimes angel 'sinks' in the platform with his legs.

        platforms.forEach(function(platform, index){
                if (platform.isMoving) {     //if platform is able to move
                        if (platform.x < 0) {
                                platform.direction = 1;
                        }
                        else if (platform.x > width - platformWidth) {
                                platform.direction = -1;
                        }
                                platform.x += platform.direction * (index / 2) * ~~(points / 100);
                        }
                platform.draw();
        });
}
增加点集应该在检查玩家是否在屏幕中央时,在'player.checkJump()'中实现。
that.checkJump = function() {
	if (that.Y > height*0.4) {
        that.setPosition(that.X, that.Y - that.jumpSpeed);
	} else {
	if (that.jumpSpeed > 10) points++;
        MoveCircles(that.jumpSpeed * 0.5);
 }
现在是时候结束游戏了。 这样'GameOver()'函数必须要完成,而且"GameLoop()"函数要做一点修改。
var state = true;
var GameLoop = function(){
if (state)
        gLoop = setTimeout(GameLoop, 1000 / 50);
}
var GameOver = function(){
    state = false;
     clearTimeout(gLoop);
     clear();
        ctx.fillStyle = "Black";
        ctx.font = "10pt Arial";
        ctx.fillText("GAME OVER", width / 2 - 60, height / 2 - 50);
        ctx.fillText("YOUR RESULT:" + points, width / 2 - 60, height / 2 - 30);
    }, 100);
};
现在决定什么时候停止游戏并显示'GameOver'画面。 这样要修改玩家的'checkfall()'方法
that.checkFall = function(){
    if (that.Y < height - that.height) {
        that.setPosition(that.X, that.Y + that.fallSpeed);
        that.fallSpeed++;
    } else {
        if (points == 0)
        that.fallStop();
        else
            GameOver();
    }
}
屏幕截图