Image Editor
PUBLISHED
Overview
This article demonstrates the use of "Pixastic" javascript library for image processing and editing. Link for pixastic javascript library - http://www.pixastic.com/lib/download/zip.php.
Following are the effects available with pixastic JS library to edit an image:
To select the above options, the web application has side bar which is implemented using Jquery plugin "sidr". Link for this library - https://github.com/artberri/sidr-package/archive/1.1.1.zip.
This library has two css files for two different themes of side bars( Dark and Light ).
The edited image is saved in phone memory using "tlib.logger.js" javascript library. Link for this library - https://github.com/Dashboard-X/html5demos/tree/master/penguin-jump_13721....
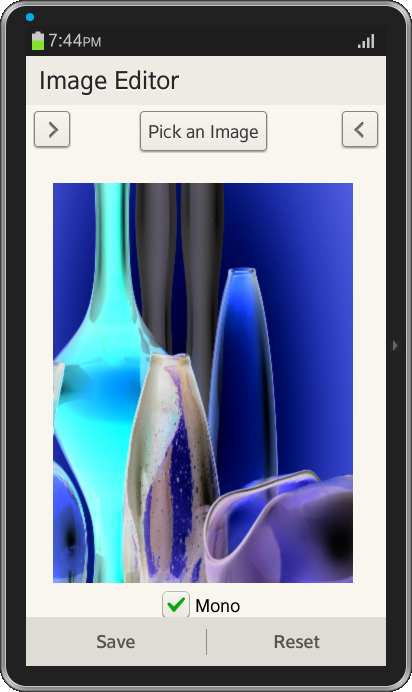
Image Editor HTML Page
The content area of the web application has a button which popups options to pick image from gallery or from camera using application control and this selected image is displayed on the content area. The content area also has buttons to open side bars from both left and right side of the page to select effects to be applied on the image. The footer has a tabbed menu to save the edited image on phone and reset effects applied on the image.
<a id="left-menu" data-role="button" data-inline="true" data-icon="arrow-r" style="float: left;"></a>
<a data-role="button" href="#pop_icon_text" data-inline="true" data-rel="popup">Pick an Image</a>
<a id="right-menu" data-role="button" data-inline="true" data-icon="arrow-l" style="float: right;"></a>
<div id="pop_icon_text" data-role="popup">
  <ul data-role="listview">
    <li class="ui-li-1line-bigicon1"><a href="#" onclick="openGallery();">
      <img class="ui-li-bigicon" src="./Images/Gallery.png"> <span class="ui-li-text-main">Gallery</span></a>
    </li>
    <li class="ui-li-1line-bigicon1"><a href="#" onclick="openCamera();">
      <img class="ui-li-bigicon" src="./Images/Camera.png"> <span class="ui-li-text-main">Camera</span></a>
    </li>
  </ul>
</div>
<br> <br><img src="" id="pic"/><br>
<div id="editOptions"></div>
Footer
<div data-role="tabbar">
  <ul>
    <li><a onclick="reset();">Reset</a></li>
    <li><a href="#popup_div" data-rel="popupwindow">Save</a></li>
  </ul>
</div>
<div id="popup_div" class="vertical" data-role="popupwindow" data-show-arrow="true" data-style="center" data-overlay-theme="a"
    class="ui-content" data-position-to="window"></br>
  <center>
    <label>Save Image As :</label></br>
    <input type="text" id="filename" style="width: 85%; cursor: pointer" placeholder="Enter file name"></br>
	<a onclick="save();" data-role="button" data-inline="true" style="border: 1px solid white; font-size: 18px">Save</a>
    <a data-role="button" data-inline="true" style="border: 1px solid white; font-size: 18px" onclick="cancel();">Cancel</a>
  </center>
  </br> </br>
</div>
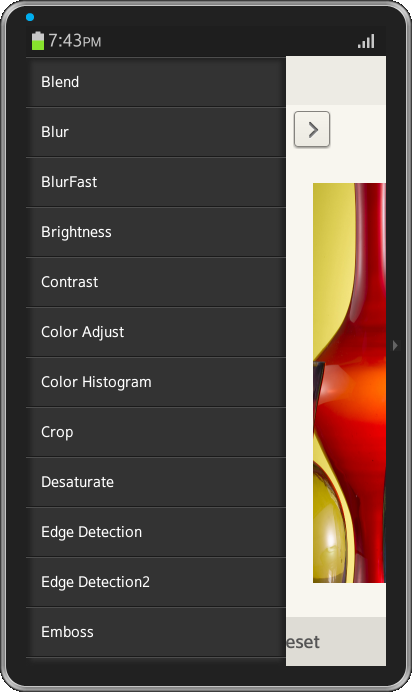
Side Bar
The side bar is shown both on left and right sides of the page. These side bars show the list of all the editing options provided by pixastic JS library. Side Bar - HTML
The belwo code displays the list of all effects provided by pixastiz JS library.
<div id="leftmenu" style="display: none;">
      <ul>
        <li><a onclick="blend();">Blend</a></li>
        <li><a onclick="blurr();">Blur</a></li>
        <li><a onclick="blurrfast();">BlurFast</a></li>
        <li><a onclick="brightnes();">Brightness</a></li>
        <li><a onclick="contrastt();">Contrast</a></li>
        <li><a onclick="colorAdjust();">Color Adjust</a></li>
        <li><a onclick="colorHistogram">Color Histogram</a></li>
        <li><a onclick="cropp();">Crop</a></li>
        <li><a onclick="desaturatee();">Desaturate</a></li>
        <li><a onclick="edgeDetect();">Edge Detection</a></li>
        <li><a onclick="edgeDetect2();">Edge Detection2</a></li>
        <li><a onclick="emboss();">Emboss</a></li>
        <li><a onclick="flipH();">Flip Horizontally</a></li>
        <li><a onclick="flipV();">Flip Vertically</a></li>
        <li><a onclick="gloww();">Glow</a></li>
    </ul>
</div>
<div id="rightmenu" style="display: none;">
    <ul>
        <li><a onclick="histogramm();">Histogram</a></li>
        <li><a onclick="huee();">Hue</a></li>
        <li><a onclick="saturation();">Saturation</a></li>
        <li><a onclick="lightness();">Lightness</a></li>
        <li><a onclick="invert();">Invert</a></li>
        <li><a onclick="laplace();">Laplace Edge Detection</a></li>
        <li><a onclick="lighten();">Lighten</a></li>
        <li><a onclick="mosaic();">Mosaic</a></li>
        <li><a onclick="noise();">Noise</a></li>
        <li><a onclick="pointillize();">Pointillize</a></li>
        <li><a onclick="posterize();">Posterize</a></li>
        <li><a onclick="removeNoise();">Remove Noise</a></li>
        <li><a onclick="sepia();">Sepia</a></li>
        <li><a onclick="sharpen();">Sharpen</a></li>
        <li><a onclick="solarize();">Solarize</a></li>
        <li><a onclick="unsharp();">Unsharp Mask</a></li>
     </ul>
</div>
Side Bar - JavaScript
The below code will open side bar from both right and left side when corresponding buttons are clicked. When they are clicked again then the side bars close(toggle buttons).
$(document).ready(function() {
	$('#left-menu').sidr({
		name : 'sidr-left',
		side : 'left',
		source:"#leftmenu"
	});
	$('#right-menu').sidr({
		name : 'sidr-right',
		side : 'right',
		source:"#rightmenu"
	});
});
Image Editing Options
Blend
This effect blends two images using different blend modes like multiply, screen, exclusion, difference etc. The image element from content area is selected and blended with another image. Generally it takes images of the same size but will crop the blend image if it's too large or leave untouched areas if it's smaller then the base image.
Pixastic.process(document.getElementById("pic"), "blend", {
			amount : 1,
			mode : multiply,
			image : document.getElementById("pic1")
});
Blur
This effect applies a 3x3 blur kernel on the image, softening it a bit.
Pixastic.process(document.getElementById("pic"), "blur");
Invert
This effect inverts the colors of the image i.e if a pixel has an RGB value of (100,50,34), its new value becomes (255-100, 255-50, 255-34) = (155, 205, 221).
Pixastic.process(document.getElementById("pic"), "invert");
Glow
This action creates a glowing effect by creating a blurred copy of the image and then adding this copy to the original image.
Pixastic.process(document.getElementById("pic"), "glow", {amount:0.5,radius:1.0});
Mosaic
This applies a mosaic effect on the image, creating a pixelated look. The block size of the mosaic can be mentioned as shown in below code.
Pixastic.process(document.getElementById("pic"), "mosaic", {blockSize:10});
Desaturate
This effect converts the image to grayscale.
Pixastic.process(document.getElementById("pic"), "desaturate", {average : false});
Pointillize
This effect paints the picture with circular points. Processing time increases drastically with small radii of the points and high densities.
Pixastic.process(document.getElementById("pic"), "pointillize", {radius:5, density:1.5, noise:1.0, transparent:false});
FlipHorizontally
This effect flips the image horizontally.
Pixastic.process(document.getElementById("pic"), "fliph");
FlipVertically
This effect flips the image vertically.
Pixastic.process(document.getElementById("pic"), "flipv");
Posterize
This effect reduces the number of colours to a specified number of levels, creating a posterize effect.
Pixastic.process(document.getElementById("pic"), "posterize", {levels:10});
Sepia
This acts like the desaturation action, but instead of a regular grayscale it adds a tinting to create an effect similar to sepia toning.
Pixastic.process(document.getElementById("pic"), "sepia");
Noise
Adds random noise to the image from either coloured or monochrome noise.
Pixastic.process(document.getElementById("pic"), "noise", {mono:true,amount:0.5,strength:0.5});
Solarize
Applies a solarize effect to the image.
Pixastic.process(document.getElementById("pic"), "solarize");
Sharpen
This effect applies a 3x3 sharpen kernel on the image, sharpening it a bit. The strength of the sharpening effect can be controlled with the amount parameter.
Pixastic.process(document.getElementById("pic"), "sharpen", {amount : 0.50});
EdgeDetection
This effect performs a simple edge detection on the image. Using this the image can be converted to greyscale and/or inverted.
Pixastic.process(document.getElementById("pic"), "edges", {mono:true,invert:false});
Reset Effects Applied on Image
The below code will remove all the effects applied on the image and sets it back to original image.
Pixastic.revert(document.getElementById("pic"));
Saving Edited Image
Using "tlib.logger.js" JS library the edited image from the canvas can be saved to the phone memory.
var filename = '';
	var dataURL = document.getElementById("pic").toDataURL("image/png").replace('data:image/png;base64,', '').replace('data:,', '');
	if (dataURL === '') {
		tlib.logger.err("No image source");
	} else {
		if (filename === '') {
			filename=document.getElementById('filename').value;
			filename+=".png";
			createFile(dataURL);
		} else {
			createFile(dataURL);
		}
	}
	function createFile(content){
		var newFile = new tlib.file({
			filename : filename,
			virtualRoot : "images",
			success : function() {
				newFile.write(content, {
					success : function() {
					},
					error : function() {
						tlib.logger.err("Text not written to the file");
					}
				});
			},
			error : function() {
				tlib.logger.err("File not created");
			}
		});
	}
Screenshots