Badge API usage in the native Tizen 2.4 mobile applications
PUBLISHED
Introduction
In this article you will learn how to use the Badge API in Tizen native application to display a label with a number above an application icon.
![]()
Figure 1. Badge example
The badge can be displayed by the application itself, or by another application (eg. service application) signed with the same certificate.
Prerequisites
This article is a spin-off of the “Create a native service for Tizen wearables” series and it shows Badge API usage on the example of service and UI applications, but this time on the mobile device with Tizen 2.4.
This article will focus on the Badge API usage only, so in order to fully understand the attached source code you should know how service and UI applications work and how they can interact with each other.
Part 1 of the series, which explains a simple service running in the background:
https://developer.tizen.org/community/tip-tech/creating-native-service-tizen-wearables-part-1
Part 2, describing a simple UI combined into one package with the service:
https://developer.tizen.org/community/tip-tech/creating-native-service-tizen-wearables-part-2-service-launcher
If you want to know more about native Badge API for Tizen 2.4 mobile, please refer to the API documentation:
https://developer.tizen.org/development/api-references/native-application?redirect=https://developer.tizen.org/dev-guide/2.4.0/org.tizen.native.mobile.apireference/group__BADGE__MODULE.html
Preparation steps and code arrangement
Running the attached code
The code attached to this article is the complete source code of the created service and the accompanying app. You can import them to your SDK and they should be ready to use when you have a properly set mobile device using Tizen 2.4.
Please have in mind that the Badge API used in the presented code is of Tizen version 2.4. It differs a lot from the Badge API in Tizen 2.3.1 thus it won’t work in older Tizen versions.
Modifying the code from previous articles
On the other side, apart from the Badge API, the code of the attached service & launcher application, including Sensor API usage, is taken from the “Creating a native service for Tizen wearables – part 2” article sample code, and is reused without any changes to API function calls. So, following the instructions from this article you can modify that old code (starting with the “Prologue” section) to use the Badge API.
Additionally, cosmetic changes were made to the application & menu item labels texts, but it is not going to be discussed in this article.
Prologue: Converting the projects from Tizen 2.3.1 wearable to Tizen 2.4 mobile
Please skip this section, if you don’t reuse the code from the “Creating a native service for Tizen wearables – part 2” article.
If you had been testing the example source code from the “Creating a native service for Tizen wearables – part 2” article, you probably still have the MyService & MyServiceLauncher applications source code in your IDE. You can follow the steps below to convert the project from Tizen 2.3.1 wearable to Tizen 2.4 mobile and run it on the mobile device.
The method described below works the same way for Tizen Studio as well as for the older Tizen SDK 2.4.
First of all, you should select the projects you want to convert. You can do this for more than one project at a time.
You right-click the selected projects and choose “Configure > Convert to Tizen Projects…” from the context menu (Figure 2).
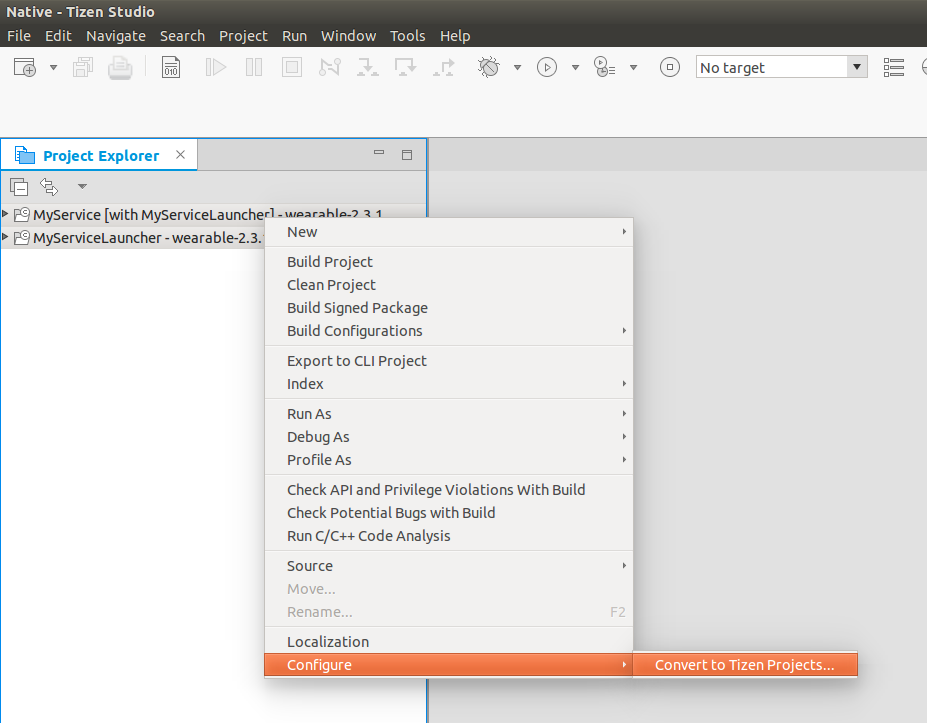
Figure 2. Converting the projects – step one
Then, when a dialog window appears (Figure 3), you can choose the Tizen profile and version which interests you. In our case, we want to convert the wearable 2.3 applications to mobile 2.4.

Figure 3. Converting the projects – step 2
The result of the conversion can be seen in the Project Explorer. New labels (mobile-2.4) appear by the project names (Figure 4).
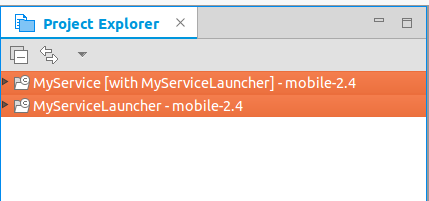
Figure 4. Converting the projects – step 3
When running My Service Launcher on the mobile device you should have the following result:

Figure 5. Converted application ran on mobile device
Now you are ready to modify the old versions of the Service and UI applications on your own to use the Badge API.
Steps to do
Step 1. Initial steps
- Notification privilege
- Badge header
Step 2. Displaying the badge
- How to set and show the badge
- How to reset and hide the badge
- How to remove the badge
Step 3. Usage example in MyService and My Service Launcher
- MyService: Calling the badge update in sensor event handler
- My Service Launcher: Resetting the badge when opening the application
- MyService: Deleting the badge when closing the service
Step 1. Initial steps
- Notification privilege
To make possible for your application to display badges you must add the following privilege to the application manifest:
<privilege>http://tizen.org/privilege/notification</privilege>
In our example code, we add the privilege both in MyService and in My Service Launcher manifests.
Notice: If you are using the code from previous articles you can remove the following privilege from MyService only: <privilege>http://tizen.org/privilege/appmanager.launch</privilege>, as we are not going to launch any application.
Do not remove this privilege from My Service Launcher! It is still needed there to launch MyService.
- Badge header
To use the Badge API you have to include the <badge.h> header to the source files:
#include <badge.h> // Tizen header for displaying the application badge
In our example code, we add the header both in MyService and in My Service Launcher source code files.
Step 2: Displaying the badge
- How to set and show the badge
If there is no badge present for a certain application, you can create a new one using badge_add(). You can check if the badge is already visible using badge_get_display(), show and hide the badge using badge_set_display(). You can remove it using badge_remove(). Remember that if not removed, both the badge itself and its value will persist after the termination of the application as well as after device powering-off or reboot. The badge value will persist even when the badge was set invisible. You get and set the current badge label value using respectively, badge_get_count() and badge_set_count().
Below you can find the custom-made, but reusable increment_badge() function definition. This function takes the currently displayed badge number, increments it by a value given by the increment_value parameter and shows the badge by the application icon given by the app_id parameter. We don’t store the current badge value anywhere else, we just keep it within the badge, get it from there using badge_get_count() and then increment and set the new value into it using badge_set_count().
Please refer to the comments in the code block with the full description of the badge creation and/or update in increment_badge() function.
// This function increments the badge counter by the increment value
// and shows the badge along the icon of an application with given app_id.
void increment_badge(unsigned int increment_value, const char *app_id)
{
    unsigned int is_displayed = 0; // Is badge displayed? 0 means false, 1 means true.
    unsigned int badge_number = 0; // The number of events that occurred since last opening of My Service Launcher.

    // We get the current number stored by the badge and check if the badge is currently displayed.
    if ((badge_get_count(app_id, &badge_number) != BADGE_ERROR_NONE)
        || (badge_get_display(app_id, &is_displayed) != BADGE_ERROR_NONE))
    {
        // If any of the function fails, we create a badge from scratch.
        dlog_print(DLOG_INFO, LOG_TAG, "Updating badge failed! Seems the badge does not exist... Creating badge...");

        // Now we will add a badge. Notice that when you add a badge to the application,
        // it will persist between the application and/or service launches and the device reboot until you remove it.
        // In our example we will remove the badge from My Service Launcher on the MyService termination.

        if (badge_add(app_id) != BADGE_ERROR_NONE)
        {
            dlog_print(DLOG_ERROR, LOG_TAG, "Badge creation failed! Leaving function...");
            return;
        }
        // Setting initial values for the variables used later...
        badge_number = 0;
        is_displayed = 0;
    }

    dlog_print(DLOG_INFO, LOG_TAG, "Incrementing and showing the badge...");
    // Incrementing the unread events number...
    badge_number+=increment_value;

    // When the badge exists, but is currently not displayed, it's time to turn on the badge.
    // In our case it means that since last "shake" event occurrence,
    // the My Service Launcher application was opened and the badge visibility was turned off.
    if (is_displayed == 0)
    {
        // Setting badge display to 1 (showing the badge):
        if (badge_set_display(app_id, 1) != BADGE_ERROR_NONE)
        {
            dlog_print(DLOG_ERROR, LOG_TAG, "Cannot set badge display!");
        }
    }
    // Now we update the badge count..
    if (badge_set_count(app_id, badge_number) != BADGE_ERROR_NONE)
    {
        dlog_print(DLOG_ERROR, LOG_TAG, "Updating badge failed!");
    }
}
How will we use this function in our example MyService application?
The number to be displayed on the My Service Launcher badge will be the number of shake events which occurred since the last opening of the My Service Launcher application. Each time the shake event occurs, we will increment the badge by 1. When the user opens the application, we will want the badge to disappear.
All of this will be explained in Step 2 section.
- How to reset and hide the badge
Below you can find a custom-made function which hides a badge of a certain application and resets its value to 0 at one time. Such situation may occur when you want to clear all notifications from the application (for example mark all email messages as “read”).
void reset_and_hide_badge(const char *app_id)
{
    // We reset the displayed badge count to 0 and hide the badge.

    if ((badge_set_count(app_id, 0) == BADGE_ERROR_NONE)
        && (badge_set_display(app_id, 0) == BADGE_ERROR_NONE))
    {
        dlog_print(DLOG_INFO, LOG_TAG, "Badge reset and hidden!");
    }
    else
    {
        dlog_print(DLOG_INFO, LOG_TAG, "Badge reset and  hiding failed! It can be that badge does not exist.");
    }
}
How will we use this function in our example application?
We will reset and hide the badge each time when opening My Service Launcher application. This will be explained in the Step 2 section.
- How to remove the badge
Removing the badge is simple. If you call badge_remove(), the badge and its value will be deleted and forgotten. If you want to create the new badge after removing it, you will have to call badge_add() again.
If you want to remove a badge from the application with ID org.example.your_app_id, the code will look like:
if (badge_remove("org.example.your_app_id") == BADGE_ERROR_NONE)
{
    dlog_print(DLOG_INFO, LOG_TAG, "Badge removed!");
}
How will we use this function in our example application?
We will remove the My Service Launcher badge when closing MyService. This will be explained in the Step 3 section.
Step 3: Usage example in MyService and My Service Launcher
In this section we will explain how to use the Badge API in our sample service and application.
- MyService: Calling the badge update in sensor event handler
As we can remember from the “Creating a native service for Tizen wearables – part 2” article, when an accelerometer value threshold was exceeded (a shake event detected), MyService application was playing a sound and a launch request was sent to the My Service Launcher UI application. Now, instead of launching this application, we will update the Badge number to display how many shake events occurred since the last opening of My Service Launcher.
To display the badge we call the previously defined increment_badge() function at the moment when sound playback starts.
// myservice.c:
// In sensor_event_callback:
// Starting playback:
    player_state_e state = PLAYER_STATE_NONE;
    if ((player_prepare(ad->player) == PLAYER_ERROR_NONE)
    && (player_get_state(ad->player, &state) == PLAYER_ERROR_NONE)
    && (state == PLAYER_STATE_READY))
    {
        dlog_print(DLOG_INFO, LOG_TAG, "Player is ready.");
        if (player_start(ad->player)== PLAYER_ERROR_NONE)
        {
            dlog_print(DLOG_INFO, LOG_TAG, "Player started!");

            // Here we call the function for updating the My Service Launcher badge.
            // We increment the number of unread events by 1 (In our case we simply store it in the badge count)...
            // We update the badge only when sound playback was successfully started.
            increment_badge(1, MYSERVICELAUNCHER_APP_ID);
        }
//...
Notice: If you are using the code from the old article you can remove the App Control calls after “Now launching the launcher…” comment. As from now on we are using the badge as a form of notification about sensor events, we don’t need to open the launcher app when a shake event occurs.
- My Service Launcher: Resetting the badge when opening the application
The reason for badge usage in our sample service and application is to indicate that the shake event occurred. It can be sometimes useful to reset the badge when we are sure the user noticed that the shake events happened. We decided to reset and hide the badge each time the user opens My Service Launcher. As the application is not always terminated by the user and can go to background mode instead, we perform the badge reset on the application resume event.
// myservicelauncher.c:
static void
app_resume(void *data)
{
    // As the My Service Launcher application is opened, we assume all the shake events are "read".
    reset_and_hide_badge(MYSERVICELAUNCHER_APP_ID);
}
- MyService: Deleting the badge when closing the service
If not removed, the badge and its value will outlive the application termination, the device powering-off and reboot. As we count only the shake events happening when MyService is working, we don’t need to keep the badge when MyService service application is not launched. That’s why we remove the badge on the service termination event.
// myservice.c:
// in service_app_terminate()...
// ...
    //Removing the badge on the service shutdown...
    if (badge_remove(MYSERVICELAUNCHER_APP_ID) == BADGE_ERROR_NONE)
    {
        dlog_print(DLOG_INFO, LOG_TAG, "Badge removed!");
    }
Summary
After reading this tutorial you should know how to manipulate the application badge in Tizen 2.4. The Badge API is easy to use and you can manipulate the badge assigned to the icon of the application both from the application itself or from another application signed with the same certificate. Please remember that the badge is displayed even when the application is not active, so when you don’t want to show it anymore you should hide or remove it yourself.
Was this document helpful?
We value your feedback. Please let us know what you think.