Anime.js – using an advanced animation library in Tizen
PUBLISHED
Introduction
In this article we want to present you a 2D animation library which can aid you in animation tasks when developing Tizen Web Applications. It is very easy to use and lets you interpolate any values and animate anything you wish. We are writing here about the Anime.js library. The library was created in 2016 by Julian Garner. As he has written on the website – Anime.js is “…a flexible yet lightweight JavaScript animation library. It works with CSS, Individual Transforms, SVG, DOM attributes and JS Objects.”
Prerequisites
Working with Anime.js is quite easy. The first thing to do is to visit the Anime.js project on GitHub and clone the repository or download the sources to your local machine.
Then in the <script></script> tag you should import the library to your project like it is shown below:
<script src="anime.js" type="text/javascript"></script>
Also in order to play around with the library you should get some CSS styles, SVG graphics, DOM elements or plain JavaScript objects. For our trials with Anime.js we have used SVG graphics created using Adobe Illustrator. As you can see below (fig. 1) we have created this cute sheep using vector graphics and three stacked balls next to it. Of course if you prefer to use a free tool then don’t hesitate and feel free to use Inkscape. It is a great tool for creating vector graphics.
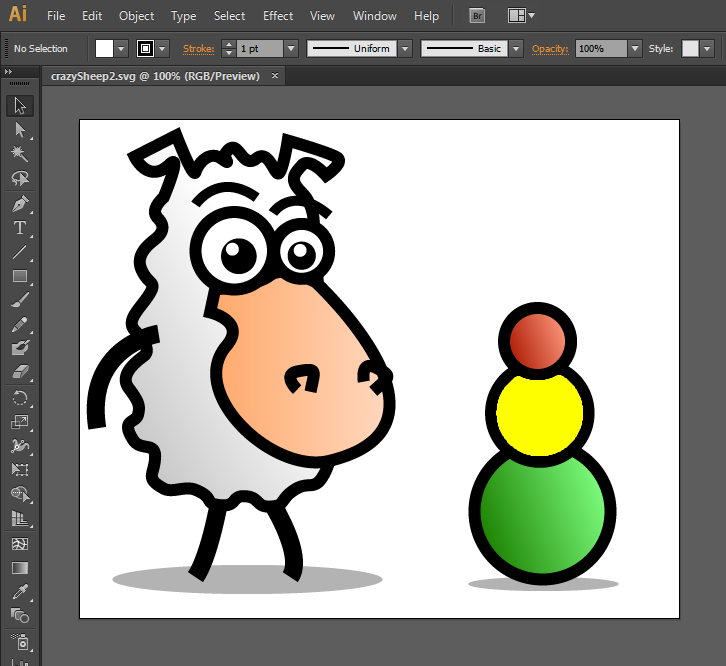
Figure 1 – SVG graphic with a cute sheep
In order to make your workflow as smooth as possible with SVG and Anime.js we advise you to break apart your SVG into several layers using your vector graphic creation suite. In Adobe Illustrator and Inkscape you can easily do it by distributing fragments of your graphics to different layers and then naming those layers accordingly. This will be very helpful when animating different parts of your SVG.
Below, on figure 2, we show you how we have divided our character into layers using Illustrator.

Figure 2 – SVG graphic layers
Seperating your graphic like this will give the SVG nodes the names of your layers, thus it will be easy to identify the parts of the whole SVG in its code and hook them up with Anime.js and animate. Below we present you the generated SVG of our sheep. You can easily put it into any HTML file and see how it looks like.
<?xml version="1.0" encoding="utf-8"?>
    		<!-- Generator: Adobe Illustrator 16.0.0, SVG Export Plug-In . SVG Version: 6.00 Build 0)  -->
			<!DOCTYPE svg PUBLIC "-//W3C//DTD SVG 1.1//EN" "http://www.w3.org/Graphics/SVG/1.1/DTD/svg11.dtd">
			<svg version="1.1" xmlns="http://www.w3.org/2000/svg" xmlns:xlink="http://www.w3.org/1999/xlink" x="0px" y="0px" width="360px"
				 height="299px" viewBox="0 0 600 499" enable-background="new 0 0 600 499" xml:space="preserve">
			<g id="shadow1">
				<ellipse fill="#B3B3B3" cx="168.919" cy="460.5" rx="134.919" ry="14.5"/>
			</g>
			<g id="shadow2">
				<ellipse fill="#B3B3B3" cx="464.919" cy="464.992" rx="75.081" ry="7.008"/>
			</g>
			<g id="legLeft">
				<path fill="none" stroke="#000000" stroke-width="18" stroke-miterlimit="10" d="M142.659,371.486c0,0-9.843,62.678-25.62,86.498"
					/>
			</g>
			<g id="legRight">
				<path fill="none" stroke="#000000" stroke-width="18" stroke-miterlimit="10" d="M187.652,374.889c0,0,39.947,59.275,24.171,83.096
					"/>
			</g>
			<g id="body">
				<linearGradient id="SVGID_1_" gradientUnits="userSpaceOnUse" x1="23.332" y1="272.5693" x2="301.5746" y2="111.9259">
					<stop  offset="0" style="stop-color:#C7C7C7"/>
					<stop  offset="0.6" style="stop-color:#FFFFFF"/>
					<stop  offset="1" style="stop-color:#FFFFFF"/>
				</linearGradient>
				<path fill="url(#SVGID_1_)" stroke="#000000" stroke-width="12" stroke-miterlimit="10" d="M235.224,104.913
					c0,0,0.975-18.705-12.045-31.466c-13.02-12.762-7.429-18.717,0.345-27.225c7.773-8.507,24.068,10.209,24.068,10.209
					s18.717-12.762,11.06-17.866c-7.656-5.104-49.393-17.015-49.393-17.015s-4.204,27.224-8.458,32.328
					c-4.253,5.105-9.967-24.672-22.761-14.462c-15.309,12.216-17.841-22.97-30.445-5.955c-4.304,5.81,7.535,14.463-4.936,5.955
					c-12.47-8.507-23.455,5.955-25.62,13.612c-2.164,7.657-19.179-36.582-19.179-36.582L56.174,37.715c0,0,13.611,28.075,34.88,7.657
					c13.58-13.036-5.955,33.179-5.955,33.179s-14.463,11.911-5.956,20.418c8.507,8.507,4.254,15.644-1.701,20.583
					c-5.956,4.939-21.269,15.594-14.463,31.109c6.806,15.517,16.164,11.263,7.657,24.875c-8.508,13.611-23.821,25.522-14.462,35.731
					c9.358,10.208,16.164,20.417,9.358,25.522c-6.806,5.104-25.522,18.716-15.313,32.329c10.209,13.611,11.453,17.576,9.358,26.373
					c-2.127,8.933-17.866,4.679-5.105,25.097c7.706,12.327,22.971,1.276,22.12,18.291c-0.851,17.016-10.588,20.133,8.508,30.627
					c8.877,4.879,21.076-3.028,31.94,1.337c18.283,7.346,9.571,12.904,20.806,14.828c22.353,3.828,13.694-9.213,28.534-8.471
					c17.015,0.851,9.515,14.083,32.295,9.463c6.292-1.276,5.454-9.002,18.717-16.732c13.866-8.082,18.774,2.553,28.074-14.462
					c9.675-17.7,5.164-30.202,5.164-30.202L235.224,104.913z"/>
			</g>
			<g id="leftHand">
				<path fill="none" stroke="#000000" stroke-width="18" stroke-miterlimit="10" d="M79.994,214.67c0,0-74.015,11.911-61.254,94.433"
					/>
			</g>
			<g id="mouth">
				<linearGradient id="SVGID_2_" gradientUnits="userSpaceOnUse" x1="131.6792" y1="248.1689" x2="311.0361" y2="248.1689">
					<stop  offset="0" style="stop-color:#FFA86A"/>
					<stop  offset="1" style="stop-color:#FFD8BF"/>
				</linearGradient>
				<path fill="url(#SVGID_2_)" stroke="#000000" stroke-width="12" stroke-miterlimit="10" d="M237.208,163.188
					c0,0,156.769,144.569,13.421,178.729c-56.881,13.555-142.453-68.323-102.833-114.895c21.092-24.794-16.117-33.62-16.117-33.62
					l4.88-22.894c0,0,42.141-3.797,54.658-13.939C204.878,145.499,237.208,163.188,237.208,163.188z"/>
				<path fill="none" stroke="#000000" stroke-width="12" stroke-miterlimit="10" d="M218.538,270.487c0,0-15.563-14.929,0.697-18.123
					c16.261-3.193,17.391-1.63,15.082,9.327c-2.311,10.957-2.311,10.957-2.311,10.957"/>
				<path fill="none" stroke="#000000" stroke-width="12" stroke-miterlimit="10" d="M285.293,262.519c0,0-3.679-21.25,11.308-14.179
					c14.986,7.071,14.971,9,6.612,16.453c-8.357,7.452-8.357,7.452-8.357,7.452"/>
			</g>
			<g id="leftEye">
				<circle fill="#FFFFFF" stroke="#000000" stroke-width="12" stroke-miterlimit="10" cx="155.774" cy="131.773" r="38.735"/>
			</g>
			<g id="rightEye">
				<circle fill="#FFFFFF" stroke="#000000" stroke-width="12" stroke-miterlimit="10" cx="223.179" cy="132.362" r="27.45"/>
			</g>
			<g id="leftEyeBall">
				<circle cx="160.349" cy="137.242" r="17.69"/>
				<circle fill="#FFFFFF" cx="153.896" cy="130.18" r="6.302"/>
			</g>
			<g id="rightEyeBall">
				<circle cx="223.234" cy="136.688" r="13.974"/>
				<circle fill="#FFFFFF" cx="221.606" cy="131.399" r="6.302"/>
			</g>
			<g id="leftEyeBrow">
				<path fill="none" stroke="#000000" stroke-width="10" stroke-miterlimit="10" d="M117.039,85.357c0,0,22.909-34.085,61-6.806"/>
			</g>
			<g id="RightEyeBrow">
				<path fill="none" stroke="#000000" stroke-width="10" stroke-miterlimit="10" d="M194.509,93.864c0,0,19.171-28.925,56.12,2.552"/>
			</g>
			<g id="ballGreen">
				<linearGradient id="SVGID_3_" gradientUnits="userSpaceOnUse" x1="399.9238" y1="415.2471" x2="528.0762" y2="369.7158">
					<stop  offset="0" style="stop-color:#1B7F00"/>
					<stop  offset="1" style="stop-color:#7FFF80"/>
				</linearGradient>
				<circle fill="url(#SVGID_3_)" stroke="#000000" stroke-width="12" stroke-miterlimit="10" cx="464" cy="392.481" r="68"/>
			</g>
			<g id="ballYellow">
				<circle fill="#FFFF00" stroke="#000000" stroke-width="12" stroke-miterlimit="10" cx="461.306" cy="294.064" r="48.751"/>
			</g>
			<g id="ballRed">
				<linearGradient id="SVGID_5_" gradientUnits="userSpaceOnUse" x1="427.4658" y1="233.7324" x2="490.6478" y2="211.2845">
					<stop  offset="0" style="stop-color:#1B7F00"/>
					<stop  offset="0" style="stop-color:#AA1700"/>
					<stop  offset="1" style="stop-color:#FF9B7F"/>
					<stop  offset="1" style="stop-color:#FAF8E1"/>
					<stop  offset="1" style="stop-color:#D41D00"/>
				</linearGradient>
				<circle fill="url(#SVGID_5_)" stroke="#000000" stroke-width="12" stroke-miterlimit="10" cx="459.057" cy="222.508" r="33.525"/>
			</g>
			</svg>
		</svg>
As you can see in the code every node is named and therefore they can be easily used with Anime.js.
Animating using Anime.js
What we want to achieve with our sheep SVG is depicted on figure 3. As you see the eyes of the sheep are getting bigger and change their color to red. Also one of the balls is being levitated by our furry hero. We also move his hand and mouth to give the whole scene a more realistic view.
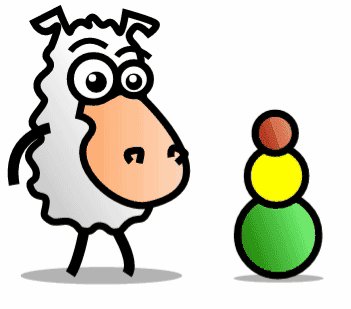
Figure 3 – The animated sheep SVG using Anime.js
Now, step by step, we will tell you how to achieve this effect on our sheep SVG using Anime.js. But before doing that, below we show you how a single animation instance looks like in Anime.js. As you can see, we can create a variable and then assign an animation instance to it. Inside of it we define an object with properties describing our animation. Also please keep in mind that it is a good practice to wait for the window object to load before doing any animations that is why we have put everything inside the window.onload function.
window.onload = function() {

       var myAnimation = anime({

   	 	// animation parameters

       });

}
First of all we want to make the smallest ball jump up and down. That is why we need to target the right SVG layer. Then we are using the translate variable and we assign an array of two values between which our desired movement will occur. In our case it is between 0 and -100. Next we specify the duration in milliseconds. In our case it will be a one-second animation. The last thing we want to do here is to call a function when our animation completes and run the ballRedDown animation. But we want to be sure that it will start from the beginning, that is why we invoke the restart() function on it.
window.onload = function() {

       var ballRedUp = anime({

			targets: "#ballRed",
			translateY: [0, -100],
			duration: 1000,
			complete: function() {
				ballRedDown.restart();
			}

       });

}
As we can put in arrays inside many of the Anime.js parameters then we will make an animation of three SVG layers at one time. As you can see the targets parameter has three entries holding the left eyeball graphic, the right eyeball and the mouth of the sheep. We just want them to be moved by 10 pixels along the Y axis. Also we will scale the three layers to 1.05 of their base scale. All this will take one second as the ball animation earlier because we want them to be synced. We are also changing the fill of the eyeballs from black to red. Maybe in this fair moment you are asking yourselves why the mouth of the sheep is not changing color, as the current animation targets both the eyes and mouth together. The answer is simple. The mouth does not have a fill color. Instead it had a gradient, so it is not affected by changing the fill parameter. And as usual the last thing is to restart the eyeBallsDown animation to get all the three layers animate back to their starting position, scale, color, etc.
window.onload = function() {

	var eyeBallsUp = anime({

		targets: ["#leftEyeBall", "#rightEyeBall", "#mouth"],
		translateY: [0, -10],
		scale: 1.05,
		fill: "#FF0000",
		duration: 1000,
		complete: function() {
			eyeBallsDown.restart();
		}

	});

}
As you might guess the eyeBallsDown animation will be the opposite to the eyeBallsUp animation, like earlier the ballRedDown function was opposite to the ballRedUp function. The only change is about the count of the targets, because we have three here, the autoplay because again we want it to be false in order to start the animation manually when the eyeBallsDown animation completes. We are changing the scale back to 1, the fill to black and we are using again the easeOutBounce easing function in order to sync the eyeBallsDown animation with the ballRedDown animation which uses the same type of easing and duration. At the end we want our animation to restart the eyeBallsUp animation.
window.onload = function() {

	var eyeBallsDown = anime({

		targets: ["#leftEyeBall", "#rightEyeBall", "#mouth"],
		translateY: [-10, 0],
		scale: 1,
		fill: "#000000",
		duration: 1000,
		easing: 'easeOutBounce',
		autoplay: false,
		complete: function() {
			eyeBallsUp.restart();
		}

	});
}
What is still missing in our sheep animation is the left arm movement. Let’s fix that by applying a proper transformation using Anime.js. Here we are targeting the leftHand SVG layer. We need to apply rotation from -2 degrees to 1 degree. Also we want this animation to loop, so we are setting that variable to true. Now it will loop and we also have set the direction parameter to alternate just to show that you can change the order of the animation in a loop. The loop will start with the animation playing normally, but the back looping will be performed by playing the animation in reversed order. Please have in mind that we could have made the whole sheep animation even simpler in terms of code complexity and length, but we wanted to show you more possibilities using a chain of animations.
window.onload = function() {

	var leftHandRotate = anime({

		targets: "#leftHand",
		rotate: [-2,1],
		duration: 1000,
		loop: true,
		direction: 'alternate',

	});

}
Summary
Now our sheep animation should look like in figure 3. The complete code can be found in the AnimeTizen.zip attachment accompanying this article. Please also note that we have added a second attachment to this article called AnimeTizenSymbol.zip where we animate the Tizen logo using Anime.js. Feel free to play around with both examples in order to learn more about using Anime.js in Tizen. We hope that this article will help you in the proper setup, usage and animation of objects, SVG and raster graphics in your Tizen projects and make them look beautiful.