Working with Web Audio API
PUBLISHED
Introduction
Modern mobile applications and games can’t exist without audio. However, for a long time, developers had to rely on external browser plug-ins to implement sounds in their application. Fortunately, W3C introduced a Web Audio API. The newest specification is still in Working Draft status. It’s a very young technology whose first specification appeared in 2011 which can be found under the following link: http://www.w3.org/TR/2011/WD-webaudio-20111215/. The Tizen’s 2.0.0 final WebKit engine implements the first specification published on 15th December, 2011 which is in Working Draft status. This technology was designed to be both very easy in use and very powerful.
You shouldn’t think about Web Audio API in terms of an html audio tag. The audio tag provides basic functionality like playing sounds; Web Audio API has by far more capabilities. Engineers working on the specification introduced many features allowing precise sound wave manipulation. It can be used to create professional sound editors. Modified sound’s data can be used as a source in an html audio tag or be saved to file. However, the second option is not provided by default. You have to compress the data and use File API. The Web Audio API is still evolving and even now we can see astonishing examples of its usage.
The entry point for all API functions is a context object which we retrieve by calling its constructor called webkitAudioContext() (as it’s still a working draft we have to use the ‘webkit’ prefix). All the functionality is encapsulated within this object.
var context = new webkitAudioContext();
What is a node and how to use it?
A sound always has its source and destination. The source can be a decoded sound/music file data or it can be synthesized by the API itself. The destination is a device which is the speaker(s) that receives sound data and plays the sound.
The source and destination are two basic nodes. A node is a basic Web Audio API element that has a specific function. There are many nodes with different functions: GainNode to manipulate the volume level, PannerNode to simulate placing the sound source in a three dimensional space, DelayNode to delay sound in time, AnalyserNode to get data from sound wave and many, many more. You can read in detail about the available nodes on the W3C website: http://www.w3.org/TR/2011/WD-webaudio-20111215/. You have to connect the source node to the destination node to hear any sound. However, you can insert any of the previously mentioned nodes between them. To connect one node to another you use a connect() function whose argument is another node to which it has to transfer data. A connection of minimum two nodes is called a routing graph. An example routing graph is shown in the picture below.
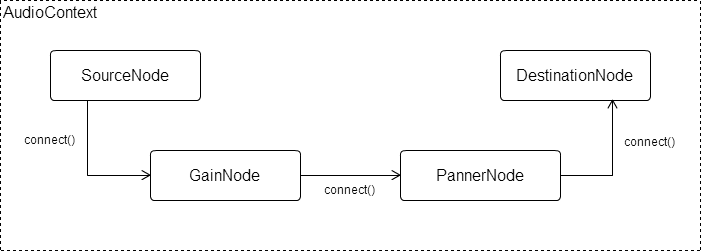 Routing graph Routing graph |
The routing graph can be far more complex. In the previous example, we showed only one route. In a real application, it can consist of many routes working with different sources and joining at the end into one destination node. For example we may want to play two sounds at the same time and have two separate volume controllers for each of them. This situation is demonstrated in the picture below.
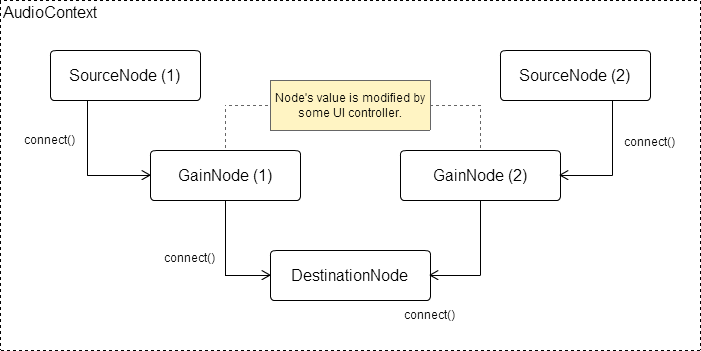 Routing graph with two sources Routing graph with two sources |
Loading and playing sounds
Now having basic knowledge about how the Web Audio API works, we can try to load and play some sounds. To load a sound data we can use several approaches, the only requirement is retrieving data in an ArrayBuffer format. We will show how to get that data using an XMLHttpRequest. In Tizen, via the XMLHttpRequest (commonly called AJAX), we can load files from different domain if we declare special access permissions in the XML configuration file. We need to set the domain to which the application will have access to. However, if you want to load sound files from an internal Tizen device memory you can use the Tizen’s Filesystem API. Additionally, every widget has its private storage which is a virtual root location called ‘wgt-private’. Describing Tizen’s Filesystem API is not the subject of this article.
Making AJAX requests
When making an AJAX request we have to set some properties like URL, request method, request type and response type. The first three parameters we set in an open() method of the XMLHttpRequest object. We use an asynchronous GET method. The file’s URL can be a path to any internal file in one of three formats (WAV, MP3 or OGG) or to an external file if its URL matches the access pattern. In the config.xml file we can add an ACCESS tag to tell the application that it can access external resources matching only a given pattern. If we want to allow the loading of files from any domain we can just write the following line of code.
<access origin="*" subdomains="true"/>
If we want to restrict the loading of files to an explicit domain we just write as follows:
<access origin="http://example.com" subdomains="true"/>
Let’s go back to the AJAX request. The response type should be set to an arraybuffer because the file’s data is binary. The code below shows the AJAX request loading a sound file from the main application directory.
xhr = new XMLHttpRequest();
xhr.open('GET', './sound.mp3', true);
xhr.responseType = 'arraybuffer';
xhr.onload = function () {
    /* Processing response data - xhr.response */
};
xhr.onerror = function () {
    /* Handling errors */
};
xhr.send();
Decoding file data
Now having the file’s data we have to decode it. As mentioned before, we can load files in three different formats: WAV, MP3 or OGG. The data from these files has to be converted to the PCM/raw format for further use.
To decode data we use a decodeAudioData() function from the webkitAudioContext object. It takes three arguments. The first one is binary data that we got from the AJAX request in the xhr.response object. The second argument is a function executed on success and the third argument is a function executed on error. When decodeAudioData() is finished, it calls a success callback function with a decoded audio data of AudioBuffer type as parameter. The code below demonstrates the decoding process.
/* Decoding audio data. */
var context = new webkitAudioContext();
context.decodeAudioData(xhr.response, function onSuccess (buffer) {
    if (! buffer) {
        alert('Error decoding file data.');
        return;
    }
}, function onError (error) {
    alert('Error decoding file data.');
});
Playing sounds
We have the sound data but we don’t have the SourceNode object, so let’s make one. We create it by calling the createBufferSource() function from the context object.
var source = context.createBufferSource(); /* Create SourceNode. */
Later, we have to assign our AudioBuffer data to the buffer property of the SourceNode.
source.buffer = buffer; /* buffer variable is data of AudioBuffer type from the decodeAudioData() function. */
As mentioned at the beginning of the article, we have to connect the SourceNode to the DestinationNode.
source.connect(context.destination); /* Connect SourceNode to DestinationNode. */
Now, just play the sound immediately by giving 0 as parameter of the noteOn() function. This parameter delays the playing of sounds by a given amount of milliseconds.
source.noteOn(0); /* Play sound. */
The Tizen’s 2.0.0 WebKit engine implements the first specification of W3C Web Audio API. In this specification to play sound we use the noteOn() function but in the present specification’s version it’s deprecated and has been replaced by a start() function.
Adding nodes to the routing graph
For now we’ve only used two nodes, the SourceNode and the DestinationNode. What if we want to add for example a GainNode to our graph? All that has to be done is connect the SourceNode to the GainNode and the GainNode to the DestinationNode. You can connect as many nodes as you want. Sound processing starts from the earliest node and finishes at the last node of the routing graph. Let’s see the code below.
var gainNode = context.createGainNode(); /* In the newest Audio API specification it's createGain(). */
source.connect(gainNode); /* Connect the SourceNode to the GainNode. */
gainNode.connect(context.destination); /* Connect the GainNode to the DestinationNode. */
And again, to play the sound you have to call the noteOn() function on the SourceNode.
source.noteOn(0); /* Play sound that will be processed by the GainNode. */
As mentioned, the GainNode is used to control the sound’s volume level. Objects of this type have a gain property, which has a value property. The value property is the one we have to modify in order to control the volume level.
gainNode.gain.value = 0.5; /* Decrease the volume level by half. */
gainNode.gain.value = 2; /* Increase the volume level two times. */
Sample application
Let’s examine the sample application attached to this article. It uses two libraries to create the UI and make AJAX calls. They’re jQuery 1.9.0 and jQuery Mobile 1.3.0. The application allows loading and playing sounds/music from different sources. First, you can run files stored within the application. In this demo application files are stored inside a ‘./sound’ directory. Another source is the ‘Music’ directory placed in the internal memory of the Tizen device. The last one is any external file from the web. In addition, you can change the volume level and simulate playing the sound in a three dimensional space. To make the application simple I’ve limited it to move the sound source only to the left or right side of the listener. The screenshot below shows the application’s main screen.
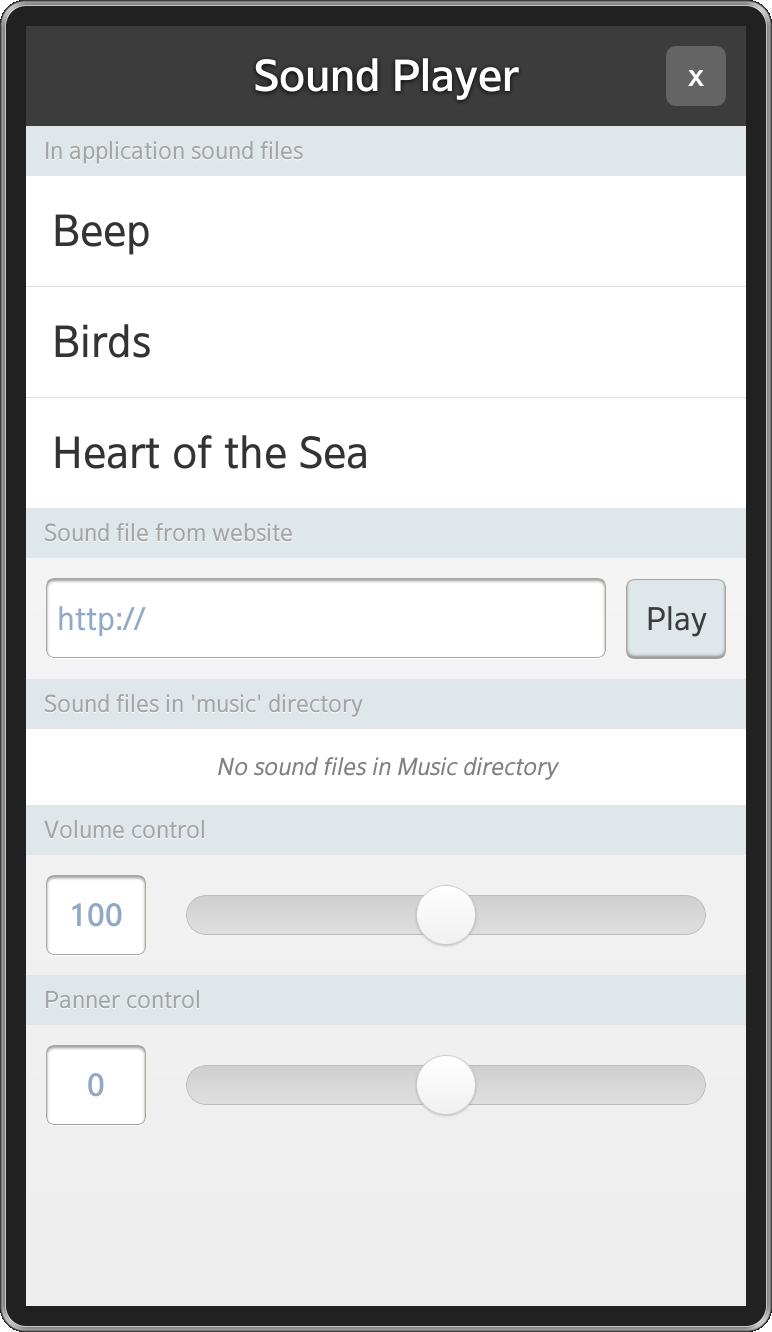 Application’s main screen Application’s main screen |
All sounds used in the application come from the SoundJay website http://www.soundjay.com/.
I will discuss only the parts of code that are essential to to understand the Web Audio API. Other parts like the UI implementation will be omitted.
The entry point is an app module that has several private methods and a public interface with the following methods:
- init() – initializes the application; called by the onload event,
- listFilesInMusicDir() – lists all the files that are stored in the ‘Music’ directory,
- loadSound() – loads sounds asynchronously and executes a callback function on success,
- playSound() – plays sound with the given name.
var app = (function () {

    /* ... */

    return {
        init                : _init,
        listFilesInMusicDir : _listFilesInMusicDir,
        loadSound           : _loadSound,
        playSound           : _playSound
    };
}());

window.onload = app.init;
This module has several private variables worth mentioning at this point:
- _files – array that holds all the file data. Each array’s element is an object having the following properties:
- name – internal file name,
- uri – URI or URL to the file,
- buffer – decoded audio buffer.
- _context – context object initialized in the init() function,
- _source – stores SourceNode,
- _gainNode, _pannerNode – objects for gaining and panning sound.
Most of these objects are initialized in the _init() method.
_context = new webkitAudioContext(); /* Create context object. */
_source = null;
/* Create gain and panner nodes. */
_gainNode = _context.createGainNode(); // createGain()
_pannerNode = _context.createPanner();
/* Connect panner node to the gain node and later gain node to the
 * destination node. */
_pannerNode.connect(_gainNode);
_gainNode.connect(_context.destination);
Notice the routing graph creation. We connect the PannerNode to the GainNode, and later the GainNode to the DestinationNode. You will see later on in the _playSound() method that we connect the SourceNode to the PannerNode to close the graph and play sounds.
During the initiation we also bind sliders to the Gain and the Panner node’s properties.
/* onVolumeChangeListener changes volume of the sound. */
onVolumeChangeListener = function () {
    /* Slider's values range between 0 and 200 but the GainNode's default value equals 1. We have to divide slider's value by 100, but first we convert string value to the integer value. */
    _gainNode.gain.value = parseInt(this.value, 10) / 100;
};

/* onPannerChangeListener changes sound's position in space. */
onPannerChangeListener = function () {
    /* setPosition() method takes 3 arguments x, y and z position of the sound in three dimensional space. We control only x axis. */
    _pannerNode.setPosition(this.value, 0, 0);
};
By clicking different UI elements we load sounds and play them after the loading has finished.
app.loadSound(file, function () {
    app.playSound(soundName);
});
Now, let’s examine the most important functions: _loadSound() and _playSound().
The _loadSound() function takes three parameters. The first one is a file object with name and uri properties. The last two properties are success and error callbacks. At the beginning, we set the default parameters’ values and define a _files object as an empty array (if not previously set). The next thing we have to do is check whether there is already a loaded file with the same name. If it exists in the _files array, we just execute the callback function.
/* Check if file with the same name is already in the list. */
isLoaded = false;
$.each(_files, function isFileAlreadyLoaded (i) {
    if (_files[i].name === file.name) {
        /* Set flag indicating that file is already loaded and stop 'each' function. */
        isLoaded = true;
        return false;
    }
});
If the file hasn’t been loaded before, we have to get its data by making an AJAX request.
/* Do AJAX request. */
doXHRRequest = function () {
    xhr = new XMLHttpRequest();
    xhr.open('GET', file.uri, true);
    xhr.responseType = 'arraybuffer';
    xhr.onload = onRequestLoad;
    xhr.onloadstart = tlib.view.showLoader;
    xhr.onerror = onRequestError;
    xhr.send();
};
After having the file’s data we decode it inside the onRequestLoad function by the decodeAudioData() method and we end up with having a buffer object which we store inside the _files array together with the file name and its URI/URL. After the decoding has finished, we execute the success callback function or the error callback function if something went wrong.
/* When audio data is decoded add it to the files list. */
onDecodeAudioDataSuccess = function (buffer) {
    if (!buffer) {
        errorCallback('Error decoding file ' + file.uri + ' data.');
        return;
    }
    /* Add sound file to loaded sounds list when loading succeeded. */
    _files.push({
       name : file.name,
       uri : file.uri,
       buffer : buffer
    });
    /* Hide loading indicator. */
    tlib.view.hideLoader();
    /* Execute callback function. */
    successCallback();
};

/* When loading file is finished try to decode its audio data. */
onRequestLoad = function () {
    /* Decode audio data. */
    _context.decodeAudioData(xhr.response, onDecodeAudioDataSuccess, onDecodeAudioDataError);
};
As we saw before, the success callback function in our application is a function that executes the playSound() function that we are going to discuss now. The first thing we do is check whether there is a sound already being played. If yes, then we have to stop it by calling the noteOff() function. It takes as an argument the number of milliseconds after which the sound should be stopped. Notice that the noteOff() function is deprecated in the newest version of the Web Audio API specification. After stopping all sounds we walk through the array of files and seek the one with the name we gave as an argument. To play the sound we have to do a few steps which we mentioned at the beginning of the article, that is: create a SoundNode object, add a buffer to the SoundObject, connect the SourceNode to the next node in the routing graph and play the sound by executing the noteOn() method. This process is shown in the code below.
_playSound = function (name) {
    /* Check whether any sound is being played. */
    if (_source && _source.playbackState === _source.PLAYING_STATE) {
        _source.noteOff(0); // stop()
        _source = null;
    }

    $.each(_files, function (i, file) {
        if (file.name === name) {
            /* Create SourceNode and add buffer to it. */
            _source = _context.createBufferSource();
            _source.buffer = file.buffer;
            /* Connect the SourceNode to the next node in the routing graph
             * which is the PannerNode and play the sound. */
            _source.connect(_pannerNode);
            _source.noteOn(0); // start()

            return false;
        }
    });
};
Summary
I hope this article helped you understand how the Web Audio API works and get familiar with the loading and playing sounds processes. Using the Web Audio API you can make applications in which you don’t need to place html audio element inside the document to play sounds. You can just play and manipulate sounds when certain actions happen. It’s big advantage in terms of game development. You should now be able to enrich any application with sounds or make a simple music player.