


Lesson 22
In this lesson, we will look at an index widget, learn how to create and use it. We will consider only the "circle" style for the index widget in which the elements circled on the screen.
Important:
In the Tizen emulator with 2.3.2 version or lower, the index widget with the "circle" style is not displayed correctly, so in this lesson for demonstration we will use the 3.0.0 version of Tizen emulator. This problem appears only on the emulators. On real devices, the index widget works correctly.
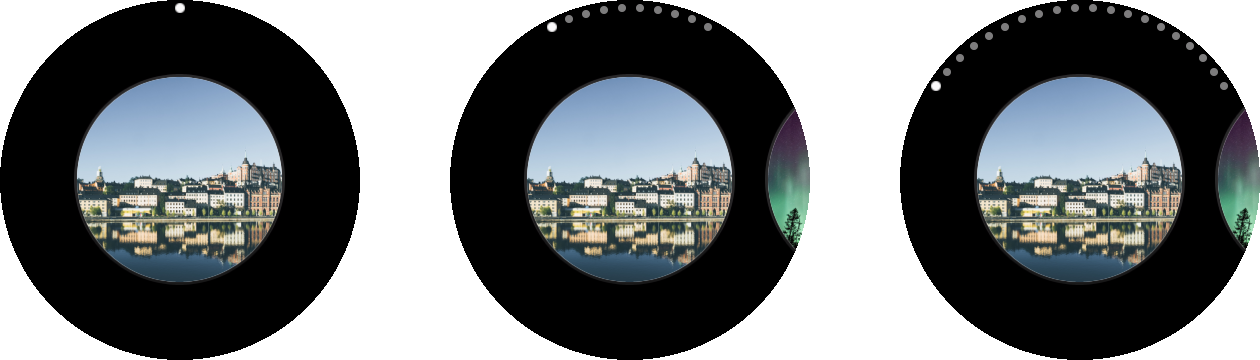
The index widget is used to display pages. For wearable devices with a round display, it is allowed to display from 1 to 20 indicators. And only active one will be highlighted.
Initially, this widget was conceived as an element for quick access to items in the large lists. For example, on mobile devices, on the side of a contacts list, there is the index widget, on which there are elements for quick search by contacts first letters. In mobile devices it is interactive, you can click on the items and you will go to the corresponding section of the list.
But currently on wearable devices with a round display, the index widget is mainly used only for displaying the active page.
As it was stated, the widget can have up to 20 items.
For each of the elements, you have to put a separate style, corresponding to its ordinal number, and an even or odd number of elements.
Let's analyze the elements styles more closely. When filling the index, the first very important point is to know whether an even or odd number of elements you are going to add.
The maximum odd number of elements in the index is 19. For an odd number of elements, the style with the prefix "item/odd_" is used, in the end of which you should put the ordinal number. All styles with odd numbers that can be used are listed below:
"item/odd_1"
"item/odd_2"

...

"item/odd_19"
The maximum even number of elements in the index is 20. For an even number of elements, the style with the prefix "item / even_" is used, in the end of which, also should be placed an ordinal number. All possible for use styles with an even number are listed below:
"item/even_1"
"item/even_2"

...

"item/even_20"
The second point is the choice of style for the central element.
For an odd number, this is the “item/odd_10” style, which should be always set to the middle element. For example, with three elements, we need to add 3 elements and set the styles in the following order:
"item/odd_9", "item/odd_10", "item/odd_11" .
For 5 elements:
"item/odd_8", "item/odd_9", "item/odd_10", "item/odd_11", "item/odd_12" .
And so on.
For an even number of elements there are two central styles: "item/even_10" and "item/even_11". So for only two elements these two styles will be added, and for 4 elements:
"item/odd_9", "item/odd_10", "item/odd_11", "item/odd_12".
Moreover, as you can see, neighboring elements should have style suffixes that differ one from another exactly by 1.
You should be careful with the styles for the elements, since if you pick the wrong style, you may get some unexpected results, like on the picture below.
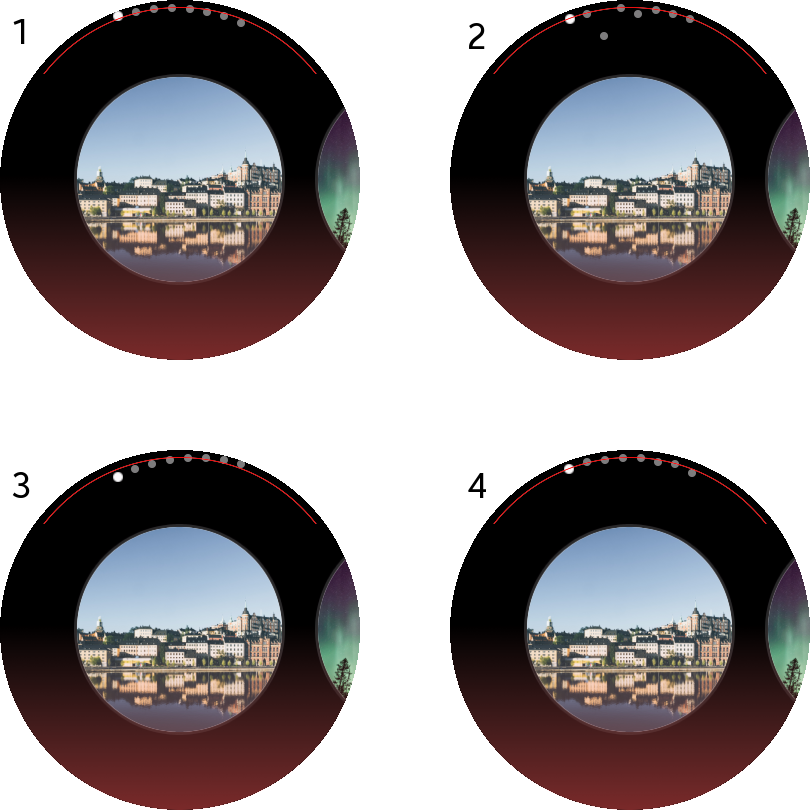
Here, when choosing the styles, the following mistakes were made:
1. There is selected a set of styles for an odd number of elements, although in this case, the number of elements is even.
2. The styles ordinal numbers are confused; the ordinal numbers of neighboring styles should differ by 1.
3. Incorrectly selected style for the central element.
4. Use even and odd elements at the same time.

Correct usage of styles is shown in the picture below.
Here the styles "item/even_ #" for an even number of elements was used, numbering [7, 8, 9, 10, 11, 12, 13, 14].
The arrangement of the elements should be along the contour of the circle; this applies only to the "circle" style of the widget itself, but not its elements.
As you might have noticed, the index widget with the circle style fitted to be placed at the top of the screen, on the topmost layer of your application's widgets.To add it to the demo application, there is should be provided a special area.
Let's add a layout with two areas. First one (background) will be used to place the scroller and its content, and the second one (front) will be used by the index widget.
In this case, the layout with the standard elm/layout/application/default theme is perfectly suited. We considered this layout in Lesson 12. It has the following form:

Let’s look at the code.
To begin with, since you will have to use the page indicator, you can turn off the visibility of the scroll bars of the scroller.
static void
_scroller_create(UIData *ui)
{
   ...

   elm_scroller_policy_set(ui->scroller, ELM_SCROLLER_POLICY_OFF, ELM_SCROLLER_POLICY_OFF);

   ...
}
Now in the structure with the main widgets, add a pointer to the layout.
Evas_Object *layout;You should get the following contents of your structure with graphical components:
typedef struct _UIData {
   Evas_Object *win;
   Evas_Object *conform;
   Evas_Object *layout;
   Evas_Object *scroller;
   Evas_Object *box;
   Evas_Object *padding_start;
   Evas_Object *padding_end;
} UIData;
To create a layout, write a separate function. Then transfer to it creation of the scroller and its placing in the desired area. In our case, this background area called - elm.swallow.bg.
static void
_layout_create(UIData *ui)
{
   ui->layout = elm_layout_add(ui->conform);

   elm_layout_theme_set(ui->layout, "layout", "application", "default");

   _scroller_create(ui);
   elm_object_part_content_set(ui->layout, "elm.swallow.bg", ui->scroller);

   evas_object_show(ui->layout);
}
Now change the contents of the conformant from the scroller to the layout.
static void
_conformant_create(UIData *ui)
{
   ...

   _layout_create(ui);
   elm_object_content_set(ui->conform, ui->layout);

   ...
}
So now the layout is an interlayer between the scroller and the conformant. Do not forget to change the parent to the scroller from the conformant to the layout, in which you will place it.
static void
_scroller_create(UIData *ui)
{
   ui->scroller = elm_scroller_add(ui->layout);

   ...
}
Further in the lesson, in aim to see the result, we will show you how to change the number of application pages between launches. Therefore, edit the loop where you create page with elements, to make it dependent from one constant.
Write a constant indicating the number of pages that should be created. Next, you will need it to create the elements of the index widget correctly. Add a global constant:
static const int PAGES_COUNT = 5;Now the number of pages may not correspond to the number of images, so you need to change the pages creation loop as follows:
static void
_box_create(UIData *ui)
{
   ...

   const int IMAGES_COUNT = 5;
   Evas_Object *page_layout;
   for (int i = 0; i < PAGES_COUNT; ++i)
     {
        page_layout = _page_layout_create(ui->box, i % IMAGES_COUNT);
        elm_box_pack_end(ui->box, page_layout);
     }

   ...
}
Now, for example, if the number of pages is 6, then the page with index 5 will contain the image 0.png instead of the nonexistent 5.png.
Create an index widget:
Evas_Object *index = elm_index_add(ui->layout);Set a circle style:
elm_object_style_set(index, "circle");Adjust the index to a horizontal displaying, since this style is designed for horizontal mode and your pages are horizontally positioned.
elm_index_horizontal_set(index, EINA_TRUE);Disable automatic widget hiding, otherwise the widget will not be displayed at all.
elm_index_autohide_disabled_set(index, EINA_TRUE);Add two arrays for even and odd configurations:
// Styles for an even number of pages
static const char *even_style[] = {
   "item/even_1",
   "item/even_2",
   "item/even_3",
   "item/even_4",
   "item/even_5",
   "item/even_6",
   "item/even_7",
   "item/even_8",
   "item/even_9",
   "item/even_10",
   "item/even_11",
   "item/even_12",
   "item/even_13",
   "item/even_14",
   "item/even_15",
   "item/even_16",
   "item/even_17",
   "item/even_18",
   "item/even_19",
   "item/even_20",
};

// Styles for an odd number of pages
static const char *odd_style[] = {
   "item/odd_1",
   "item/odd_2",
   "item/odd_3",
   "item/odd_4",
   "item/odd_5",
   "item/odd_6",
   "item/odd_7",
   "item/odd_8",
   "item/odd_9",
   "item/odd_10",
   "item/odd_11",
   "item/odd_12",
   "item/odd_13",
   "item/odd_14",
   "item/odd_15",
   "item/odd_16",
   "item/odd_17",
   "item/odd_18",
   "item/odd_19",
};
Add a functional for determining whether the number of pages is even or odd, as well as the starting index of the element in the array of styles.
Eina_Bool is_even_count = PAGES_COUNT % 2 == 0;
const int CENTER_INDEX = is_even_count ? 10 : 9;
int start_index = CENTER_INDEX - PAGES_COUNT / 2;

const char **style = is_even_count ? even_style : odd_style;
Add the index elements and set them the necessary styles, in accordance with the number of the pages.
for (int i = 0; i < PAGES_COUNT; ++i)
  {
     Elm_Object_Item *it = elm_index_item_append(index, NULL, NULL, (void *)i);
     elm_object_item_style_set(it, style[start_index + i]);
  }
The second argument is not used in this index style, so pass NULL there.
The third argument is a pointer to the callback function that will be called when this item is activated. You would not need it as well.
As the last argument of the function, pass the ordinal number of the page, these data will be attached to the index element. In your application, you can attach any data to the elements, but in this case, it is enough to store only the index of the element. We call a function in order to apply all the actions that were done when the index was created, otherwise it can be displayed incorrectly.
elm_index_level_go(index, 0);Finally, display the index:
evas_object_show(index);To create an index, use the following function:
static Evas_Object *
_index_create(UIData *ui)
{
   Evas_Object *index = elm_index_add(ui->layout);

   elm_object_style_set(index, "circle");
   elm_index_horizontal_set(index, EINA_TRUE);
   elm_index_autohide_disabled_set(index, EINA_TRUE);

   Eina_Bool is_even_count = PAGES_COUNT % 2 == 0;
   const int CENTER_INDEX = is_even_count ? 10 : 9;
   int start_index = CENTER_INDEX - PAGES_COUNT / 2;

   const char **style = is_even_count ? even_style : odd_style;

   for (int i = 0; i < PAGES_COUNT; ++i)
     {
        Elm_Object_Item *it = elm_index_item_append(index, NULL, NULL, (void *)i);
        elm_object_item_style_set(it, style[start_index + i]);
     }

   elm_index_level_go(index, 0);

   evas_object_show(index);

   return index;
}
Call it and put the index in the front area of the previously created layout.
static void
_layout_create(UIData *ui)
{
   ...

   ui->index = _index_create(ui);
   elm_object_part_content_set(ui->layout, "elm.swallow.content", ui->index);

   ...
}
Let's run it and see the result.
As you can see, the index widget is displayed, but nothing is selected and nothing happen when scrolling.
Now create a function to activate the element by passing as an argument the index widget and the ordinal number of the element that you want to activate. Since there is no standard function, we will show you how to write the one:
static void
_page_indicator_selected_set(Evas_Object *index, int page_index)
{
   Elm_Object_Item *item_to_select = elm_index_item_find(index, (void *)page_index);
   elm_index_item_selected_set(item_to_select, EINA_TRUE);
}
Here was used the function for searching for an element from the attached data, for this you should know that a sequence number were attached.
Now after adding all elements, call the function that was created to activate the first of the elements.
static Evas_Object *
_index_create(UIData *ui)
{
   ...

   _page_indicator_selected_set(index, 0);

   ...
}
If you change the active page, you ought to activate different elements. Let’s create custom smart event for the index widget. Invoke it forcibly from scroller callback when scroller page changes. Let's call this signal "active_page, changed". For this create a constant:
#define PAGE_CHANGED_EVENT "active_page,changed"Create a separate handler for the index, in which depending on the current page of the scroller, you will activate the elements. And sign in the index for this event.
static void
_active_page_changed_cb(void *data, Evas_Object *index, void *event)
{
   UIData *ui     = data;
   int cur_h_page = 0;

   elm_scroller_current_page_get(ui->scroller, &cur_h_page, NULL);

   _page_indicator_selected_set(ui->index, cur_h_page);
}

static Evas_Object *
_index_create(UIData *ui)
{
   ...

   evas_object_smart_callback_add(index, PAGE_CHANGED_EVENT, _active_page_changed_cb, ui);

   ...
}
You’ve created and registered your own widget smart event, like you did it, for example, with the click event for the button. Note that button event was emulated by the library, and your event should be emulated by you.
For this, use the following function:
void evas_object_smart_callback_call(Evas_Object *obj, const char *event, void *info);Use it from the scrolling event handler of the scroller, which was created in the last lesson.
Place the emission of the index page changing signal instead of outputting messages to the log. Now the callback supposed to looks like this:
static void
_scroll_cb(void *data, Evas_Object *scroller, void *event)
{
   static int prev_h_page = 0;
   int cur_h_page         = 0;

   elm_scroller_current_page_get(scroller, &cur_h_page, NULL);
   if (cur_h_page != prev_h_page)
     {
        UIData *ui = data;
        evas_object_smart_callback_call(ui->index, PAGE_CHANGED_EVENT, NULL);

        prev_h_page = cur_h_page;
     }
}
Now you can run the application and look at the result.
Everything is working. You can download the complete application code WearLesson022.
In the next lesson, by using a circle scroller, we'll handle the case, where the number of pages is larger than it is allowed for the index.