Watch Application: Developing a Watch Face Application
You can easily create a watch face application for a wearable device by taking advantage of the BasicWatch sample delivered with the Tizen SDK. The sample is a fully functional application that displays an analog clock on a canvas, and you can use it as a basis for your watch face application.
For more information on the sample functionality and the full source code, see Basic Watch task.
This feature is supported in wearable applications only.
This article describes the main steps required to develop a watch face application using the Tizen IDE. For more detailed information about the application development process, see Web Application Development Process. To learn how to design a watch face, see the Gear UI guides on the Samsung Developers site.
Step 1: Creating the Project
To create the application project in the IDE:
- Launch the Tizen IDE.
- In the IDE menu, select File > New > Tizen Web Project.
If the project option you want is not visible, make sure that you are using the correct perspective (Tizen Web). To switch perspectives, go to Window > Open Perspective > Other and select the perspective you need.
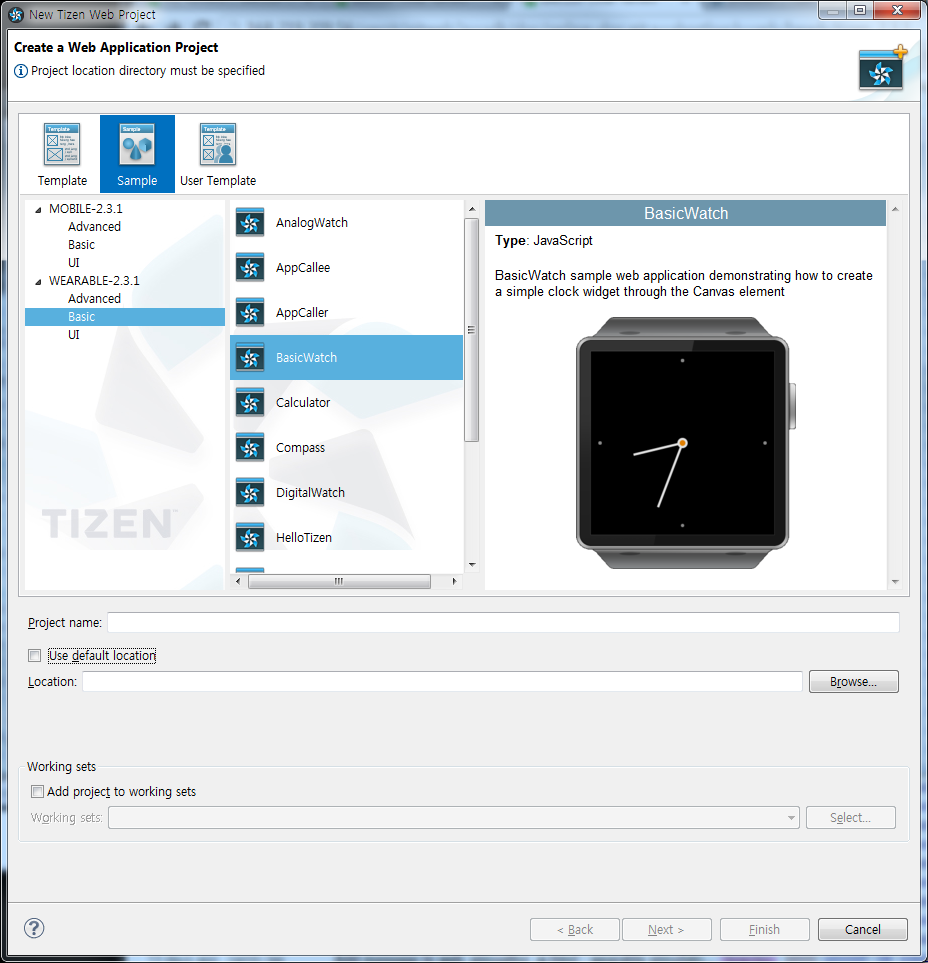
- In the New Tizen Web Project window, select Sample > WEARABLE-[version] > Basic > BasicWatch.
- Define your project name and location, and click Finish.
Figure: Creating the project

The new project is shown in the Project Explorer view of the IDE, with full sample content:
- css folder: CSS file directory
- js folder: JavaScript file directory
- config.xml: Application configuration file
- icon.png: Icon file
- index.html: HTML file defining the application layout
Setting the Application Layout
You can define the application layout with the index.html file.
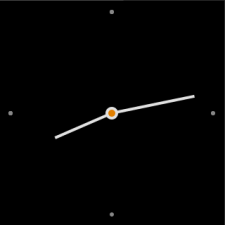
Figure: BasicWatch screen

By default, the BasicWatch sample application layout contains only the main screen that displays the clock on a canvas element.
<head>
   <title>Canvas Clock - Canvas API Tutorial</title>
   <link rel="stylesheet" type="text/css" href="css/style.css" />
</head>
<body>
   <div id="box">
      <canvas class="canvas"></canvas>
   </div>
   <script src="js/main.js"></script>
</body>
To draw the watch face on the canvas, use the main.js file:
- Create the clock in the middle of the canvas, and define the watch face style:
function renderDots() { 'use strict'; var dx = 0, dy = 0, i = 1, angle = null; context.save(); context.translate(canvas.width / 2, canvas.height / 2); context.beginPath(); context.fillStyle = '#999999'; - Create 4 dots on the sides of the watch face and use the fill() method to style the dots:
for (i = 1; i <= 4; i++) { angle = (i - 3) * (Math.PI * 2) / 4; dx = clockRadius * 0.9 * Math.cos(angle); dy = clockRadius * 0.9 * Math.sin(angle); context.arc(dx, dy, 3, 0, 2 * Math.PI, false); context.fill(); } context.closePath(); - Create the center point:
   context.beginPath();

   context.fillStyle = '#ff9000';
   context.strokeStyle = '#fff';
   context.lineWidth = 4;

   context.arc(0, 0, 7, 0, 2 * Math.PI, false);
   context.fill();
   context.stroke();
   context.closePath();
}
Configuring and Initializing the Application
You can set the application configuration using the config.xml file.
| Note |
|---|
| By default, the BasicWatch sample has the application category defined as <tizen:category name="http://tizen.org/category/wearable_clock" />.
To run your application on Samsung Gear 2, Samsung Gear 2 Neo, and Samsung Gear S devices, use <tizen:category name="com.samsung.wmanager.WATCH_CLOCK" /> instead. |
To initialize the application and define basic features, use the main.js file:
- Modify the window.requestAnimationFrame() method to make the application compatible with the main browsers:
window.requestAnimationFrame = window.requestAnimationFrame || window.webkitRequestAnimationFrame || window.mozRequestAnimationFrame || window.oRequestAnimationFrame || window.msRequestAnimationFrame || function (callback) { 'use strict'; window.setTimeout(callback, 1000 / 60); }; - Initialize the canvas context and define the canvas area:
window.onload = function () { 'use strict'; canvas = document.querySelector('canvas'); context = canvas.getContext('2d'); clockRadius = document.width / 2; canvas.width = document.width; canvas.height = canvas.width; - Define an event listener to detect back key events:
   window.addEventListener('tizenhwkey', function (e)
   {
      if (e.keyName == 'back')
      {
         tizen.application.getCurrentApplication().exit();
      }
   });

   window.requestAnimationFrame(watch);
};
Coding the Main Features
To display the actual time on the watch face, create the clock needles and set their position using the main.js file:
- Render the clock needles:
- The needles can be created using the renderNeedle() method.
To create the needle as a triangle or a polygon, assign the coordinate of the beginning point with the moveTo() method. To assign the rest of the points of the triangle or polygon, use the lineTo() method, which defines the position of the next connecting vertex. You can also adjust the size of each clock needle with the lineTo() method.
function renderNeedle(angle, radius) { 'use strict'; context.save(); context.rotate(angle); context.beginPath(); context.lineWidth = 4; context.strokeStyle = '#fff'; context.moveTo(6, 0); context.lineTo(radius, 0); context.closePath(); context.stroke(); context.closePath(); context.restore(); } - Create the hour needle using the renderHourNeedle() method:
function renderHourNeedle(hour) { 'use strict'; var angle = null, radius = null; angle = (hour - 3) * (Math.PI * 2) / 12; radius = clockRadius * 0.55; renderNeedle(angle, radius); } - Create the minute needle using the renderMinuteNeedle() method:
function renderMinuteNeedle(minute)
{
   'use strict';

   var angle = null,
       radius = null;

   angle = (minute - 15) * (Math.PI * 2) / 60;
   radius = clockRadius * 0.75;
   renderNeedle(angle, radius);
}
- The needles can be created using the renderNeedle() method.
- Indicate the current time:
- Determine the current time using the new Date() method.
To point the needles accurately, define variables for the current hour and minute.
function watch() { 'use strict'; var date = new Date(), hours = date.getHours(), minutes = date.getMinutes(), seconds = date.getSeconds(), hour = hours + minutes / 60, minute = minutes + seconds / 60; nextMove = 1000 - date.getMilliseconds(); - Every time a new time is indicated, erase the previous time (the previously positioned needles) using the clearRect() method:
context.clearRect(0, 0, context.canvas.width, context.canvas.height);
- Point the clock needles to display the current time:
   renderDots();
   renderHourNeedle(hour);
   renderMinuteNeedle(minute);

   context.restore();
   setTimeout(function()
   {
      window.requestAnimationFrame(watch);
   }, nextMove);}
- Determine the current time using the new Date() method.
Step 2: Building the Project
When your code is ready, you can build the project:
- In the Project Explorer view, select your project.
- In the IDE menu, select Project > Build Project.
Any build errors are shown in the Problems and Project Explorer views.
After building, the Tizen IDE automatically packages the project by creating a .wgt package file.
Step 3: Running the Application
You can run the application on the Emulator or a real target device.
To run the application on the Emulator:
- Launch the Emulator:
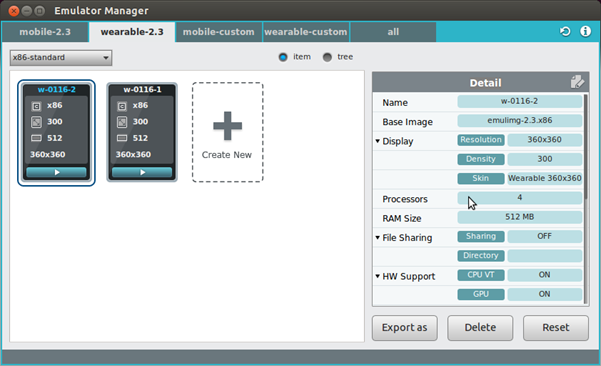
- Start the Emulator Manager by clicking the Emulator Manager icon in the Connection Explorer view.
- In the Emulator Manager window, select the wearable-[version] tab.
- If no Emulator images exist, create one by clicking Create New.
- Launch the Emulator by clicking the play button.

- In the Project Explorer view, right-click the project and select Run As > Tizen Web Application.
To run the application on a target device:
- Connect the target device to your computer.
- In the Project Explorer view, right-click the project and select Run As > Run Configurations.
- In the Run Configurations window, click New Launch Configuration and set the timeout using the Timeout value slider.
The timeout value represents the waiting time for the application launch operation. If you are using a lower configuration computer, set a higher timeout value to avoid application launch failure errors.
- To start the run, click Run.
BasicWatch Source Code
index.html:
<!DOCTYPE html><html><head>
   <meta charset="utf-8" />
   <meta name="viewport" content="width=device-width, initial-scale=1.0, maximum-scale=1.0" />
   <meta name="description" content="Canvas Clock - Canvas API Tutorial" />

   <title>Canvas Clock - Canvas API Tutorial</title>

   <link rel="stylesheet" type="text/css" href="css/style.css" />
</head>
<body>
   <div id="box">
      <canvas class="canvas"></canvas>
   </div>
   <script src="js/main.js"></script>
</body>
</html>
main.js:
var canvas, context, clockRadius;

window.requestAnimationFrame = window.requestAnimationFrame ||
   window.webkitRequestAnimationFrame ||
   window.mozRequestAnimationFrame ||
   window.oRequestAnimationFrame ||
   window.msRequestAnimationFrame ||
   function (callback)
   {
      'use strict';
      window.setTimeout(callback, 1000 / 60);
   };

function renderDots()
{
   'use strict';

   var dx = 0,
       dy = 0,
       i = 1,
       angle = null;

   context.save();

   /* Assign the clock creation location in the middle of the canvas */
   context.translate(canvas.width / 2, canvas.height / 2);

   /* Assign the style of the number which will be applied to the clock plate */
   context.beginPath();

   context.fillStyle = '#999999';

   /* Create 4 dots in a circle */
   for (i = 1; i <= 4; i++)
   {
      angle = (i - 3) * (Math.PI * 2) / 4;
      dx = clockRadius * 0.9 * Math.cos(angle);
      dy = clockRadius * 0.9 * Math.sin(angle);

      context.arc(dx, dy, 3, 0, 2 * Math.PI, false);
      context.fill();
   }
   context.closePath();

   /* Render center dot */
   context.beginPath();

   context.fillStyle = '#ff9000';
   context.strokeStyle = '#fff';
   context.lineWidth = 4;

   context.arc(0, 0, 7, 0, 2 * Math.PI, false);
   context.fill();
   context.stroke();
   context.closePath();
}

function renderNeedle(angle, radius)
{
   'use strict';
   context.save();
   context.rotate(angle);
   context.beginPath();
   context.lineWidth = 4;
   context.strokeStyle = '#fff';
   context.moveTo(6, 0);
   context.lineTo(radius, 0);
   context.closePath();
   context.stroke();
   context.closePath();
   context.restore();
}

function renderHourNeedle(hour)
{
   'use strict';

   var angle = null,
      radius = null;

   angle = (hour - 3) * (Math.PI * 2) / 12;
   radius = clockRadius * 0.55;
   renderNeedle(angle, radius);
}

function renderMinuteNeedle(minute)
{
   'use strict';

   var angle = null,
      radius = null;

   angle = (minute - 15) * (Math.PI * 2) / 60;
   radius = clockRadius * 0.75;
   renderNeedle(angle, radius);
}

function getDate()
{
   'use strict';

   var date;
   try
   {
      date = tizen.time.getCurrentDateTime();
   }
   catch (err)
   {
      console.error('Error: ', err.message);
      date = new Date();
   }

   return date;
}

function watch()
{
   'use strict';

   /* Import the current time */
   /* noinspection JSUnusedAssignment */
   var date = getDate(),
      hours = date.getHours(),
      minutes = date.getMinutes(),
      seconds = date.getSeconds(),
      hour = hours + minutes / 60,
      minute = minutes + seconds / 60,
      nextMove = 1000 - date.getMilliseconds();

   /* Erase the previous time */
   context.clearRect(0, 0, context.canvas.width, context.canvas.height);

   renderDots();
   renderHourNeedle(hour);
   renderMinuteNeedle(minute);

   context.restore();
   setTimeout(function ()
   {
      window.requestAnimationFrame(watch);
   }, nextMove);
}

window.onload = function ()
{
   'use strict';

   canvas = document.querySelector('canvas');
   context = canvas.getContext('2d');
   clockRadius = document.width / 2;

   /* Assign the area that will use Canvas */
   canvas.width = document.width;
   canvas.height = canvas.width;

   /* Add eventListener for tizenhwkey */
   window.addEventListener('tizenhwkey', function (e)
   {
      if (e.keyName === 'back')
      {
         try
         {
            tizen.application.getCurrentApplication().exit();
         }
         catch (err)
         {
            console.error('Error: ', err.message);
         }
      }
   });

   window.requestAnimationFrame(watch);
};

