
Task: Basic Watch
This task, based on the BasicWatch sample delivered with the Tizen SDK, demonstrates how you can use the HTML Canvas 2D Context API to create an analog watch on a canvas. For more information on the sample functionality and creating the sample with the full source code, see BasicWatch.
This task consists of the following parts:
- Defining the Application Layout defines how to create the application screens.
- Initializing the Application defines how to initialize the application.
- Displaying the Time defines how to show the clock needles on the watch canvas in a correct location.
This sample is a fully functional application for displaying a clock on a canvas.
Defining the Application Layout
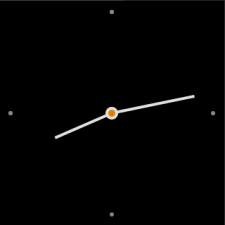
The BasicWatch sample application layout contains only 1 screen: the main screen that displays the clock.
The following figure shows the main screen of the application.
Figure: BasicWatch screen
Defining the Main Screen
- index.html Source File
The main screen displays a canvas element on which the clock face and needles are placed.
<head>
   <title>Canvas Clock - Canvas API Tutorial</title>
   <link rel="stylesheet" type="text/css" href="css/style.css" />
</head>
<body>
   <canvas class="canvas"></canvas>
   <script src="js/main.js"></script>
</body>
- main.js Source File
-
Create the clock in the middle of the canvas. Define the clock face style.
function renderDots() { 'use strict'; var dx = 0, dy = 0, i = 1, angle = null; context.save(); context.translate(canvas.width / 2, canvas.height / 2); context.beginPath(); context.fillStyle = '#999999'; -
Create 4 dots on the sides of the clock face and use the fill() method to style the dots.
for (i = 1; i <= 4; i++) { angle = (i - 3) * (Math.PI * 2) / 4; dx = clockRadius * 0.9 * Math.cos(angle); dy = clockRadius * 0.9 * Math.sin(angle); context.arc(dx, dy, 3, 0, 2 * Math.PI, false); context.fill(); } context.closePath(); -
Create the center point.
   context.beginPath();

   context.fillStyle = '#ff9000';
   context.strokeStyle = '#fff';
   context.lineWidth = 4;

   context.arc(0, 0, 7, 0, 2 * Math.PI, false);
   context.fill();
   context.stroke();
   context.closePath();
}
-
Initializing the Application
- config.xml Source File
Define the application category.
<tizen:category name="http://tizen.org/category/wearable_clock" />
Note To run your application on Samsung Gear 2, Samsung Gear 2 Neo, and Samsung Gear S devices, use <tizen:category name="com.samsung.wmanager.WATCH_CLOCK" /> instead of <tizen:category name="http://tizen.org/category/wearable_clock" />.
- main.js Source File
-
Modify the window.requestAnimationFrame() method to make the application compatible with the main browsers.
window.requestAnimationFrame = window.requestAnimationFrame || window.webkitRequestAnimationFrame || window.mozRequestAnimationFrame || window.oRequestAnimationFrame || window.msRequestAnimationFrame || function (callback) { 'use strict'; window.setTimeout(callback, 1000 / 60); }; -
Initialize the canvas context and define the canvas area.
window.onload = function () { 'use strict'; canvas = document.querySelector('canvas'); context = canvas.getContext('2d'); clockRadius = document.width / 2; canvas.width = document.width; canvas.height = canvas.width; -
Define an event listener to detect back key events.
   window.addEventListener('tizenhwkey', function (e)
   {
      if (e.keyName == 'back')
      {
         tizen.application.getCurrentApplication().exit();
      }
   });

   window.requestAnimationFrame(watch);
};
-
Displaying the Time
This section builds upon the elements described in Creating Text and Lines on the Canvas.
Creating the Clock Needles
The clock needles are rendered in the main.js file.- Rendering the Clock Needles
The needles can be created using the renderNeedle() method.
To create the needle as a triangle or a polygon, assign the coordinate of the beginning point with the moveTo() method. To assign the rest of the points of the triangle or polygon, use the lineTo() method, which defines the position of the next connecting vertex. You can also adjust the size of each clock needle with the lineTo() method.
function renderNeedle(angle, radius) { 'use strict'; context.save(); context.rotate(angle); context.beginPath(); context.lineWidth = 4; context.strokeStyle = '#fff'; context.moveTo(6, 0); context.lineTo(radius, 0); context.closePath(); context.stroke(); context.closePath(); context.restore(); } - Creating the Hour Needle
To create the hour needle, use the renderHourNeedle() method.
function renderHourNeedle(hour) { 'use strict'; var angle = null, radius = null; angle = (hour - 3) * (Math.PI * 2) / 12; radius = clockRadius * 0.55; renderNeedle(angle, radius); } - Creating the Minute Needle
To create the minute needle, use the renderMinuteNeedle() method.
function renderMinuteNeedle(minute)
{
   'use strict';

   var angle = null,
       radius = null;

   angle = (minute - 15) * (Math.PI * 2) / 60;
   radius = clockRadius * 0.75;
   renderNeedle(angle, radius);
}
Indicating the Current Time
The time displaying functionality is implemented in the main.js file.
- Determining the Time
Use the new Date() method to find out the current time. To point the needles accurately, define variables for the current hour and minute.
function watch() { 'use strict'; var date = new Date(), hours = date.getHours(), minutes = date.getMinutes(), seconds = date.getSeconds(), hour = hours + minutes / 60, minute = minutes + seconds / 60; nextMove = 1000 - date.getMilliseconds(); - Erasing the Previous Time
Use the clearRect() method to delete the previous time (the previously positioned needles) every time a new time is indicated.
context.clearRect(0, 0, context.canvas.width, context.canvas.height);
- Pointing the Clock Needles
Display the current time.
   renderDots();
   renderHourNeedle(hour);
   renderMinuteNeedle(minute);

   context.restore();
   setTimeout(function()
   {
      window.requestAnimationFrame(watch);
   }, nextMove);
}
