Working with Raphael JS Library on Tizen
PUBLISHED
This article describes the Raphael JavaScript Library and how to work with it on Tizen. You will learn how to draw simple 2D shapes: built-in (rectangles, circle, ellipse) and other (using paths), how to work with attributes of Raphael elements and create simple animations. You will also learn how to manipulate elements (move, scale and rotate).
Getting started with Raphael JS Library
Raphael JS is a small JavaScript library which allows working with vector graphic in your Tizen Web application. It uses the SVG W3C Recommendation and VML. By using SVG objects, each of them is also a SVG DOM object, which allows for example attaching event handlers to them.
To use the Rapheal JS library:
- Download the Raphael JS framework from its dowload page. You can choose to download the minified or the uncompressed version of the library.
- Include it into your project in the head section.
Note: For your easy reference, on a particular functions used/described in this article has been hyperlinked to the suitable fragments of the Raphael Documentation.
For more information about the Raphael JS library and for some amazing demos, visit raphaeljs.com. The documentation is available here. A great page showing the capabilities of the Raphael JS Library can be found here.
Introducing the RaphaelPaint sample application
The RaphaelPaint sample application demonstrates how to use the Raphael JavaScript Library to create and work with 2D vector graphics.
The UI of the sample application consists of a single page. After launching, you can see a toolbar on the top of the page and an empty canvas. The toolbar contains the following options: “arrow”, “rectangle”, “square”, “triangle”, “circle”, “ellipse”, “star”, “eraser”, “fill color”, “stroke color” and “clear canvas”. The first one allows the manipulation of the selected shapes (moving, scaling and rotating). The next six options are responsible for the drawing of typical shapes. The usage of other tools is self explanatory.
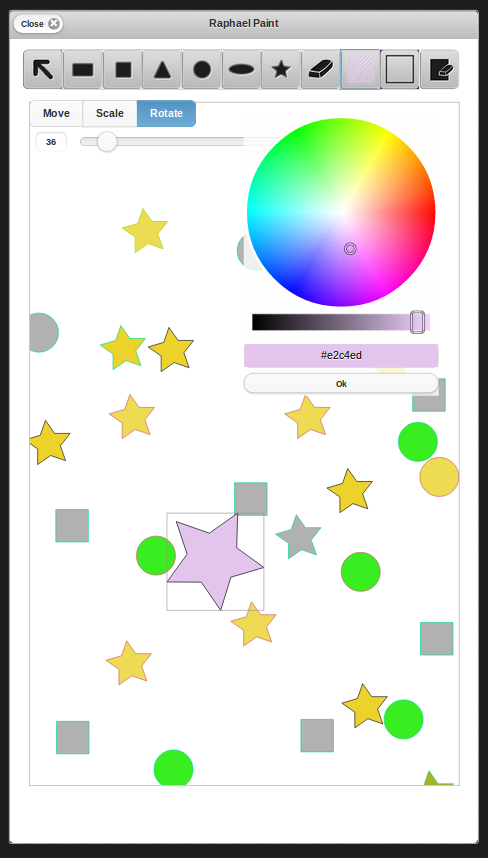 Figure 1 The sample application screenshot
The sample application uses the full Tizen viewport (720×1280), includes the jQuery Mobile 1.3.0 framework and the jQuery 1.9.0 library and tested on Tizen SDK 2.0.0.
Drawing Shapes & Paths
You can draw shapes using Raphael JS in two ways:
- Using built-in shapes (provided by the library): rectangle, circle, ellipse
- Using paths.
Both of these ways are described below.
All shapes are drawn on the Raphael paper, so to use the Raphael JS framework you must first create at least one its instance. You can do this by using the Raphael() function. This function can take several different sets of arguments. The sample application uses the following one:
container = document.getElementById('canvas_container');
paper = new Raphael(container, config.canvas.width, config.canvas.height);
container represents a DOM element, capable of holding other elements. The Raphael paper is drawn inside this element. Instead of applying container as parameter you can also define the (x, y) position of the paper.
The width and height parameters represent the width and height of the created paper.
When we have our drawing surface, it is time to draw some shapes onto it. To operate this surface, we need the coordinates of the click position. For this purpose we need to attach an event handler to the container:
$("#canvas_container").on(
        "click",
        function(e) {
            e.preventDefault();
            var rect = container.getBoundingClientRect();
            var x0 = e.pageX, y0 = e.pageY;
            var x = x0 - rect.left, y = y0 - rect.top;
            var elem = paper.getElementByPoint(x0, y0);

            if (config.tool === "arrow") {
                ...
            } else {
                paint(x, y);
            }
        })
The getBoundingClientRect() function returns a TextRectangle object with four attributes: top, left, right, bottom. These attributes define the container’s position. When you click inside of the container, the callback function gets an event object (e) as a parameter which has pageX and pageY attributes holding click position. This position is relative to the upper-left corner of the device screen. We have to convert it to position relative to the upper-left corner of the container by doing a little math:
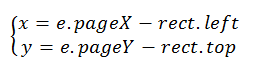
Where rect means the TextRectangle object returned by the getBoundingClientRect () function.
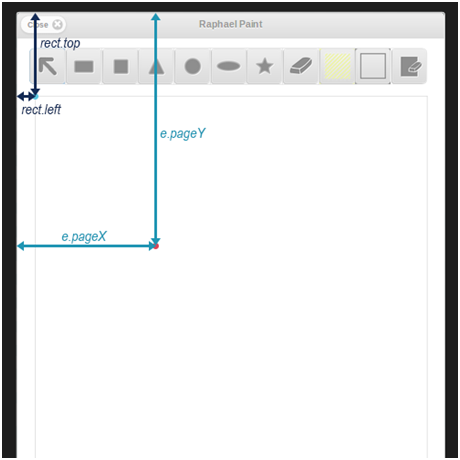 Figure 2 Determining the coordinates of a drawn object
You can now draw shapes in the proper place (of course if you choose any tool other than the arrow).
Note: The coordinate system for Raphael is the same as for the canvas.
 Figure 3 The Raphael JS coordinate system
Built-in Shapes
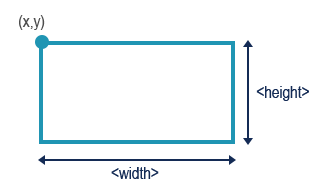
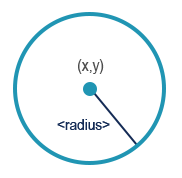
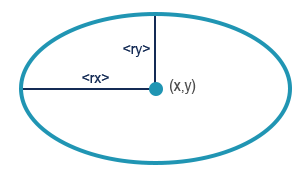
As mentioned before, there are three built-in shapes provided by the Raphael JS library. To draw them you have to use the following functions (the following images describe how to understand the input parameters):
- Rectangle – Paper.rect() function
var rect = paper.rect(x, y, width, height);
We also use a paper.rect() method to draw a square (a rectangle, in which the width = the height).
- Circle – Paper.circle() function
var circle = paper.circle(x, y, radius);
- Ellipse – Paper.ellipse() function
var ellipse = paper.ellipse(x, y, rx, ry);
Drawing Paths
But how to draw other shapes (e.g. triangle, other polygon)? We can use “paths”.
A path is a string consisting of a command and space separated arguments, e.g.
"M 100 100 l 100 0 l 0 100 l -100 -100"
This path means: “move to (100, 100), line 100 in right direction, line 100 down and draw line directed upper-left by 100 pixels in x axis and 100 pixels in y axis”. The outcome is shown below.
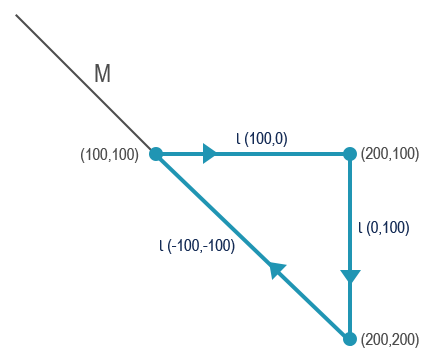
The same effect would give a path:
"M 100 100 l 100 0 l 0 100 z”
Which means: “move to (100, 100), line 100 in right direction, line 100 in down direction and close the path (connect the last and first point of the path)”.
The commands and their meanings according to the Raphael reference:
There are two types of commands. The command “L” (with uppercase) doesn’t mean the same as “l” (with lowercase). The first one type means absolute command, the second one – relative. What is the difference?
"L 100 0” means: line to point (100, 0)
"l 100 0” means: line 100 to the right
You can find more information about commands here.
The RaphaelPaint sample application uses paths to draw the following shapes:
- Triangle
- Star
Newly created shapes have visible bounding boxes (just as these selected). To get the bounding box for any element, you can use the Element.getBBox() function. The only parameter which the function takes is a Boolean value. It specifies whether you want to have a bounding box with the original shape (before transformations). It is optional and by default equals false. An example of using this function:
addBox : function() {
    ...

    var bBox = selectedShape.getBBox();
    lastbBox = paper.rect(bBox.x,bBox.y,bBox.width,bBox.height).attr({stroke:"#9a9a9a"});
},
As you can see, the function gets the bounding box for selected shape and draws it. The box is added after creating the shape and every time the element is dragged.
Working with attributes
To change or get the attributes of the drawn element you can use the Element.attr() function.
These two ways of setting attributes are equal:
elem.attr({
    // Attributes of the element
    "fill" : "#dfed48",
    "stroke" : "#dfed48"
});

Elem.attr("fill", "#dfed48");
Elem.attr("stroke ", "#dfed48");
You can set one or many element’s attributes at once. When setting multiple attributes you have to pass object with keys specifying attributes’ names and values specifying attributes’ values. When setting one attribute, the first parameter is the name of the attribute, the second one – the new value. If only one parameter is passed (the attribute’s name), the Element.attr() function returns the value of this attribute, e.g. Elem.attr(“fill”) will return the “#dfed48” string. Possible attributes’ names are described in Raphael Reference and W3C SVG 1.1 Recommendation from 16 August 2011.
Adding transformations
The RaphaelPaint allows moving, scaling and rotating of objects. To provide these transformations you can use the Element.transform() function. The way of invoking this function is similar to the method of creating paths. You need to create a string with commands and their parameters. The sample application uses three of the four commands provided by Raphael JS:
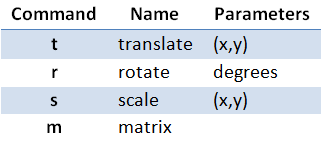
Note: Describing the m (matrix) command isn’t in the scope of this article. You need to apply the created string as parameter of the Element.transform() function. In case of our sample application the applyTransforms() function is responsible for this:
/**
 * Adds specified transformation to the element
 *
 * @param that {Object} Element to which the transformation is added
 */
applyTransforms : function(that) {
    var str = "t" + that.translate[0] + "," + that.translate[1] + "r"
            + that.rotate + "s" + that.scale[0] + "," + that.scale[1];
    that.transform(str);
    …
}
that.translate, that.rotate and that.scale properties are created and initialized while setting properties of newly created shape. These properties will be described in more details later.
var setProperties = function(elem) {
    ...

    // Initial values of applied transforms
    elem.translate = [ 0, 0 ];
    elem.scale = [ 1, 1 ];
    elem.rotate = 0;

    ...

    return elem;
}
It’s important to apply transformations in the proper order. “t100,20r60” and “r60t100,20” look very similar, but give different results:
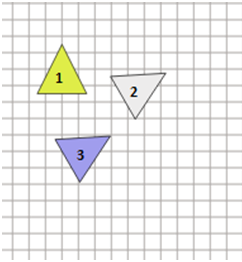
1 – the triangle without any transformations,
2 – the triangle after “t100,20r60” transformation
3 – the triangle after “r60t100,20” transformation
Keep that in mind while adding transformations to Raphael elements.
You know how to apply created transformation to an element. It’s time to set commands’ attributes of the transformation. These attributes are related with drag event. Below fragment will explain “how”. Firstly, you need to add the event handler for dragging of the element you can use the Element.drag() function.
// Sets event handlers for moving, drag start and drag end
elem.drag(transforms.move, transforms.start, transforms.up);
You can find event handlers for moving, drag start and drag end for all drawn shapes at the ./js/transforms.js module.
/**
 * Event handler for drag start
 */
start : function() {
    that = this;

    ...

    if (config.tool === 'arrow') {
        ...

        switch (config.operation) {
        case "move": {
            // read last translation
            that.odx = that.translate[0];
            that.ody = that.translate[1];
        }
            break;

        case "scale": {
            // read last scale
            that.osx = that.scale[0];
            that.osy = that.scale[1];
        }
            break;

        default:
            break;
        }
    }
},

/**
 * Event handler for moving
 * @param dx {Number} shift by x axis from the start point
 * @param dy {Number} shift by y axis from the start point
 */
move : function(dx, dy) {
    if (config.tool === 'arrow') {
        switch (config.operation) {
        case "move": {
            // change translation
            that.translate[0] = that.odx + dx;
            that.translate[1] = that.ody + dy;
        }
            break;

        case "scale": {
            // change scaling
            if ((that.fig !== "circle") && (that.fig !== "square")) {
                // for all figures except circle and square
                that.scale[0] = that.osx + 10 * dx
                        / config.canvas.width;
                that.scale[1] = that.osy + 10 * dy
                        / config.canvas.height;
            } else {
                // for circle and square
                if (dx > dy) {
                    that.scale[0] = that.scale[1] = that.osx + 10 * dx
                            / config.canvas.width;
                } else {
                    that.scale[0] = that.scale[1] = that.osy + 10 * dy
                            / config.canvas.height;
                }
            }
        }
            break;

        default:
            break;
        }

        transforms.applyTransforms(that);
    }
},
Simple animations
To apply an animation to an object you must use the Element.animate() function. It creates and starts the animation for the specified element. Example of using Element.animate() function:
// Animation for selected element
that.animate({
    "fill-opacity" : 0.4
}, 500);
The first parameter defines the final attributes’ values for the animated shape. The second one specifies the animation duration (in milliseconds). The Element.animate() function takes also a third and fourth parameter that respectively mean the easing type and callback function (called when the animation ends).
The RaphaelPaint sample application uses the Element.animate() function when you drag some element. When a drag-start event gets invoked, the fill-opacity attribute of the shape decreases and the on drag-end returns to its previous state.
Working with ‘paper’
You can draw shapes, change their attributes and add transformations and animations. But how to select the element, which you want to manipulate? Raphael JS proposes the Paper.getElementByPoint(x, y) function. It returns the topmost element having the (x,y) point contained within its shape. x,y represent the x and y coordinates from the upper-left corner of the device’s screen (look at: figure 2).
var elem = paper.getElementByPoint(e.pageX, e.pageY);
You can remove the selected element from the paper using the ‘Eraser’ tool which invokes the Element.remove() function.
/**
 * Removes specified element (figure) from canvas
 * @param elem {Object} Element to be removed
 */
removeShape : function(elem) {
    elem.remove();
    if (lastbBox) {
        lastbBox.remove();
    }
},
If you want to remove all the elements from the paper, you can use the Paper.clear() function. It doesn’t take any parameters, e.g.
case "clear": {
    ...
    paper.clear();
    ...
}
break;
Summary
We hope this article will show you how you can utilize the Raphael JS library in your Tizen Web applications. You can use it to create:
- Specific charts for presenting data, e.g. Animated Skills Diagram, Population Pyramid,
- Simple games, e.g. puzzles, etc.
- UI for your application with menus as clickable graphic elements,
- Maps and plans with interactive elements, e.g. Woodsetton School Map,
- And many more….
Was this document helpful?
We value your feedback. Please let us know what you think.