SceneJS – creating and importing 3D animations in the MD2 format
PUBLISHED
Introduction
Together with this article we have attached a sample application named SceneJS_3D_MD2_DEMO which was created with the Tizen SDK 2.3 (revision 2). Please have an in depth view on the code of the sample application in order to get new insights on working with the MD2 file format.
Creating an animated 3D model in Blender
As you can see on Figure 1, the MD2 model looks different than the model in the past SceneJS articles. That is because this model of the Lumber Jack does not consist of several elements like in the previous SceneJS articles. The MD2 model is a one, textured and animated mesh in Blender. More over OBJ models aren’t meant to store 3D animations. On the other hand MD2 models were designed specifically to be used in Quake 2, hence they needed the ability to store the animation data. You may be wondering how the animation data in the MD2 files is stored. Basically, it is stored as a set of positions of the vertices of the mesh over each frame. They are known to the wider public as morph targets.

Figure 1 – The 3D Lumber Jack model with bones inside Blender.
Why we are writing about this? Because in order to place our Lumber Jack MD2 model inside SceneJS (Figure 2) we first needed to create a single model out of separate OBJ Lumber Jack elements, texture them, insert the bones for the character and finally we have animated him inside Blender. Then, when the model was exported, the bones (Figure 1) of the model were not exported. We have only exported the morph targets for different animation frames. The bones are only used inside Blender to make it easier for the animator to change the position of the vertices in each animation frame.
The modelling and animating a 3D character from scratch is not the main topic of this article, so we encourage you to look at the Blender Wiki in order to learn how to model the character mesh, prepare the UV maps, texture them, put in the bones and finally animate the character. Having done that, we can focus on exporting the animated Blender mesh to the MD2 format.

Figure 2 – The 3D, animated Lumber Jack model, imported from a MD2 file.
Exporting an animated 3D model from Blender to MD2
You might think that exporting the animated 3D model from Blender to MD2 will be as simple as in the case of the OBJ files. It isn’t the case this time. The process will be much complicated. In order to perform the export operation to MD2, first we need to download and install the exporter plugin to the MD2 file format. You can find it here.
Please download the md2_export_263.py python file. Then run Blender. The next thing to do is to install the python plugin in Blender. But before doing that we need to patch the plugin. Otherwise we will get errors later, in the export process. So you need to edit the plugin file with a specific editor which can edit the python code. It is crucial that you use a dedicated editor to python, because as you know, in python indentations are very important. If you will perform the changes inappropriately, then the plugin won’t work. We recommend using for this task the widely known Notepad++ editor.
After opening the python plugin file in Notepad++ you should get at line number 603 the following code:
[…]

    @staticmethod
	def getSkins(mesh):
		skins = []
		for material in mesh.materials:
			for texSlot in material.texture_slots:
				if not texSlot or texSlot.texture.type != "IMAGE":
					continue

				skins.append(texSlot.texture.image.filepath)

		return skins

 […]
You need to add two lines beneath the for material in mesh.materials (line 606). The first line from the code below will print out the materials (or the lack of them) of your object to the Blender console. You can access the console in Blender by entering the Window menu and then clicking the Toggle System Console. The second line will make sure that the rest of the code will execute only when there are materials present.
[…]

print(str(material))
if material is not None:

[…]
Now, use the code above to change the python plugin file, but please remember to precisely put the indentations just like in the example below.
[…]

    @staticmethod
	def getSkins(mesh):
		skins = []
		for material in mesh.materials:
			print(str(material))
			if material is not None:
				for texSlot in material.texture_slots:
					if not texSlot or texSlot.texture.type != "IMAGE":
						continue

					skins.append(texSlot.texture.image.filepath)

		return skins

[…]
These two lines will prevent us from the occurrence of an error about missing materials for the exported model in Blender.
Having done that, we can finally install the plugin in Blender. To do that, go to the File menu, open the User Preferences, then go to Addons and choose Install Addon. After that, tick the checkbox in order to activate the addon.
After creating your animated 3D object, in order to export it to SceneJS via the MD2 file format you need to do the following things. First of all select the desired object, then go to the File menu, choose export and pick Quake II’s MD2 (.md2). You will be then transferred to a window where you can specify the file name and save the file. But before doing that please look at the export options in the lower left part of the screen (Figure 3).
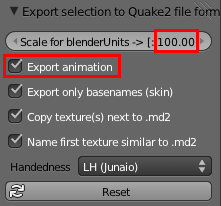
Figure 3 – the MD2 export plugin options in Blender.
In the export panel please check the tick next to the Export animation label. The purpose of this is quite self- explanatory. The second thing to do is to change the scale of the object. You can change it to 100 from the default 1000 value. We are doing that because if we try to import a MD2 object to SceneJS with a scale of 1000, it will surely be too large and won’t fit in the screen. So the best way is to shrink it in the export options. If the value of 100 will still be too big for you, then feel free to decrease it more. Of course, you can always omit that step and use a scale node in SceneJS in order to set the desired object size.
After clicking the Save button you will have to wait a bit for the export of your MD2 file to take place. Take note that along with your MD2 file a JPG file will be exported, containing the texture of your object. When the process is finished you can move to the next step, which is importing the MD2 file to SceneJS.
Importing a MD2 3D animated model to SceneJS
Importing a MD2 model with animation to SceneJS is quite easy. First, remember to put both the MD2 file and its JPG texture file in the same folder of your Tizen Web project. Then you must add the MD2 import node into your SceneJS code along with a texture node, a material node and eventually some rotate and translate nodes in order to position your model as you wish. Below you can find an example of such code. Remember to change the paths in the MD2 node and the texture node, so that they will point to the appropriate assets in your Tizen Web project.
[…]

nodes: [{

        id: "lumberMaterial",
        type: "material",
        color: {
            r: 1,
            g: 1,
            b: 1
        },
        specularColor: {
            r: 1.0,
            g: 1.0,
            b: 1.0
        },
        specular: 1.0,
        shine: 70.0,
        emit: 0,
        alpha: 1,

        nodes: [{


            type: "name",
            name: "LumberMan",

            nodes: [{

                type: "texture",
                src: "models/model_texture.jpg",

                nodes: [

                    {
                        type: "import/md2",
                        src: "models/model_animated.md2",
                        rate: 1
                    }
                ]
            }]
        }]

    }]

[…]
After using the code above and running your Tizen web application with SceneJS, you should see on the screen an animated MD2 3D model. Please note that the MD2 loader node has a rate parameter. You can use that parameter to change the speed of the animation. In our example it is set to 1, which means the animation is played back at the same speed as it was designed in Blender. But you can change this value to 2 or 3 and then accordingly the animation will be faster two or three times than the previously designed animation in Blender.
Summary
In this article we showed you where to look in order to learn how to create animated 3D models in Blender. We have also showed you how to patch and install the MD2 file export plugin for Blender. Finally we made a description of importing an animated MD2 model along with a texture into SceneJS. We hope that this article will be a big aid for you in creating 3D Tizen Web applications with animated 3D models in SceneJS.
Was this document helpful?
We value your feedback. Please let us know what you think.