IvanK library introduction
PUBLISHED
This article describes an IvanK JavaScript library and how to work with it on Tizen.
Introduction
IvanK Lib is an open source JavaScript graphics library. It is small, simple and very light. It renders graphics using WebGL and runs in browsers with WebGL support (also on mobile devices).
To use the IvanK Lib in your Tizen Web application:
- download the library from the Download section,
or
- link your application directly to the latest version:
<script type="text/javascript" src="js/ivank.js"></script>
See some Demos and Projects using IvanK library. Two of them were used to create the Tizen Web sample applications attached to this article.
You can find very useful information about the IvanK library in this Tutorial. The API documentation can be found HERE.
Sample applications
For this article we created two Tizen Web sample applications (IvanKBox2D and IvanKPsuedo3D) using the source code of demos („Box2D” and „Pseudo 3D”) from the IvanK homepage.
The sample applications use the full Tizen viewport (720×1280) and were tested on Tizen SDK 2.2.1.
How to work with the IvanK library
This section describes some basic issues about working with the IvanK library. For more information please refer to the IvanK Lib homepage.
A coordinate system for IvanK looks as follows:
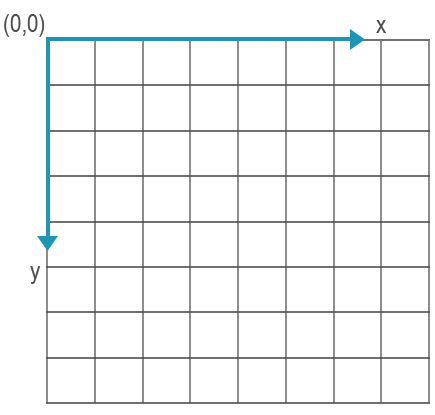
Figure 1: A coordinate system for IvanK
The units are pixels.
IvanKPseudo3D
First, we’ll focus on the IvanKPseudo3D sample application. How to create such an application?
The first step is creating a <canvas> element in your DOM structure:
<canvas id="c" width="720" height="1280"></canvas>
As you can see, the canvas fits the HD (720×1280) resolution. The canvas id attribute is used to create a Stage object that is the root of the display tree for IvanK (look at the Class hierarchy section in the IvanK tutorial).
stage = new Stage("c");
When we have the Stage we can create other objects. We’ll add them as children of the Stage to display them. We create a new Sprite and set its position:
s = new Sprite();
s.x = stage.stageWidth/2;
s.y = stage.stageHeight/2;
We could also set its rotation and size as follows:
s.rotation = Math.random()*360;
s.scaleX = s.scaleY = 0.5 + Math.random();
And we add a newly created object to the Stage:
stage.addChild(s);
However, in the IvanKPseudo3D sample application it looks a little more complicated because our earth should have a specific shape. The following code snippet is responsible for giving shape and 3D effect to our earth object:
vrt = []; ind = []; uvt = [];
var lat, lon, x, y, z, p;

for (var i=0; i<=n; i++)        // rows
    for (var j=0; j<=n; j++)    // cols
    {
        lat = -Math.PI/2 + i*Math.PI/n;
        lon =  Math.PI   + j*Math.PI/n;
        x = Math.cos(lat) * Math.cos(lon);
        y = Math.sin(lat);
        z = Math.cos(lat) * Math.sin(lon);
        p = 9/(8+z);            // perspective
        vrt.push(p*x, p*y);
        uvt.push(0.5*j/n, i/n);
        if(i<n && j<n)          // 6 indices for 2 triangles
           ind.push(nn*i+j, nn*i+j+1, nn*(i+1)+j, nn*i+j+1, nn*(i+1)+j, nn*(i+1)+j+1);
    }
vrt, ind, uvt are respectively: vertices, indices and coordinates used to apply texture mapping.
Note: It isn’t in the scope of this article to explain how the above code snippet works. If you want to know more please refer to this article. It describes how you can use triangles for 3D effects in ActionScript (the IvanK library is based on the Flash API).
Now we can use the calculated data (vrt, ind, uvt) to draw an appropriate shape and draw a bitmap on it in a desired way (look Figure 4):
// static shading layer
var sh = new Sprite();  s.addChild(sh);
sh.graphics.beginBitmapFill(new BitmapData("images/shade.png"));
sh.graphics.drawTriangles(vrt, ind, uvt);
The above code snippet is responsible for drawing a shading layer for our Earth object.

Figure 2: shade.png bitmap

Figure 3: earth.jpg bitmap
We fill the Sprite with an earth bitmap in a similar way:
s.graphics.beginBitmapFill(bd);
s.graphics.drawTriangles(vrt, ind, uvt);
The above code snippet is a fragment of the onEF() function, which is invoked on the Event.ENTER_FRAME event:
stage.addEventListener(Event.ENTER_FRAME, onEF);
The full onEF() function looks as follows:
function onEF(e)
{
    s.scaleX = s.scaleY = zoom = (3*zoom + 50 + stage.mouseY)*0.25;
    var vel = 0.00005*(stage.mouseX - s.x);
    for(var i=0; i<uvt.length; i+=2) uvt[i] += vel;  // shifting X coordinate

    s.graphics.clear();
    s.graphics.beginBitmapFill(bd);
    s.graphics.drawTriangles(vrt, ind, uvt);
}
It is responsible for zooming and rotating the earth object. The stage.mouseX and stage.mouseY mean the touch coordinates.
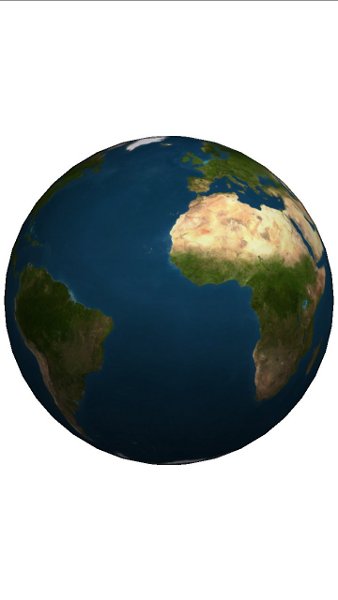
Figure 4 IvanKPseudo3D sample application screen shot (device)
Note: The application looks different on the device and the Emulator. On the device the background is white and on the Emulator – black. This is because the background of IvanK is transparent so it is the same as parent background (different in case of the device and the Emulator).
IvankBox2D
The IvankBox2D sample application uses IvanK library and Box2dWeb (version 2.1a.3) physics engine. The Box2dWeb physics engine performs all simulations. The IvanK library displays their results.
Note: More information about the Box2dWeb physics engine can be found on the Box2dWeb homepage or in two articles published on developer.tizen.org: “Box2DWeb in Cocos2D-HTML5 games” (“Box2dWeb” section) and “Custom 3D graphics on Tizen” (“Physics engine – Box2dWeb” section).
Learning basics of the Box2dWeb physics engine isn’t in the scope of this article. It’s recommended to refer to the aforementioned articles to understand the Box2dWeb physics engine before reading this section.
var bodies = [];    // instances of b2Body (from Box2D)
var actors = [];    // instances of Bitmap (from IvanK)
The “bodies” and “actors” tables store the instances of Box2D and IvanK objects to allow easy access to them. As previously, we create a canvas element and a Stage object (look to the previous section for details). Next we need to create a background for our application:
// background
var bg = new Bitmap( new BitmapData("images/winter2.jpg") );
bg.scaleX = bg.scaleY = stage.stageHeight/512;
stage.addChild(bg);
We create a Box2D world with box and ball objects that can collide with each other. We can define their shape, position, size, etc.
When you have all Box2D objects created you can draw them using the IvanK library. You need to create a new Sprite object (actor), set the bitmap to this object, scale it and add it as a child of the Stage object.
// both images are 200 x 200 px
var bxBD = new BitmapData("images/box.jpg");
var blBD = new BitmapData("images/bigball.png");

(...)
var bm = new Bitmap(i<15 ? bxBD : blBD);  bm.x = bm.y = -100;
var actor = new Sprite();  actor.addChild(bm);
if(i<15) { actor.scaleX = hw;  actor.scaleY = hh; }
else     { actor.scaleX = actor.scaleY = hw;      }

actor.addEventListener(MouseEvent.MOUSE_MOVE, Jump);
stage.addChild(actor);
actors.push(actor);
“hw” and “hh” mean respectively half width and half height of Box2D body.
Additionally, we add an event listener to the Sprite object. The MouseEvent.MOUSE_MOVE event invokes the Jump() function:
up = new b2Vec2(0, -5);

(...)

function Jump(e)
{
    var a = e.currentTarget;    // current actor
    var i = actors.indexOf(a);
    //  cursor might be over ball bitmap, but not over a real ball
    if(i>=15 && Math.sqrt(a.mouseX*a.mouseX + a.mouseY*a.mouseY) > 100) return;
    bodies[i].ApplyImpulse(up, bodies[i].GetWorldCenter());
}
The Jump() function is responsible for applying an impulse to the moved object.
As previously, we need the onEF() function which looks as follows:
function onEF(e)
{
    world.Step(1 / 60,  3,  3);
    world.ClearForces();

    for(var i=0; i<actors.length; i++)
    {
        var body  = bodies[i];
        var actor = actors [i];
        var p = body.GetPosition();
        actor.x = p.x *100; // updating actor
        actor.y = p.y *100;
        actor.rotation = body.GetAngle()*180/Math.PI;
    }
}
The finished IvanKBox2D sample application:
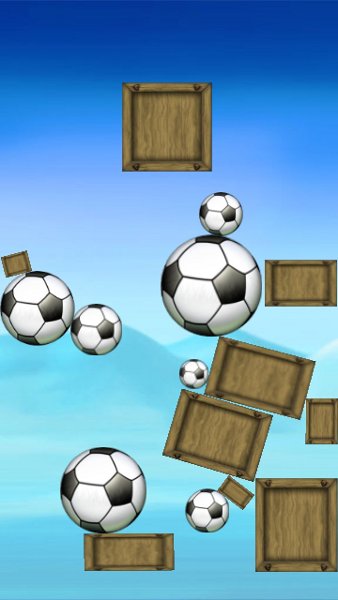
Figure 5 IvanKBox2D sample application screen shot
Summary
We hope this article has shown you how you can use the IvanK graphics library in your Tizen Web application. Use it to create amazing games and applications
Was this document helpful?
We value your feedback. Please let us know what you think.