HTML-GL – rendering HTML with WebGL
PUBLISHED
Introduction
WebGL gives web developers new possibilities, not connected only with 3D graphics. Have you ever thought about using WebGL to actually render the DOM elements? If not, now is the time. It is possible to achieve that out of the box, with the usage of the HTML-GL library. This library parses the DOM elements and creates their equivalents on the WebGL accelerated canvas. What is important, the whole process is very easy and if you are familiar with PIXI.js, then you will learn using this library in a very short time. HTML-GL is based on PIXI.js, so you will be able to use any tools that are inside Pixi.js to manipulate your WebGL content.
This article describes how to setup the library. We will also show how you can use the <html-gl> tag to render HTML elements with WebGL. Finally, we will present how to apply graphical filters (figure 1) to the WebGL content based on HTML. Together with this article we have bundled the HTMLgl example application. The sample application was created using the Tizen SDK 2.3 (rev2). Please feel free to build and run this application and play around with the WebGL effects.
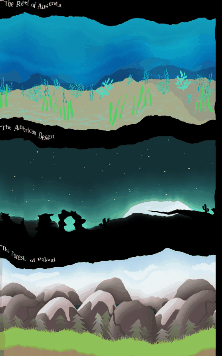
Figure 1 – HTML-GL filters
HTML-GL setup
The setup process of HTML-GL is fairly easy. You just need to import the htmlgl.min.js library just like in the example below.
[…]

<script src="js/htmlgl.min.js"></script>

[…]
Having done that all you need to do now in the HTML document is to use the <html-gl> tag to determine which HTML content should be parsed and rendered using WebGL. In our example application it looks like in the snippet below.
[…]

<body>

<html-gl>
 <div id="image1" class="imgCell">
        <p>The Reef of Australia</p>
 	<img src="images/water.png"></img>
 </div>
 <div id="image2" class="imgCell">
 	<p>The American Desert</p>
 	<img src="images/sand.png"></img>
 </div>
 <div id="image3" class="imgCell">
 	<p>The Forests of Poland</p>
 	<img src="images/wood.png"></img>
 </div>
</html-gl>

</body>

[…]
As you can see, we have ordered the library to render all three <div> elements along with their content using WebGL. You can see the final example working on figure 1. Please note that until this moment we have only chosen which content we want to render using WebGL. The next thing is to actually setup and run the library inside our main JavaScript file.
First of all we need to fetch the <html-gl> element from our HTML file. As you can see we are assuring ourselves that we are using the first <html-gl> element by taking specifically the [0]-th element from the array of <html-gl> elements.
[…]

var WebGlBox = document.getElementsByTagName('html-gl')[0];

[…]
As HTML-GL is based on Pixi.js, then the next thing to do is to setup a renderer for our WebGL content. You do it with the following line of code.
[…]

var renderer = window.HTMLGL.renderer;

[…]
Having set up the renderer and knowing that we want to manipulate our WebGL image, we now can fetch the actual sprite generated from the HTML document. You do it by referencing the .sprite property of our WebGlBox object.
[…]

var displaceContainer = WebGlBox.sprite;

[…]
Now the rest of the setup is done actually the same as in Pixi.js. We need a render loop to make our changes visible. So just like in Pixi.js we make one below. Using the requestAnimFrame() and renderer.render() functions we bring our WebGL content to life.
[…]

function animate() {

            renderer.render(stage);
	        requestAnimFrame( animate );

	    }

	    renderer.render(stage);
	    requestAnimFrame( animate );

[…]
Effects and image manipulations
At this point you can finally apply any filters and image manipulations for the former HTML content. To do that you can use the same methods as you have used with PIXI.js. So creating any sprites or applying filters to the whole content is done the same way as in PIXI.js. Below we are giving you a hint how to apply some filters to our WebGL content.
The steps are easy. First you need to create an instance of the desired filter. In our case it is the displacement filter. Along with this filter you have to tell PIXI.js to load a displacement texture. Then while instantiating the filter you need to pass in the displacement texture as the parameter. The next step is to set some filter specific values. In this case it’s the .scale.x and .scale.y values. They determine the size of the displacement map.
After setting up the filter we just need to apply it to our WebGL content, which is based on our former HTML content. Remember that earlier we have created the displaceContainer variable which holds the WebGLBox.sprite. So now at the end you just have to put the displacementFilter to the filters array of the displaceContainer. After doing that you should get the same result on your screen as presented on figure 1.
[…]

// displacement filter
var displacementTexture = PIXI.Texture.fromImage("images/displace.jpg");
var displacementFilter = new PIXI.DisplacementFilter(displacementTexture);

    displacementFilter.scale.x = 50;
    displacementFilter.scale.y = 50;

    displaceContainer.filters = [displacementFilter];

[…]
Remember that with HTML-GL you can do all the other things which PIXI.js lets you do. Creating sprites, adding them to the stage, drawing with the graphics tool set. HTML-GL seems a great way to enhance your Tizen web applications with beautiful, animated elements without the usage of any external plugins like Flash. It is also a great way to create new kind of user experiences for your apps or games. You should definitely think about using HTML-GL when you are working on any creative multimedia
Summary
This article describes how to create multimedia WebGL content out of an ordinary HTML layout with the usage of the HTML-GL library. We have presented how to setup the HTML-GL library. We have also described how to use the HTML-GL with your main HTML file. Then we showed you what you need to add to your main JavaScript file. Finally we have explained how to apply a displacement filter to the WebGL content.
We hope that this article gave you valuable knowledge about the possibilities of creating multimedia content for your Tizen web applications utilizing traditional DOM elements. We encourage you to look inside the source code of the sample application attached with this article. It will give you more insights how you can use HTML-GL inside your Tizen web projects.
For more information please visit the official HTML-GL website and the GitHub repository.
Was this document helpful?
We value your feedback. Please let us know what you think.