How to create collage from your photos using Raphael JS Library on Tizen
PUBLISHED
Introduction & Prerequisites
Note: Before reading this article we recommend you to get familiar with the “Working with Raphael JS Library on Tizen” article where we have introduced the Raphael JS Library and some of possibilities offered by this library.
This article describes some functionality offered by the Raphael JS library. You will learn: how to draw texts and images, how to manipulate them (translate, rotate, scale), how to work with their attributes, how to apply a “glow” effect to an image, etc. You will find out how to save a created collage as a PNG file in the Tizen file system. Sample application “CollageCreator“, provided along with this article, demonstrates the usage of these functionalities and some more.
After launching, you can see an empty “canvas” on the left and a toolbar on the right of the screen. The toolbar contains the following options: “Text”, “Image”, “Properties”, “Up”, “Down”, “Bask”, “Clear”, “Save”, “Close”. The first and the second one allow creating text and image objects. Using the “Properties” button, you can modify attributes of selected elements. The “Up” and “Down” options allow organizing items (changing their order). The “Bask” button removes the selected object and the “Clear” option removes all elements from the “canvas”. The “Close” button closes the application.
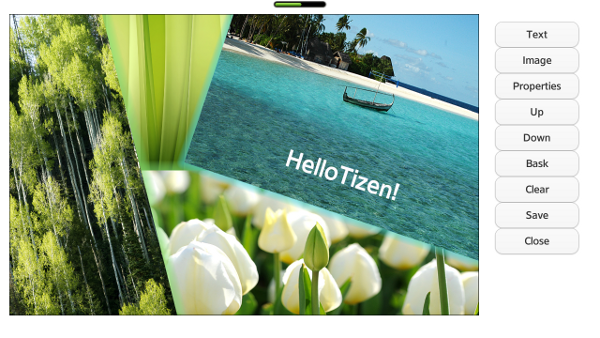
Figure 1 Sample application screenshot
The CollageCreator sample application requires:
- the Raphael JS Library,
It is a small JavaScript library which enables you to work with vector graphic in your Tizen Web application. It uses the SVG W3C Recommendation and VML. The library works on SVG Objects and each of them is also an SVG DOM object, which allows, attaching event handlers to them.
Instruction on how to get started with it can be found in the “Getting started with Raphael JS Library” section in the “Working with Raphael JS Library on Tizen” article. For more information about the Raphael JS library and some amazing demos, visit raphaeljs.com. The documentation is available here. A great page showing the capabilities of the Raphael JS Library can be found here.
It is a SVG parser and renderer, allowing, for example, svg to canvas conversion. It is released under the MIT license just as the rgbcolor.js class required by canvg.
Now we know that, using canvg, we can convert SVG to canvas. However, the SVG generated by Raphael JS is not well formatted. Svgfix is a JavaScript function which takes a SVG string (generated by Raphael JS) as an argument and makes some modifications. The result is passed as an argument to canvg.
The CollageCreator sample application was developed on Tizen SDK 2.1.0 and includes jQuery Mobile 1.3.1 and jQuery 1.9.1 libraries.
Note: For easy reference, particular functions used/described in this article have been hyperlinked to the suitable fragments of the Raphael Documentation.
Using Raphael JS you can draw: shapes, texts and images. Drawing shapes was described in the “Drawing Shapes & Paths” section of the “Working with Raphael JS Library on Tizen” article. Drawing texts and images is described in this article.
Drawing Texts
To use the Raphael JS framework you need an object on which you can draw – the Raphael paper. It is created by the Raphael() function. This function can take several different sets of arguments. The sample application uses the following one:
paper = new Raphael(container, container.clientWidth, container.clientHeight)
The following code snippet explains what the “container” is:
<!-- index.html file: -->
<div id="container"></div>

// collage.js:
container = document.getElementById('container');
When you have a Raphael paper, you can pass it as an argument to the TextObject() function, which creates a text element, initializes it and stores information about its attributes (please refer to ./js/textObject.js).
this.element = this.paper.text(300, 300, textContent);
The Paper.text() function draws a string on the Raphael paper and takes the following parameters: x and y coordinate position, a text string to draw. As the result it returns a Raphael element.
Note: The coordinate system for Raphael is the same as for the canvas.
You can define such properties of text element as: size, weight, font’s color and content.
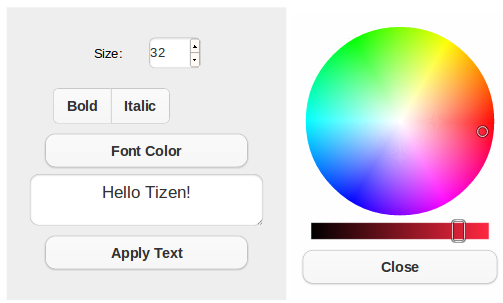
Figure 2 Setting properties of text element
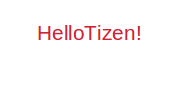
The newly created text element is shown on the Figure 3:
|
Figure 3 Selected text element |
Figure 4 Not selected text element |
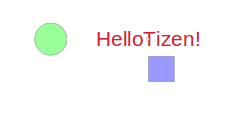
To move the text you can use the rectangle element below it, to rotate – the circle on the left of it.
Drawing Images
To create an image element you have to pass the path to the selected image (URI) to the addImage() function.
Clicking on the “Image” toolbar’s option displays a popup with two options. “Choose the file” option shows the “Media” page, where you can select the image you want to add to your collage.
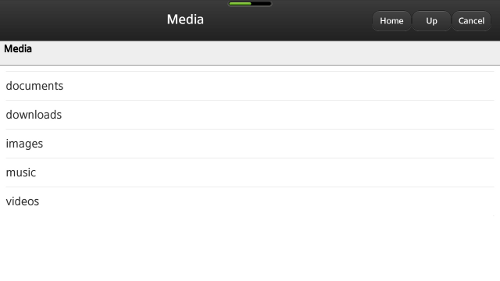
Figure 5 “Media” view
The selected image must have a proper extension (“.jpg” or “.png”). Please refer to ./js/mediaList.js, if you want to know more about the module responsible for managing the “Media” view.
After selecting an image, its URI is passed to the addImage() function:
addImage : function(uri) {
    var img = new Image();
    img.onload = function() {
        if (this.width > this.height) {
            var scaledWidth = 200 / this.height * this.width;
            var scaledHeight = 200;
        } else {
            var scaledWidth = 200;
            var scaledHeight = 200 / this.width * this.height;
        }

        var imgObj = new ImageObject(paper, uri, scaledWidth,
                scaledHeight);

        imgObj.element.pos = elements.length;
        elements[elements.length] = imgObj.element;
    };
    img.src = uri;
},
The size of the image is scaled. The maximum dimension of the newly created image is equal to 200 (for both width and height). Next, the ImageObject() function is called. It creates an image element, initializes it and stores information about its attributes (please refer to ./js/imageObject.js).
this.element = this.paper.image(src, 100, 100, width, height);
The Paper.image() function embeds an image on the Raphael paper. It takes the following parameters: URI of the source image, x and y coordinate position, width and height of the image. As the result it returns the Raphael element.
You can change the ‘opacity’ property of the image element and add the “glow” effect to this element, what will be described later.
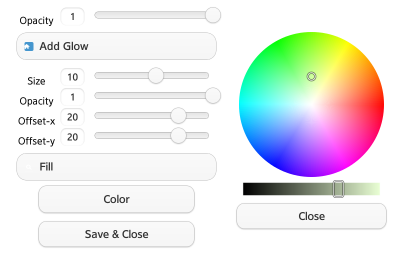
Figure 6 Setting properties of image element
The newly created image element is shown below:
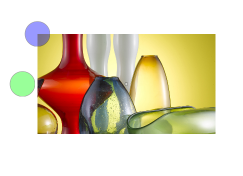
Figure 7 Selected image element
To move the image you only have to drag it. To rotate it you can use the green circle on the left of it, to scale it – the purple circle in the upper-left corner.
Saving the collage to the file
Saving the collage to the file is not as difficult as it might appear. Raphael JS generates the SVG elements. You must convert it to canvas, which can be saved as a PNG file. To convert SVG to canvas, you can use the canvg parser, described in the “Introduction & Prerequisites” section of this article. However, SVG generated by Raphael JS is not well formatted for canvg. To resolve this problem we use the solution proposed by PHPepe – the svgfix parser.
To save the collage to the file:
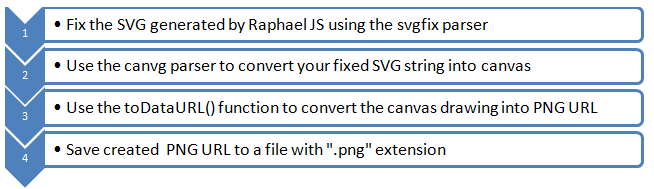
Fix the SVG generated by Raphael JS using the svgfix parser
The Raphael paper is drawn inside the element with id=“container” (please refer to “Drawing Texts” section of this article). To get the SVG generated by Raphael JS use the innerHTML property of this DOM Element:
var innerSVG = container.innerHTML;
The only thing you have to do to fix the generated SVG string is to use the svgfix() function (please refer to ./js/lib/external/svgfix-0.2.js file). It takes as a parameter a SVG string which you want to fix:
var fixedSVG = svgfix(innerSVG);
Use the canvg parser to convert your fixed SVG string into canvas
Now, you can use the canvg() function:
canvg("canvas-result", fixedSVG, {
    renderCallback : function() {
        render();
    }
});
The canvg() function can take zero, two or three arguments. In this case, it takes all three arguments: id of a canvas element, fixed SVG string and optional parameter: the “renderCallback” function, which is called after the rendering of the canvas is complete.
Note: For more information about parameters taken by the canvg() function, please refer to ./js/lib/external/canvg.js file.
Use the toDataURL() function to convert the canvas drawing into PNG URL
The render() function looks as follows:
var render = function() {
    var can = document.getElementById('canvas-result');

    try {
        var dataURL = can.toDataURL("image/png").replace(
                'data:image/png;base64,', '').replace('data:,', '');
        if (dataURL === '') {
            tlib.logger.err("No image source");
        } else {
            if (filename === '') {
                $("#filename-popup").show();

                $("#filename-save").unbind().bind("click", function() {
                    filename = $("#filename-input").val() + ".png";
                    $(".popup").hide();
                    createFile(dataURL);
                });
            } else {
                createFile(dataURL);
            }
        }
    } catch (e) {
        tlib.logger.err('canvas.toDataUrl error: ' + e.message);
        alert("Data source error: " + e.message);
        return;
    }
};
The toDataURL() function is responsible for conversion of the canvas drawing into PNG. It returns URI containing the representation of the image as a PNG.
Save created PNG URL to a newly created file with “.png” extension
To save created PNG URI to the file, we use the createFile() function:
var createFile = function(content) {
    var newFile = new tlib.file({
        filename : filename,
        virtualRoot : "images",
        success : function() {
            newFile.write(content, {
                success : function() {
                },
                error : function() {
                    tlib.logger.err("Text not written to the file");
                }
            });
        },
        error : function() {
            tlib.logger.err("File not created");
        }
    });
};
It uses functionality offered by the tlib.file module to create and write to the file. For more information about it please refer to ./js/lib/tlib/tlib.file.js file.
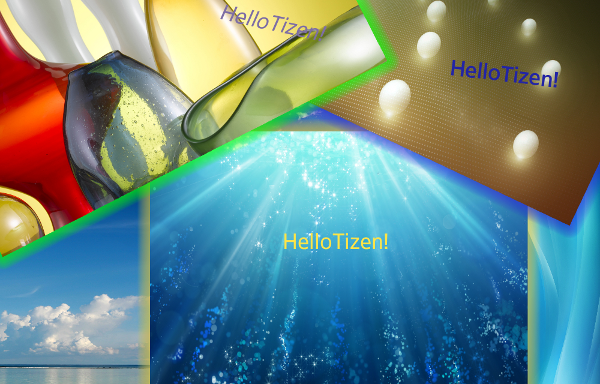
Example collage created using the sample application:
Working with attributes
How to change attribute of a Raphael element was described in the “Working with attributes” section of the “Working with Raphael JS Library on Tizen” article. Here, we will focus on the “glow” effect which can be applied to an image element.
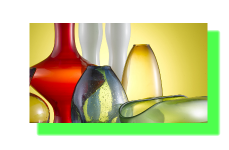
Figure 8 Image element with the “glow” effect applied
You can set such properties of the “glow” effect as:
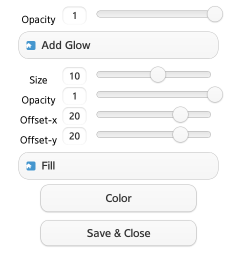
Figure 9 Image’s properties popup
To apply glow you need to invoke the Element.glow([properties]) function. You can apply some properties of glow (all are optional):
- width {Number} size of the glow, by default: 10
- opacity {Number} opacity of the glow, by default: 0.5
- offset-x {Number} horizontal offset, by default: 0
- offset-y {Number} vertical offset, by default: 0
- fill {Boolean} if glow should be filled, by default: false
- color {String} color of the glow, by default: black
Transformations
How to create transformation and how to apply it to an element was described in the “Adding transformations” section of “Working with Raphael JS Library on Tizen” article. Transformations are applied as a result of drag events. You can find event handlers for: moving, drag start and drag end for all drawn elements in ./js/transforms.js file.
Operations
Two other functionalities offered by Raphael JS are: Element.insertBefore() and Element.insertAfter(). Both are responsible for ordering elements. All newly created Raphael elements go to elements[] array, elements[0] refers to the bottom most element.
To set one element before other element use the upElement() function:
var upElement = function(up) {
    if (up !== (elements.length - 1)) {
        // If selected item isn't on the peak: selected item insert up
        elements[up].insertAfter(elements[up + 1]);
        orderElements(up, up + 1);
    } else {
        tlib.logger.warn("up is not permitted");
    }
};
up – means position (index) of the selected element in the elements[] array. The Element.insertAfter() function inserts “elements[up]” element after the “elements[up+1]”. Visible effect of function’s working is shown below:
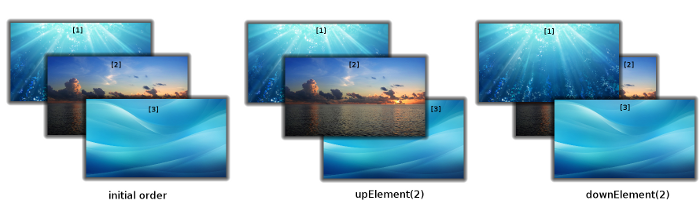
Similarly, the downElement() function works like this:
var downElement = function(down) {
    if (down !== 0) {
        // If selected item isn't on the bottom: selected item insert down
        elements[down].insertBefore(elements[down - 1]);
        orderElements(down - 1, down);
    } else {
        tlib.logger.warn("down is not permitted");
    }
};
The orderElements() function is responsible for swapping position of two elements from the array and setting some other attributes.
var orderElements = function(up, down) {
var tmp = elements[up];
elements[up] = elements[down];
elements[down] = tmp;
if (elements[down].type === "image") {
elements[down].refreshGlow();
}
elements[up].pos--;
if (elements[up].type === "image") {
elements[up].refreshGlow();
}
elements[down].pos++;
};
Toolbar’s option “Clear” invokes the paper.clear() function, which removes all elements from the paper. It doesn’t take any parameters.
Toolbar’s option “Bask” invokes removeElement() function:
/**
 * Removes text or image from the Raphael's paper
 */
var removeElement = function() {
    elements.splice(selectedItem.pos, 1);
    transforms.removeSelection(selectedItem);
    if (selectedItem.type === "image") {
        selectedItem.removeGlow();
    }
    selectedItem.remove();
    collage.setItemSelected(null);
};
The most important part of the above code snippet is the Element.remove() function, which removes the selected element from the paper.
Summary
We hope this article has shown you how you can utilize Raphael JS library in your Tizen Web applications. You have learned how to save the result of your work to the file, which can be useful while creating drawing applications, collages, puzzles and many more.
Use the Raphael JS library to create amazing Web application on Tizen.
Was this document helpful?
We value your feedback. Please let us know what you think.