Custom 2D Graphics on Tizen
PUBLISHED
In this article, you will learn how to draw primitives, such as rectangles, circles and triangles using both the HTML5 canvas APIs and Fabric canvas APIs through our TizenPaint sample app. You will also learn how to change some of the properties of primitives such as the width and color of stroke. In the last section of this article, we will also cover the topics of how to save your drawings in serialized String form.
Understanding HTML5 Canvas API & Fabric.js
Before we dive into anything in details, let’s first get familiar with the HTML5 canvas and the Fabric.js JavaScript framework.
HTML5 Canvas is a DOM element you can use to dynamically draw 2D/3D graphics. It is a defined area on your web page or device screen where you can draw graphic objects. To create a canvas, you can add this code to your HTML file:
<canvas id="paint-canvas" width="680" height="1000"></canvas>
The Fabric.js framework is an interactive object model built on top of the canvas element. It makes easier to work with HTML5 canvas elements. You can create and populate objects such as geometrical shapes and complex shapes consisting of hundreds or thousands of simple paths. For more information about how to use Fabric.js library, visit http://fabricjs.com/docs/
Introducing TizenPaint sample application
The TizenPaint sample application demonstrates how to use the HTML5 Canvas API, and how to use the Fabric.js framework to create and work with 2D graphics on the HTML5 canvas.
The UI of this sample application consists only one page element. After launching the sample app, you see an empty canvas and some buttons, such as Save as, Open, Draw etc. You can use this sample in two modes: Draw and Edit as shown in the two buttons at the bottom of the page. The default mode is the Edit Mode. In the Edit Mode, you can manipulate the selected objects, for example move, resize or rotate them, change the color or line width of them, and even add the SVG file from three available image resources (saved in “images” folder). You can draw new objects by turning on the Drawing Mode and touching the screen. You can draw simple 2D shapes such as lines, squares, circles, triangles and polygons using provided tools. You can save your drawings on device storage.
The sample application uses the full viewport on Tizen (720×1280), includes jQuery 1.8.0 library and was tested on Tizen SDK 2.1.0
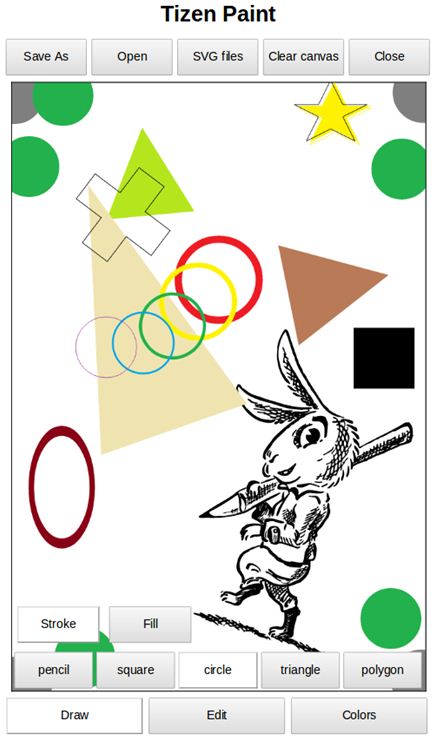
Figure: Sample application screen shot
Drawing on Canvas using the frabric.js framework
You can directly draw one primitive shape – rectangle using the canvas API. If you want to draw other shapes, you have to create one or multiple paths then draw the paths on the canvas. Or alternatively, you can use the fabric.js framework to draw complex shapes in a more convenient way. You don’t need to define the points of the path, and link the path, instead you can create each shape as an object with defined properties. The article will show you how to create shapes using the fabric.js framework and the Canvas API.
To use the fabric.js framework, you must create instance of the fabric.Canvas() object on the HTML Canvas element like this:
var fabricCanvas = new fabric.Canvas('paint-canvas');
When you call the fabric.Canvas constructor, the fabric.js framework adds a secondary canvas element (it’s the canvas with the “upper-canvas” class identifier) into the DOM.
<canvas id="paint-canvas" class="lower-canvas"></canvas>
<canvas class="upper-canvas"></canvas>
When you click the “Draw” button, it actives the drawing mode and make all other items on the canvas unselectable. This is to avoid the situation when you select some random objects while drawing.
$('#add-figure').unbind().click(function() {
    /**
     * Draws line or adds figure on click
     */
    if ($('#shape-menu').hasClass('hidden')) {
        drawMode = true;
        if (currShape === 'pencil') {
            fabricCanvas.isDrawingMode = true;
        } else {
            $('#stroke-menu').toggleClass('hidden', false);
        }
        if (currShape === 'polygon') {
            $('#vertex').toggleClass('hidden', false);
        }
        if (!($('#colors-menu').hasClass('hidden'))) {
            $('#colors-menu').addClass('hidden');
            $('#choose-color').removeClass('selected');
        }
        $('#shape-menu').toggleClass('hidden', false);
        $('#edit-figure').removeClass('selected');
        $('#add-figure').addClass('selected');

        fabricCanvas.deactivateAll();
        for ( var i = 0; i < fabricCanvas.getObjects().length; i++) {
            fabricCanvas.item(i).selectable = false;
        }

        fabricCanvas.renderAll();

    } else {
        $('#shape-menu').toggleClass('hidden', true);
        $('#stroke-menu').toggleClass('hidden', true);
        $('#vertex').toggleClass('hidden', true);
    }
});
By default, selected tool is the pencil that allows you to draw a simple line. To use this tool, you just need to set fabricCanvas.isDrawingMode to true.
Drawing on canvas using the Canvas API
Another option to draw on the canvas is to use the Canvas API. To use the Canvas API, you should register the canvas to handle two events: touchstart and touchmove using following code:
canvas.addEventListener("touchstart", handleStart);
canvas.addEventListener("touchmove", handleMove);
The first parameter passed to the addEventListener() method is the event type. The Second parameter is the listener itself. It receives the notification when the specified type of event occurs.
The drawing itself is actually nothing but recording the touch positions. You can do it using following code:
function handleStart(evt) {
    var touches = evt.changedTouches[0];
    var x = touches.pageX - leftPos;
    var y = touches.pageY - topPos;
The evt.changedTouches[0] property returns the object that represents the first touch point on the view port from the user. The touches.pageX and touches.pageY properties represent the x and y coordinates relative to the most top-left corner of the view port. The leftPos and topPos properties represent the x and y coordinates relative to the most top-left corner of the canvas. If you subtract leftPos from touches.pageX (the same applies to topPos and touches.pageY) you get x (or y) coordinate of the point on a canvas.
In the ‘touchstart’ listener, you must start your drawing by calling beginPath() method and define the starting point using ctx.moveTo(x,y)method.
    ctx.beginPath();
    ctx.moveTo(x,y);
In the ‘touchmove’ listener, you must use the lineTo(x, y) method to define the end point of the line (or path) and stroke the line by calling stroke() method:
    ctx.lineTo(x, y);
    ctx.stroke();
Drawing Different Shapes
In this section, you will learn how to draw more complex shapes using both fabric.js APIs and Canvas APIs. We start from the simplest shape – Rectangle.
Rectangle
Drawing a rectangle is simple when using fabric.js APIs. You can create a rectangle using following code:
var rect = new fabric.Rect({
    width : 100,
    height : 100,
    left : x,
    top : y,
    selectable : false
});
The left and top properties represent the position of the rectangle’s center point; the width and height properties define the size of the rectangle; and the selectable property indicates whether the object is selectable or not.
Finally you add this rectangle to the canvas by calling the add() method:
fabricCanvas.add(rect);
If you want to change color of a rectangle, you can use the following properties of Rect object:
- ‘fill’ – if you want to fill shape with the given color;
- ‘stroke’ – if you want to set the color of stroke to the given color;
fill : 'rgb(34,177,76)',
stroke : 'rgba(0,0,0,0.8)',
If you don’t specify the color of the fill or stroke properties, by default, they are black. If you want to change the default color, you can specify any color that is defined in the W3C CSS3 color recommendation.
Unlike the Canvas API, in fabric.js every shape is an object. If you want to change a property value, you can use the set() method.
rect.set('left', 'x+50');
When using the Canvas API to draw the rectangle, you can use the following methods:
- for filled rectangle: fillRect(x,y,width,height)
- for empty rectangle with stroke: strokeRect(x,y,width,height)
The x and y are the coordinates for top left corner of the rectangle. Width and height defines the size of the rectangle.
Please notice when you draw a rectangle using the canvas API, you must define the top-left corner of the rectangle, not the center point while you use the fabric.js API.
The Canvas API has two important properties that we can use to apply colors to the shape: fillStyle and strokeStyle.
fillStyle = color
strokeStyle = color
Circle
Drawing circle in fabric is very simple. You can create a circle object in fabric.js like this:
var circle = new fabric.Circle({
    radius : 50,
    left : x,
    top : y,
    opacity : 1,
    selectable : false
});
You need to initialize the properties of Circle object, for example we initialize the radius of the circle to 50 pixels, the center point to (x, y), and opacity to 1, and make the circle not selectable.
There is another alternative way to draw circle using the arc() Canvas API.
ctx.arc(x, y, radius, startAngle, endAngle, anticlockwise)
The arc() method draws a section of the circumference of an imaginary circle. The circle is defined by the center point (x, y) and the radius parameters. The startAngle and endAngle parameters are defined in radians in clockwise from the postivie x-axis. The last parameter defines the direction of the arc path between the two points. In case you need to draw a full circle, you can define startAngle = 0 * Math.PI, and endAngle = 2 * Math.PI.
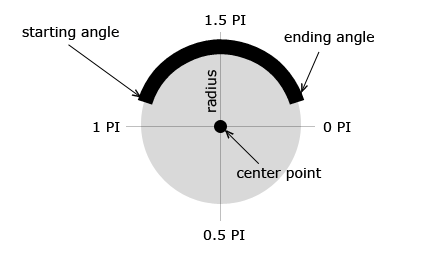
Figure: arc parameters
Triangle
It’s simple to draw a triangle in fabric.js using the below code:
var triangle = new fabric.Triangle({
    left : x,
    top : y,
    width : 100,
    height : 100,
    opacity : 1,
    selectable : false
});
The properties: left and top represent the position of the triangle’s center; other properties are pretty much self-explained themself.
If you want to use the Canvas API to draw the triangle, it will be a little bit more complicated than using fabric.js API. As we mentioned before, you can only draw the rectangle shape using the given Canvas method. For any other shapes, you have to use moveTo and lineTo methods to create the path. The following code shows you how to draw the triangle:
ctx.beginPath();
ctx.moveTo(x, y);
ctx.lineTo(x+50, y+100);
ctx.lineTo(x-50, y+100);
ctx.lineTo(x, y);
ctx.fill(); // for filled triangle
//ctx.stroke(); // for stroked triangle
ctx.closePath();
Changing draw properties
You learn how to draw some basic shapes on the canvas. Now we show you how to change the properties of shape, such as the color of fill and width of the stroke. Again, we use our TizenPaint sample as an example. When you click the “Colors” button in the sample application, it shows the menu with available colors and the line width. When you change the line width, it invokes the setStrokeWidth()method with the value you passed. The following code shows you how to set the stroke width using fabric.js API.
function setStrokeWidth(value) {
    $('#line-width').text(value);
    fabricCanvas.freeDrawingLineWidth = parseInt($('#line-width').text(), 10);
    if (fabricCanvas.getActiveObject()) {
        if (fabricCanvas.getActiveObject().get('stroke')) {
            fabricCanvas.getActiveObject().set('strokeWidth', parseInt($('#line-width').text(), 10) || 1);
        }
        fabricCanvas.renderAll();
    }
}
If you want to change the line width before you draw any shapes, you can use the fabricCanvas.freeDrawingLineWidth property to set the line width in the draw mode. If you want to change the line width of selected shape, you can use the fabricCanvas.getActiveObject() method to select the canvas object and use the get() method to select the ‘stroke’ property of the selected canvas object. Finally you can set the line width value with the set() method.
Now let’s see how to change the color of your drawing objects. In our sample application, we implement a method called setColors(). When you select a color, it invokes this method. The setColors() method not only changes the color of your drawing but also the color of ‘fill’ or ‘stroke’ properties of any active objects on the canvas. The following code shows you how the setColors() method is implemented:
function setColors(color) {
	if (!(color.prop("checked"))) {
		actualColor.css('border', '1px solid black');
		actualColor.prop("checked", false);
		color.css('border', '3px solid red');
		color.prop("checked", true);
		actualColor = color;

		fabricCanvas.freeDrawingColor = color.css('background-color');

		if (fabricCanvas.getActiveObject()
				&& fabricCanvas.getActiveObject().get('active')) {
			if (fabricCanvas.getActiveObject().get('stroke')) {
				fabricCanvas.getActiveObject().set('stroke',
						color.css('background-color'));
			} else {
				fabricCanvas.getActiveObject().set('fill',
						color.css('background-color'));
			}
		}

		fabricCanvas.renderAll();
	}
}
In this method, you can set the color in draw mode using the fabricCanvas.freeDrawingColor property. And you need to call the fabricCanvas.renderAll() method to render you changes on the top canvas which is the fabricCanvas and the secondary container canvas which is the HTML5 canvas element. For more information about canvas layers, you can find it from here.
If you want to clear the fabric canvas, you can use the fabricCanvas.clear() method.
Using the Edit Mode Option
In this section, we explain how to use the editing mode in our sample app. When you click the “Edit” button, it calls the editModeOn() method and turns on the edit mode. Meanwhile this method deactivates the drawing mode, hides some options (if they are displayed) and makes all items on canvas selectable.
function editModeOn() {
    if (drawMode) {
        drawMode = false;
        fabricCanvas.isDrawingMode = false;
        $('#shape-menu').toggleClass('hidden', true);
        $('#stroke-menu').toggleClass('hidden', true);
        $('#vertex').toggleClass('hidden', true);
        $('#add-figure').removeClass('selected');
        $('#edit-figure').addClass('selected');

        for ( var i = 0; i < fabricCanvas.getObjects().length; i++) {
            fabricCanvas.item(i).selectable = true;
        }

        fabricCanvas.renderAll();
    }
}
In Edit Mode you can select shape and:
- move it by drag and drop,
- resize/rotate it by click on the one of the controls surrounding it and stretching/rotating,
- change the color or line width (in case of stroked shapes), by select menu ‘Colors’.
Saving and opening the file
Fabric.js allows you to serialize the entire canvas into a JSON object. When you click the “Save” button, it invokes the serialization function called stringify():
var canvasSerialized = JSON.stringify(fabricCanvas);
After successfully serialized the canvas, you can the canvasSerialized object in the device file system. We use the Filesystem Tizen Device API to save this object which is nothing but a string to the file. The next section explains how to do that.
Using the Filesystem Tizen Device API
The Tizen Filesystem API provides the access to the device’s file system. To use features of the Filesystem object, you must declare the features (http://tizen.org/privilege/filesystem.read and http://tizen.org/privilege/filesystem.write) in your config.xml file. For more information about the Filesystem Tizen Device API, you can find it from here.
Resolving the directory
Before you save anything to a file, you need to specify the directory for the file you’re going to operate. In this sample application, we use the root folder called ‘documents’ for all our text documents. Prior to any directory operation the directory must be resolved. The resolve operation determines if the application can access the directory. If the access is permitted, an object representing the directory is provided. The File handle called dir is returned in the callback function. You can use it for various operations on this file, for example create or delete this file. The tizen.filesystem.resolve() method take following parameters:
- location – the relative path to the file or directory
- success callback – called when the operation is successful
- error callback – called when an error occurs (optional)
- mode – the mode in which the application requests to open the file or directory (optional), possible values: “r” (read) or “rw” (read and write)
This is how the sample application uses this method:
tizen.filesystem.resolve("documents", function(dir) {
    gDocumentsDir = dir;
}, onError, "rw");
The only parameter passed to success callback is the file handle called dir. The file handle can be either the file or the directory. In this case, it represents a directory. In the callback function, we assign the file handle dir to our own variable called gDocumentsDir, which will be used in other parts of the sample application. Because we need to save and override the file, we set the file mode to ‘rw’ in this case.
Creating & writing a file
Once you resolved the directory and gain the access to the directory or file, you can now create and write to the file. You can use the createFile() method provided by the File object to create the file with the given file name. In our sample application, you enter the filename in the input field and click on the “Save” button to create a file.
var filename = $('#file-name').val();

try {
    gDocumentsDir.createFile(filename);
} catch (exc) {
    $('#save-popup').toggleClass('hidden', false);
    return;
}
If the file already exists, the sample application displays a popup and allows you to change the filename or to override the existing file. This function is implemented in the writeToFile() method shown as below:
var filename = $('#file-name').val();

function writeToFile(filename) {
    var file;

    try {
        file = gDocumentsDir.resolve(filename);
    } catch (exc) {
        console.error('Could not resolve file: ' + exc.message);
        return;
    }

    try {
        file.openStream('w', writeToStream, onError);
    } catch (exc) {
        console.error('Could not write to file: ' + exc.message);
    }
}
Writing to an existing file is slightly different from creating a new file. You should resolve the file using the resolve() method provided by the File object. In our case it is the gDocumentsDir object. The method returns a new file handle which you use to open the file, using the method openStream(). In our case, we want to open it in the write mode, so we pass the ‘w’ to this method. The success callback function looks as follow:
function writeToStream(fileStream) {
    try {
        fileStream.write(canvasSerialized);
        fileStream.close();
    } catch (exc) {
        console.error(exc.message);
    }
}
Remember we want to save the serialized canvas which is the JSON string to the file. So we pass the string object canvasSerialized to the write() method. After the text is written to the file, the stream is closed with the close() method.
If there is any error occurs, the error callback function onError() is invoked:
function onError(err) {
    console.error("Error: " + err.message);
}
Reading from a file
The sample application allows you to open files that contain the serialized canvas. And you can import the canvas and modify the objects. In this section, we show you how to read the file. We implement a method called displayFileContents() to handle the opening file event. When you click the “Open” button, it invokes this method. The following code shows you how it is implemented.
function displayFileContents() {
    var file;

    try {
        file = gDocumentsDir.resolve($('#file-name').val());
    } catch (exc) {
        console.error('resolve() exception: ' + exc.message);
        return;
    }

    try {
        file.openStream('r', readFromStream, onError);
    } catch (exc) {
        console.error('openStream() exception:' + exc.message);
    }
}
It looks very similar with the writeToFile() method as we described earlier. Once you receive the file handle from the resolve() method, you then call the openStream() method from the File object and specify that you want to open the file in the read mode by passing ‘r’ . You also need a success callback function and an error callback function. The success callback function we implemented is called readFromStream(). It takes the stream from the openStream() method:
function readFromStream(fileStream) {
    try {
        var contents = fileStream.read(fileStream.bytesAvailable);
        fileStream.close();

        fabricCanvas.loadFromJSON(contents);

        for ( var i = 0; i < fabricCanvas.getObjects().length; i++) {
            if (drawMode) {
                fabricCanvas.item(i).set('selectable', false);
            } else {
                fabricCanvas.item(i).set('selectable', true);
            }
        }
    } catch (exc) {
        tlib.logger.err('File reading exception: ' + exc.message);
    }
}
To make sure you read the valid bytes from the stream, you need to use the bytesAvailable property. It returns the number of bytes that are available to read from the stream. Then the method read() reads all characters from the given FileStream. Once you finish reading from the stream, you need to close the streaming by calling the close() method. The next step is to parse the serialized string which is the JSON object to canvas objects. Fabric.js provides a method called loadFromJSON() to do that.
Note: If the sample application is in ‘Draw Mode’, all objects should be non selectable.
SVG files
There is one more thing you can do with the fabric.js framework. You can also insert the SVG image on your canvas. The “SVG files” button in our sample application allows you to do that. It opens menu with three buttons (SVG1, SVG2, SVG3). Every button triggers the function called loadSVGFromURL():
var svgFileName = 'someFile.svg';

fabric.loadSVGFromURL('images/' + svgFileName + '.svg', function(objects, options) {
    var loadedObject = fabric.util.groupSVGElements(objects, options);

    loadedObject.set({
        left : x,
        top : y,
        angle : 0,
        padding : 0
    });
    loadedObject.setCoords();

    fabricCanvas.add(loadedObject);
});
svgFileName is a string representing the file name. The first parameter of loadSVGFromURL() method is the path to the SVG file. The second parameter is a success callback function, which retrieves an array of elements imported from the SVG file. fabric.util.groupSVGElements is used to group elements from the SVG file. setCoords() method sets the corner position coordinates. Finally, function fabricCanvas.add() draws the SVG image on the canvas.
Exit application
The sample application can be terminated. To provide this feature, you should:
- add the Exit button to index.html, e.g. in this way:
<input type="submit" id="close" value="Close" class="top-menu-button"/>
- bind the exit method with the exit button
$("#close").unbind().click(function(event) {
    var app = tizen.application.getCurrentApplication();
    app.exit();
});
Summary
In this article, you learn how to use the Canvas API and fabric.js to draw simple 2D shapes on the canvas, how to use fabric.js framework to save and open your canvas as a file, and finally how to insert SVG image to your canvas using fabric.js. As you can see, it is not that difficult to implement these features on Tizen. We hope this article will help you to create some simple 2D games and animations in your Tizen web apps.
Was this document helpful?
We value your feedback. Please let us know what you think.