Communication between Native Widget and UI App
PUBLISHED
Introduction
Widget applications (or simply widgets) are specialized applications useful in providing users with a quick view of specific information from the parent application. Also, widgets allow users to access certain features without launching the parent applications. Combined with the parent application, a widget can have various features to increase the usability of an application set.
To show the changes done by a widget in the UI app, communication between widget and UI app is required. Data sharing can be a way for this type of communication.
In this tip document, demonstration is done on how to establish the communication mechanism between a native widget application and UI application in Tizen using App Control and Preference API.
To complete the following steps at first, create an UI app and a widget app for a wearable device using Tizen Studio as shown in the below links:
Steps to do
Step-1: Add headers to use App Control & Preference API
To use the functions and data types of the App Control API, include the following header file in your widget application.
#include <app.h>
You must add the following header file in both of the UI and widget app.
#include <app_preference.h>
Step-2: Initialization and Prerequisites
The following privilege is required to make the launch request from the widget application.
|
Privilege |
Description |
|
http://tizen.org/privilege/appmanager.launch |
Allows the application to open other applications using the application ID or application control. |
Here is the example code of tizen-manifest.xml of widget application which is modified with required privilege:
<?xml version="1.0" encoding="UTF-8" standalone="no"?>
<manifest xmlns="http://tizen.org/ns/packages" api-version="2.3.1" pack-age="org.example.widget2" version="1.0.0">
    <profile name="wearable"/>
    <widget-application appid="org.example.widget2" exec="widget2" main="true" update-period="0">
        <label>widget2</label>
        <icon>icon.png</icon>
        <support-size preview="preview.png">2x2</support-size>
    </widget-application>
    <privileges>
        <privilege>http://tizen.org/privilege/appmanager.launch</privilege>
    </privileges>
</manifest>
Step-3: Set label and register callback
Set a simple label in the widget app and register a smart callback to it. The callback function will do the application launch request to the UI app.
wid->label = elm_label_add(wid->conform);
evas_object_resize(wid->label, w, h / 3);
evas_object_move(wid->label, w / 4, h / 3 - 40);
elm_object_text_set(wid->label, "Widget app");
evas_object_smart_callback_add(wid->label, "clicked", _btn_clicked, context);
evas_object_show(wid->label);
Step-4: Creating app control handle
Create an app control handle by using the method app_control_create().
app_control_h app_control;
app_control_create(&app_control);
Step-5: Setting information into app control handle
After the successful creation of the handle you can set information into it. The app_control_set_operation() function will let you to set different type of operations into the handle.
app_control_set_operation(app_control, APP_CONTROL_OPERATION_DEFAULT);
You can also set other information e.g. id of the application to launch, extra data in Key-value pair to provide additional information to the requested application. The app_control_set_app_id() function is used to set the app id to the app control handle.
app_control_set_app_id(app_control, APP_ID);
In the sample app, instance id, widget id and the data in the label is sent as extra data by using the app_control_add_extra_data() function as given in the following code:
app_control_add_extra_data(app_control, INSTANCE_ID , instance_id);
app_control_add_extra_data(app_control, WIDGET_ID, APP_ID);
app_control_add_extra_data(app_control, LABEL_DATA, elm_object_text_get(wid->label));
Step-6: Send launch request and Destroy app control handle
The app_control_send_launch_request() function sends the launch request to the application to be launched. It returns 0 on success, otherwise a negative error value. Send the launch request with the app_control handle by using the following code structure:
if (app_control_send_launch_request(app_control, NULL, NULL) == APP_CONTROL_ERROR_NONE)
dlog_print(DLOG_INFO, TAG, "Succeeded: the application is launched.");

else
dlog_print(DLOG_ERROR, TAG, "Failed to launch an application.");
After sending the launch request, use app_control_destroy() function to destroy the app control handle and release all its resources.
app_control_destroy(app_control);
Step-7: Receiving app control signal
When the Application will receive the app_control signal, the app_control function of the UI app will be operated first. In this function, the information sent from the widget app along with the launch request can be received.
The following functions are needed to receive the required information:
app_control_get_operation(app_control, &operation);
app_control_get_extra_data(app_control, INSTANCE_ID, &value_instance_id);
app_control_get_extra_data(app_control, LABEL_DATA, &labelData);
To get the operation set by the widget app app_control_get_operation() function is used. In this sample app, app_control_get_extra_data() function is used to receive both the widget instance id and the data set in the label.
Step-8: Saving the data using Preference
The text on the label will be changed in both the widget and UI app. So, we have to store the data in a common directory from where both of the apps can use the same data. preference_set_string() function is used to store data in a common directory using the following code:
preference_set_string(value_instance_id, elm_entry_entry_get(ad->textInput));
In the sample app, the entry data is saved in the directory.
Step-9: Getting data from common directory
Now, the data saved in the previous step can be used by both the widget app and UI app. To update the UI of widget app according to this data, you have to use preference_get_string() function in the widget_instance_resume() callback. The first parameter of this function is the key and the value saved against that key will be stored in the second parameter.
int ret = preference_get_string(instance_id, &prefval);
After that, set the value in the label of the widget.
Step-10: Updating Widget UI
Widget UI can be updated in two different ways. The ways are:
- Updating the UI when it’s visible to the user.
- Trigger to an Update Event.
Updating the UI when it’s visible to the user:
When the widget is visible to the user, widget_instance_resume() function is called. So, required updates of UI can be made here. The above mentioned function can be written as below:
static int
widget_instance_resume(widget_context_h context, void *user_data)
{

	const char *instance_id = widget_app_get_id(context);

	int ret = preference_get_string(instance_id, &prefval);

	if(!ret)
	{
		widget_instance_data_s *wid = NULL;
		widget_app_context_get_tag(context,(void**)&wid);

		elm_object_text_set(wid->label, prefval);

	}
	/* Take necessary actions when widget instance becomes visible. */
	return WIDGET_ERROR_NONE;
}
Trigger to an Update Event:
A trigger to update the UI of widget can be initiated from the UI app. If a trigger to update event is created then the event is received in the widget_instance_update() function of the widget app.
The trigger can be created as below:
widget_service_trigger_update(ad->widget_id, ad->instance_id, NULL, 0);
And the widget_instance_update() function of the widget app can be written as below:
static int
widget_instance_update(widget_context_h context, bundle *content,
                             int force, void *user_data)
{
	/* Take necessary actions when widget instance should be updated. */

	const char *instance_id = widget_app_get_id(context);

	int ret = preference_get_string(instance_id, &prefval);

	widget_instance_data_s *wid = NULL;
	widget_app_context_get_tag(context,(void**)&wid);
	elm_object_text_set(wid->label, prefval);
	return WIDGET_ERROR_NONE;
}
Running the sample application
Now, both of the sample applications are capable of sharing data between them. Build and run the attached sample application.
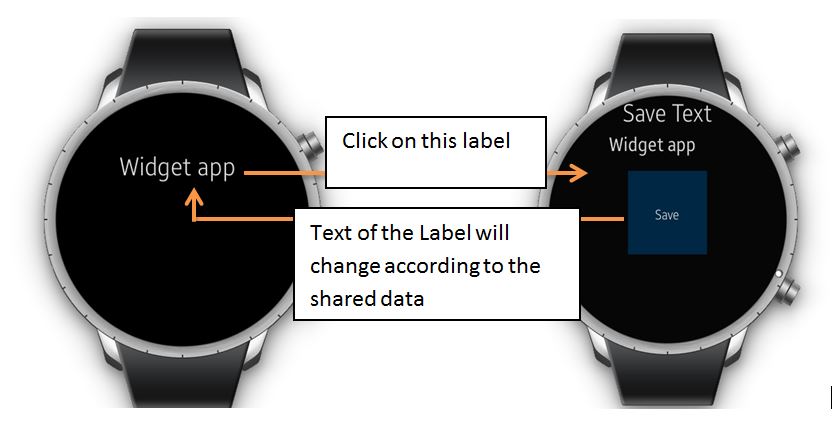
Figure: Sharing data between widget and UI app
Was this document helpful?
We value your feedback. Please let us know what you think.