Canvas2D mobile web game development – basics
PUBLISHED
Introduction
The main aim of this article is to get you familiar with the mobile web game development on Tizen platform. I want to show you that basic knowledge of Canvas 2D API and good game architecture is sufficient to create a fully working version of HTML5 game on Tizen. Sample application – Earth Guard 0.0.1 attached to this article is compatible with Tizen SDK 2.0.0 public release.
How to use the application?
In the attached sample application – Earth Guard 0.0.1 the only user input mechanism implemented is keyboard. So we recommend you to launch the application on Tizen simulator and use up/down/left/right and space bar keys to control the player ship. Aplication control using gyroscope for mobile devices is described in “Keeping high portability of your Tizen web applications” article.
Do I need to use any frameworks for mobile web game development?
There are many JavaScript game frameworks. Most of them use Canvas in 2D context, few of them use WebGL. The main reason behind this, is the simplicity of Canvas 2D API and the natural correspondence between standard coordinates in two dimensional space with the way you draw on Canvas 2D. On the other hand WebGL is designed to present 3D graphics using perspectives and complex shaders. For more on WebGL topic please see Custom 3D Graphics on Tizen article. For basic information on Canvas 2D context please visit: Custom 2D Graphics on Tizen.
There are many game frameworks for web apps: Cocos2D-HTML5, Quintus, CraftyJS, just to name a few. Fortunately you do not need to know any of them to create a highly interactive, portable game that launches on all HTML5 friendly platforms, including Tizen. The only thing you need to know is how to use Canvas 2D API and design a maintainable game class architecture, which I present in this article.
Canvas2D introduction
Canvas 2D declaration and feature detection
There is very little to know about Canvas in 2D context in order to develop Tizen web games. The first thing you need to do is create a canvas element in your DOM structure. Please refer to index.html file in the sample application.
<canvas id='game' width='720' height='1280'></canvas>
You should set the appropriate width and height of the canvas element. In our example, canvas fits the HD resolution.
After that you are ready to get the reference to your canvas instance in JavaScript application. Before reference acquisition you should perform a feature detection in order to verify if the browser really supports Canvas API in 2D context. Fortunately Tizen embedded browser is WebKit, that fully supports Canvas API in 2D context. So the verification is needed only if you decide to distribute your application for desktop browsers. This is a highly recommended approach, because Earth Guard game can be easily launched on desktop browsers. For Canvas2D feature detection please refer the game module in ./js/game.js file:
checkEnviroment : function() {
    var canvas = document.getElementById('game');
    var ctx = canvas.getContext && canvas.getContext('2d');
    if (!ctx) {
        alert("Please upgrade your browser!");
        return false;
    }
    ...
    ...
    return true;
},
You should expect to have a reference to the canvas element in the canvas variable if the verification is successful.
Sprite image handling with Canvas2D
After successful canvas reference acquisition we should consider how to store graphical resources in our application. The best way to do this is to use a single sprite image for all game related graphics. In order to get familiar with sprite images please visit: http://www.w3schools.com/css/css_image_sprites.asp.
Canvas 2D API makes it extremely easy to work with sprite images. Here is the algorithm you need to follow in order to load a custom sprite and use it with Canvas API:
- Create a new Image object instance.
- Assign callback for Image onload event. In this callback function you can safely use a reference to previously created Image object instance. We will show you how to do this later on.
- Assign sprite path to Image src property.
Canvas 2D API provides the following interface:
canvas.drawImage(image, sx, sy, sWidth, sHeight, dx, dy, dWidth, dHeight);
where:
image – a reference to previously created Image object instance
sx, sy, sWidth, sHeight – top, left corner and width, height of source rectangle taken from image
dx, dy, dWidth, dHeight – destination rectangle on Canvas
In Earth Guard we have created a separate module for handling sprites (spriteSheet in ./js/modules/spriteSheet.js). In this module a solid sprite structure is defined:
ship : {
    sx : 0, // top left corner x coordinate
    sy : 0, // top left corner y coordinate
    w : 37, // sprite width
    h : 42, // sprite height
    frames : 1 // frame number
},
Because graphics for one item are placed horizontally in sprite image, we provided a frames property that allows us to handle a specific frame for an item from a sprite image. You can see that the explosion item has 12 frames. All of the other items have just one frame.
![]()
Fig 1: Initial sprite sheet for Earth Guard
By now you should know what a sprite image is and how it should be defined in JSON. The next step is the spriteSheet module that allows us to handle multiple items from sprites and draw them on canvas.
var spriteSheet = function() {
    var sprites = {
    ship : {
        sx : 0, // top left corner x coordinate
        sy : 0, // top left corner y coordinate
        w : 37, // sprite width
        h : 42, // sprite height
        frames : 1 // frame number
    }
    };
    var spriteSource = 'images/sprites.png';
    var image = new Image();
    return {
        load : function(callback) {
            image.onload = callback;
            image.src = spriteSource;
        },
        draw : function(ctx, sprite, x, y, frame) {
            var s = sprites[sprite];
            if (!frame)
                frame = 0;
            ctx.drawImage(image, s.sx + frame * s.w, s.sy, s.w, s.h, Math
                    .floor(x), Math.floor(y), s.w, s.h);
        }
    };
}();
The SpriteSheet module provides two methods: load and draw. The load method is used do assign the callback function to onload event as well as to define the src property of the image object. Please remember that you can use the draw method only if the image is loaded by the browser, so basically you can do this either in the callback function or after it’s invocation. In Earth Guard the spriteSheet.load method is invoked in game.initialize method. After the sprite image was loaded we can safely use the spriteSheet draw method.
What are the approaches for game development on Tizen?
The first question you need to answer when you start a mobile web game development is what kind of abstraction should reflect your game primitives such as enemies, bullets, missiles etc. It can either be DOM elements or graphics drawn on 2D Canvas surface. The first type is usually referenced as Retained mode, in which the browser tracks object’s positions and hierarchy. Instead of starting from scratch in each frame, you need to adjust only the elements that have changed and the browser takes care of rendering everything correctly. On the other hand there is also an Immediate mode in which you control all pixels being drawn on the surface. You control the hierarchy of objects – it means that it is up to you to decide which objects should be drawn over the other ones. In this mode all objects are redrawn regardless of their position change. Which mode is better? Generally speaking, when you need to interact with many objects using, for example, touch control, it is much better to use the Retained mode in which it is easy to assign event handlers to all objects. On the other hand, when you control your application using some simple input mechanism, it is better to use Immediate mode.
Our sample game will use the Immediate mode due to the fact that the only control mechanisms are the gyroscope/keyboard and the user cannot directly interact with touch with any objects on a 2D surface.
Game structure – the Three Principle Objects
There are three principle objects that you need in every game: a Game object tying everything together, a GameBoard that handles sprites collisions and groups them and a SpriteSheet that allows to load a sprite from a given file in order to display selected part of a sprite on the screen.
Immediate mode concept – the game loop
In the immediate mode the application entry point is the game loop, where:
- Canvas is cleared
- New position of objects are calculated
- All objects are drawn taking into consideration the new positions calculated in 2nd step
- Event loop is released for a time period equal to T (msec)
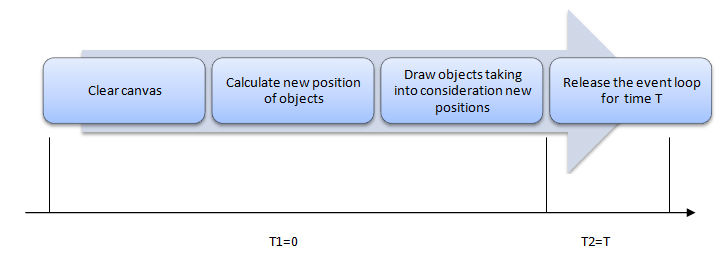
Fig 2: Diagram that shows the game loop
In case of ideal, super fast hardware we may assume that points 1-3 take no time, so the T1=0. That’s why we need to release (4th point) the whole JavaScript event loop for a time period T2=T. During this release time our application can handle other events such as: keyboard events, touch events, gyroscope events etc. It is your task to choose the appropriate T time, because the game FPS (Frame per second rate) depends on it. The FPS is the game draw surface refresh frequency. It can be calculated in the following way: FPS = 1/T. Usually the developer knows the FPS he wants to set for his game. For example, in case of Earth Guard this value is set to 40fps. If the FPS is defined you can calculate T=1/FPS. So in our case T=0,025sec = 25 msec. After this calculation you can create a game loop with assigned values. Please keep in mind that below code is just a pseudo code that will not work after copy/paste. It is used only to demonstrate the game loop concept.
var fps = 40; // sample fps set to 40
var T = 1 / (fps / 1000); // period needs to be defined in msec
var dt = T / 1000;
var loop = function() {
    background.draw(ctx); // clear canvas (1st point)
    obj.step(dt); // calculate new object position (2nd point)
    obj.draw(ctx); // draw object taking into account new coordinates (3rd point)
    setTimeout(loop, T); // recursive call of loop method after given period (4th point)
};
loop();
Use adaptive game loop to optimize your game for changing hardware capabilities
For a basic game loop concept we assumed that points 1-3 from previous chapter take no time. Unfortunately, for a real device this is not true, because rendering and new position calculation takes some time. This time depends on the device performance. If the performance is good (for example for desktop browser), the T1 time is almost equal to 0. In case of mobile devices such as Tizen we need to take the T1 time into consideration and create an adaptive game loop. In the adaptive game loop we release the main program event loop not for time T, but for T2=T-T1. Thanks to this approach, if the device performance drops suddenly the user will not notice this fact, because we subtract lag time (T1) from developer’s defined period (T) and we use this new time to release the main event loop.
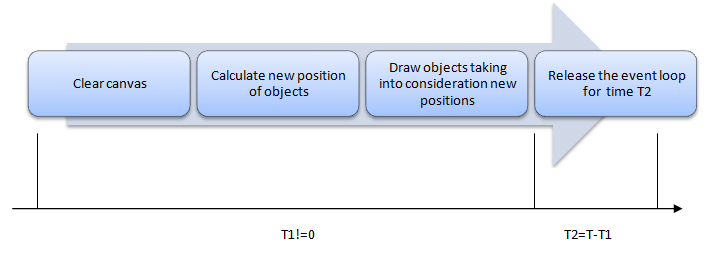
Fig 3: Diagram that shows the game adaptive loop
Below code represents the adaptive game loop concept with the 5 msec threshold.
var fps = 40; // sample fps set to 40
var T = 1 / (fps / 1000); // period needs to be defined in msec
var dt = T / 1000;
var loop = function() {
    var ta = new Date();
    background.draw(ctx); // clear canvas (1st point)
    obj.step(dt); // calculate new object position (2nd point)
    obj.draw(ctx); // draw object taking into account new coordinates (3rd point)
    var tb = new Date();
    var T1 = tb-ta; // calculate T1 duration
    var T2 = T - T1 // calculate T2 that will be used for setTimeout
    if(T2<5) // in case the device performance is so poor that T2 time is less then 5 msec, leave 5msec time to release the event loop to not block the application
        T2 = 5;
    setTimeout(loop, T2); // recursive call of loop method after given period (4th point)
};
Basic game architecture
The basic game architecture consists of the following classes and modules:
- Game module – its main purpose is to initialize the game engine for Earth Guard and run the game loop as well as provide a mechanism for changing the game boards.
- GameBoard class – its main purpose is to aggregate game logical items such as: ships, missiles etc. It allows to easily add/remove items to/from board and to iterate through item’s properties.
- spriteSheet module – keeps all functionalities for sprite handling. It is used by Sprite class.
- Sprite class – stores all functionalities for drawing item image on Canvas2D and manages sprite image for current item.
- PlayerShip, Enemy, PlayerMissile inherit from Sprite class. Thanks to this they do not need to take care of item drawing. Those classes are responsible only for handling item’s dedicated logic and for new position calculation.
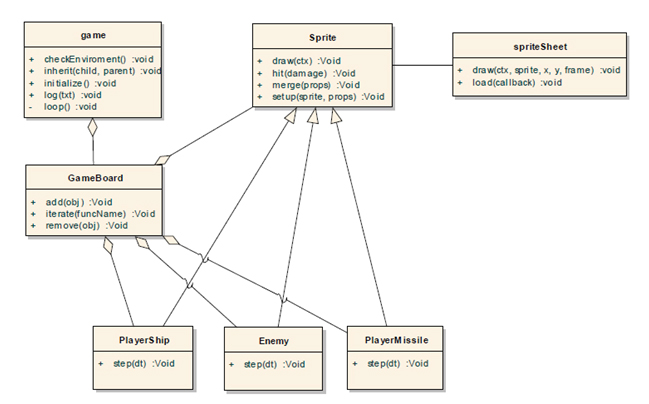
Fig 4: Basic Earth Guard class diagram
Summary
This article gives you a brief overview on what approach should be used for mobile web game development. You are now familiar with the game loop and adaptive game loop terms as well as the basic web game architecture. Sample application attached to this article is called Earth Guard v. 0.0.1.
This is just the first article form a series of three articles. If you want to know more please move to: Canvas2D mobile web game development – implementation article.
Was this document helpful?
We value your feedback. Please let us know what you think.