Advanced features of Kinetic.js
PUBLISHED
Introduction
In the last article about Kinetic.js we have showed how to setup the Kinetic library and how to use it in the process of building a little Mars Lander game. Lots of capabilities of this engine have been shown, but still there are many advanced topics to be explained about Kinetic.js.
This article shows how to use advanced capabilities of Kinetic.js such as graphical filters, internal tweening animations and rendering a text over a SVG path on the DOM canvas element. Those functionalities are implemented in the extended sample application MarsLanderExtended.wgt supplied with this article. We encourage you to take a peek inside the source code of that application while reading this article. The sample application has been tested on the Tizen SDK 2.2.1.
You can obtain additional information about this library at http://kineticjs.com/ and the complete documentation for the library can be found here: http://kineticjs.com/docs/. But beware that the documentation as for now doesn’t cover the Kinetic.js filters very well. You can reference to the comments inside the filter class files inside the Kinetic.js source code on GitHub instead.
Filters in Kinetic.js
Kinetic.js offers several graphical filters you can easily use in your web canvas projects.The list of filters can be seen below. The names of the filters are quite self-explanatory.
Kinetic.Filters.Blur
Kinetic.Filters.Brighten
Kinetic.Filters.Emboss
Kinetic.Filters.Enhance
Kinetic.Filters.Grayscale
Kinetic.Filters.HSL – (hue, saturation, luminance)
Kinetic.Filters.HSV – (hue, saturation, value)
Kinetic.Filters.Invert
Kinetic.Filters.Kaleidoscope
Kinetic.Filters.Noise
Kinetic.Filters.Pixelate
Kinetic.Filters.Posterize
Kinetic.Filters.RGB – (red, green, blue)
Kinetic.Filters.Sepia
Kinetic.Filters.Solarize
Kinetic.Filters.Threshold
Kinetic.Filters.Mask
The next question raised should be about applying the filters and controlling them in Kinetic.js. It seems to be quite easy. We just need loaded and instantiated images or Kinetic shapes on our stage to see the results. Then we can apply any filter to an image, shape, layer or group. The following code describes how to do it using the Emboss filter.
[…]

image.filters([Kinetic.Filters.Emboss]);

image.embossStrength(1);
image.embossWhiteLevel(0.7);
image.embossDirection('top-right');
image.embossBlend(true);

[…]
As you can see how applying a filter is done using the filters() function with a filter name as parameter. Then having assigned a filter to an image, shape, layer or group, we can easily control the parameters of that filter. For the emboss filter we can manipulate the embossStrength(), embossLevel(), embossDirection() and embossBlend() parameters. Remember that in order to make the changes on the screen you need to render the entity which the filter was applied to, using the draw() or batchDraw() method inside your main game render loop.

![]()
Figure 1 – preview of the MarsLanderExtended.wgt with applied filters (Emboss, HSL, Pixelate).
Although filters can achieve nice effects for your canvas applications and games, as seen on figure 1, but also can be the source of rendering lags. So do not burden your applications’ performance by applying too many filters at the same time. Please keep that in mind while building and testing your applications.
Internal tweening engine in Kinetic.js
Kinetic.js comes together with an internal animation engine. The engine enables developers to animate any property of the Kinetic display list. You can animate image coordinates, values of effect parameters or plain scaling properties of an object. The code below describes how to apply a simple tweening animation, based on the sample application, supplied with this article. The MarsLanderExtended.wgt uses a tween to move a Sojuz / Shenzhou like spacecraft above the Mars atmosphere in the background of the game.
[…]

var carrier_tween;

[…]

carrier_tween = new Kinetic.Tween({
            node: carrier,
            duration: 9,
            x: -200,
            easing: Kinetic.Easings.EaseInOut,
            onFinish: function() {

			// here will happen something after the end of the tween

            }
        });

        carrier_tween.play();
[…]
As you can see above, in order to implement a tween you just need to create a Kinetic.Tween() object and specify the node (Kinetic object) which the tween will be applied to. In the case of our sample application it is the carrier image. You must also specify the duration (in seconds) of the animation. Then you specify the final state of the parameters you want to animate. In our example we are animating the x parameter of the carrier image. Finally you can also specify the easing type. Easing is the type of movement applied to the animation. Kinetic allows you to use the following easing types:
Kinetic.Easings.Linear
Kinetic.Easings.EaseIn
Kinetic.Easings.EaseOut
Kinetic.Easings.EaseInOut
Kinetic.Easings.BackEaseIn
Kinetic.Easings.BackEaseOut
Kinetic.Easings.BackEaseInOut
Kinetic.Easings.ElasticEaseIn
Kinetic.Easings.ElasticEaseOut
Kinetic.Easings.ElasticEaseInOut
Kinetic.Easings.BounceEaseIn
Kinetic.Easings.BounceEaseOut
Kinetic.Easings.BounceEaseInOut
Kinetic.Easings.StrongEaseIn
Kinetic.Easings.StrongEaseOut
Kinetic.Easings.StrongEaseInOut
You can also specify a function to be executed after the end of the tween animation. To accomplish that apply a function to the onFinish parameter. In order to start the animation you just need to invoke the play() function on the Kinetic.Tween object. It is worth noticing that you can invoke other useful functions on the tween object. Below you can find the whole list of those methods.
play() – plays the tween animation forward
pause() – pauses the tween animation
reverse() – plays the animation in reverse
reset() – moves the animation to the beginning and stops
seek(_t) – goes to a specifided in the _t parameter second of the animation
finish() – goes to the end of the animation and stops it
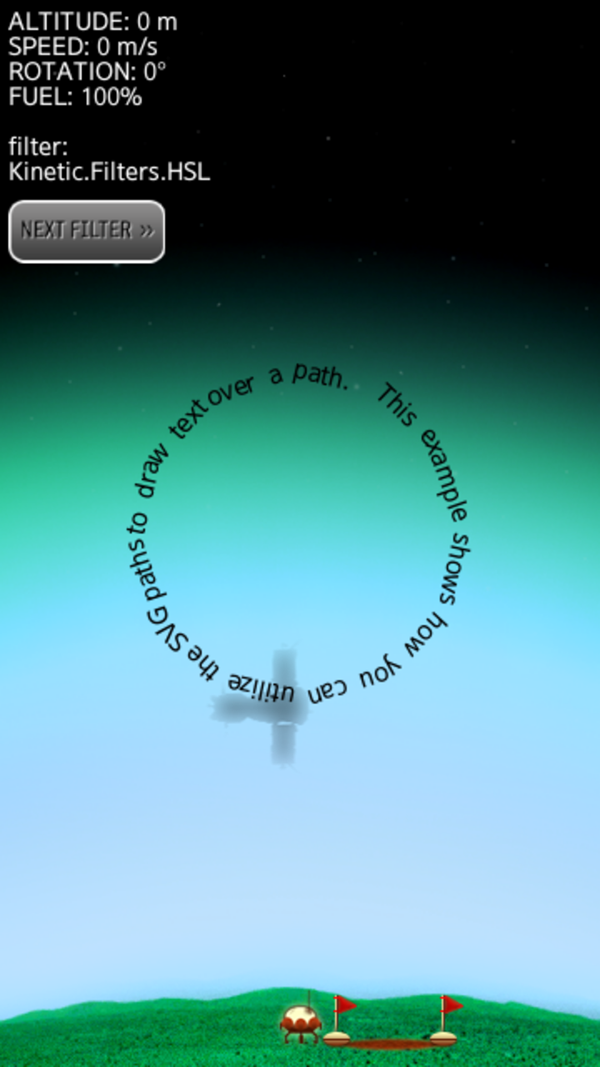
Rendering canvas text using SVG paths
Another useful feature in Kinetic.js is rendering text over a SVG path. This comes really useful when you need to make a dynamical text which needs to be bended in some way on the screen. In Kinetic.js it just takes minutes to apply a SVG path to a text. Please look at the following code.
[…]

var textpath;

[…]

textpath = new Kinetic.TextPath({
                   x: gameWidth/2,
	           y: gameHeight/2,
	           fill: '#000',
	           fontSize: '16',
	           fontFamily: 'Arial',
	           text: 'This  example  shows  how  you  can
                          utilize  the SVG paths to  draw
                          text over  a  path.',
	           data: 'm1,71.642052l25.857967,-44.784084l44.784084,
                         -25.857967l51.715858,0l44.784027,
                          25.857967l25.858078,44.784084l0,51.715858l-25.858078,
                          44.784027l-44.784027,25.858078l-51.715858,0l-44.784084,
                         -25.858078l-25.857967,-44.784027l0,-51.715858z',
	           offset: {x:97, y:97} // set the anchor point of
                                        // the SVG shape in its geometrical middle
	         });

[…]
First of all you need to instantiate a Kinetic.TextPath() object. Specify its x and y positions, choose a fill color for the text, specify the font size and font family and the text you want to display. You may be wondering what is the string with numbers and letters in the data parameter. This is the actual SVG path drawn in a visual SVG editor and then imported into the Kinetic.TextPath() object. Of course you don’t have to use any editors to create a SVG path, but in this tutorial we are not focusing on SVG path creation. Also when creating a Kinetic.TextPath() it is wise to change the transformation point of the object. This is the point which will be used as the point for rotation, scaling and other transformations. It is wise to set that point using the offset attribute while working with SVG paths in Kinetic.js.
Summary
In this article we have described some of the advanced features of Kinetic.js. We have presented how to use the graphical filters and their attributes. There has been also presented the tweening (animating) of Kinetic.js graphical objects and the interface of the tweening engine. The last thing we have described was creating a dynamical text rendered over a SVG path on the canvas. We hope that you will find the described features useful while developing your future projects with Kinetic.js on Tizen. Also please free to play around with the sample application attached to this article to learn more about the presented topics.
Was this document helpful?
We value your feedback. Please let us know what you think.