使用了Crafty.js的游戏
PUBLISHED
概述
本文演示了使用crafty js游戏引擎开发游戏的方法。 Crafty是一种基于JavaScript的HTML5游戏引擎。 设计它的目的是使开发2D图形游更加容易。 使用crafty开发一个游戏之前,用户必须了解两个重要的事情。 他们是
1. 实体(Entity)
2. 组件(Component)
实体(Entity)
一个实体就是一个存在于游戏世界里的某个对象,并且它具有某种运动行为。 换句话说,用户在一个Crafty游戏屏幕上(没有背景图像)看到的一切都可能是一个实体。
组件(Component)
一个组件指定了一个数据集或者某种运动行为,它们可以被应用到一个或多个实体上。
使用Crafty构建一个游戏
此游戏是一个低功能的冒险类游戏,其目的是四处奔跑,访问森林中的所有村庄。
先决条件
开始开发游戏之前,用户必须下载最新的Crafty.js文件。 接下来,从此存档中下载需要的所有图像和音频资料。 创建assets目录,并将下载下来的"crafty_bng_tut_assets"目录中的所有文件拷贝到"assets"目录中。
初始化游戏
首先创建一个文件game.js. 对 js/game.js文件本身只是定义了一个全局可访问的游戏对象,该对象只有一个函数start,该函数实现初始化和启动Crafty "game"。
 Game = {

  // Initialize and start the game

  start: function() {

    // Start crafty and set background color

    Crafty.init(480, 320);
    Crafty.background('green');
  }
}
HTML文件index.html只导入了Crafty游戏的库文件“crafty.js”,其次是game.js(其中包含建立独特Crafty游戏的代码)。 最后,一旦页面完全加载,JavaScript的一便会通知浏览器运行“Game.start”函数。
<html>
<head>
 <script src="lib/crafty.js"></script>
 <script src="src/game.js"></script>
 <script>
    window.addEventListener('load', Game.start);
 </script>
</head>
<body>
</body>
</html>
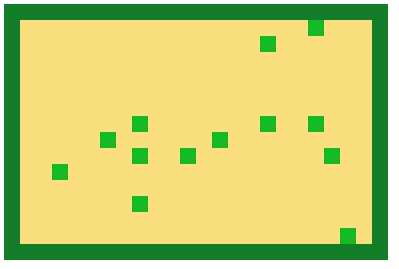
创建一个简单的森林场景
在创建森林场景之前,用户必须知道如何创建可以放置实体的"grid" 和 "tiles"。 现在,通过在网格的每一个边框上放置一颗树,然后在边框中间的广场上随意放一些灌木来创建一些地形。 看看代码如何创建网格,树木和灌木
Game = {
  // This defines our grid's size and the size of each of its tiles
  map_grid: {
    width:  22,
    height: 33,
    tile: {
      width:  16,
      height: 16
    }
  },

  // The total width of the game screen. Since the grid takes up the entire screen this is just the width of a tile times the width of the grid

  width: function() {
    return this.map_grid.width * this.map_grid.tile.width;
  },

  // The total height of the game screen. Since the grid takes up the entire screen this is just the height of a tile times the height of the grid

  height: function() {
    return this.map_grid.height * this.map_grid.tile.height;
  },

  // Initialize and start the game

  start: function() {
    // Start crafty and set a background color so that we can see it's working
    Crafty.init(Game.width(), Game.height());
    Crafty.background('rgb(249, 223, 125)');

    // Place a tree at every edge square on our grid of 16x16 tiles

    for (var x = 0; x < Game.map_grid.width; x++) {
      for (var y = 0; y < Game.map_grid.height; y++) {
        var at_edge = x == 0 || x == Game.map_grid.width - 1 || y == 0 || y == Game.map_grid.height - 1;
        if (at_edge) {

          // Place a tree entity at the current tile

          Crafty.e('2D, Canvas, Color')
            .attr({
              x: x * Game.map_grid.tile.width,
              y: y * Game.map_grid.tile.height,
              w: Game.map_grid.tile.width,
              h: Game.map_grid.tile.height
            })
            .color('rgb(20, 125, 40)');
        }
        else if (Math.random() < 0.06) {

          // Place a bush entity at the current tile

          Crafty.e('2D, Canvas, Color')
            .attr({
              x: x * Game.map_grid.tile.width,
              y: y * Game.map_grid.tile.height,
              w: Game.map_grid.tile.width,
              h: Game.map_grid.tile.height
            })
            .color('rgb(20, 185, 40)');
        }
      }
    }
  }
}
上面的代码中,“Crafty.e('2D, Canvas, Color')“创建一个实体,该实体使用三个组件:”2D“,"Canvas"和"Color"。 2D组件允许用户设置实体x和y位置(直角坐标)以及对象的高度和宽度。 Canvas组件允许在Canvas DOM元素上绘制实体,从而现实游戏界面。 Color组件允许用户设置实体的颜色。
通过“Components”重用普通的属性和行为。
在上面的代码中,“Tree”和“Bush”创造好了。 如果用户想在“森林场景”中复制多个树木和灌木,这个比较难。 因此,建立我们自己的组件,便可以重复多样实体。 为此,创建component.js文件,并放置所有已创建的组件。 除了“Tree”和“Bush”,我们创建另一个组件'Actor'。 作为一个组件,“Actor”封装了2D,Canvas和Grid组件的使用方法。 看看代码如何创建可重用的组件
//Component.js

// The Grid component allows an element to be located on a grid of tiles

Crafty.c('Grid', {
  init: function() {
    this.attr({
      w: Game.map_grid.tile.width,
      h: Game.map_grid.tile.height
    })
  },

  // Locate this entity at the given position on the grid

  at: function(x, y) {
    if (x === undefined && y === undefined) {
      return { x: this.x/Game.map_grid.tile.width, y: this.y/Game.map_grid.tile.height }
    } else {
      this.attr({ x: x * Game.map_grid.tile.width, y: y * Game.map_grid.tile.height });
      return this;
    }
  }
});

// An "Actor" is an entity that is drawn in 2D on canvas via our logical coordinate grid

Crafty.c('Actor', {
  init: function() {
    this.requires('2D, Canvas, Grid');
  },
});

// A Tree is just an Actor with a certain color
Crafty.c('Tree', {
  init: function() {
    this.requires('Actor, Color')
      .color('rgb(20, 125, 40)');
  },
});

// A Bush is just an Actor with a certain color
Crafty.c('Bush', {
  init: function() {
    this.requires('Actor, Color')
      .color('rgb(20, 185, 40)');
  },
});
现在game.js文件更简单了,因为它只是引用刚刚创建的组件,而不是定义每一个内嵌实体的所有属性。 一起来看看简化过的game.js文件
Game = {
// This defines our grid's size and the size of each of its tiles

  map_grid: {
    width:  24,
    height: 16,
    tile: {
      width:  16,
      height: 16
    }
  },

  // The total width of the game screen. Since our grid takes up the entire screen this is just the width of a tile times the width of the grid

  width: function() {
    return this.map_grid.width * this.map_grid.tile.width;
  },

  // The total height of the game screen. Since our grid takes up the entire screen this is just the height of a tile times the height of the grid

  height: function() {
    return this.map_grid.height * this.map_grid.tile.height;
  },

  // Initialize and start our game

  start: function() {
    // Start crafty and set a background color so that we can see it's working
    Crafty.init(Game.width(), Game.height());
    Crafty.background('rgb(249, 223, 125)');

    // Place a tree at every edge square on our grid of 16x16 tiles

    for (var x = 0; x < Game.map_grid.width; x++) {
      for (var y = 0; y < Game.map_grid.height; y++) {
        var at_edge = x == 0 || x == Game.map_grid.width - 1 || y == 0 || y == Game.map_grid.height - 1;

        if (at_edge) {

          // Place a tree entity at the current tile

          Crafty.e('Tree').at(x, y);
        }
        else if (Math.random() < 0.06) {

          // Place a bush entity at the current tile

          Crafty.e('Bush').at(x, y);
        }
      }
    }
  }
}
现在屏幕看起来是这样的
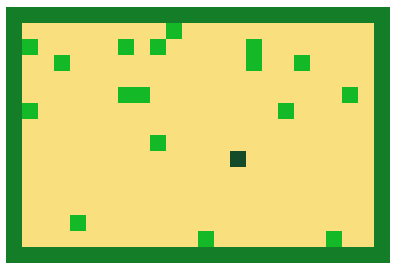
添加玩家到画面上
添加一个玩家可以控制的实体。 要做到这一点,定义一个名为PlayerCharacter(简写为PC)的新组件。 PC组件需要Actor,MoveTo和Color组件。 Actor和Color组件已经在上面的代码中使用了,但moveTo是新的。 通过使用“鼠标或触摸事件”,MoveTo可以让玩家在屏幕上移动。 若要为PC实体激活此“moveTo”控制方案,需要添加"MoveTo"到PC实体,然后在该实体上调用moveTo()来设置应该移动的速度。 已下载的crafty.js文件不具有“moveTo”功能。 因此,从这里复制代码,并添加到crafty.js文件的末尾。
添加下面的代码到Component.js文件中。
// This is the player-controlled character

Crafty.c('PlayerCharacter', {
  init: function() {
    this.requires('Actor, MoveTo, Color')
      .moveTo(4)
      .color('rgb(20, 75, 40)');
  }
});
现在,添加下面的代码到game.js文件中
Game = {
  // Initialize and start our game

start: function() {
    // Start crafty and set a background color so that we can see it's working...

    // Player character, placed at 5, 5 on our grid

    Crafty.e('PlayerCharacter').at(5, 5);

    // Place a tree at every edge square on our grid of 16x16 tiles
    //...
  }
}
现在屏幕看起来是这样的
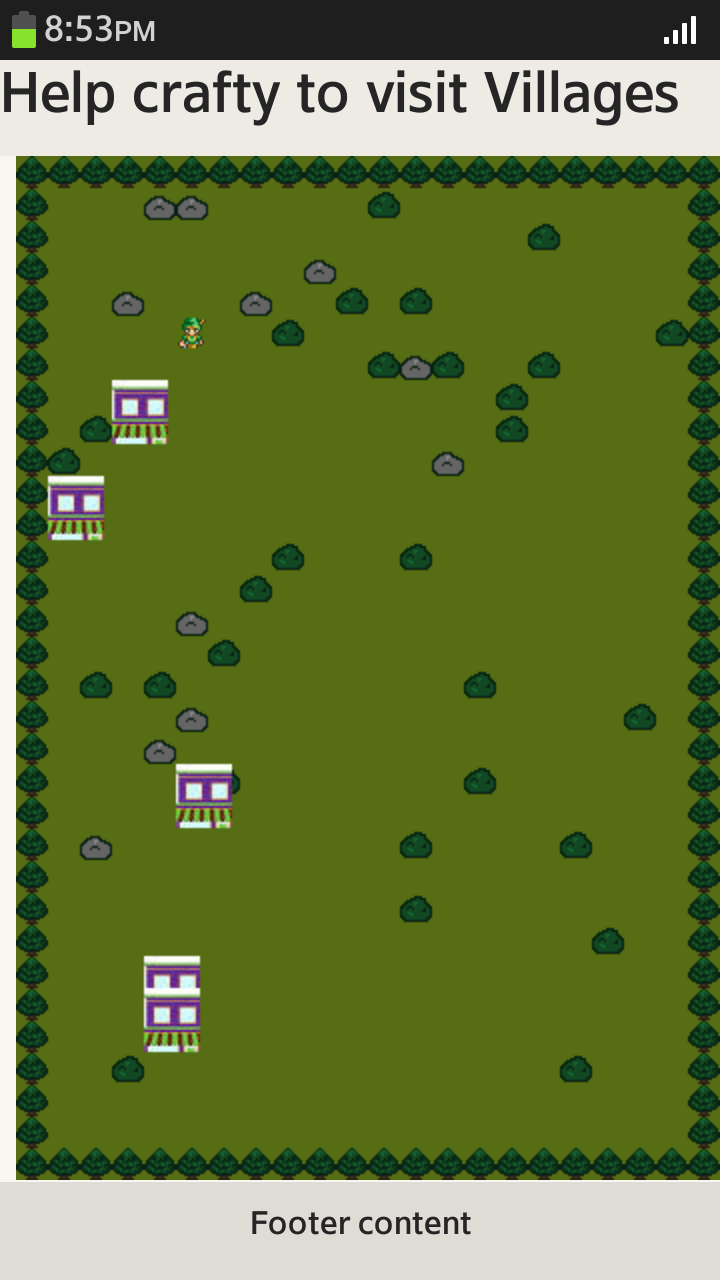
添加要访问的村庄
现在游戏包含了一个PC实体,它可以在树木和灌木之间来回移动的。 当他移动的时候,我们可以通过赋予玩家一些东西来增加一些互动。 他在屏幕上来回移动,我们可以为其添加可以访问的“villages”。 添加村庄只需要增加三部分到代码中。 首先,定义一个新的组件并命名为Village,给它一个独特的色彩,从而可以在游戏板上看到它们。 二,注册一个回调函数,每当玩家进入一个村庄时,便用来处理“visiting”。 最后,在启动流程中添加一些代码,用来在随机位置生成一些初始的村庄。 下面是代码所需的补充:
Component.js
// This is the player-controlled character

Crafty.c('PlayerCharacter', {
  init: function() {
    this.requires('Actor, MoveTo, Color, Collision')
      .moveTo(4)
      .color('rgb(20, 75, 40)')

      // Whenever the PC touches a village, respond to the event
      .onHit('Village', this.visitVillage);
  },

  // Respond to this player visiting a village

  visitVillage: function(data) {
    villlage = data[0].obj;
    villlage.collect();
  }
});

// A village is a tile on the grid that the PC must visit in order to win the game

Crafty.c('Village', {
  init: function() {
    this.requires('Actor, Color')
      .color('rgb(170, 125, 40)');
  },

  collect: function() {
    this.destroy();
  }
});
Game.js
Game = {
  // ...
  // Initialize and start our game

  start: function() {
    // ...
    // Generate up to five villages on the map in random locations

    var max_villages = 5;
    for (var x = 0; x < Game.map_grid.width; x++) {
      for (var y = 0; y < Game.map_grid.height; y++) {
        if (Math.random() < 0.02) {
          Crafty.e('Village').at(x, y);

          if (Crafty('Village').length >= max_villages) {
            return;
          }
        }
      }
    }
  }
}
现在屏幕看起来是这样的

创建一个胜利画面
现在为玩家添加一个需要完成的目标以及一个胜利画面,当玩家成功完成此目标后,显示胜利的画面。 结束时,统计玩家访问的村庄个数,如果他访问到了最后一个,则现实一个胜利画面说:"Victory!"。 为了实现这一目标,我们使用了Crafty非常有用的内置概念“scenes”。 Scenes是区分游戏中某部分与其他部分的差异。 对于这个游戏,开始于两个场景:一个是用户一直在玩的"Game" 场景,一个是“Victory”场景,用于告诉玩家他已经赢了。 由于场景是代码组织中如此重要的组成部分,为此建立一个新文件“js/ scenes.js”来定义这些场景。 对于“Loading”屏幕,只需要使用一个新的实体以文本方式显示一条简单的信息即可,该实体使用2D,DOM和Text组件。 通过使用标准的DOM + CSS浏览器技术,这三个内置的组件可以很容易地为游戏绘制文字。 胜利屏幕所做的唯一一件事是告诉用户,他已经完成了目标。 这是代码的补充部分
Scenes.js
Crafty.scene('Game', function() {

  // A 2D array to keep track of all occupied tiles

  this.occupied = new Array(Game.map_grid.width);
  for (var i = 0; i < Game.map_grid.width; i++) {
    this.occupied[i] = new Array(Game.map_grid.height);
    for (var y = 0; y < Game.map_grid.height; y++) {
      this.occupied[i][y] = false;
    }
  }

  // Player character, placed at 5, 5 on our grid

  this.player = Crafty.e('PlayerCharacter').at(5, 5);
  this.occupied[this.player.at().x][this.player.at().y] = true;

  // Place a tree at every edge square on our grid of 16x16 tiles

  for (var x = 0; x < Game.map_grid.width; x++) {
    for (var y = 0; y < Game.map_grid.height; y++) {
      var at_edge = x == 0 || x == Game.map_grid.width - 1 || y == 0 || y == Game.map_grid.height - 1;

      if (at_edge) {
        // Place a tree entity at the current tile
        Crafty.e('Tree').at(x, y);
        this.occupied[x][y] = true;
      }
      else if (Math.random() < 0.06 && !this.occupied[x][y]) {

        // Place a bush entity at the current tile

        Crafty.e('Bush').at(x, y);
        this.occupied[x][y] = true;
      }
    }
  }

  // Generate up to five villages on the map in random locations

  var max_villages = 5;
  for (var x = 0; x < Game.map_grid.width; x++) {
    for (var y = 0; y < Game.map_grid.height; y++) {
      if (Math.random() < 0.02) {
        if (Crafty('Village').length < max_villages && !this.occupied[x][y]) {
          Crafty.e('Village').at(x, y);
        }
      }
    }
  }

  this.show_victory = this.bind('VillageVisited', function() {
    if (!Crafty('Village').length) {
      Crafty.scene('Victory');
    }
  });
}, function() {
  this.unbind('VillageVisited', this.show_victory);
});

Crafty.scene('Victory', function() {
  Crafty.e('2D, DOM, Text')
    .attr({ x: 0, y: 0 })
    .text('Victory!');
},
Game.js
Game = {
  // ...
  // Initialize and start our game

  start: function() {
    // Start crafty and set a background color so that we can see it's working
    Crafty.init(Game.width(), Game.height());
    Crafty.background('rgb(249, 223, 125)');

    // Simply start the "Game" scene to get things going

    Crafty.scene('Game');
  }
}
使用“sprites”添加丰富的图形并使之动画。
"sprite"是一个2D图像,表示一个单独的可视的元素,如树木或者灌木。 一个sprite图是一个位映射的图像,它包含多个sprite。 根据一个spite图,Crafty可以很容易地将不同的sprite映射到相应的组件和实体上。 开始,通过Crafty.load加载sprite图图像。 然后调用Crafty.sprite,并传递sprite图中每个sprite中的宽度(以像素为单位),asset的路径,和对象,对于不同的sprite,对象定义什么会被调用,然后在sprite图中,每个sprite之间进行垂直方向和水平方向上填充。 有关如何创建sprites的信息,请参考链接。 添加下面的代码到Scene.js文件中
// Handles the loading of binary assets such as images and audio files
Crafty.scene('Loading', function(){

  // Draw some text for the player to see in case the file takes a noticeable amount of time to load
  Crafty.e('2D, DOM, Text')
    .text('Loading...')
    .attr({ x: 0, y: Game.height()/2 - 24, w: Game.width() })
    .css($text_css);

  // Load our sprite map image

  Crafty.load(['assets/16x16_forest_1.gif'],'assets/village1.jpg', function(){

    // Once the image is loaded, define the individual sprites in the image each one (spr_tree, etc.) becomes a component these components' names are prefixed with "spr_" to remind us that they simply cause the entity to be drawn with a certain sprite

    Crafty.sprite(16, 'assets/16x16_forest_1.gif', {
      spr_tree:    [0, 0],
      spr_bush:    [1, 0],
      spr_player:  [1, 1]
    });

    Crafty.sprite(8,'assets/village1.jpg',{
    spr_Village:[1.2,6.3,3.5,4]
    });

    // Now that our sprites are ready to draw, start the game

    Crafty.scene('Game');
  })
如下图所示,修改component.js文件,实现添加sprite
// A Tree is just an Actor with a certain sprite

Crafty.c('Tree', {
  init: function() {
    this.requires('Actor, Solid, spr_tree');
  },
});

// A Bush is just an Actor with a certain sprite

Crafty.c('Bush', {
  init: function() {
    this.requires('Actor, Solid, spr_bush');
  },
});

// This is the player-controlled character

Crafty.c('PlayerCharacter', {
  init: function() {
    this.requires('Actor, MoveTo, Collision, spr_player')
      .moveTo(4)
      .onHit('Village', this.visitVillage)

      //These next lines define our four animations each call to .animate specifies the name of the animation the x and y coordinates within the sprite map at which the animation set begins the number of animation frames *in addition to* the first one
      .animate('PlayerMovingUp',    0, 0, 2)
      .animate('PlayerMovingRight', 0, 1, 2)
      .animate('PlayerMovingDown',  0, 2, 2)
      .animate('PlayerMovingLeft',  0, 3, 2);

  // Watch for a change of direction and switch animations accordingly

    var animation_speed = 8;
    this.bind('NewDirection', function(data) {
      if (data.x > 0) {
        this.animate('PlayerMovingRight', animation_speed, -1);
      } else if (data.x < 0) {
        this.animate('PlayerMovingLeft', animation_speed, -1);
      } else if (data.y > 0) {
        this.animate('PlayerMovingDown', animation_speed, -1);
      } else if (data.y < 0) {
        this.animate('PlayerMovingUp', animation_speed, -1);
      } else {
        this.stop();
      }
    });
  },

  },
  // Respond to this player visiting a village
  visitVillage: function(data) {
    villlage = data[0].obj;
    villlage.visit();
  }
});

// A village is a tile on the grid that the PC must visit in order to win the game

Crafty.c('Village', {
  init: function() {
    this.requires('Actor, spr_village');
  },

  // Process a visitation with this village

  visit: function() {
    this.destroy();
    Crafty.trigger('VillageVisited', this);
  }
});
现在,最后的画面是这样的