图像幻灯片放映教程 - 使用 HTML5/JavaScript
PUBLISHED
图像幻灯片放映教程
概述
在本教程中,我们将学习如何使用JavaScript实现图像的幻灯片放映。 有许多不同的方式来实现相同的功能或行为。 本教程所讨论的示例应用程序,只是实现基本的幻灯片放映功能,即“播放”和“暂停”功能。
基本的预期操作是在每个图像显示之间预先设置一定的时间间隔,依次显示所有的图像。 在我们的应用程序中,我们选择了 2 秒作为时间间隔。
示例应用程序基于 Tizen web UI 框架。
幻灯片放映脚本
首先,我们需要创建和初始化一个图像名称的数组(带有完整的文件位置)。 然后在页面就绪事件上触发此函数。 下面显示了如何在我们的示例应用程序中完成此操作。
// Array to Store all the image file locations
var imageSourceArray = new Array();
用图像路径初始化数组,
// stores all image names(with entire file path) onto an array
function initImages() {
	console.log("initImages() called");
	imageSourceArray[imageIndex++] = new addImageFile(imageSourceDir + "pic1.png");
	imageSourceArray[imageIndex++] = new addImageFile(imageSourceDir + "pic2.png");
	imageSourceArray[imageIndex++] = new addImageFile(imageSourceDir + "pic3.png");
	imageSourceArray[imageIndex++] = new addImageFile(imageSourceDir + "pic4.png");
	imageSourceArray[imageIndex++] = new addImageFile(imageSourceDir + "pic5.png");
	imageSourceArray[imageIndex++] = new addImageFile(imageSourceDir + "pic6.png");
	totalImages = imageSourceArray.length;
	console.log("Total "+ totalImages+ " images added");
	setInitialImage();
}
“addImageFile”函数创建一个新对象并将图像名称 (文件路径) 分配给 src 属性(为每个图像创建文件路径)。
// Function to add the image file to the array
function addImageFile(imageSourcePath) {
    this.imageFile = new Image();
    this.imageFile.src = imageSourcePath;
}
同样地,我们有以下函数返回一个给定图像对象的文件路径。
// Function to get the image file path
function getImageFileSourcePath(imageObj) {
    return(imageObj.imageFile.src)
}
现在,让我们看看负责获取图像信息(文件路径)的函数和以确定的时间间隔在各显示之间呈现每个图像(幻灯片在开始放映的第一个图像上停止)的函数。 该函数收到 <img> 标签的属性“name”,图像将被链接至该名称。
相同的函数被触发,直至呈现所有图像。 这是使用 JavaScript 计时事件处理方法“setTimeout”来完成的,即每过去一个指定的时间间隔,执行一次函数。
// Function for slide show
function ImageSlideShow(layoutPos) {
	console.log("ImageSlide() called");
	// Loop to process all the images
      if ( Imageprocessed < totalImages ) {
	   Imageprocessed++; // Image processed counter
	   var nextImage = getNextImageToShow(); // Get the next image to be displayed
	   document[layoutPos].src = nextImage; // Set the image source as new image
	   var SlideShow = "ImageSlideShow('"+layoutPos+"')";
	   // Set the time interval to call the slideshow function
	   tID = setTimeout(SlideShow, timeInterval);
       }
      else  {
    	// All images are processed,so reset the counter to Zero
	    Imageprocessed=0;
	    imageIndex=0;
	    console.log("All images processed..");
	    return ;
       }
 }
在上面的函数中,您可以观察到函数 getNextImageToShow 获取要显示的下一个图像文件路径。 为此,应在数组中确定图像索引,该索引是表达式的结果 (imageIndex+1) % totalImages。 结果索引提供需要图像路径的数组元素,该元素作为参数被传递至函数 getImageFileSourcePath。
// Gets the next image file to be shown
function getNextImageToShow() {
	console.log("getNextImageFile() called");
	imageIndex = (imageIndex+1) % totalImages;
	var image = getImageFileSourcePath(imageSourceArray[imageIndex]);
	return(image);
}
暂停幻灯片放映
您可以随时使用提供的选项 Pause 停止放映幻灯片。 该 clearTimeout 方法用来阻止ImageSlideShow函数的执行,该函数在 setTimeout 方法中定义。
// Function to pause the slide show
function pauseSlideShow() {
	console.log("PauseShow() called");
	clearTimeout(tID);
}
幻灯片放映的 UI 控制选项
该应用程序在其页脚提供暂停和幻灯片放映按钮,以及更多(为其他受支持的功能提供)和后退选项。
<img> 标签被放置在内容中,图像的高度和宽度在 CSS 中设置。
  <div data-role="content" id="myDiv">
    <img name="imagehere" src="" id="ImagePage">
  </div><!-- /content -->
<div data-role="footer" data-position="fixed" id="footerid">
<a href="#pop_js" data-role="button" data-icon="naviframe-more" data-transition="slideupfade" data-rel="popup"></a>
<div id="pop_js" data-role="popup">
<ul data-role="listview">
<li><a href="#" onClick="ImageSlideShow('imagehere')" data-rel="back">Slide Show</a></li>
<li><a href="#" data-rel="back">Set As</a></li>
<li><a href="#" data-rel="back">Favorites</a></li>
</ul>
</div>
<div data-role="button" data-inline="true" data-style="circle" onClick="pauseSlideShow()">Pause</div>
<div data-role="button" data-inline="true" data-style="circle" onClick="ImageSlideShow('imagehere')">Slide Show</div>
</div><!-- /footer -->截图:
下面是从示例应用程序截取的快照。
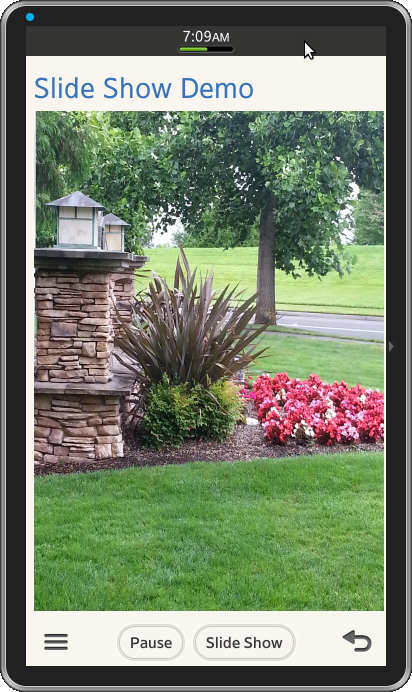
图 1:显示应用程序的主页
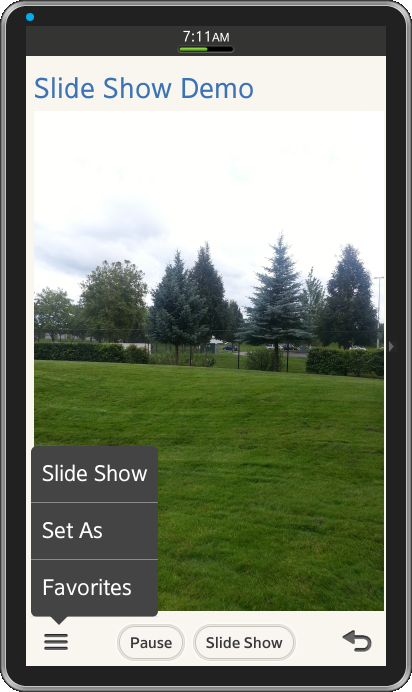
图片 2:显示应用程序的菜单选项。
开发环境:
Tizen SDK
版本:2.1.0
构建 id:20130416-1439
注意:
示例应用程序可供参考(参见“文件附件”一节)。