Three.js - importing MD2 3D animated models
PUBLISHED
Three.js is the most popular 3D JavaScript engine nowadays based on WebGL. It combines the ease of use with flexibility and stability. You should definitely use it if you are building a 3D multimedia application for the web.
This article describes the pipeline of converting an animated MD2 model to work with the Three.js library. We have attached an example application EXAMPLETHREEJS.wgt to the article, which shows how to setup, initialize and use Three.js for creating cool, 3D multimedia web experience.
Converting a MD2 file to the Three.js JSON format
First of all, you need an MD2 model. You can create one yourself using the Blender 3D suite. We have described the basics of creating an MD2 animated model in this article. Or you can download a free, animated MD2 model from the web. You can find many pages with free models. In our example application we have used the animated MD2 3D horse (fig.1) model form this page. The author Elias Tsiantas gives away for free his models for any use. So, please do play around with them in order to learn importing MD2 animated models to Three.js.
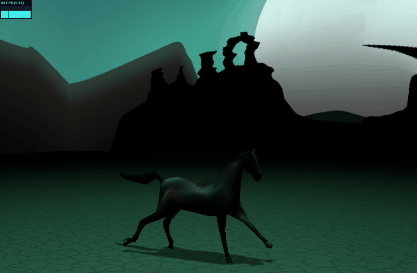
Figure 1 – animated MD2 horse model, converted to the Three.js JSON format
So what do you need to do when you have your 3D animated MD2 model created or downloaded? First of all you can check if it works properly with the MD2 viewer tool (fig.2). With this tool you can check if the model mesh is properly exported to the MD2 format. You can also check if the animations inside the model are named. Our horse model has a “stand” animation inside, consisting of 11 frames. We will use later the animation name to select and play the animation inside of Three.js. Think about the MD2 Viewer step like a validation of your MD2 model.
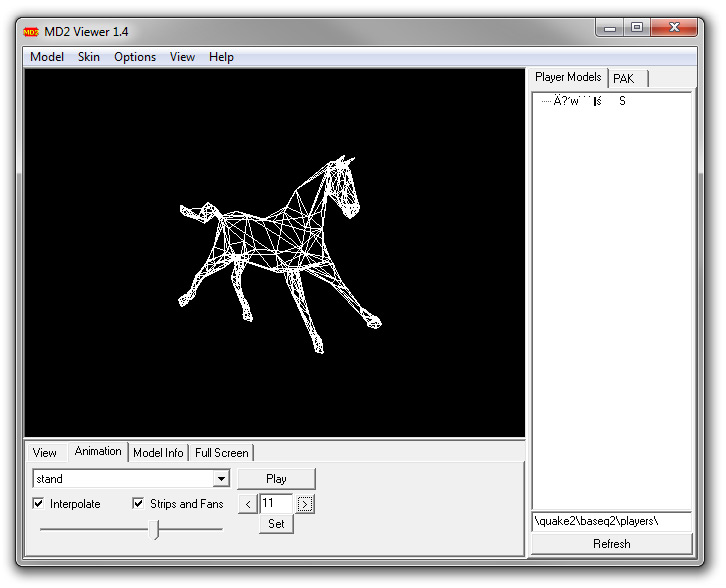
Figure 2 – animated MD2 horse model in the MD2 Viewer 1.4
If you were successful in checking the 3D model in the MD2 Viewer, the next step to perform is to actually export the model to an acceptable Three.js model format. In our case it will be the Three.js JSON format. There are two ways to do that. If you are creating an animated model from scratch in the Blender 3D suite, then you should download and install the Three.js JSON exporter plugin for Blender. You can obtain it here. You will find there the whole information how to install and use this plugin in order to export a valid Three.js JSON mesh.
In the second case, where you have a free and ready animated MD2 model, downloaded from the web, you can use this page to automatically convert your MD2 model to a Three.js friendly JSON 3D model file. All you need to do is just drag and drop your MD2 file to the browser window. Next, when your model shows up in the browser window in the wireframe mode you can drag its texture from the desktop to the browser window and it will get skinned with given texture. The last thing to do is to save your Three.js JSON model on your hard drive. To do that, just click the save button in the left part of the screen.
Having done that, you are ready for the last step which is importing your Three.js JSON model to Three.js.
Three.js basic setup
Before you load any models in the Three.js 3D engine, first you need to setup the engine itself. In this article we are working on the r70 version of Three.js. To see how to setup this version of engine, please take in-depth view of the EXAMPLETHREEJS.wgt application attached along with this article. Beneath, we show you an example setup including the creation of the Three.js scene, the renderer, a camera and lights.
[…]

     // CREATE A SCENE FOR HOLDING OUR ALL 3D SCENE ELEMENTS
             scene = new THREE.Scene();

     // CREATE THE CAMERA
             camera = new THREE.PerspectiveCamera(45, window.innerWidth / window.innerHeight, 0.1, 10000);

     // CREATE A WEBGL RENDERER
             webGLRenderer = new THREE.WebGLRenderer();
	     webGLRenderer.setClearColor(new THREE.Color(0x000000, 1.0));
	     webGLRenderer.setSize(window.innerWidth, window.innerHeight);
	     webGLRenderer.shadowMapEnabled = true;

     // POSITION THE CAMERA AND MAKE IT LOOK TO THE CENTER OF THE STAGE
	     camera.position.x = 150;
	     camera.position.y = -1650;
	     camera.position.z = -700;
	     camera.lookAt(new THREE.Vector3(0, 0, 0));

     // CREATE POINT LIGHT
	     pointlight = new THREE.PointLight( 0x4aa592, 1, 900 );
	     pointlight.position.set( 0, -1100, -100 );
	     scene.add( pointlight );

	     var light = new THREE.SpotLight( 0x4aa592, 2, 4500 );
			light.position.set( 0, 20, 1 );

			light.castShadow = true;
			light.shadowMapWidth = 1024;
			light.shadowMapHeight = 1024;
			light.shadowMapDarkness = 0.98;

			scene.add(light);

[…]
Please note that this basic setup is just a sneak peek of what you have to do in order to run Three.js and see any effects on the screen! If you want to run this example you should first refer to the example application attached to this article. The code above will show nothing for now. In order to see something you need to put 3D objects in the Three.js scene. Also you need a render loop, which will update the Three.js engine and redraw the screen contents. The whole engine setup has been explained in depth in the comments of the example application.
Implementing the JSON model in Three.js.
To implement your JSON model inside Three.js first you need to load it into the engine. To do this you must create a new THREE.JSONLoader() instance. Then you need to use the load function and specify the path to the JSON model and the second parameter which is the callback function, taking as parameters the geometry and mat (for material) variables. The next thing to do inside the callback function is to compute the normals for the morphs of the models animation. Then you need to define the mat (material) for our model and load it. We are using the THREE.MeshLambertMaterial. In the parameters of the material we specify which texture should be loaded, then we want to use the morph targets and morph normals, because our 3D model is animated. We are also setting the specular color of the material, its shininess, type of shading and the base colors of the vertices.
[…]

// LOAD THE JSON MODEL - FORMER MD2 ANIMATED MODEL
	     var loader = new THREE.JSONLoader();
	         loader.load('models/horse.js', function (geometry, mat) {
	         geometry.computeMorphNormals();

	            var mat = new THREE.MeshLambertMaterial(
	                    {
	                        map: THREE.ImageUtils.loadTexture("models/horse.jpg"),
	                        morphTargets: true, morphNormals: true,
	                        specular: 0xffffff, shininess: 60,
	                        shading: THREE.SmoothShading,
	                        vertexColors: THREE.FaceColors
	                    });

[…]
The next step is to add the model to the stage. In order to do that you need to create a THREE.MorphAnimMesh(), which takes as parameters the geometry and mat variables. It is a good practice to name the mesh with a custom name parameter. In our case we have named the model as “horse1”. Next you need to use the parseAnimations() function. This will enable you to get to the names of the animations inside the MD2 model. As you remember the name of our animation inside the horse 3D model was “stand”. Now that we have the access to the animation names we can play the “stand” animation by invoking the playAnimation() function and passing as the first parameter the name of the desired animation to play and as the second parameter the frames per second ratio. In our case we wanted to play the “stand” animation in the rate of 10 frames per second.
[…]

// CREATE THE MESH FOR THE FIRST HORSE MODEL
                    mesh = new THREE.MorphAnimMesh(geometry, mat);
	            mesh.name = "horse1";

// HERE WE PARSE THE ANIMATION IN ORDER TO GET THE NAMES OF THE KEYFRAMES IN THE ANIMATION
	            mesh.parseAnimations();
	            mesh.playAnimation("stand", 10);

[…]
The next thing to do is to position the 3D model in the 3D space. You can accomplish that by using the position.x, position.y and position.z parameters. You can additionally make the model receive shadows and cast shadows from the lights. This can be done by setting the castShadow and receiveShadow parameters to true. Now you can add the model to the scene by invoking the add() function on the scene object and putting as a parameter the desired 3D model.
[…]

scene.add(mesh);

[…]
The last thing to do in order to animate the models is to put some code in the render loop of your Tizen Three.js application. But before doing that we will need a THREE.Clock() instance in the beginning of our application. Why? Because we need to keep the track of time inside the 3D engine in order to move forward the animation of the 3D model.
[…]

var clock = new THREE.Clock()

[…]
Then your render loop should look like the snippet below. First you need to get the delta time from our clock instance. The getDelta() function gives you the information about seconds passed since the last call to this method. By doing that we are sure that the animation will be synchronized with the Three.js engine. Next, you need to animate the animation using the updateAnimation() function. You must pass the delta time acquired earlier and multiply it by 1000 (1 second). The last two things to do is to call the webkitRequestAnimationFrame function on the window object and put as a parameter out render method. And to make our webGLRenderer render our scene through our Three.js camera.
[…]

function render() {

	            // GET THE DELTA TIME
	               var delta = clock.getDelta();

	            // UPDATE THE HORSE ANIMATION
	               mesh.updateAnimation(delta * 1000);

	            // RENDER USING THE REQUESTANIMATIONFRAME
	               window.webkitRequestAnimationFrame(render);
		       webGLRenderer.render(scene, camera);

	        }

render();

[…]
Having done that, you are ready to see your 3D model animating in your Tizen application (fig.3). For a full insight of the whole process of the setup of Three.js along with putting a 3D model inside the engine please refer to the code of the example application attached together with this article.

Figure 3 – animated Three.js horse model
Summary
In this article we have showed you how to convert an animated 3D MD2 model to the Three.js JSON format. We have also explained how to verify the model using the MD2 Viewer. We described how to setup the scene in the Three.js r70 version. And finally we have showed how to import the JSON model to the 3D engine and animate it.
We hope that this article will help you in creating impressive 3D applications for Tizen. For more information on Three.js, please visit the official Three.js website. The documentation of this 3D engine can be found here.