Game assets in EFL
PUBLISHED
Introduction
The article will demonstrate how to create some popular graphical elements of a 2D game using the EFL library in a Tizen Native Application. The topic presented here is based on the code of a sample game which was simplified in order to focus on elements such as an animated background, creating elements using 9-slice scaling, animations using sprites and making simple effects imitating three-dimensionality.
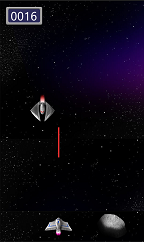
Figure 1 Screenshot from sample game
The article was created for developers who have basic knowledge of the C programming language and wanting to write native 2D games for Tizen. Developers reading this article should have basic knowledge about the Tizen native application lifecycle as well.
In the sample game the accelerometer sensor was used to control the spaceship. If you don’t understand the part of the code responsible for the accelerometer, you should also read the following article. Moreover, in the example program there were used animations. Therefore take a look at the following article.
Animated background and parallax effect
Animation of background is a common element for two-dimensional games. It's often associated with the so-called parallax effect. The parallax effect may be achieved by moving elements of the background with different speeds. The speeds are proportional to the distance between the element and the observer. You can read more about it here. In the sample game the asteroids are moving at a higher speed than the stars on the background. This gives the player an illusion that asteroids are much closer than the stars.
The background animation can be realized in the following way. First of all, create the object that will be used as the background.
    static int screen_width;
    static int screen_height;

    typedef struct appdata {
        Evas_Object *win;
        Evas_Object *background;

	 […]
    } appdata_s;

    […]

    static Evas_Object *
    add_image(Evas_Object * parent_object,
        	const char *filename, int width, int height) {
    	char buf[PATH_MAX];
    	Evas_Object * image = evas_object_image_filled_add(
    			evas_object_evas_get(parent_object));

    	snprintf(buf, sizeof(buf), "%s/", app_get_resource_path());
    	strcat(buf, filename);
    	evas_object_image_file_set(image, buf, NULL);
    	evas_object_resize(image, width, height);

    	return image;
    }

    […]

    static void
    create_base_gui(appdata_s *ad)
    {
	/* Get device parameters */
	elm_win_screen_size_get (ad->win, NULL, NULL, &screen_width, &screen_height);

 	[…]

	// starfield_small.jpg is a name of file in allocated in resource directory
        ad->background = add_image(ad->win, "starfield_small.jpg", screen_width,screen_height);
        evas_object_move(ad->background, 0, 0);
        evas_object_image_fill_set(ad->background, 0, 0, screen_width, BACKGROUND_IMAGE_HEIGHT);

	[…]

 	/* show evas object */
 	evas_object_show(ad->background);
    }
In this case, the key function is evas_object_image_fill_set(Evas_Object *, x, y, w, h) where w and h are dimensions of your background image. The x and y are coordinates of the point on the Evas_Object. At this point, drawing of the background image will be started. By shifting the location of this point, we can animate the background as shown in Figure 2.

Figure 2 Motion of the background
A useful feature illustrated in figure 2c is the possibility of going beyond the area of the background image. Therefore you can create a loopable animation. The part of the picture that is moving off the screen in the upper part will automatically show up on its bottom, without any additional code handling. This animation can be created as follows:
        typedef struct appdata {
            Evas_Object *win;
    	    Evas_Object *background;
	    int velocity;
	    int game_position;
	    […]
 	} appdata_s;

        […]

        static void
        move_scene(appdata_s *ad)
        {
            ad->game_position += ad->velocity;
        	evas_object_image_fill_set(ad->background, 0,
        			ad->game_position % BACKGROUND_IMAGE_HEIGHT, screen_width,
        			BACKGROUND_IMAGE_HEIGHT);
        }

        […]

 	static Eina_Bool
        play_game_cb(void *app_data)
        {
            […]

	    appdata_s *ad = (appdata_s *) app_data;
	    move_scene(ad);

            […]
 	}

        […]

 	/* Register callbacks to game control */
	ecore_animator_add(play_game_cb, ad);
Animations using spritesheets
Spritesheets are two-dimensional images. In order to create an animation from a spritesheet we need to crop it, by showing to the user individual spritesheet frames in a short amount of time, but without changing the position. By doing so, we achieve an effect of moving pictures, which basically animation is all about. In the sample game this technique was used to animate the explosion of an enemy ship. The spritesheet used for this animation is shown on Figure 3.
![]()
Figure 3 Sprites used in the sample game (spritesheet).
The following code shows how to use the first frame from the spritesheet and render it on the evas_object. It was made in a similar way as in the background example earlier.
        /* enemy image properties */
        #define ENEMY_EXPLOSION_IMAGE_WIDTH 1980
        #define ENEMY_EXPLOSION_IMAGE_HEIGHT 180
        #define ENEMY_EXPLOSION_POS_NUM 11

        […]

        static Evas_Object *
        add_image(Evas_Object * parent_object,
            	const char *filename, int width, int height) {
        	char buf[PATH_MAX];
        	Evas_Object * image = evas_object_image_filled_add(
        			evas_object_evas_get(parent_object));

        	snprintf(buf, sizeof(buf), "%s/", app_get_resource_path());
        	strcat(buf, filename);
        	evas_object_image_file_set(image, buf, NULL);
        	evas_object_resize(image, width, height);

        	return image;
        }

        […]

        /* Add enemy */
    	int enemy_width = ENEMY_EXPLOSION_IMAGE_WIDTH / ENEMY_EXPLOSION_POS_NUM;
    	ad->enemy = add_image(ad->win, "ship_explode.png", enemy_width,
    			ENEMY_EXPLOSION_IMAGE_HEIGHT);

     	/* set the image location on the screen */
    	evas_object_move(ad->enemy, x_position, y_position);

 	/* Set the filling */
	evas_object_image_fill_set(ad->enemy, 0, 0,
                                  ENEMY_EXPLOSION_IMAGE_WIDTH,
                                  ENEMY_EXPLOSION_IMAGE_HEIGHT);

 	/* Resize image */
	evas_object_resize(ad->enemy,
                          ENEMY_EXPLOSION_IMAGE_WIDTH/ENEMY_EXPLOSION_POS_NUM,
                          ENEMY_EXPLOSION_IMAGE_HEIGHT);
You can change the currently displayed image using the following function:
    static void
    set_enemy_sprite_position(Evas_Object *enemy, int position)
    {
        evas_object_image_fill_set(enemy,
     		-1 * (ENEMY_EXPLOSION_IMAGE_WIDTH/ENEMY_EXPLOSION_POS_NUM) * position,
     		0,
     		ENEMY_EXPLOSION_IMAGE_WIDTH,
     		ENEMY_EXPLOSION_IMAGE_HEIGHT);
    }
For displaying the animation there was used a subset of EFL called the Ecore Animator. The following example shows an implementation of a complete animation cycle. In the case when the duration of individual frames of an animation need to be longer than the current time of displaying the frames on the device, use the Ecore Timer.
    static Eina_Bool
    enemy_explosion(void *data)
    {
        appdata_s * ad = (appdata_s *)data;
    	static int frame = 0;
    	set_enemy_sprite_position(ad->enemy, frame);
    	frame +=1;

    	if(frame >= ENEMY_EXPLOSION_POS_NUM){
     		/* The animation is over, create a new enemy ship */
     		frame = 0;
    	}

    	return EINA_TRUE;
    }

    […]

    ecore_animator_add(enemy_explosion, ad);
9-slice scaling
This technique is often used to create scalable borders around elements. In the application attached to the article it is used to create a frame that contains the players’ score of the game. Basically it is dividing the graphical element to 9 parts as shown in Figure 4.
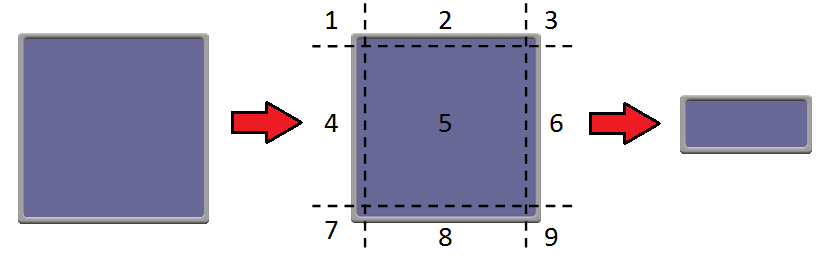
Figure 4 Example of 9-slice scaling
The fragments marked with the numbers 1, 3, 7 and 9 remain unchanged while scaling. Fields marked with numbers 2 and 8 are scaled horizontally. The fields 4 and 6 are scaled vertically, and number 5 in both dimensions. The EFL library provides a function which uses the method described above. The function evas_object_image_border_set(Evas_Object*, left, right, top, bottom) defines the border for the Evas_Object. You can define in the arguments the width for each side of the border measured in pixels. The following example shows how this has been done in the sample application:
        /* add image */
	Evas_Object *score_frame = evas_object_image_filled_add(evas_object_evas_get(ad->win));
	snprintf(buf, sizeof(buf), "%s/score_frame.png", app_get_resource_path());
	evas_object_image_file_set(score_frame, buf, NULL);
	evas_object_resize(score_frame,SCORE_FRAME_WIDTH, SCORE_FRAME_HEIGHT);
	evas_object_move(score_frame, SCORE_FRAME_POS_X, SCORE_FRAME_POS_Y);

	/* add border */
	evas_object_image_border_set( score_frame, SCORE_BORDER_WIDTH, SCORE_BORDER_WIDTH,
                                                   SCORE_BORDER_WIDTH, SCORE_BORDER_WIDTH);

	/* scale the border */
	evas_object_image_border_scale_set( score_frame, 0.5);
The last function in the example allows you to scale the entire frame if it is too thick. In the sample image the no scalable parts have 30 pixels of height and width. But for example, if we want to display it as a 15 pixel border, then we need to scale it by a factor of 0.5.
3d perspective
The EFL library offers simple effects which imitate three-dimensionality. For any Evas_Object you can obtain a map of points. Then the map can be converted in a three-dimensional space. You can also add the lighting to the scene. The sample application uses these effects while rotating the spacecraft.
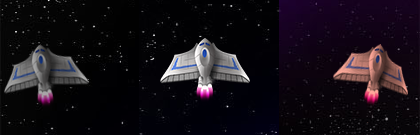
Figure 5 Example of 3D perspective and 3D lightning
The following function shows how to achieve the effect on Figure 5.
static void
ship_rotation(Evas_Object *ship, double angle) {
        Evas_Map *m;
	Evas_Coord x, y, w, h;
	int y_sensitivity = 6;
	int z_sensitivity = 2;
	int focal_distance = 300;

	m = evas_map_new(4);
	evas_object_geometry_get(ship, &x, &y, &w, &h);
	evas_map_util_points_populate_from_object(m, ship);

	double rotation_x = 0;
	double rotation_y = -1 * y_sensitivity * angle;
	double rotation_z = -1 * z_sensitivity * angle;
	int image_ceter_x = x + (w / 2);
	int image_center_y = y + (h / 2);
	int image_center_z = 0;

	int lights_distance = 1000;

	/* center of the image is the center of rotation */
	evas_map_util_3d_rotate(m, rotation_x, rotation_y, rotation_z,
			image_ceter_x, image_center_y, image_center_z);

	evas_map_util_3d_perspective(m, image_ceter_x, image_center_y, 0,
			focal_distance);

	/* Light reflection from left
	 * (255, 255, 255) is RGB color of ambient light,
	 * (0, 0, 0) is RGB color of light  */
	evas_map_util_3d_lighting(m, x - lights_distance, image_center_y, 0, 0, 0,
			0, 255, 255, 255);

	/* Light reflection from right
	 * (255, 255, 255) is RGB color of ambient light,
	 * (255, 99, 71) is RGB color of light  */
	evas_map_util_3d_lighting(m, x + lights_distance, image_center_y, 0, 255,
			99, 71, 255, 255, 255);

	evas_object_map_set(ship, m);
	evas_object_map_enable_set(ship, TRUE);

}
In the code above the object was processed into a map and after that it was rotated using the evas_map_util_3d_rotate(Evas_map *, dx, , dy, dz, cx, cy, cz) function. The values of dx, dy, dz are the amount of degrees for each axis coordinate, which we want to rotate the map. The values of cx, cy, cz are the coordinates of the transformation point. To obtain a more realistic effect you should add to the map the perspective using the evas_map_util_3d_perspective (Evas_map *, px, py, z0, focal_distance) function. The values of px, py are the coordinates of the point in a plane parallel to the screen, relative to the perspective which will be created. In the sample game the perspective is created relative to the point above to the center of the map. The z0 is the position of the map on the axis perpendicular to the screen surface. If z0 is greater than 0 and less than the focal distance, the displayed object will be larger than in its original size. If the value will be smaller than 0, then dimensions for the object will be reduced. The order of these operations is very important. Another function, which was used is evas_map_util_3d_lighting(Evas_map *, lx, ly, lz ,lr, lg, lb, ar, ag, ab). It adds a light to the map. In the sample application there were added two lights, one on the right side of the ship with a red hue and the second on the left with a gray shade. The arguments lx, ly and lz are the coordinates of the position of the light. The next three arguments are the red, green and blue components of the light color and the last 3 are the components of the ambient light color.
Summary
In this article you have learned how to make game assets like sprite animations and simple 3D effects. Moreover it was shown how to make 9-slice scaling, which can be used to create game elements like buttons, frames and platforms. We hope that you find this article helpful in creating EFL based applications for the Tizen platform.