Developing Tizen Web Applications with Google Web Toolkit (GWT)
PUBLISHED
About This Document
This article explains how to use the Google Web Toolkit (refered later as GWT) to develop Tizen web applications. It focuses mainly on work environment tasks such as compiling an app with GWT, packaging it as a Tizen web app .wgt file and installing it on the Tizen emulator or device. This article is not a GWT programming tutorial. It comes however with a sample application to show you a working example. The sample application is not deeply discussed. Only less obvious parts and not typical GWT constructs are explained.
IMPORTANT!
This article has been written for Tizen versions 2.1 to 2.2 and GWT 2.5.1 version. It may not work with earlier or later versions of that software.
Targeted Audience
The article is targeted at GWT developers interested in developing Tizen web applications as well as Tizen Web App developers who are interested in learning a new tool.
A Foreword to Tizen Web App Developers
Shortly speaking GWT is a Java to JavaScript cross-compiler. (In fact, it is also a framework. In some part even a server side framework, but it is the cross-compilation facet which makes it somehow more unique on the market).
To start working with GWT at least basic knowledge of Java programming language is needed. However, if you are an experienced JavaScript developer with no previous experience in Java programming, GWT can be an ideal tool to start learning Java. GWT does not expect you to know broad spectrum of libraries and specifications existing in the Java world. All you need is the bare Java language and (if you plan to develop GWT server side, too) familiarity with the Servlet API Specification. Knowledge of JavaScript and web development related issues is a big plus in GWT development.
You may wonder why you could need such cross-compilation at all. At first glimpse GWT source code may look excessively verbose in comparison to equivalent JavaScript code. However the compiled JavaScript produced by the GWT compiler is of comparable size and often executes faster than the hand-written JavaScript code. Producing a code which is comparable to the one you could write manually is of course not a sufficient reason for using a cross compiler.
So why at all use GWT? The answer is stuck in maintenance capabilities. JavaScript is flexible and powerfull scripting language but maintenance and refactoring of large JavaScript projects (especially developed by a larger team or a team with frequent rotation of its members) is difficult and prone to errors. It happens so that the Java programming language and the developer tools available for Java developers are really powerful when it comes to refactoring or support for teamwork. In large projects GWT can leverage productivity and eliminate a lot of errors which could be easily overlooked in a scripting language like JavaScript. However, in small projects GWT is often an unnecessary burden.
Required software
In order to create a Tizen web application with GWT you will need the Tizen SDK (with Eclipse based IDE shipped with it) and the GWT SDK installed on your computer. You will also use the Apache Ant build tool (which shoul be bundled with the Tizen IDE).
Tizen SDK
The GWT application can be packaged and installed using Tizen Command Line Tools, either manually or from within Ant script. However, because create a signing profile for Tizen web applications is possible only from the Tizen IDE (at least for the current version of the SDK) you will need to install the IDE, too (not only command line tools and system image). The typical installation suggested by the installer will be enough. In order to install The Tizend SDk with IDE:
- Download the Tizen Install Manager from https://developer.tizen.org/downloads/tizen-sdk
- Follow the installer, on the Configure Screen choose Typical under the Install Type header. Click the Next button to get to the Install Screen.
- Provide the installation path of your choice. (You will need this path when packaging and deploying Tizen application with Apache Ant. If you prefer command line to Ant scripts the path to the Tizen command line tools is appended to the PATH environment variable by the installer.) Click the Next button and let the installer finish its job.
GWT SDK
The GWT SDK can be downloaded and installed either as a part of Google Plugin for Eclipse or as a standalone command line tool. Even if you decide to use the Google Plugin for Eclipse (which is more convenient) you still can use the command line tool (in this case the GWT SDK can be found in location like <TIZEN_SDK_PATH>/ide/plugins/com.google.gwt.eclipse.sdkbundle_x.x.x/gwt-x.x.x, where x.x.x stands for the GWT version).
Installing GWT SDK with Google Plugin for Eclipse (recommended)
- In the Tizen IDE top menu select Help > Install New Software…
- In web browser go to https://developers.google.com/eclipse/docs/download and copy the URL for Eclipse Indigo version (Tizen IDE for versions 2.1 and 2.2 is based on Eclipse Indigo).
- Add new repository for URL copied in point 2. From listed components select at least Google Plugin for Eclipse (required) and SDK’s > Google Web Toolkit SDK x.x.x.
Installing standalone GWT SDK
To install GWT SDK for use without Eclipse:
- Go to https://developers.google.com/web-toolkit/download.
- Select Download GWT SDK button (at the bottom of the site).
- Unpack to the folder of your choice.
- For your convenience you may want to add this folder to PATH environment variable.
Apache Ant
After you have installed the Eclipse based Tizen IDE on your computer you do not have to install Ant separately. The IDE contains Apache Ant as its plugin. It can be found on path like: <TIZEN_SDK_PATH>/ide/plugins/org.apache.ant_1.8.3.v20120321-1730/bin. If you prefer to use Ant from command line (not from Eclipse’s Ant view) add this folder to your system PATH variable.
Preparing Environment for Tizen Web App Development with GWT
The IDE bundled with the Tizen SDK does not allow you to organize your web application project’s structure arbitraly. Maybe this will change in future, but for now it seems that a natural starting point for writing a Tizen web application with GWT is a regular GWT project. Although later in this article you will see a sample application project imported into the IDE, the next sections discuss how to prepare a boilerplate code for an easy start with Tizen GWT project.
IMPORTANT!
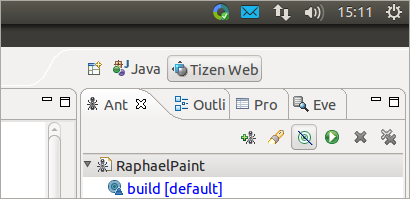
Before creating a GWT project switch your IDE’s working perspective to the “Java Perspective” (the default for the Tizen IDE is the “Tizen Perspective”). Icons for switching perspectives should be in the top right corner of the IDE window. If the Java Perspective button is not visible click the Open Perspective icon on the left of all visible “perspective buttons” (see image below).
Creating a GWT Project
If you are an experienced GWT developer skip this section and go directly to Packaging GWT Application for Tizen section.
GWT project can be created either with command line tool or from the IDE (with Google Plugin for Eclipse installed).
Creating a GWT Project in Eclipse based IDE
- Select File > New > Project… this will open a wizard selection popup.
- On the wizard selection popup select Google > Web Application Project wizard.
- Fill in the project name and package.
- Uncheck Use Google App Engine and ensure that Use Google Web Toolkit option is checked.
- Uncheck Generate project sample code (Generating sample sode is discussed later in this section).
- Click Finish button.
Creating a GWT Project from Command Line
- Ensure the directory where you unpacked GWT is in the PATH environment variable or navigate to this directory. (If you have installed GWT with Eclipse plugin it is <TIZEN_SDK_PATH>/ide/plugins/com.google.gwt.eclipse.sdkbundle_x.x.x/gwt-x.x.x).
- On the Unix-like systems make sure webAppCreator is executable or run chmod u+x webAppCreator if it isn’t.
- Open system console and type:
webAppCreator -out ./MyAppName org.my.package.MyAppName -templates ant,eclipse
This will generate the directory structure and the Ant build file for the project. If you omit the -templates options then it will use sample,ant,eclipse,readme templates. The sample template means that webAppCreator will generate sample code. Generating sample sode is discussed later in this section. The readme template simply adds the README.txt file (You can use it if it is the first time you generate GWT application).
The generated GWT project looks like a typical Dynamic Web Applicacation project in Eclipse. It has /src folder for java sources and /war with WEB-INF sub-directory and web.xml file. It is because in fact a GWT application is a Java Servlet web application, and the /war folder can be deployed on any standard servlet container. The JavaScript output files compiled from the GWT sources find their place in the /war too, as so they are a part of the web application.
GWT is not only a client-side framework but it also contains some servlet specific classes (for RPC communication). Consider you want to develop a web application which communicates with a server side application using AJAX. You develop both sides – the client and server. If you decide to use Java on the server side and cross compiled GWT Java on the client side than GWT has some extra offer for you. Using GWT-RPC (or a newer RequestFactory) as the communication layer you may share Java code between the client and the server sources. GWT-RPC and RequestFactory are layers built over HTTP-AJAX communication, both on the client- and the server-side. (Of course, you still can develop a “normal” AJAX client web application with GWT in case you do not have control over the server application).
Both Eclipse plugin and command line tool allow you to generate a sample code when creating a new project. The generated sample code will contain server-side classes too. If you do not intend to use GWT-RPC or RequestFactory nor build the server side application in the same project just remove them. If you are (or after you have become) a little more advanced GWT developer you probably prefer not to generate sample code on project creation.
IMPORTANT!
Generating sample code when creating a GWT project has been discouraged for Tizen web apps built with GWT – for more explanation see “Bootstrapping Tool” section).
Compiling a GWT Project
A GWT project contains Java source files for client-side application and may or may not have Java source files for server-side application. It is important to understand how these both are compiled.
- The client-side Java sources are cross compiled to JavaScript and moved to /war/<MODULE_NAME> folder.
- The server-side Java sources are compiled to “normal” Java classes and moved to /war/WEB-INF/classes folder.
Compiling with Ant
When you create your project with the webAppCreator tool with ant template it generates the appriopriate Ant build file for you. If you did so, enter the root of your project ant type in console:
ant gwtc
This will compile both client side code and server side code (the Ant’s gwtc target depends on the javac target defined in the same build file). To package your server side code as a WAR application type in console:
ant war
HINT!
If have not used Ant before you may not know that you may fire Ant tasks not only from command line but also from within the Eclipse’s Ant View (where you simply double click the task which you want to fire).
In order to open Ant View in Eclipse based Tizen IDE select from top menu Window > Show View > Other…, This will show the Show View dialog, where then on the newly opened window select Ant > Ant.
Compiling in Eclipse based IDE
Google Plugin for Eclipse compiles client side and server side code separately.
To compile client side code in Eclipse IDE right click the GWT project in the Eclipse’s Project Explorer view, and select Google > GWT Compile from context menu.
Building server side code and packaging to WAR file is done as with any other Java Web application, however many developers prefer to open ant build file.
Packaging GWT Application for Tizen
Tizen web applications are packaged according to the W3C Widget Packaging and XML Configuration Guidelines (see http://www.w3.org/TR/widgets/). Basically they are JavaScript and HTML5 applications packed together with a config file into a single ZIP archive (with .wgt extension). The Tizen web app config file must be placed in the root of the .wgt archive and have config.xml name. The structure of the file is described later.
As it has been said earlier the GWT project contains a /war folder which has a structure of “standard” web application. A web application consists of static files (both generated and created by user) and “dynamic” files. The “dynamic” files are servlets and other compiled Java classes which are located inside the /war/WEB-INF directory and JSP files which may be scattered around the /war folder and its subfolders.
In order to create a Tizen web app file from /war directory (with GWT compiled JavaScript in it) you simply need to create ZIP archive with a .wgt file extension which:
- Includes additionally a config.xml file,
- Excludes dynamic files (e.g. /WEB-INF subdirectory and JSP files if there are any).
“Bootstrapping Tool”
The GWT and Tizen web application facets of the project cause a need for quite a lot of boilerplate code. Unfortunately you cannot rely on sample code generated by tools provided with GWT and Tizen SDKs because they are completely unaware of each other. For this reason a simple “bootstrapping tool” is bundled together with this article. The tool is distributed as an executable JAR file tizengwt.jar. Next to boilerplate code it also creates an Ant build file.
Of course you could also create all these files manually or rely on sample code generated wit GWT webAppCreator modifying them afterwards to “let them know” about Tizen specific files which you would have added manually. This suite of generated files provides a good inspection of what is needed.
The source code for the tool is also shipped with the article. You can look through it to know how it works or adjust it for you needs or for the future versions of the Tizen SDK or the GWT SDK. Treat it however as a help utility for teaching purposes not as a production ready software.
Let’s see how it works.
- Create a GWT project either with Eclipse or with webAppCreator (but without generating the sample code!) as described in previous sections.
- Copy the tizengwt.jar file shipped with this article into the root folder newly created project.
- Run in console:
java -jar tizengwt.jar
- You will be monited to provide a module name. If you have created your GWT project with webAppCreator command line tool then the module name should be exactly the same as the one provided to that tool. If you have created your GWT project with Eclipse plugin then the module name is constructed as <package_name>.<project_name> (which you have provided in the project’s wizard).
D:\TizenWorkspace\Test>java -jar tizengwt.jar
GWT module name:
com.test.Test
Created file: D:\TizenWorkspace\Test\build.properties
Created file: D:\TizenWorkspace\Test\build.xml
Created file: D:\TizenWorkspace\Test\config.xml
Created file: D:\TizenWorkspace\Test\src\com\test\client\Test.java
Created file: D:\TizenWorkspace\Test\src\com\test\Test.gwt.xml
Created file: D:\TizenWorkspace\Test\war\index.html
Created file: D:\TizenWorkspace\Test\war\icon.png
Assuming that the provided module name is com.test.Test you will see in the “console” panel output which should look like presented above.
- Do not remove the tizengwt.jar from its location as it contains also Ant tasks used by the generated Ant build file.
This forms a good starting point for building a Tizen GWT web application. Let’s look closer at the generated files.
Build Properties File - /build.properties
This file contains properties extracted from the generated Ant build file. The properties are specific to local filesystem. If the project is to be shared between team members with use of the control version system this file should not be added to repository. Open this file and provide values matching your filesystem.
#Path to Tizen SDK on your computer
tizen.sdk=/path/to/tizen-sdk

#path to GWT SDK
#If you installed GWT SDK with Google Plugin for Eclipse from within
#Tizen flavoured Eclispe IDE you can leave the default value untouched
gwt.sdk=${tizen.sdk}/ide/plugins/com.google.gwt.eclipse.sdkbundle_2.5.1/gwt-2.5.1

#Profile name and path to profiles.xml generated in Tizen IDE
#profiles.xml file is stored in #.metadata/.plugins/org.tizen.common.sign/profiles.xml
#subdirectory of the Tizen IDE workspace
tizen.sign.profile=profilename:/path/to/tizen-ide-workspace/.metadata/.plugins/org.tizen.common.sign/profiles.xml
Currently there are only three properties in it. Names of the first two are self-descriptive. The last one will be described in Preparing Signing Profile section.
Build File - /build.xml
This is a modified version of the file generated by webAppCreator fired with -template ant. It contains Ant targets for building GWT application. All targets described in Compiling a GWT Project section remain unchanged.
Additionally, this file defines Ant targets for working with Tizen web applications. These targets are described later in the Packaging and Installation section.
The default build target is also slightly modified to include the Tizen specific targets.
Tizen Config File - /config.xml
This is an already mentioned Tizen web app config file. The generated content is presented below. You can consider it to be a minimal version of the config file.
<widget xmlns:tizen="http://tizen.org/ns/widgets" xmlns="http://www.w3.org/ns/widgets" id="http://test.com/Test" version="1.0.0" viewmodes="maximized">
    <tizen:application id="TfHKObV1Sm.Test" package="TfHKObV1Sm" required_version="2.1"/>
	<content src="index.html"/>
	<icon src="icon.png"/>
	<name>Test</name>
</widget>
The package attribute of the tizen:application node is a unique ten character length alphanumeric string which identifies the application on a Tizen device. The id attribute of that node is constructed from the package id followed by a dot and an alphanumeric string. When creating a Tizen web application project with an IDE wizard, values for these attributes are generated automatically for you. All other settings in this file seem to be self-descriptive.
GWT Module descriptor - /src/com/test/Test.gwt.xml
This is a GWT module descriptor. It contains a meaningful comment for each entry. It is usually a point from which you start browsing a GWT module sources.
<?xml version="1.0" encoding="UTF-8"?>
<!DOCTYPE module PUBLIC "-//Google Inc.//DTD Google Web Toolkit 2.5.1//EN" "http://google-web-toolkit.googlecode.com/svn/tags/2.5.1/distro-source/core/src/gwt-module.dtd">
<module rename-to="test">

	<!-- GWT modules on which this module depends -->
	<inherits name="com.google.gwt.user.User" />

	<!-- the class form which all starts -->
	<entry-point class="com.test.client.Test"/>

	<!-- Tizen web environment behaves like chrome browser we can ignore
		other browsers -->
	<set-property name="user.agent" value="safari"/>

	<!-- If you add other compile properties it makes the output is not splitted
		into multiple files -->
	<collapse-all-properties />

	<!-- comment out the sso linker setting when debugging in chrome -->
	<add-linker name="sso" />
</module>
The most important is the entry-point node which points at the module’s entry point class.
GWT Entry Point Class - /src/com/test/client/Test.java
The entry point to the GWT application is the class pointed by the module descriptor file.
You may wonder why it is in .client subpackage as you have not specified such package anywhere. The .client subpackage in the module’s package (with its subpackages) is by convention the place where client side Java sources are placed. You can overwrite this location in module’s descriptor (however it must be a subpackage of the module’s package or the very module’s package itself).
By convention the “server side” sources are in .server subpackage and the sources used by both the server and the client are in .shared subpackage (these names can be overridden, too). But the generated boilerplate code structure contains only a .client package.
The class declared as module’s entry point must conform only one requirement. It must implement com.google.gwt.core.client.EntryPoint interface. The module’s entry point class can have any name and location inside the “client side” package. However the class generated automatically by the “bootstrapper tool” has the same name as the module name and is placed directly in the .client package. The skeleton of this class generated by the “bootstrapper tool” looks as presented below.
package com.test.client;

import com.google.gwt.core.client.EntryPoint;

public class Test implements EntryPoint {

	@Override
	public void onModuleLoad() {
		//TODO:
	}
}
The onModuleLoad() method is called after two conditions are fulfilled: the module is loaded on the client and “DOM Ready” event is fired.
Start Page - /war/index.html
This is a start page of a Tizen web application. The name is defined in the Tizen config file. The file generated by the tizengwt.jar is a blank HTML page with standard code for inclusion of compiled GWT module.
<!-- Include a history iframe to enable full GWT history support -->
<!-- (the id must be exactly as shown)                           -->
<iframe src="javascript:''" id="__gwt_historyFrame"
style="width:0;height:0;border:0"></iframe>

<script type="text/javascript" src="test/test.nocache.js"></script>
A path to generated GWT module is based on the rename-to attribute of the root node of the GWT module descriptor XML file. This is where the GWT compiler moves the resulting JavaScript code (inside the /war directory).
Application Icon – /war/icon.png
The icon image file (the name of which is specified in the config.xml) which serves as application’s icon when it is installed on a Tizen device. This is a default icon exactly the same as in project generated with the IDE wizard.
Preparing Signing Profile
Starting from version 2.1 all Tizen web application must be signed before installation.
Information on the Certificate Generator command line tool as well as information on registering Author Certificates in IDE can be found in the Tizen developer guide at the URLs https://developer.tizen.org/help/index.jsp?topic=%2Forg.tizen.gettingstarted%2Fhtml%2Fdev_env%2Fcertificate_generator.htm, and https://developer.tizen.org/help/topic/org.tizen.gettingstarted/html/dev_env/setting_author_certificate.htm respectively. As this topic can be a bit confusing for a newcomer, a short how-to guide is presented below.
The first step is to generate pksc12 file storing private key and certificate. You do this with use of Certificate Generator command line tool. In the console enter the <TIZEN_SDK_PATH>\tools\certificate-generator folder and type: ./certificate-generator.sh or ./certificate-generator.bat (depending on your OS). Then provide answers to the questions asked by the tool. The output file is generated the working directory and has .p12 extension. (In Tizen SDK version 2.2.1 you may also generate this certificate from within Tizen IDE – see next paragraph).
After you have created a pksc12 file you must register your certificate in the Tizen IDE. In order to register author’s certificate in the Tizen IDE fowllow the instructions below:
- Open the Window > Preferences entry in the main menu of the Tizen IDE. Then on the Preferences page select Tizen SDK > Secure Profiles.
- Click Add button in the Profiles section to create a new profile.
- In the Author Certificate section click the Edit button (or, if you are using 2.1 version of IDE, click on an input field under the Certificate path label). This will open a file chooser dialog to help you to provide a path to generated pksc12 file. In an input field under the Password label enter the password which you have defined when creating the pksc12 file with the certificate-generator tool.
If you are using 2.2.1 version of IDE, you will find here also the Generate button, which opens an IDE form window to interact with the certificate-generator tool.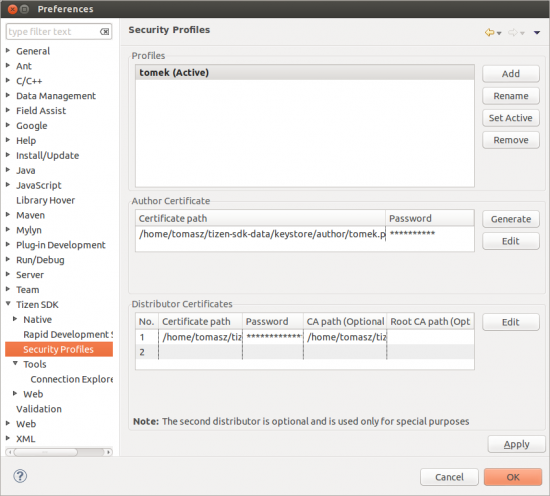
- Now a profiles.xml file is generated in a hidden directory in your workspace. The path is <YOUR_WORKSPACE>/.metadata/.plugins/org.tizen.common.sign/profiles.xml.
After you have generated the signing profile open the build.properties file (which was generated with the “Bootstrapping Tool”) and update the tizen.sign.profile property accordingly.
Packaging and Installation
After you have created your GWT project, enchanced it with tizengwt.jar tool and generated your signing profile you can exercise Tizen specific commands either called from Ant or directly from command line. Let’s start with Ant.
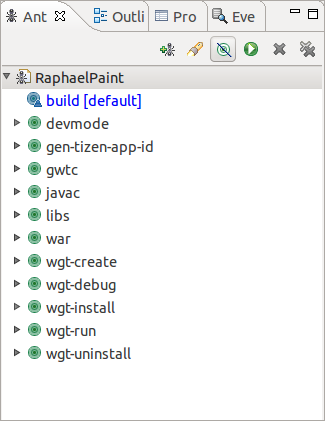
The default Ant target is called when you type ant with no arguments. In the build file generated with the “bootstrapping tool” the default target calls three other targets sequentially: gwtc, war, and wgt-create. The first two you have already encountered in the Compiling a GWT Project section, the last one is described below.
To sign and package your GWT client side code as .wgt file with Ant:
- Ensure you have compiled your GWT client side sources as described in Compiling a GWT Project section.
- Enter the root folder of your project and type in console:
ant wgt-create
This should create a widget with name <ENTRY_POINT_NAME>.wgt in the (You may however tune the build file to provide the name of your choice).
To install your application on Tizen emulator or device with Ant:
- Connect the Tizen device to your computer or start the Tizen emulator.
- Enter the root folder of your project and type in the console window:
ant wgt-install
This target calls wgt-create and wgt-unistall targets before actually installing the application. For this reason the /war folder should contain valid and up-to-date GWT compiled JavaScript.
To uninstall your application from Tizen emulator or device with Ant:
- Ensure a proper device is connected or a proper emulator is started.
- Enter the root folder of your project and type in the console window:
ant wgt-uninstall
To generate a new Tizen package id and Tizen application id with Ant:
- Enter the root folder of your project and type in console:
ant gen-tizen-app-id
If you don’t like Ant you may use Tizen command line tools. However in that case you will have to type widget id and path each time manually (and packaging file will imply some extra manual work).
Ant build files are really comfortable when they are fired from Eclipse’s Ant view. Hint: In order to open Ant View in the IDE select from main menu Window > Show View > Ant. If the Ant entry is not visible select Window > Show View > Other… and then select An.
After you have compiled the GWT code, in order to create a signed .wgt file from command line you will use web-signing and web-packaging tools. A GWT project includes also source files, built Java classes and other files intended for use on the server side. You do not want to sign these files neither to include them into a .wgt file. For this reason you will need to create a temporary folder including only files from the /war folder intended for packaging, as well as the config.xml file before firing these tools. Follow the wgt-create Ant target code to see the suggested workflow.
<target name="wgt-create" description="Creates wgt file">
	<delete file="${tizen.wgt}"></delete>
Delete old .wgt file if exists.
	<mkdir dir="${tizen.wgt.tmp.dir}"/>
	<copy todir="${tizen.wgt.tmp.dir}">
		<fileset dir="./war" excludes="WEB-INF/**" />
		<fileset file="./config.xml" />
	</copy>
Create a temporary folder and copy static web files from the /war folder and a config file into it.
	<exec executable="${tizen.sdk.tools}/web-signing${bat}"
		dir="${tizen.wgt.tmp.dir}">
		<arg value="-n" />
		<arg value="--profile" />
		<arg value="${tizen.sign.profile}" />
	</exec>
Run web-signing --profile profilename:path/to/profiles.xml from command line.
	<exec executable="${tizen.sdk.tools}/web-packaging${bat}">
		<arg value="-n" />
		<arg value="${tizen.wgt}" />
		<arg value="${tizen.wgt.tmp.dir}" />
	</exec>
Run web-packaging /path/to/Widget.wgt /path/to/temporaryFolder from command line.
	<delete dir="${tizen.wgt.tmp.dir}" />
</target>
Finally delete the temporary folder.
To install your application on Tizen emulator or device with Tizen command line tools:
- Connect the Tizen device to your computer or start the Tizen emulator.
- Enter the /war folder in your project and type in the console window:
web-install --widget /path/to/Widget.wgt
Unlike the corresponding Ant it does not fire any other tasks.
To uninstall your application from Tizen emulator or device with Tizen command line tools:
- Ensure a proper device is connected or a proper emulator is started.
- Enter the /war folder in your project and type in the console window:
web-uninstall --id <ID_FROM_config.xml>
Generating a new package and application ids on demand cannot be achieved with Tizen command line tools.
Debugging in Google Chrome Web Browser
The GWT application can not be debugged in the Tizen emulator in meaning of Java Platform Debugger.
However when your application runs in a Chrome Browser you can debug it with a “normal Java debugger” from within the Eclipse IDE. (The Chrome browser is also used by Mobile JavaScript Developers as it is closely related to mobile webkits). In order to debug your application in Chrome Browser:
- Comment out the linker setting the module’s descriptor file:
<!-- comment out the sso linker setting when debugging in chrome -->
<!-- <add-linker name=”sso” /> -->
- Recompile the client side code.
- Set breakpoints as you would normally in a Java application.
- Right click the project in the Project Explorer window and from the main menu select Debug as > Web Application. This will start the GWT debugger.
- Open chrome browser and paste the URL copied from the GWT debugger’s window.
- If you run the debugger for the GWT debugger for the firs time in chrome it will monit you to install proper plugin.
The Sample Application
The sample application delivered with this article is a clone of RaphaelPaint sample application which is discussed in the article “Working with Raphael JS Library on Tizen” (https://developer.tizen.org/documentation/articles/working-raphael-js-library-on-tizen). Shortly speaking, the application is a playground for drawing simple shapes. For full description of the application’s logic, please refer to the mentioned article.
Only the source code of the very application has been ported to GWT. All dependencies to external JavaScript libraries remain unchanged. (If you wonder how “native” JavaScript can be used from within Java you will find explanation some sections later). Also CSS styles and HTML markup are left unchanged.
Running Sample Application
The directory structure of the project has been created with Google Plugin for Eclipse (without generating sample code and without the AppEngine project facet), then it was “enhanced” with the tizengwt.jar (as described in the “Bootstrapping tool” section).
Open the build.properties file and adjust the tizen.sdk and gwt.sdk properties to match actual paths on your file system. You must also create a signing profile as described in Preparing Signing Profile section and update the tizen.sign.profile property accordingly.
Importing the project into Eclipse based IDE is straightforward and not specific to Tizen or GWT. To do it just select File > Import… from the IDE’s main menu, then on the popping-up window select General > Existing Project into Workspace and follow the wizard.
(Information on how to create a deployable .wgt file and install it on emulator or device has already been provided in the Packaging and Installation section).
The Source Code
GWT Module Descriptor
When you are about to read source code of a GWT module you usually start from its module descriptor file. The GWT module name of the sample application is org.tizen.gwt.sample.raphaelpaint.RaphaelPaint. This means that the module descriptor is called RaphaelPaint.gwt.xml and is placed in org.tizen.gwt.sample.raphaelpaint package. Open it in your editor. This descriptor is almost the same as generated by the earlier mentioned “bootstrapping tool” jar. The only difference is the additional dependency line:
<inherits name="com.google.gwt.i18n.I18N"/>
This means the application depends also on com.google.gwt.i18n.I18N module. This is a standard module provided with the GWT SDK. If you wanted to include a third party GWT module in your module, then, next to declaring the dependency as above, you would need also to put a source JAR file in the java build path. The name attribute of inherits node is the name of the module (which describes the module’s root package and the entrypoint name exactly as our org.tizen.gwt.sample.raphaelpaint.RaphaelPaint).
Tizen Web App Config
The /config.xml file is in turn a “descriptor file” for the Tizen web app. In this sample application it is also not much different from the boilerplate config file generated by the “bootstraper tool” jar. There is only one additional node.
<tizen:setting screen-orientation="portrait" context-menu="enable" background-support="enable" encryption="disable" install-location="auto"/>
These are basic Tizen app settings. You probably will have also requests for Tizen privileges in your application’s config file. For complete list of priviliges please consult Tizen API Reference.
This file is specific to Tizen not GWT, and although it is placed in the Tizen project’s root folder, the wgt-create Ant target copies it into the generated .wgt archive as if it were in the /war folder.
Tizen Web App Start Page
The start page of Tizen web application is an HTML page with a name as specified in the config.xml file. It can be named arbitrally but the default value index.html is used in most cases. This “links” the Tizen part of the project with the compiled GWT code. This file is also based on the file generated by the “bootstrapping tool”. The generated file is an empty page with HTML markup which shows how to attach the compiled GWT module to the client page. Next to generated code the page contains:
- In the head node: link and script nodes to import external javascript files and CSS styles (but not the JavaScript code produced by GWT).
- In the body node: HTML markup copied from the the original RaphaelPaint Tizen Web App and pasted just above the markup for including GWT module.
Java Sources
As mentioned above only the source code of the very application has been ported to GWT, but not the external libraries. In order to help you to compare source codes for both applications, the class names are corresponding to the names of the JavaScript files in the original application. Also the class member fields and methods are named with respect to variable names in the original JavaScript. Although they were slightly modified to conform to Java naming conventions, you can easily identify which part of JavaScript code in the original “native” application corresponds to particular Java method. The GWT Java code also uses enum types to improve maintainability. The enum types are not present in the JavaScript language.
JavaScript Libraries and the JSNI Overlay Types
As you see the .client subpackage has another subpackage named .overlay. This is the package with the “overlay” classes “built over” the native JavaScript libraries used by the module.
Before explaining the overlay types another notion must be introduced: a JSNI – JavaScript Native Interface. JSNI enables GWT developers to incorporate native JavaScript in their GWT Java code. The syntax is based on JNI.
public static final native JQuery jQuery(Element element) /*-{
	return $wnd.$(element);
}-*/;
A native method is prefixed with native keyword and has no Java body (as an abstract method). However there’s one difference to JNI. JSNI method has additionaly its JavaScript source inside a special comment block /*- -*/. For an example open the JQuery class in the .overlay package.
JSNI Overlay type is a class which wraps over an existing JavaScript object and provides an “interface” contract to access its methods and properties from the GWT Java code. JSNI Overlay type class must conform to the following restrictions.
- It has to extend com.google.gwt.core.client.JavaScriptObject.
- All of its non-static methods (both native and non native) must be declared as final or the class itself must be final.
- It must not declare member fields.
- It must have only one, no-arguments constructor.
Almost all classes in the .overlay package are JSNI overlay types. One of these classes the BoundingClientRect (which is concise enough to be quoted as a whole) is presented below to illustrate this topic.
public class BoundingClientRect extends JavaScriptObject {

	public static final native BoundingClientRect get(Element element)/*-{
		return element.getBoundingClientRect();
	}-*/;

	protected BoundingClientRect() {}

	public final native int getTop() /*-{
		return this.top;
	}-*/;

	public final native int getLeft() /*-{
		return this.left;
	}-*/;

	public final native int getBottom() /*-{
		return this.bottom;
	}-*/;

	public final native int getRight() /*-{
		return this.right;
	}-*/;

	public final native int getWidth() /*-{
		return this.width;
	}-*/;

	public final native int getHeight() /*-{
		return this.height;
	}-*/;
}
The GWT compiler inlines calls to methods of JSNI overlay classes, so in the resulting code there is no sign of their existence as if you were using the wrapped original JavaScript objects.
All the overlay types in this sample application, which wrap JavaScript objects from well known libraries as Jquery or Raphael, wrap over only those methods and properties of original objects which are actually used in this sample application.
Dynamic Object Properties
JavaScript developers are accustomed to adding properties or methods to existing object dynamically, while Java requires from an object to conform the contract defined by its class and by implemented interfaces. Porting existing JavaScript code to GWT causes these two attitudes to collide. Of course, you could redesign the whole application in the Java manner. Alternatively you could add a “wildcard” Object field to you class to keep reference to anything. This would work but with that you loose the advantages of strictly typed language. GWT comes with one more solution.
If an object is of class extending com.google.gwt.core.client.JavaScriptObject then underneath it wraps over a real JavaScript object, which, as you know, is dynamic. However from the Java point of view this is hidden under the contract of actual Java class. As all the classes which extend JavaScriptObject are in runtime “wrapped over” existing JavaScript object which from their nature are dynamic and their “interface” can change over the time , it may make sense to cast between them, even if they are not in the same class hierarchy (as long as they have common parent com.google.gwt.core.client.JavaScriptObject). Yes, it may sound tortuously. Looking at some code will be more descriptive. The source code for the draw method of the ShapeDrawer class provides a good illustration.
In the original RaphaelPaint JavaScript application there is a file shapeDrawer.js which includes a snippet of code like below.
elem.attr({
	// Attributes of the element
	"fill" : config.fillColor,
	"stroke" : config.strokeColor
});

// Initial values of applied transforms
elem.translate = [ 0, 0 ];
elem.scale = [ 1, 1 ];
elem.rotate = 0;

// Sets event handlers for moving, drag start and end
elem.drag(transforms.move, transforms.start, transforms.up);
The elem variable keeps a reference to an object returned by one of the Raphael drawing functions. As so it has properties and methods as specified in the library for the “raphael element”. However you cannot say it is of type “raphael element” as it can be modified at any time. And actually it is modified in the above code. Three new properties (translate, scale, rotate) are added to it. The “raphael element” has no idea of them.
The corresponding part in GWT is ShapeDrawer#draw() method. It looks like below.
//...
RaphaelElement element;
switch(tool) {
	case circle:
		element = mPaper.circle(x, y, 30);
		break;
//...
element.attr(RaphaelAttr.FILL, fillColor);
element.attr(RaphaelAttr.STROKE, strokeColor);

element.<JsBag> cast()
	.put(Props.TOOL_NAME, tool.name())
	.put(Props.TRANSLATE_X, 0)
	.put(Props.TRANSLATE_Y, 0)
	.put(Props.SCALE_X, 1)
	.put(Props.SCALE_Y, 1)
	.put(Props.ROTATION, 0);

element.setDragCallback(mTransforms);
Both RaphaelElement and JsBag are descendants of JavaScriptObject and none of them is in class hierarchy of the other. In spite of this the element is casted on JsBag type. The method JavaScriptObject#cast() is only a utility. It looks like below.
@SuppressWarnings("unchecked")
public final <T extends JavaScriptObject> T cast() {
	return (T) this;
}
You could achieve the same easily without this method.
RaphaelElement element;
JsBag jsBag = (JsBag) (JavaScriptObject) element;
The “magic” is not in syntax but in what’s underneath - e.g. native JavaScript. In “normal” Java code a cast operation as above would also cheat the compiler but in runtime it would throw a ClassCastException.
As you know this feature, you can define different “faces” of the JavaScript object as JSNI overlay types and then cast between them when needed. However, when designing the overlay type class keep in mind to handle the case when it is casted on a “bare fresh object”. And sometimes this “handling” may simply mean throwing some specific exception.