Image Editing
PUBLISHED
Tizen offers various image processing features.
The main features of the Image Util API include:
- Conversion
You can change the image and media packet color space among the supported formats.
- Resizing
You can change the image and media packet resolution.
- Rotation
You can change the image and media packet angle around the X or Y axis.
- Crop
You can crop the outer parts of the image and media packet.
- Decoding from a file or memory and encoding to a file or memory
You can decode images and encode them with the following formats:
- Bitmap formats: YUV420, YUV422, RGB888, RGBA8888, BGRA8888, and ARGB8888
- Input image formats for decoding: JPEG, PNG, GIF, and BMP
- Output image formats for encoding: JPEG, PNG, GIF, BMP, and animated GIF
NotePay attention to how the image quality depends on the size and compression ratio.
Prerequisites
To enable your application to use the image util functionality:
-
To use the functions and data types of the Image Util API (in mobile and wearable applications), include the
<image_util.h>header file in your application:#include <image_util.h>
To ensure that an Image Util function has been executed properly, make sure that the return value is equal to
IMAGE_UTIL_ERROR_NONE. -
Declare the required variables:
#define SAMPLE_FILENAME "sample_image.jpg"
#define OUTPUT_ROTATED_JPEG "rotated_image.jpg"

const image_util_colorspace_e colorspace = IMAGE_UTIL_COLORSPACE_RGBA8888;
image_util_image_h src_image = NULL;
image_util_image_h dst_image = NULL;
image_util_decode_h decode_h = NULL;
-
To find out the color spaces supported on the device, use
image_util_foreach_supported_colorspace():int image_util_foreach_supported_colorspace(image_util_type_e image_type, image_util_supported_colorspace_cb callback, void *user_data);The possible color spaces are defined in the
image_util_colorspace_eenumeration (in mobile and wearable applications).For more information on the YUV color space, see http://www.fourcc.org/yuv.php.
-
To support
image_util_transform_run(), which is used for all image transformations, set the source image and create a handle for it (to be used as the second parameter):ret = image_util_decode_create(&decode_h); ret = image_util_decode_set_input_path(decode_h, SAMPLE_FILENAME); ret = image_util_decode_set_colorspace(decode_h, colorspace); ret = image_util_decode_run2(decode_h, &src_image); ret = image_util_decode_destroy(decode_h);
Converting Image Color Space
To convert one color space of an image to another:
- Create a transformation handle using
image_util_transform_create():transformation_h transform_h; ret = image_util_transform_create(&transform_h);
- Set the target color space using
image_util_transform_set_colorspace():ret = image_util_transform_set_colorspace(transform_h, colorspace);
- Execute the transformation using
image_util_transform_run2():ret = image_util_transform_run2(transform_h, src_image, &dst_image);
- Execute the transformation using
image_util_transform_run2_async():ret = image_util_transform_run2_async(transform_h, src_image, (image_util_transform_completed2_cb)completed_callback, user_data);Noteimage_util_transform_run2()andimage_util_transform_run2_async()only converts the color space. These functions do not change the image width, height, or any other image property. Due to these restrictions of the image processing library, not all color space combinations are supported for conversion. - Handle the transformation results in
image_util_transform_completed2_cb(), which is invoked after the transformation is complete. - After the transformation is complete, destroy the transformation handle using
image_util_transform_destroy():ret = image_util_transform_destroy(transform_h);
Converting Media Packet Color Space
To convert one color space of a media packet to another:
- Create a transformation handle using
image_util_transform_create():transformation_h transform_h; ret = image_util_transform_create(&transform_h);
- Set the target color space using
image_util_transform_set_colorspace():ret = image_util_transform_set_colorspace(transform_h, colorspace);
- Execute the transformation using
image_util_transform_run():ret = image_util_transform_run(transform_h, (media_packet_h)src_packet, (image_util_transform_completed_cb)completed_callback, user_data);Noteimage_util_transform_run()only converts the color space. The function does not change the image width, height, or any other image property. Due to these restrictions of the image processing library, not all color space combinations are supported for conversion.For more information on how to use the media packet handle of the Media Tool API, see Media Handle Management.
- Handle the transformation results in
image_util_transform_completed_cb(), which is invoked after the transformation is complete. - After the transformation is complete, destroy the transformation handle using
image_util_transform_destroy():ret = image_util_transform_destroy(transform_h);
Resizing Image
To resize an image:
-
Create a transformation handle using
image_util_transform_create():transformation_h transform_h; ret = image_util_transform_create(&transform_h);
-
Set the target resolution using
image_util_transform_set_resolution():ret = image_util_transform_set_resolution(transform_h, width, height);
-
Run the transformation using
image_util_transform_run2()orimage_util_transform_run2_async():ret = image_util_transform_run2(transform_h, src_image, &dst_image);
Note The image format has no effect on the transformation. If the color space is YUV, then the width and height of the target image must be multiples of eight. This restriction does not apply to the RGB images. -
If
image_util_transform_run2_async()is used to run the transformation, handle the transformation results inimage_util_transform_completed2_cb(), which is invoked after the transformation is complete. -
After the transformation is complete, destroy the transformation handle using
image_util_transform_destroy():ret = image_util_transform_destroy(transform_h);
Resizing Media Packet
To resize a media packet:
- Create a transformation handle using
image_util_transform_create():transformation_h transform_h; ret = image_util_transform_create(&transform_h);
- Set the target resolution using
image_util_transform_set_resolution():ret = image_util_transform_set_resolution(transform_h, width, height);
- Run the transformation using
image_util_transform_run():ret = image_util_transform_run(transform_h, (media_packet_h)src_packet, (image_util_transform_completed_cb)completed_callback, user_data);NoteThe image format has no effect on the transformation. If the color space is YUV, then the width and height of the target image must be multiples of eight. This restriction does not apply to the RGB images. - Handle the transformation results in
image_util_transform_completed_cb(), which is invoked after the transformation is complete. - After the transformation is complete, destroy the transformation handle using
image_util_transform_destroy():ret = image_util_transform_destroy(handle);
Rotating Image
To rotate an image:
-
Create a transformation handle using
image_util_transform_create():transformation_h transform_h; ret = image_util_transform_create(&transform_h);
-
Set the amount of rotation using
image_util_transform_set_rotation():ret = image_util_transform_set_rotation(transform_h, rotation);
The possible values for the
rotationparameter are defined in theimage_util_rotation_eenumeration (in mobile and wearable applications). -
Execute the transformation using
image_util_transform_run2()orimage_util_transform_run2_async():ret = image_util_transform_run2(transform_h, src_image, &dst_image);
Note The image format has no effect on the transformation. If the color space is YUV, then the width and height of the target image must be multiples of eight. This restriction does not apply to the RGB images. -
Handle the transformation results in
image_util_transform_completed2_cb(), which is invoked after the transformation is complete. -
After the transformation is complete, destroy the transformation handle using
image_util_transform_destroy():ret = image_util_transform_destroy(transform_h);
Rotating Media Packet
To rotate a media packet:
- Create a transformation handle using
image_util_transform_create():transformation_h transform_h; ret = image_util_transform_create(&transform_h);
- Set the amount of rotation using
image_util_transform_set_rotation():ret = image_util_transform_set_rotation(transform_h, rotation);
The possible values for the
rotationparameter are defined in theimage_util_rotation_eenumeration (in mobile and wearable applications). - Execute the transformation using
image_util_transform_run():ret = image_util_transform_run(transform_h, (media_packet_h)src_packet, (image_util_transform_completed_cb)completed_callback, user_data);NoteThe image format has no effect on the transformation. If the color space is YUV, then the width and height of the target image must be multiples of eight. This restriction does not apply to the RGB images. - Handle the transformation results in
image_util_transform_completed_cb(), which is invoked after the transformation is complete. - After the transformation is complete, destroy the transformation handle using
image_util_transform_destroy():ret = image_util_transform_destroy(transform_h);
Cropping Image
To crop an image:
-
Create a transformation handle using
image_util_transform_create():transformation_h transform_h; ret = image_util_transform_create(&transform_h);
-
Set the crop area using
image_util_transform_set_crop_area():ret = image_util_transform_set_crop_area(transform_h, start_x, start_y, end_x, end_y);
-
Execute the transformation using
image_util_transform_run2()orimage_util_transform_run2_async():ret = image_util_transform_run2_async(transform_h, src_image, (image_util_transform_completed2_cb)completed_callback, user_data);Note As there is a YUV restriction and the crop start position can be set arbitrarily, the cropped image width and height must be even. -
Handle the transformation results in
image_util_transform_completed2_cb(), which is invoked after the transformation is complete. -
After the transformation is complete, destroy the transformation handle using
image_util_transform_destroy():ret = image_util_transform_destroy(transform_h);
Cropping Media Packet
To crop a media packet:
-
Create a transformation handle using
image_util_transform_create():transformation_h transform_h; ret = image_util_transform_create(&transform_h);
-
Set the crop area using
image_util_transform_set_crop_area():ret = image_util_transform_set_crop_area(transform_h, start_x, start_y, end_x, end_y);
-
Execute the transformation using
image_util_transform_run():ret = image_util_transform_run(transform_h, (media_packet_h)src_packet, (image_util_transform_completed_cb)completed_callback, user_data);Note As there is a YUV restriction and the crop start position can be set arbitrarily, the cropped image width and height must be even. -
Handle the transformation results in
image_util_transform_completed_cb(), which is invoked after the transformation is complete. -
After the transformation is complete, destroy the transformation handle using
image_util_transform_destroy():ret = image_util_transform_destroy(transform_h);
Decoding from a File or Memory
To decode a JPEG, PNG, GIF, or BMP image:
-
Create a decoding handle using
image_util_decode_create():image_util_decode_h decode_h = NULL; ret = image_util_decode_create(&decode_h);
-
Set the image to the input path or buffer using
image_util_decode_set_input_path()orimage_util_decode_set_input_buffer():ret = image_util_decode_set_input_path(decode_h, path);
-
Additionally, you can set the color space and JPEG downscale using
image_util_decode_set_colorspace()andimage_util_decode_set_jpeg_downscale():unsigned char *result = NULL; ret = image_util_decode_set_colorspace(decode_h, IMAGE_UTIL_COLORSPACE_RGBA8888); ret = image_util_decode_set_jpeg_downscale(decode_h, IMAGE_UTIL_DOWNSCALE_1_1);
Note- Due to the decoder limitations, the color space setting is only supported for decoding the JPEG images. The default color space is
IMAGE_UTIL_COLORSPACE_RGBA8888. PNG, GIF, and BMP images are decoded withIMAGE_UTIL_COLORSPACE_RGBA8888.
- Due to the decoder limitations, the color space setting is only supported for decoding the JPEG images. The default color space is
-
Execute the decoding using
image_util_decode_run2()orimage_util_decode_run_async2():image_util_image_h decoded_image = NULL; ret = image_util_decode_run2(decode_h, &decoded_image);
-
After the decoding is complete, destroy the decoding handle using
image_util_decode_destroy():ret = image_util_decode_destroy(decode_h);
Encoding to a File or Memory
To encode a raw image:
-
Create an encoding handle using
image_util_encode_create():image_util_type_e encoder_type = IMAGE_UTIL_JPEG; image_util_encode_h encode_h = NULL; ret = image_util_encode_create(encoder_type, &encode_h);
-
Additionally, you can set the JPEG quality or PNG compression using
image_util_encode_set_quality()orimage_util_encode_set_png_compression():ret = image_util_encode_set_quality(decode_h, 100);
Note The compression is only supported for the PNG images. The default JPEG quality is 75. The default PNG compression isIMAGE_UTIL_PNG_COMPRESSION_6. -
Execute the encoding using
image_util_encode_run_to_file()orimage_util_encode_run_to_buffer():ret = image_util_encode_run_to_file(encode_h, decoded_image, file);
Note Due to the encoder limitations, the color space setting is only supported for encoding the JPEG images. The default color space isIMAGE_UTIL_COLORSPACE_RGBA8888. PNG, GIF, and BMP images are encoded withIMAGE_UTIL_COLORSPACE_RGBA8888. -
After the encoding is complete, destroy the encoding handle using
image_util_encode_destroy():ret = image_util_encode_destroy(encode_h);
Encoding an Animated GIF
To encode an animated GIF image:
-
Create an encoding handle using
image_util_agif_encode_create():image_util_agif_encode_h agif_encode_h = NULL; ret = image_util_agif_encode_create(&agif_encode_h);
- Add the images with the delay time between GIF frames using
image_util_agif_encode_add_frame():ret = image_util_agif_encode_add_frame(agif_encode_h, src_image, delay_time);
- Save the encoded image using
image_util_agif_encode_save_to_file()orimage_util_agif_encode_save_to_buffer():ret = image_util_agif_encode_save_to_file(agif_encode_h, path);
- After the encoding is complete, destroy the encoding handle using
image_util_agif_encode_destroy():ret = image_util_agif_encode_destroy(agif_encode_h);
Supported Color Space Formats
The following tables define the supported color space formats.
Table: RGB pixel formats
| Label | FOURCC in hex | Bits per pixel | Description |
|---|---|---|---|
| RGB | 0x32424752 | 1, 4, 8, 16, 24, 32 | Alias for BI_RGB |
| RGBA | 0x41424752 | 16, 32 | Raw RGB with alpha. Sample precision and packing is arbitrary and determined using bit masks for each component, as for BI_BITFIELDS. |
Table: Packed YUV formats
| Label | FOURCC in hex | Bits per pixel | Description |
|---|---|---|---|
| UYVY | 0x59565955 | 16 | YUV 4:2:2 (Y sample at every pixel, U and V sampled at every second pixel horizontally on each line). A macropixel contains 2 pixels in 1 u_int32. |
| YUYV | 0x56595559 | 16 | Duplicate of YUY2. |
Table: Planar YUV formats
| Label | FOURCC in hex | Bits per pixel | Description |
|---|---|---|---|
| YV16 | 0x36315659 | 16 | 8-bit Y plane followed by 8-bit 2×1 subsampled V and U planes. |
| YV12 | 0x32315659 | 12 | 8-bit Y plane followed by 8-bit 2×2 subsampled V and U planes. |
| I420 | 0x30323449 | 12 | 8-bit Y plane followed by 8-bit 2×2 subsampled U and V planes. |
| NV12 | 0x3231564E | 12 | 8-bit Y plane followed by an interleaved U/V plane with 2×2 subsampling. |
| NV21 | 0x3132564E | 12 | As NV12 with U and V reversed in the interleaved plane. |
Quality and Size Comparison
The following table shows the effect on the image quality and file sizes when using different compression ratios.
Table: Quality and size comparison
| Image | Quality | Size (bytes) | Compression ratio | Description |
|---|---|---|---|---|
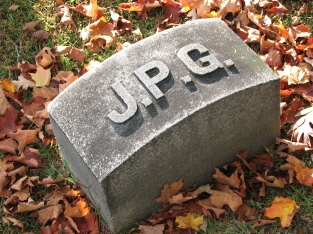 |
Highest quality (Q = 100) | 83,261 | 2.6:1 | Extremely minor artifacts |
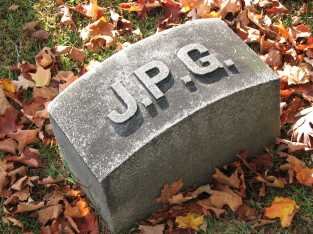 |
High quality (Q = 50) | 15,138 | 15:1 | Initial signs of subimage artifacts |
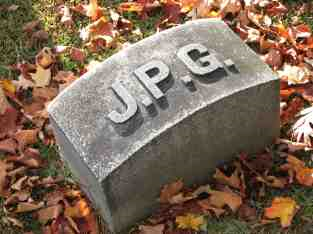 |
Medium quality (Q = 25) | 9,553 | 23:1 | Stronger artifacts; loss of high-frequency information |
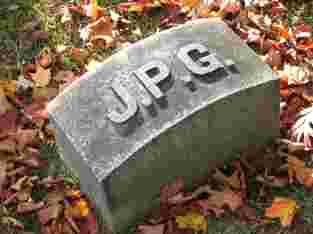 |
Low quality (Q = 10) | 4,787 | 46:1 | Severe high frequency loss; artifacts on subimage boundaries (“macroblocking”) are obvious |
 |
Lowest quality | – | – | – |
Was this document helpful?
We value your feedback. Please let us know what you think.


