


In this lesson, we will talk about a special widget called bg which is used as a background graphical element in applications.
As it was mentioned, the widget is used as the background of the application. In fact, this does not mean that it is obligatory for use, for example, you may use the image widget instead of it. Still if you need static background, we recommend using bg widget. The advantage of the background widget is that you can set it both as an image and as a solid color. Thus, unlike the image widget, in the background widget color can be set by a specially created interface. A feature of the background widget is the ability to set the image display mode. This can be stretching across the whole area or tiling the entire space in case the size of the image is smaller than the size of the widget.
Let's add a background to the watch app that was created in the previous lesson.
Add to the structure a field for the new widget.
typedef struct _UIData
{
   Evas_Object *win;
   Evas_Object *bg;
   Evas_Object *label;
} UIData;
Write a function for creating a background widget and place its call before a text widget creation because you ought to display the background at first, and only then the time digits, otherwise you will overlap the digits with a background.
static void
_bg_create(UIData *ui, int width, int height)
{
}
static void
_window_create(UIData *ui, int width, int height)
{
...
_bg_create(ui, width, height);
_label_create(ui, width, height);
...
}To create the widget object, use following function:
ui->bg = elm_bg_add(ui->win);It was agreed that in this demo application containers, to place components, would not be used, so now you should set the dimensions explicitly by using the arguments passed to the function. The widget can be immediately displayed:
evas_object_resize(ui->bg, width, height);
evas_object_show(ui->bg);
Let's set the dark green color to the background, by calling the function:
elm_bg_color_set(ui->bg, 0, 80, 20);Install and run the watch application and see what will happen.
As you can see, the watch app has a green background and gray numbers, displaying time.
Let's add some variety to the watch app and set an option to change the style by clicking on the numbers. You have to define the styles or how the watch application will look like, implement the function of setting the background of the desired color or image, add it to the formatted string where you set the color to the text, and create a handler for pressing numbers.
First of all, let’s determine that the style includes following elements:
- Type of the style (what will be used as a background: image or solid color);
- Color of the text marked out with HTML, since it will be more convenient to use;
- Three components of RGB for setting the background color. The function takes three parameters for the three color channels instead of HTML code.
- The name of the image file for the background (in case of using the non-color watch application style).
After determined what is needed, describe the data structure in the code:
typedef struct _Style
{
   Eina_Bool is_image;

   char *digits_color;
   int bg_r;
   int bg_g;
   int bg_b;

   char *image_name;
} Style;
Define the set of styles that will be given to the user:
1. Yellow digits (#edf8bd), dark red background (104,0,32).
2. Light purple digits (#9598bc), mustard background (117, 104, 0).
3. Light red digits (#eec4c7) and dark turquoise background (8,60,55).
4. Dark turquoise digits (#00332e) and green background (71,188,53).
5. Dark turquoise digits (#005848) and the next background image
6. White numbers (#ffffff) and the next background image.

Now add the images to the project in the res/folder and define the styles in the code, so that they can be used:
static Style styles[] = {
   {EINA_FALSE, "edf8bd", 104, 0, 32},
   {EINA_FALSE, "9598bc", 117, 104, 0},
   {EINA_FALSE, "eec4c7", 8, 60, 55},
   {EINA_FALSE, "00332e", 71, 188, 53},
   {EINA_TRUE, "005848", 0, 0, 0, "bg1.png"},
   {EINA_TRUE, "ffffff", 0, 0, 0, "bg2.png"},
};
Let's add to the structure with the graphic components the field in which the index of the current style will be stored:
typedef struct _UIData
{
   Evas_Object *win;
   Evas_Object *bg;
   Evas_Object *label;
   int style_index;
} UIData;
In accordance with the style, add some changes to the digits style. In the place where the string for the text widget is generated, add the color attribute to the block and pass color of the text for the current style through the format:
static void
_ui_update(UIData *ui, watch_time_h watch_time)
{
   ...

   Style *style = &styles[ui->style_index];
   char *color = style->digits_color;

   snprintf(text,
            BUF_SIZE,
            "<font font_size=80 color=#%s>"
               "<align=center>%02d:%02d:%02d</align>"
            "</font>",
            color,
            hour24,
            minute,
            second);

   ...
}
Now let's implement a function in which we will change the appearance of the background widget according to the current style.
Add the function for getting the full path to the image file on the device at runtime. The similar operation was done in the creating image tutorial. The background widget takes path to the images in the same way.
static void
_file_abs_resource_path_get(char *res_file_path, char *abs_path, int buf_size)
{
   char *res_dir_path = app_get_resource_path();

   if (res_dir_path)
     {
        snprintf(abs_path, buf_size, "%s%s", res_dir_path, res_file_path);
        free(res_dir_path);
     }
}
Implement the function of changing the background style.
static void
_bg_apperance_set(UIData *ui)
{
   Style *style = &styles[ui->style_index];

   if (style->is_image == EINA_TRUE)
     {
        const int BUF_SIZE = 256;
        char image_path[BUF_SIZE] = {0,};
        _file_abs_resource_path_get(style->image_name, image_path, BUF_SIZE);

        elm_bg_file_set(ui->bg, image_path, NULL);
     }
   else
     {
        char *image = NULL;
        elm_bg_file_get(ui->bg, &image, NULL);
        if (image)
          elm_bg_file_set(ui->bg, NULL, NULL);

        elm_bg_color_set(ui->bg, style->bg_r, style->bg_g, style->bg_b);
     }
}
In this function, the current style was taken, and then a background image or color was set to the widget.
As you can see, in case of color style, two functions are used simultaneously. At the same time background widget can use either color or image, still image is more preferable. As a result, the program should be executed as follows.
If the style has an image as a background, then we take the full path to the image and set it to the widget.
If the style has a color as the background, then first of all we have to remove the image, if it was set. Image deletion from the background widget is performed by the same function as the image setting, but instead of the path to the file, pass NULL.
Now you can replace the static color setting for the background widget with this function, now the function of creating a bg widget looks like this:
static void
_bg_create(UIData *ui, int width, int height)
{
   ui->bg = elm_bg_add(ui->win);

   evas_object_resize(ui->bg, width, height);

   _bg_apperance_set(ui);

   evas_object_show(ui->bg);
}
The last step is to implement a handler for clicking on the text widget for later changing the watch application style. The text widget does not have a smart callback for the click event, so now to avoid separate button creation, you should use event of the beginning of the touch (EVAS_CALLBACK_MOUSE_DOWN).
In the real watch application it would be necessary to create a separate button because the event of the beginning of the touch does not completely reflect the click, but for our demo this solution is acceptable.
static void
_label_create(UIData *ui, int width, int height)
{
   ...

   evas_object_event_callback_add(ui->label, EVAS_CALLBACK_MOUSE_DOWN, down_cb, ui);
}
Implement the handler:
static void
down_cb(void *data, Evas *evas, Evas_Object *obj, void *event)
{
   UIData *ui = data;

   int styles_count = EINA_C_ARRAY_LENGTH(styles);
   ui->style_index = (ui->style_index + 1) % styles_count;

   _watch_update(ui, NULL);

   _bg_apperance_set(ui);
}
In this function, we show you how to cyclically change the index of the current style, and call both function to update the digits, and function to update the appearance of the background. Now you can run the watch application.
There is a watch application with a number of styles. Changes occurs only on the touch in the digits area, in the end of the video it is shown that if you make touches outside the digits, nothing happens.
It was mentioned that in the background widget there is possible to adjust the way the image is displayed if image size is different from the size of the widget. To do so, use following function:
elm_bg_option_set(Evas_Object *bg, Elm_Bg_Option option);The second parameter is the display method itself.
Also there is possibility to find out what mode is currently used, by using the function:
Elm_Bg_Option elm_bg_option_get(const Evas_Object *bg);Let's take a small image to see what happens with the different ways of displaying.
ELM_BG_OPTION_CENTER — the image will be located in the middle of the widget:
ELM_BG_OPTION_SCALE — the image will be stretched with the proportion preservation, until the side with a smaller size will reach the size of the widget:

ELM_BG_OPTION_STRETCH — the image will stretch without preserving the proportion:
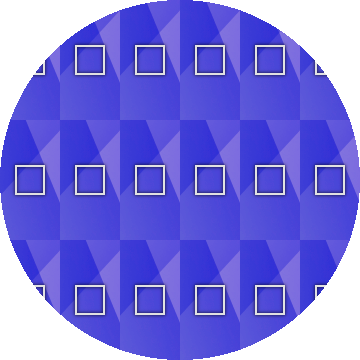
ELM_BG_OPTION_TILE — the background widget area will be paved with images:
If you do not set the mode to the widget, the default mode is ELM_BG_OPTION_SCALE.
The full code of this lesson is available for downloading here WearLesson029.