Creating Application UIs with UI Builder
Tizen provides a WYSIWYG (What You See Is What You Get) UI Builder tool in the IDE for creating application UIs. The UI Builder includes the following features:
Creating a UI Builder Project
A UI Builder project creates the source code and required files and folders in the IDE workspace for building a Tizen native application using the UI Builder. You can use the UI Builder to create and modify the page layout using a graphical user interface.
To create a native UI Builder project:
- In the IDE, select File > New > Tizen Native Project.
If the project option you want is not visible, make sure that you are using the correct perspective (Tizen Native UI Builder). To switch perspectives, go to Window > Open Perspective > Other and select the perspective you need.
- In the New Tizen Native Project window, select the Template tab and define the project details:
- Select the Tizen Native UI Builder project type.
- Define the name for your project.
Note The Tizen API names cannot be used as project names. The project name must be more than 2 characters and is restricted to the following regular expression: [a-z OR A-Z][a-z OR A-Z OR 0-9]{2,49}. The default location for your application project is defined.
- Click Finish.
The new application project is shown in the Project Explorer view of the IDE, with default content in the app.xml file as well as in several project folders.
Structure of a UI Builder Project
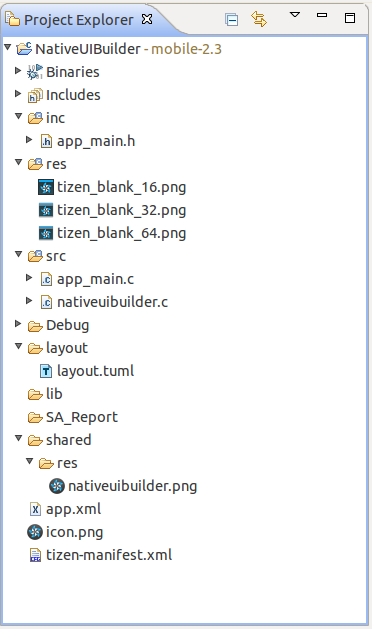
The following figure illustrates the default project folder structure for Tizen UI Builder applications.
Figure: Default project folder structure

The following table describes the content of the default project folders.
| File or folder | Content |
|---|---|
|
|
Native UI framework |
|
|
Icons or images |
|
|
Application source files |
|
|
Layout folder |
|
|
Library folder |
|
|
Shared folder |
|
|
Resource folder of the Tizen IDE |
|
|
Layout meta file (tuml: Tizen UI Markup Language) |
|
|
Application icon file |
|
|
Application information file |
|
|
Manifest XML file of the Tizen IDE |
Creating and Designing Page Layouts
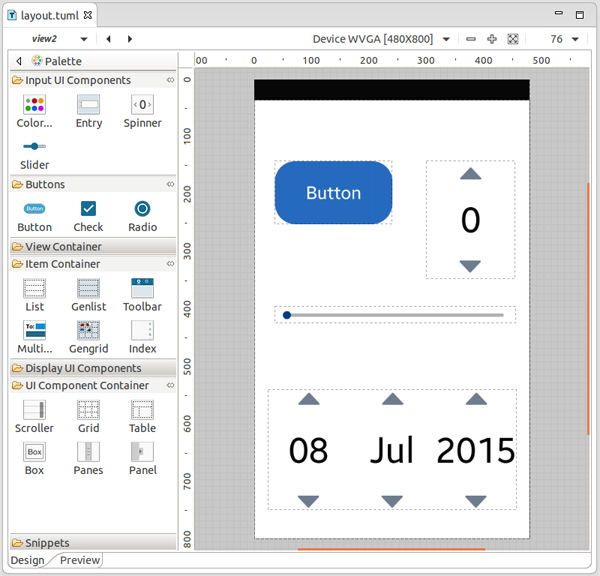
You can create and design native UI Builder application pages in the WYSIWYG Editor view.
Creating a New Native UI Builder Application View
You can create multiple views for a native UI Builder application. To add a new view:
- In the IDE, select File > New > Project.
- In the New window, select Tizen Native Project and click Next.
- Select UI Builder Application > Empty Application.
- Enter the new project name in the Project Name field.
- Click Finish.
The new project appears in the Project Explorer view.
Using the WYSIWYG Editor View
You can configure the design area of the WYSIWYG Editor view by managing the display resolution, changing the orientation, zooming in and out, and scaling the design area to the available screen space.
You can add a UI component in the WYSIWYG Editor view and set its properties:
- In the Project Explorer view, double-click the layout.tuml file to which you want to add UI components.
A design area is displayed in the WYSIWYG Editor view.
- Drag the UI component from the Palette area to the WYSIWYG Editor view.

- Select the UI component in the WYSIWYG Editor or Outline view.
- In the Properties view, set the UI component properties.
You can move the UI components around in the WYSIWYG Editor.
Placing UI Components
You can place a variety of UI components in the WYSIWYG Editor view.
To place a UI component, drag the UI component from the Palette area to the WYSIWYG Editor view. The next empty position in the WYSIWYG Editor view is marked with a dotted rectangle.
You can add child UI components in a container, such as a Table. For example, you can add a set of Image components in a Table container component. When adding the Image component, some areas in the Table container change to the blue color, which implies that the UI component can be placed.
Handling Events and Testing
You can select a UI component from the design area of the WYSIWYG Editor view and add event handlers to it.
To add an event handler to a selected UI component:
- In the Properties view, select the Event sub-tab.
- In the list, select the event to which you want to add an event handler.
- If you want to add a click event, click the + button on the right side of the clicked label.
- Click the right arrow on the right side of Combo.
The UI Builder generates a skeleton code for the event handler, and the event handler for the selected event is displayed.
- Enter the application-specific event handler-related code.
- Press Ctrl+s.
The Tizen native application is rendered as it is on the Emulator (target).
All UI components have their own unique ID in a specific view, and you can access the UI components in the event handler code using the ID. You can view and edit the UI component ID in the Outline view.
For example, if your view (with the view1 ID) has a button (with the button1 ID), you can create an event handler for the button tap that changes the heading text:
void view1_button1_onclicked(uib_view1_view_context *vc, Evas_Object *obj, void *event_info)
{
   elm_object_text_set(vc->button1, "Hello button1");
}
Testing a UI Builder Project
To test the UI Builder project:
- Select the project in the Project Explorer view.
- In the IDE menu, select Run > Run as > Tizen Native Application to test the project on the Emulator or target device.


