Creating a Naviframe for Navigation
The naviframe container is useful for implementing interfaces where several screens have a previous/next relationship.
The following example shows how to create an application with a simple naviframe. This naviframe has 2 views (screens):
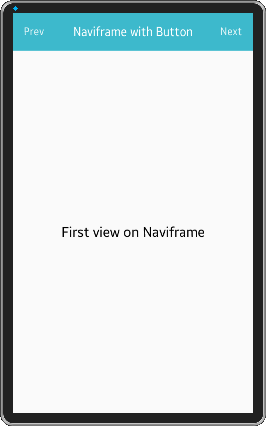
- The first view only contains a title with 2 buttons in the header area, and some text in the content area. The Prev button is used to terminate the application, and the Next button opens the second view.
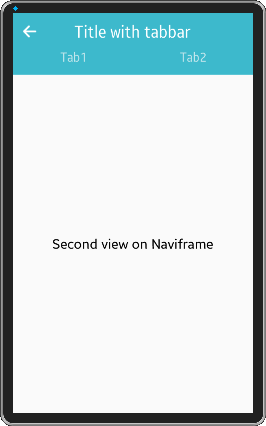
- The second view contains a title with a back button in the header area, a tabbar below the title, and some text in the content area. The back button is used to move back to the first view.
Figure: Naviframe views


To create an application with a naviframe:
-
Create the application based on the BasicUIApplication template in the SDK.
The application UI is created with the create_base_gui() function, which calls the necessary functions to create the naviframe (create_naviframe()), set the naviframe on the conformant (elm_object_content_set()), and create the first view (first_page()):
static void create_base_gui(appdata_s *ad) { // Window ad->win = elm_win_util_standard_add(PACKAGE, PACKAGE); elm_win_autodel_set(ad->win, EINA_TRUE); evas_object_smart_callback_add(ad->win, "delete,request", win_delete_request_cb, NULL); // Conformant ad->conform = elm_conformant_add(ad->win); elm_win_indicator_mode_set(ad->win, ELM_WIN_INDICATOR_SHOW); elm_win_indicator_opacity_set(ad->win, ELM_WIN_INDICATOR_OPAQUE); evas_object_size_hint_weight_set(ad->conform, EVAS_HINT_EXPAND, EVAS_HINT_EXPAND); elm_win_resize_object_add(ad->win, ad->conform); evas_object_show(ad->conform); // Add the naviframe ad->nf = create_naviframe(ad->conform); elm_object_content_set(ad->conform, ad->nf); // Create the first view first_page(ad->nf); // Show the window after the base GUI is set up evas_object_show(ad->win); } -
Create the naviframe with the elm_naviframe_add() function.
In Tizen 2.4, you can use the elm_naviframe_prev_btn_auto_pushed_set() function to automatically create a back button for all views except the first. When you call this function when creating the naviframe, you do not need to manually add a back button to the second view to allow the user to return to the first view.
static Evas_Object * create_naviframe(Evas_Object *parent) { Evas_Object *nf; nf = elm_naviframe_add(parent); // Add back button automatically on naviframe views when created // This API cannot affect naviframe views already created elm_naviframe_prev_btn_auto_pushed_set(nf, EINA_TRUE); return nf; } -
Create the first view with the first_page() function and push the view to show it on the screen.
Create 2 buttons for the view with callbacks for the clicked event. The buttons are added on both sides of the naviframe title area. When clicked, the left Prev button terminates the application, and the right Next button pushes the second view to show it on the screen. For the content area, set a layout with simple text in it.
static void first_page(Evas_Object *nf) { Evas_Object *content, *btn; Elm_Object_Item *nf_it; // Set nocontents layout content = elm_layout_add(nf); elm_layout_theme_set(content, "layout", "nocontents", "default"); elm_object_part_text_set(content, "elm.text", "First view on Naviframe"); // Push the first view nf_it = elm_naviframe_item_push(nf, "Naviframe with Button", NULL, NULL, content, NULL); // Set left button on the title btn = elm_button_add(nf); elm_object_style_set(btn, "naviframe/title_left"); elm_object_item_part_content_set(nf_it, "title_left_btn", btn); elm_object_text_set(btn, "Prev"); evas_object_smart_callback_add(btn, "clicked", prev_btn_clicked_cb, nf); // Set right button on the title btn = elm_button_add(nf); elm_object_style_set(btn, "naviframe/title_right"); elm_object_item_part_content_set(nf_it, "title_right_btn", btn); elm_object_text_set(btn, "Next"); evas_object_smart_callback_add(btn, "clicked", second_page_cb, nf); // Set a callback for when a naviframe view is popped (hidden from the screen) elm_naviframe_item_pop_cb_set(nf_it, naviframe_pop_cb, nf); } -
When the left Prev button is clicked, the prev_btn_clicked_cb() callback pops the current view. When the view is popped, the naviframe_pop_cb() callback is triggered with the popped item and terminates the application.
// Left button click callback static void prev_btn_clicked_cb(void *data, Evas_Object *obj, void *event_info) { Evas_Object *nf = data; elm_naviframe_item_pop(nf); } // View pop callback // If the callback returns EINA_FALSE, item popping is canceled and item is not deleted static Eina_Bool naviframe_pop_cb(void *data, Elm_Object_Item *it) { ui_app_exit(); // EINA_FALSE is returned, since the application is terminated anyway return EINA_FALSE; } -
When the right Next button is clicked, the second_page_cb() callback creates the second view and pushes it to the screen.
Create a toolbar below the title area, and for the content area, set a layout with simple text in it. Since you used the elm_naviframe_prev_btn_auto_pushed_set() function when creating the naviframe, a back button is automatically added to this view. When you push the view, use the tabbar style.
static void second_page_cb(void *data, Evas_Object *obj, void *event_info) { Evas_Object *content, *tabbar, *nf = data; Elm_Object_Item *nf_it; // Set nocontents layout content = elm_layout_add(nf); elm_layout_theme_set(content, "layout", "nocontents", "default"); elm_object_part_text_set(content, "elm.text", "Second view on Naviframe"); // Push the second view with tabbar style nf_it = elm_naviframe_item_push(nf, "Title with tabbar", NULL, NULL, content, "tabbar"); // Create and set a toolbar into the tabbar part tabbar = create_tabbar_with_title(nf); elm_object_item_part_content_set(nf_it, "tabbar", tabbar); } -
Create the toolbar and append 2 items into it using the create_tabbar_with_title() function. When the toolbar is located under the naviframe title area, the tabbar_with_title style can be used.
static Evas_Object*
create_tabbar_with_title(Evas_Object *parent)
{
   Evas_Object *toolbar;
   toolbar = elm_toolbar_add(parent);
   elm_object_style_set(toolbar, "tabbar_with_title");
   elm_toolbar_shrink_mode_set(toolbar, ELM_TOOLBAR_SHRINK_EXPAND);
   elm_toolbar_transverse_expanded_set(toolbar, EINA_TRUE);
   elm_toolbar_item_append(toolbar, NULL, "Tab1", NULL, parent);
   elm_toolbar_item_append(toolbar, NULL, "Tab2", NULL, parent);
   elm_toolbar_select_mode_set(toolbar, ELM_OBJECT_SELECT_MODE_ALWAYS);

   return toolbar;
}


