Creating Your First Tizen Application
Before you get started with developing Tizen applications, you must download and install the Tizen SDK (software development kit). For more information about the installation process, see the Tizen developer site.
This tutorial demonstrates how you can create a simple HelloWorld application. Study this tutorial to help familiarize yourself with the Tizen native application development process as well as using the Tizen SDK and installing the created application on the Emulator or target device.
When you are developing a more complex application, you can take advantage of the tools included in the SDK to ease the tasks of creating functionality and designing the application UI.
To Create a HelloWorld Application
- Creating the HelloWorld Project
- Launch the Tizen IDE.
-
Create the application project in the IDE.
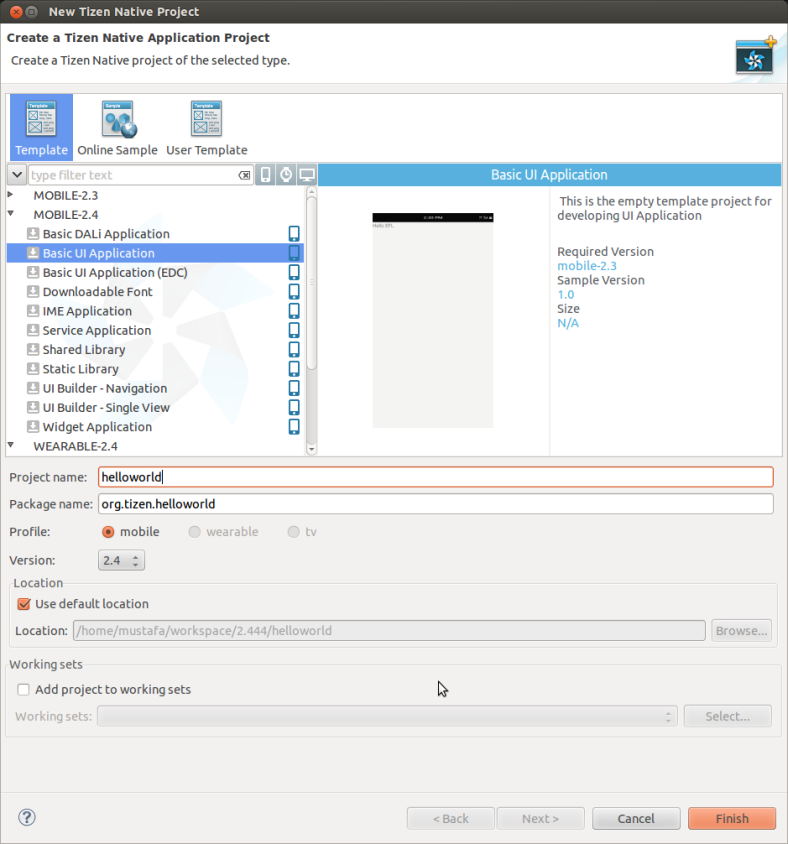
During the project creation, use the basic Tizen project template: in the New Tizen Native Project window, select Template > MOBILE|WEARABLE-<version> > Basic UI Application.
- Define helloworld as the name of your project and click Finish.
Figure: Creating the helloworld project
The new helloworld project is shown in the Project Explorer view of the IDE, with default content in the tizen-manifest.xml configuration file as well as in several other project files, including:
- inc folder: Application header file directory
- src folder: C files directory
- Configuring the Application and Creating the Application Code
To configure the application:
- Set the project properties by modifying the tizen-manifest.xml file.
- Implement the application code in the helloworld.c file.
When coding the application, note that the Tizen Native API follows the basic principles listed below:
- Ownership of returned strings
All strings returned as pointers must be freed by the caller unless stated otherwise.
To not free memory can lead to memory leaks. Insufficient system memory triggers a system low memory notification and some applications can be killed. As a heuristic algorithm selects the process to be killed, it can destabilize the system.
char *app_id_string = NULL; if (!app_get_id(&app_id_string)) { // Use app_id_string if (app_id_string != NULL) free(app_id_string); } - Handles
A handle provides means to manage an instance associated with it. Handles are widely used in Tizen Native API for API compatibility reasons. Creation and destruction functions (create/destroy) are provided for each handle type. They do not create and destroy the handle itself, but they operate on the instance associated with a given handle. It means that a handle is not valid until a corresponding create function has been called and the handle is not valid after a corresponding destroy function has been called. Also accessor functions (getters/setters) are provided to access members of the hidden structure identified by a given handle.
// Text message is represented by a handle
messages_message_h sms_msg;

// Create message and associate it with this handle
messages_create_message(MESSAGES_TYPE_SMS, &sms_msg);

// Destroy message
messages_destroy_message(sms_msg);

// Change the properties of the text message
messages_set_text(sms_msg, "Hello, how are you?");
messages_add_address(sms_msg, "01020157919", MESSAGE_RECIPIENT_TO);
- Asynchronous function calls
Some of Tizen native API functions are asynchronous.
An asynchronous function starts the processing and returns before this processing is finished. However, sometimes one should know, when this processing is finished. In such cases, waiting for the processing completion notification must be properly implemented.
- Code assist
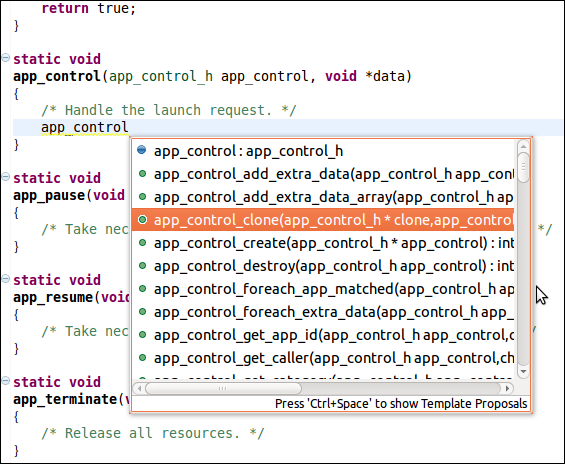
Tizen IDE provides the API assist and API hover features to make writing content in the native editor quick and efficient.
Press CTRL+SPACE while editing your codes to see available APIs as follows:
Figure: Code assist
- Creating the Application UI with EFL
The EFL is the native graphical toolkit for Tizen.
To create the application UI:
- Add an interface
In this tutorial, there are the following exercises:
- a window to hold everything
- a conformant, which shows the virtual keyboard (required by Tizen guidelines)
- a naviframe used for applications, which show multiple screens through their lives with back and forth transitions between them (required by Tizen guidelines)
- a horizontal box with
- a label with several lines of text
- a button
- Add an application skeleton with appcore
A pointer to important objects is stored in the following data structure.
typedef struct appdata
{
   // All graphical objects here are pointers to the value of the type Evas_Object
   Evas_Object *win;
   Evas_Object *conformant;
   Evas_Object *naviframe;
} appdata_s;
The pointer is created and initialized to contain only zeros in the main() function. The same applies for the structure of the app_event_callback_s type, which holds the app-core related callbacks.
static bool
app_create(void *data)
{
   appdata_s *ad = data;
   create_gui(ad);

   return true;
}

int
main(int argc, char *argv[])
{
   appdata_s *ad = {0,};
   int ret = 0;
   ui_app_lifecycle_callback_s event_callback = {0,};
   app_event_handler_h handlers[5] = {NULL,};

   event_callback.create = app_create;
   event_callback.terminate = app_terminate;
   event_callback.pause = app_pause;
   event_callback.resume = app_resume;
   event_callback.app_control = app_control;

   ui_app_add_event_handler(&handlers[APP_EVENT_LOW_BATTERY], APP_EVENT_LOW_BATTERY, ui_app_low_battery, &ad);
   ui_app_add_event_handler(&handlers[APP_EVENT_LOW_MEMORY], APP_EVENT_LOW_MEMORY, ui_app_low_memory, &ad);
   ui_app_add_event_handler(&handlers[APP_EVENT_DEVICE_ORIENTATION_CHANGED], APP_EVENT_DEVICE_ORIENTATION_CHANGED, ui_app_orient_changed, &ad);
   ui_app_add_event_handler(&handlers[APP_EVENT_LANGUAGE_CHANGED], APP_EVENT_LANGUAGE_CHANGED, ui_app_lang_changed, &ad);
   ui_app_add_event_handler(&handlers[APP_EVENT_REGION_FORMAT_CHANGED], APP_EVENT_REGION_FORMAT_CHANGED, ui_app_region_changed, &ad);
   ui_app_remove_event_handler(handlers[APP_EVENT_LOW_MEMORY]);

   ret = ui_app_main(argc, argv, &event_callback, &ad);

   return ret;
}
Note For more information on Appcore, see Handling the Application Fundamentals. - Create the GUI objects
The GUI is created with the create_gui() function. It receives a pointer to fill in the "ad" structure.
Create the function and mark it static, since it is reachable only from the current compilation unit (which allows the compiler to produce faster and smaller code).
Inside the function, create a window and set its name and title to "Hello World". Add a callback on the "delete,request" event (when the window is to be closed).
static void
create_gui(appdata_s *ad)
{
   // Create the window
   ad->win = elm_win_util_standard_add(PACKAGE, PACKAGE);
   elm_win_conformant_set(ad->win, EINA_TRUE);

   // Advertise which rotations are supported by the application; the
   // device_orientation callback is used to do the actual rotation when
   // the system detects the device's orientation has changed
   if (elm_win_wm_rotation_supported_get(ad->win))
   {
      int rots[4] = {0, 90, 180, 270};
      elm_win_wm_rotation_available_rotations_set(ad->win, (const int *)(&rots), 4);
   }

   // Add a callback on the "delete,request" event; it is emitted when
   // the system closes the window
   evas_object_smart_callback_add(ad->win, "delete,request", win_delete_request_cb, NULL);

   // Alternatively, elm_win_autodel_set() can be used to close
   // the window (not the application) automatically
   // with the Back button, for example
   // elm_win_autodel_set(ad->win, EINA_TRUE);
The conformant goes inside the window first. Everything created from now on is inside it.
   // Create the conformant
   ad->conformant = elm_conformant_add(ad->win);

   // Set the conformant use as much horizontal and vertical space as
   // possible, that is, expand in both directions
   evas_object_size_hint_weight_set(ad->conformant, EVAS_HINT_EXPAND, EVAS_HINT_EXPAND);

   // Set the conformant as the resize object for the window:
   // the window and the conformant grow together
   // in proportion to each other
   elm_win_resize_object_add(ad->win, ad->conformant);

   // Show the conformant since all UI components are hidden by default
   evas_object_show(ad->conformant);
The naviframe is useful for applications showing multiple screens: it enables displaying a screen, switching to another, moving back to the first (and doing the same with several screens).
Only one screen is built: the naviframe is created and put inside the conformant.
   // Create the naviframe
   ad->naviframe = elm_naviframe_add(ad->conformant);
   elm_object_content_set(ad->conformant, ad->naviframe);

   // Show the box
   evas_object_show(ad->conformant);
The box is probably the most common container; it arranges a set of UI components in a vertical or horizontal way.
   // Create the box
   Evas_Object *box = elm_box_add(ad->naviframe);

   // Set the box vertical
   elm_box_horizontal_set(box, EINA_FALSE);

   // The box expands when its contents need more space
   evas_object_size_hint_weight_set(box, EVAS_HINT_EXPAND, EVAS_HINT_EXPAND);

   // The box fills the available space
   evas_object_size_hint_align_set(box, EVAS_HINT_FILL, EVAS_HINT_FILL);

   // Add the box in the naviframe container
   elm_naviframe_item_push(ad->naviframe, "Hello World", NULL, NULL, box, NULL);

   // Show the box
   evas_object_show(box);
Labels hold text with formatting and over multiple lines.
   // Create the label
   Evas_Object *label = elm_label_add(box);
   // The label expands when its contents need more space
   evas_object_size_hint_weight_set(label, EVAS_HINT_EXPAND, EVAS_HINT_EXPAND);
   // The box fills the available space on the horizontal axis and is
   // centered on the vertical axis (placed at 0.5 vertically, that is, in the
   // middle)
   evas_object_size_hint_align_set(label, EVAS_HINT_FILL, 0.5);

   // Set the text for the label and set formatting through the HTML tags:
   // - "Hello World!" centered on the first line
   // - skip a line
   // - Add a longer text that does not fit on a single line but wraps at
   //   the word boundaries
   elm_object_text_set(label,
         "<align=center>Hello World!</align><br>"
         "<br>"
         "<wrap = word>Clicking on the button below closes the application.</wrap>");

   // Add the label at the end of the box
   elm_box_pack_end(box, label);

   // Show the label
   evas_object_show(label);
The last UI component is the button. It exits the application when clicked.
   // Create the button
   Evas_Object *button = elm_button_add(box);

   // The box expands when its contents need more space
   evas_object_size_hint_weight_set(button, EVAS_HINT_EXPAND, EVAS_HINT_EXPAND);

   // The button fills the available space on the horizontal axis and is
   // placed at the bottom of the vertical axis (1 is the end of the axis,
   // the coordinates start at (0, 0) on the top-left corner
   evas_object_size_hint_align_set(button, EVAS_HINT_FILL, 1);

   // Set the text for the button
   elm_object_text_set(button, "Close!");

   // Add a callback on the button for the "clicked" event; implementation of
   // the callback is below
   evas_object_smart_callback_add(button, "clicked", clicked_cb, NULL);

   // Add the UI component at the end of the box; since the axis starts in the top left
   // corner and the box is vertical, the end of the box is below the label
   elm_box_pack_end(box, button);

   // Show the button
   evas_object_show(button);
This is how to set the window displaying everything on screen at once.
   // Show window after the GUI is set up
   evas_object_show(ad->win);
}
- Exit the GUI
The clicked_cb() function exits the Elementary; the prototype of the function is common to all callbacks given to evas_object_smart_callback_add(). Put the clicked_cb() function above the create_gui() function.
For more details on the callbacks, see the Evas Smart Object Events guide.
static void
clicked_cb(void *user_data, Evas_Object *obj, void *event_info)
{
   elm_exit();
}
- Add an interface
- Building and Packaging the Application
After you have finished implementing your application, you must build it.
After building, the Tizen IDE automatically packages the project.
- Running and Debugging the Application
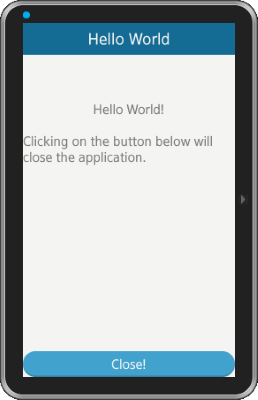
You can run the HelloWorld application on the Emulator.
The following figure shows the application running in the Emulator.
Figure: Running the project