

HTML5 Canvas: Creating Shapes and Text
This tutorial demonstrates how you can create images, shapes, text, and lines on a canvas.
Warm-up
Become familiar with the HTML5 Canvas Element and HTML Canvas 2D Context API basics by learning about:
-
Using a Canvas
Create and manage a canvas.
-
Using Images on the Canvas
Connect an image to the canvas and transform it.
-
Drawing Shapes to the Canvas
Draw shapes to the canvas and transform them.
-
Drawing Masks to the Canvas
Replace a background image by drawing a mask on it with a brush.
-
Creating Text and Lines on the Canvas
Draw text and line on the canvas and assigning styles for them.
Task in Wearable Applications
In the Basic Watch task, we will walk through using canvas contexts to create and display a clock on the canvas.
Using a Canvas
To draw images with JavaScript, you must learn to use a canvas in your application:
- Create a <canvas> element with the HTML5 Canvas Element API.
The canvas assigns the region (canvas context) where images are drawn with JavaScript.
<canvas width="300" height="300" id="canvas">
   This browser is not supported
</canvas>
If no width and height attributes are inserted, the default value is width: 300px, height: 150px.
- To check the information of the image connected to the canvas, use the toDataURL([Optional], [Variadic]) method to restore the URL of the image used in the canvas. To create a blob object of the image file, use the getContext(contextId) method.
- Use the CanvasRenderingContext2D interface to connect to the canvas and get the canvas context:
var canvas = document.querySelector("canvas"),
var context = canvas.getContext('2d');
The interface has various methods and attributes for expressing images and shapes.
- To manage the work stack of the canvas, use the following methods:
- save(): Pushes the current state onto the stack.
- restore(): Pops the top state on the stack, restoring the context to that state.
There is a need to separately check whether the canvas 2D context can be used by using the getContext() method:
if (!(canvas.getContext))
{
   alert("This browser is not supported");
}
Source Code
For the complete source code related to this use case, see the following files:
Using Images on the Canvas
To use a canvas in your application, you must learn to use images on it:
-
Use the drawImage() method to express an image in the canvas.
When you define the URL of the image to be imported and its coordinates, the original image is imported as it is. You can hide certain parts of the image by assigning its size accordingly.
/* Draw the image by setting its size */
context.drawImage(image, 30, 130, 130, 30);
context.drawImage(image, 200, 100, 80, 60);

/* Draw the image by setting the image area */
context.drawImage(image, 193, 0, 30, 30, 80, 220, 50, 50);
context.drawImage(image, 0, 10, 40, 60, 190, 205, 40, 60);
-
When the image is connected to the canvas, extract the color value through the getImageData() method. Re-input the transformed values with the putImageData() method.
/* Import the image with the required coordinates */ var transImage = context.getImageData(30, 20, image.width, image.height); /* Convert the data color value for each image pixel */ for (var i = 0; i < transImage.data.length; i += 4) { transImage.data[i + 0] = 255 - transImage.data[i + 0]; transImage.data[i + 1] = 255 - transImage.data[i + 1]; transImage.data[i + 2] = 255 - transImage.data[i + 2]; } /* Insert the converted image back to the canvas */ context.putImageData(transImage, 30, 20); -
Use the CanvasTransformation interface to transform the selected object, for example, its size, angle, or position. By connecting to the image used in the canvas, you can also rotate it. (The following figure applies to mobile applications only.)
context.beginPath();
context.scale(1.7, 1.3);
context.drawImage(image, 30, 20);
context.restore();

/* Move the (0, 0) reference axis coordinates of the canvas */
context.beginPath();
context.translate(50, 100);
context.drawImage(image, 30, 20);
context.restore();

/* Rotate using the (0, 0) coordinates as reference */
context.beginPath();
context.rotate(45 * Math.PI/180);
context.drawImage(image, 70, 20);
context.restore();

Source Code
For the complete source code related to this use case, see the following files:
Drawing Shapes to the Canvas
To use a canvas in your application, you must learn to create draw shapes on it:
- Use the rect() method to create a rectangle.
Use the canvas context to assign the rectangle attributes, such as position and size. (The following figure applies to mobile applications only.)
/* Rectangle fill style */
context.fillStyle = '#333';
context.fillRect(10, 10, 300, 300);

/* Rectangle stroke style */
context.strokeStyle = '#ff0';
context.strokeRect(100, 100, 100, 100);

/* Rectangle clear style */
context.clearRect(50, 50, 100, 100);
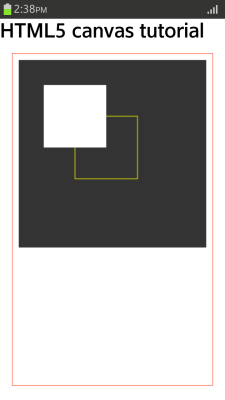
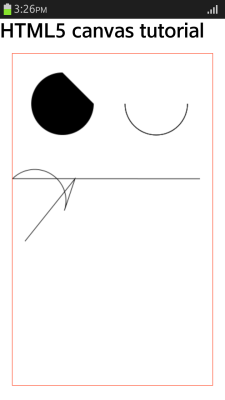
- Use the arc() method to create a circle.
Use the canvas context to assign the circle attributes, such as position and radius. (The following figure applies to mobile applications only.)
/* Create a circle */
context.beginPath();
context.arc(80, 80, 50, 0, 1.5 * Math.PI);
context.fill();

context.beginPath();
context.arc(230, 80, 50, 0, 1 * Math.PI);
context.stroke();

/* Create line A */
context.moveTo(20, 300);
context.lineTo(100, 200);

/* Connect the line A end coordinates to the line B start coordinates */
context.arcTo(150, 50, 100, 100, 50);

/* Draw line B */
context.lineTo(300, 200);
context.stroke();
-
Use the CanvasTransformation interface to transform the created shapes. With compositing, a certain part of the shape can be made transparent. (The following figure applies to mobile applications only.)
/* Display the relevant area */
context.rect(50, 20, 100, 120);
context.stroke();
context.clip();

context.beginPath();
context.arc(150, 150, 100, 0, 2 * Math.PI);

/* Fill the shape */
context.fillStyle = 'tomato';

| Note |
|---|
| For a canvas, the rendering occurs in the order from the back of the input source. |
Source Code
For the complete source code related to this use case, see the following file:
Drawing Masks to the Canvas
To use a canvas in your application, you must learn to draw masks on it:
- Create the HTML layout with a canvas and 2 button input elements for brush selection:
<canvas id="canvas" width="600" height="300"></canvas>
<input type="button" value="Small brush" id="smallBrush">
<input type="button" value="Big brush" id="bigBrush">
- Define the CSS style for the background image:
<style> body { background: url(images/tizen_blackfold3.png) no-repeat; background-size: cover; } </style> - Declare the JavaScript variables needed in the application. The lastX and lastX variables indicate the last position of a user event. The mouseBtn variable indicates whether a button or touch event has occurred, and the brushSize variable indicates the current brush size.
var lastX = 0,
    lastX = 0,
    mouseBtn = false,
    brushSize = 4;
var canvas, context;
- Initialize the canvas:
window.onload = function() { canvas = document.getElementById('canvas'); context = canvas.getContext("2d"); if (!context) { return; } } - Draw an image on the canvas using the drawImage() method. The user is able to replace the image with another using a brush.
Create a new Image object, including the path of the image file. Define the line width to be based on the brush size selected by the user.
var img = new Image(); img.addEventListener('load', function() { context.drawImage(img, 0, 0); }); img.src = "images/TizenPinwheelArrows.png"; context.lineWidth = brushSize; context.lineCap = 'round'; - Define the button events and brushes:
var smallBtn = document.getElementById("smallBrush"); smallBtn.addEventListener('click', smallBrush); var bigBtn = document.getElementById("bigBrush"); bigBtn.addEventListener('click', bigBrush); function smallBrush(e) { context.beginPath(); brushSize = 4; context.lineWidth = brushSize; } /* Define the big brush similarly */ - Add event listeners to detect touch and mouse events:
canvas.addEventListener('touchstart', startDraw);
canvas.addEventListener('touchmove', drawStep);
canvas.addEventListener('touchend', stopDraw);
canvas.addEventListener('mouseout', stopDraw);
/* Event listeners for mouse events */
The touchstart and mousedown events only store the event coordinates, the touchmove and mousemove events define the position and direction of the drawing, and the touchend and mouseup events indicate that the user event ends, as illustrated in the following figure.

- Use the updateLastPos() method to update the lastX and lastY variable values. The real coordinates can be calculated by reducing the offset position of the canvas element from the touch position coordinates. The 'touch' string indicates that the event is a touch event.
function updateLastPos(e) { if (e.type.indexOf('touch') >= 0) { var pos = e.touches.item(0); lastX = pos.clientX-pos.target.offsetLeft; lastY = pos.clientY-pos.target.offsetTop; } else { lastX = e.offsetX; lastY = e.offsetY; } } - When the user starts drawing, the touchstart or mousedown event calls the startDraw() method, which updates the event position, sets the composite operations property to make the drawing a mask, begins to draw a new path, moves the drawing point to the selected coordinates, and sets the button or touch event state to true.
function startDraw(e) { updateLastPos(e); context.globalCompositeOperation = 'destination-out'; context.beginPath(); context.moveTo(lastX, lastY); mouseBtn = true; } - While the user is drawing, the touchmove and mousemove events are handled with the drawStep() method based on the button state retrieved from the mouseBtn variable. The drawStep() method calls the updateLastPos() method only when the mouse or finger is being moved. Use the stroke() method to make the drawn line visible.
function drawStep(e) { if (mouseBtn) { updateLastPos(e); context.lineTo(lastX, lastY); context.stroke(); } } - When the touch event ends or the mouse button is released, use the stopDraw() method to stop drawing:
function stopDraw(e)
{
   context.globalCompositeOperation = 'source-over';
   mouseBtn = false;
}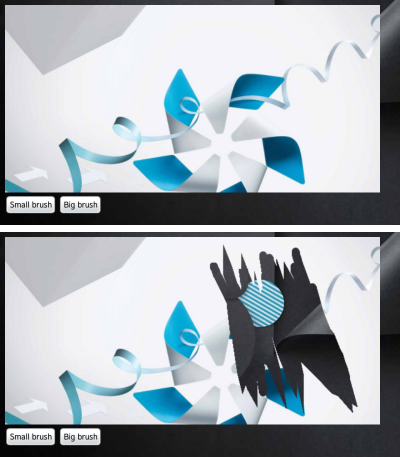
Source Code
For the complete source code related to this use case, see the following file:
Creating Text and Lines on the Canvas
To use a canvas in your application, you must learn to create text and lines:
-
To draw a line, use the moveTo() method to assign the beginning point of the line, and the lineTo() method to assign the end point of the line. The stroke() method draws the full line.
context.lineJoin = "bevel";
context.lineWidth = 20;

context.beginPath();
context.lineJoin = "round";
context.moveTo(20, 20);
context.lineTo(100, 40);
context.stroke();
-
When adding text on the canvas, use various attributes and methods to define how the text looks and where it is located.
The font attribute defines the font style, and the textBaseline attribute the vertical alignment of the text.
context.font = 'italic 400 22px/2 sans-serif';
context.strokeStyle = "#f00";
context.textBaseline = "alphabetic";
context.moveTo(150, 20);
context.lineTo(150, 170);
context.stroke();
-
Use the textAlign attribute and the fillText() method to position the text in the assigned location:
context.textAlign = "start";
context.fillText("textAlign=start", 150, 50);
context.textAlign = "end";
context.measureText("textAlign=end", 150, 100);
| Note |
|---|
| When drawing multiple images in a canvas, indicate the starting point with the beginPath() method to prevent unforeseen errors. |
Source Code
For the complete source code related to this use case, see the following files:
