
SelfCamera Overview
The SelfCamera sample application demonstrates how you can use the front camera in your application.
For information on creating the sample application project in the IDE, see Creating Sample Applications, and on the coding of the sample application, see Self Camera task.
The following figure illustrates the main screen of the SelfCamera application.
Figure: SelfCamera screen
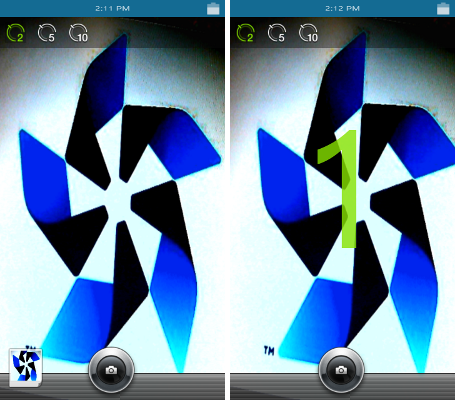
The application opens with a screen that shows the front camera. To set the timer for 2, 5, or 10 seconds, click a timer option on top of the screen. To take a photo, click on the shutter button.
Source Files
| File name | Description |
|---|---|
| config.xml | This file contains the application information for the platform to install and launch the application, including the view mode and the icon to be used in the device menu. |
| index.html | This is a starting file from which the application starts loading. It contains the layout of the application screens. |
|
js/app.systemIO.js js/main.js |
These files contain the code for handling the camera functionality of the application. |
Implementation
To use the camera:
-
Add the required privileges.
To use the camera, the application has to request permissions by adding the corresponding privileges to the config.xml file. In this case, the application.launch privilege is also added to allow other applications to launch.
<tizen:privilege name="http://tizen.org/privilege/application.launch" />
<tizen:privilege name="http://tizen.org/privilege/filesystem.read" />
<tizen:privilege name="http://tizen.org/privilege/filesystem.write" />
<tizen:privilege name="http://tizen.org/privilege/content.read" />
<tizen:privilege name="http://tizen.org/privilege/content.write" />
<tizen:privilege name="http://tizen.org/privilege/mediacapture" />
-
Create the layout for the camera preview.
<body>

   <div id="camera"></div>

   <div id="countdown"></div>

   <div class="timers">
      <div id="timer2"></div>
      <div id="timer5"></div>
      <div id="timer10"></div>
   </div>

   <div id="thumbnail">
      <div id="upImage"></div>
   </div>

   <div id="shutter-container">
      <div id="shutter"></div>
   </div>

   <div id="bar"></div>

   <div id="failure">Failed to take photo!</div>

</body>
-
Initialize the camera.
The startPreview() function obtains the media stream and passes it to the onCaptureVideoSuccess callback.
SelfCamera.prototype.startPreview = function startPreview() { /* Declare what media is used by this application */ var options = { audio: true, video: true }; navigator.getUserMedia = navigator.getUserMedia || navigator.webkitGetUserMedia; try { if (typeof (navigator.getUserMedia) === 'function') { /* Ask the user to grant permissions to use media objects */ navigator.getUserMedia(options,this.onCaptureVideoSuccess.bind(this), this.onCaptureVideoError.bind(this)); } } catch (e) { alert('navigator.getUserMedia() error.'); console.error('navigator.getUserMedia() error: ' + e.message); } }; -
Start the preview.
The createVideoElement() function creates a video element and sets the media stream URL as its source. The media stream URL is passed to the createVideoElement() function as a parameter.
SelfCamera.prototype.createVideoElement = function createVideoElement(src)
{
   this.video = $('<video/>',
   {
      autoplay: 'autoplay',
      id: 'video',
      style: 'height:' + $(window).height() + 'px',
      src: src
   })
   .appendTo('#camera').get(0);

   this.video.play();
};
The onCaptureVideoSuccess() function gets a media stream element and creates an URL of this stream. Next the video element is created with the URL as a source. Finally the video element is played.
This function is a callback used in the startPreview() function in the previous step.
SelfCamera.prototype.onCaptureVideoSuccess = function onCaptureVideoSuccess(stream) { var urlStream; /* Create the stream */ urlStream = window.webkitURL.createObjectURL(stream); this.createVideoElement(urlStream); }; -
Capture the photo.
The camera stream is drawn in the canvas element.
var img = document.createElement('canvas');The captureImage() function draws an image from the HTML video element on the canvas.
SelfCamera.prototype.captureImage = function captureImage(video) { var sourceWidth = window.innerWidth, sourceHeight = window.innerHeight, sourceX = (sourceWidth - $(video).width()) / 2, sourceY = (sourceHeight - $(video).height()) / 2; img.width = sourceWidth; img.height = sourceHeight; /* Crop image to viewport dimension */ img.getContext('2d').drawImage(video, sourceX, sourceY, $(video).width(), $(video).height()); }; -
Open the photo in an external application.
To open the created and saved photo in an external application, call the tizen.application.launchAppControl() function. It takes the tizen.ApplicationControl object and success and error callbacks as input parameters. The following function opens the image file in an external application.
SelfCamera.prototype.showPhotoPreview = function showPhotoPreview(file)
{
   var service, onReply, self = this;

   /* Configure service */
   service = new tizen.ApplicationControl('http://tizen.org/appcontrol/operation/view', file);
   onReply =
   {
      onsuccess: function noop() { return; },
      onfailure: function noop() { return; }
   };

   try
   {
      /* Try to launch service */
      tizen.application.launchAppControl(service, null, function launchPhotoSuccess()
      {
         (...)
      },
         function launchPhotoError()
      {
         (...)
      },
      onReply);
   }
   catch (exc)
   {
      alert('Exception: ' + exc.message);
   }
}
