Animation and Effect Types
Ecore Animator
Ecore provides a facility for animations called Ecore_Animator. Ecore animators use the Ecore main loop for creating animations, running a specific action on each tick of a timer in the main loop.
To create an Ecore animation:
- Determine the duration of the animation.
- Define a callback function that performs the animation with that duration.
To use Ecore animators in your application, you must include the <Ecore.h> file. This file is included by default if you are already using the <Elementary.h> file in your application. You then declare an Ecore_Animator* variable and use the variable in the ecore_animator_* functions.
The following example shows how to create a simple animation with a finite duration:
static Eina_Bool
_do_animation(void *data, double pos)
{
   evas_object_move(data, 100 * pos, 100 * pos);
   // Do some more animating...
}
ecore_animator_timeline_add(2, _do_animation, my_evas_object);
In the above example, we create a linear transition to move my_evas_object from position (0,0) to position (100,100) in 2 seconds.
Creating an Animation with a Finite Duration
Most of the time, you will want to create animations that last for a predefined time.
The ecore_animator_timeline_add() function allows you to define an animator that is automatically deleted after the animation is finished:
ecore_animator_timeline_add(double runtime, Ecore_Timeline_Cb func, const void *data)
- The first argument is the duration of the animation in seconds. The duration is not affected by frame rate.
- The second argument is the callback function that performs the animation.
- The third argument is the parameter passed to the callback function. This is usually the Evas object to animate.
| Note |
|---|
| The callback function can return ECORE_CALLBACK_RENEW to keep the animator running or ECORE_CALLBACK_CANCEL to stop the animator and have it be deleted automatically at any time. The callback function is also passed a timeline position parameter with a value between 0.0 (start) to 1.0 (end) to indicate where along the timeline the animator is running. |
The following example performs a linear horizontal translation of 500 pixels in 8 seconds:
static Eina_Bool
_my_animation(void *data, double pos)
{
   Evas_Object *obj = data; // Get the target object
   int x, y, w, h; // Target object geometry
   evas_object_geometry_get(obj, &x, &y, &w, &h); // Get current object position and size attributes
   evas_object_move(obj, 500 * pos, y); // Linear translation of the Evas object
}
ecore_animator_timeline_add(8, _my_animation, my_evas_object);
Position Mappings
The Ecore_Pos_Map position mappings are used to define the evolution of a given position in accordance with the desired effects. The value ranges from 0.0 to 1.0 on a given timeline. This position variation allows you to apply dynamic changes to any attribute of your Evas object, such as position, width, height, scale, angle, and color.
Ecore supports the following position mappings (with the listed v1 and v2 parameters):
-
ECORE_POS_MAP_LINEAR: linear 0.0 - 1.0
- v1: not used
- v2: not used
-
ECORE_POS_MAP_ACCELERATE: start slow, then speed up
- v1: not used
- v2: not used
-
ECORE_POS_MAP_DECELERATE: start fast, then slow down
- v1: not used
- v2: not used
-
ECORE_POS_MAP_SINUSOIDAL: start slow, speed up, then slow down at the end
- v1: not used
- v2: not used
-
ECORE_POS_MAP_ACCELERATE_FACTOR: start slow, then speed up
- v1: power factor: 0.0 is linear, 1.0 is standard acceleration, 2.0 is a much more pronounced acceleration (squared), 4.0 is cubed, and so on
- v2: not used
-
ECORE_POS_MAP_DECELERATE_FACTOR: start fast, then slow down
- v1: power factor: 0.0 is linear, 1.0 is standard deceleration, 2.0 is a much more pronounced deceleration (squared), 3.0 is cubed, and so on
- v2: not used
-
ECORE_POS_MAP_SINUSOIDAL_FACTOR: start slow, speed up, then slow down at the end
- v1: power factor: 0.0 is linear, 1.0 is a standard sinusoidal, 2.1 is a much more pronounced sinusoidal (squared), 3.0 is cubed, and so on
- v2: not used
-
ECORE_POS_MAP_DIVISOR_INTERP: start at gradient * v1, interpolated via power of v2 curve
- v1: multiplication factor for gradient
- v2: curve value
-
ECORE_POS_MAP_BOUNCE: start at 0.0, then "drop" like a ball bouncing to the ground at 1.0, and bounce v2 times, with a decay factor of v1
- v1: bounce decay factor
- v2: number of bounces
-
ECORE_POS_MAP_SPRING: start at 0.0, then "wobble" like a spring until rest position at 1.0, and wobble v2 times, with a decay factor of v1
- v1: wobble decay factor
- v2: number of wobbles
Figure: Position mappings

Using Position Mappings
When using the animation callback function, the animator passes a timeline position parameter with a value between 0.0 (start) and 1.0 (end) to indicate where along the timeline the animator is running.
If you want to create a non-linear animation, map the position value to one of several curves and mappings:
ecore_animator_pos_map(double pos, Ecore_Pos_Map map, double v1, double v2)
- The first argument is the current position value, which ranges from 0.0 to 1.0.
- The second argument is the position mapping you want to apply.
- The third argument is the first parameter (v1) to pass to the position mapping.
- The fourth argument is the second parameter (v2) to pass to the position mapping.
| Note |
|---|
| The v1 and v2 arguments are specific to the chosen position mapping. For example, if you are using ECORE_POS_MAP_BOUNCE, v1 represents the bouncing level and v2 the number of bounces. |
The following example performs a transition that bounces 7 times, diminishing by a factor of 1.8 over 5 seconds:
static Eina_Bool
_my_animation_callback(void *data, double pos)
{
   Evas_Object *obj = data; // Get the target object
   int x, y, w, h; // Target object geometry
   double frame = pos; // Actual position variation
   // Get frame relative position depending on desired effect
   frame = ecore_animator_pos_map(pos, ECORE_POS_MAP_BOUNCE, 1.8, 7);
   evas_object_geometry_get(obj, &x, &y, &w, &h); // Get current object position and size attributes
   evas_object_move(obj, x, 600 * frame); // Move the Evas object according to desired effect

   return EINA_TRUE;
}
ecore_animator_timeline_add(5, _my_animation_callback, my_evas_object);
Creating an Infinite Animation
If you want the animation to run for an unspecified amount of time, use the ecore_animator_add() function. This function works the same way as the ecore_animation_timeline_add() function, except its interval is based on frame rate. Using frame rate as the basis benefits performance, especially if you define multiple animations, since you may want to have a different timer for each callback function.
ecore_animator_add(Ecore_Task_Cb func, const void *data)
- The first argument is the callback function that performs the animation.
- The second argument is the parameter passed to the callback function. This is usually the Evas object to animate.
| Note |
|---|
| The function returns a pointer to an Ecore_Animator object, which you can use to adjust the animation. |
The following example creates a rectangle sliding from left to right and back again. When the rectangle hits one edge of the screen, it changes direction.
static Eina_Bool
_slide_back_and_forth(void *data)
{
   typedef enum {LEFT, RIGHT} direction_t; // Direction datatype
   static int x = 0; // Initial position
   static direction_t direction = RIGHT; // Initial direction
   if (x >= 250)
      direction = LEFT; // Change direction
   else if (x <= 0)
      direction = RIGHT; // Change direction
   if (direction == RIGHT)
      evas_object_move(data, ++x, 350); // Slide to right
   else if (direction == LEFT)
      evas_object_move(data, --x, 350); // Slide to left

   return EINA_TRUE;
}
int
main(int argc, char *argv[])
{
   // Declarations

   // Ecore Evas init

   // Draw Evas objects

   // Animations go here
   anim = ecore_animator_add(_slide_back_and_forth, rectangle);
   // Ecore main loop

   // Free memory
}
| Note |
|---|
| To use this code, you have to merge it with the Ecore transition example above. |
Chaining Animations
You may sometimes want to delay animating an object. This can be useful if, for example, you want to start an animation only after another one has finished.
You can simply set a delay to the second animation equal to the duration of the first animation:
static int runtime = 5;
static int delay = runtime;
static Eina_Bool
_start_fold_animation(void *data)
{
   ecore_animator_timeline_add(runtime, _fold_animation, data);

   return EINA_FALSE;
}
static Eina_Bool
_start_unfold_animation(void *data)
{
   ecore_animator_timeline_add(runtime, _unfold_animation, data);

   return EINA_FALSE;
}
_start_fold_animation(my_evas_object);
ecore_timer_add(delay, _start_unfold_animation, my_evas_object);
Pausing and Resuming Animations
You can pause and resume Ecore animations. To pause a running animation, use the ecore_animator_freeze() function:
ecore_animator_freeze(Ecore_Animator *animator)
The parameter is the Ecore_Animator to pause.
To resume the paused animation, use the ecore_animator_thaw() function:
ecore_animation_thaw(Ecore_Animator *animator)
The parameter is the Ecore_Animator to resume.
The following example pauses a transition after 5 seconds and resumes it after 5 more seconds:
static Eina_Bool
_freeze_animation(void *data)
{
   ecore_animator_freeze(data);

   return EINA_FALSE;
}
static Eina_Bool
_thaw_animation(void *data)
{
   ecore_animator_thaw(data);

   return EINA_FALSE;
}
ecore_timer_add(5, _freeze_animation, animator);
ecore_timer_add(10, _thaw_animation, animator);
Freeing Up Memory
When you create an animation that does not have a timeout, you will have to manually free up the memory allocated to the Ecore_Animator object. By comparison, if the animation has a timeout, Ecore implements the mechanisms to automatically delete the animator from the list of pointers: When your animation callback returns 0 or ECORE_CALLBACK_CANCEL, the animator manager takes care of freeing up the allocated memory.
To manually free up the memory, delete the pointer by using the ecore_animator_del() function:
ecore_animator_del(Ecore_Animator *animator)
The argument is the Ecore_Animator whose memory allocation to free up.
Regardless of the type of animation, it is good practice to always ensure that the allocated memory is freed up before the program exits:
if (animator != NULL)
   ecore_animator_del(animator);
Frametime
In most cases, you will want to use the default timer ECORE_ANIMATOR_SOURCE_TIMER. This timer ticks every "frametime" seconds and allows you to perform transitions within a predefined timeline. The timer uses the system clock to tick over every Nth second, with the default being 1/30th of a second.
To tweak performance, you can change the frametime value:
ecore_animator_frametime_set(double frametime)
The argument is the new frametime value.
| Note |
|---|
| Too small a value can cause performance issues, whereas too high a value can cause your animation to seem jerky. |
If you want to get the current frametime value, use the ecore_animator_frametime_get() function.
Custom Timer
You may want to specify a custom timer to match your animation to third-party events. For example, the filling speed of a progress bar will mainly depend on the time it takes for a task to complete and the velocity at which the remaining time estimation evolves. This kind of animation requires you to use a custom timer.
To use a custom timer, first set ECORE_ANIMATOR_SOURCE_CUSTOM as the timer source, and then drive the timer based on an input tick source (such as another application via IPC or a vertical blanking interrupt):
ecore_animator_custom_source_tick_begin_callback_set(Ecore_Cb func, const void *data)
The first argument is the callback function to call on the tick start. The second argument is the data to pass to the callback function.
ecore_animator_custom_source_tick_end_callback_set(Ecore_Cb func, const void *data)
The first argument is the callback function to call on the tick end. The second argument is the data to pass to the callback function to set the functions that will be called to start and stop the ticking source.
Next, trigger a tick over one frame:
ecore_animator_custom_tick(void)
The following example supposes a progress bar that will be refreshed every time some progress occurs:
ecore_animator_source_set(ECORE_ANIMATOR_SOURCE_CUSTOM);
void _on_progress_update()
{
   // Called when some progress occurs
   ecore_animator_custom_tick(); // Tick (next frame in progress bar animation)
}
Finally, to get the current animator source, use the ecore_animator_source_get() function.
Edje Animation
The Edje animations are based on a very simple principle: going from one state to another. If you want to animate something with Edje, you must define two states and move from the first state to the second.
Animating a Rectangle
This example shows how to animate a rectangle. It is positioned in the top left corner of the window and is moved to the bottom right corner in five seconds. To do that with Edje, define a part called "rectangle" with the type RECT: this part has two descriptions (or states). In the first state, the rectangle is in is the top left corner. In the second state, it is in is the bottom right corner. To create the transition, set this EDC code for Edje to switch the object from its current state to another.
collections
{
   group
   {
      name: "main";
      parts
      {
         part
         {
            name: "rectangle";
            type: RECT;
            description
            {
               state: "default" 0.0;
               align: 0.0 0.0;
               rel1 {relative: 0.0 0.0;}
               rel2 {relative: 0.3 0.1;}
               color: 0 0 255 255;
            }
            description
            {
               state: "default" 0.5;
               align: 0.0 0.0;
               rel1 {relative: 0.7 0.9;}
               rel2 {relative: 1.0 1.0;}
               color: 0 0 255 255;
            }
         }
      }
      programs
      {
         program
         {
            name: "animation,state1";
            source: "";
            signal: "load";
            action: STATE_SET "default" 0.5;
            target: "rectangle";
            transition: LINEAR 5;
         }
      }
   }
}
The "rectangle" part has two descriptions that share the same name, but have a different "version".
part
{
   name: "rectangle";
   type: RECT;
   description
   {
      state: "default" 0.0;
   }
   description
   {
      state: "default" 0.5;
   }
}
The program defines when and how to move from one state to another. A program is called upon reception of a signal from a source. Here the program is called when the signal load is received from any source.
program
{
   name: "animation,state1";
   source: "";
   signal: "load";
}
An action is performed upon the signal reception. In this example, the state is changed.
action: STATE_SET "default" 0.5;
The program has a target, here the "rectangle".
target: "rectangle";
The program uses a transition to perform the action.
transition: LINEAR 5;
This example produces a blue rectangle that moves from the upper left to the lower right corner with a linear transition in five seconds.
Actions
The Edje programs are not only for animations. There are different actions, for example STATE_SET and ACTION_STOP. You may also send signals with SIGNAL_EMIT.
The STATE_SET action changes the state of the "target".
In the following example, the state of the part named "image" changes to "default" "0.0".
program
{
   name: "animate";
   signal: "animate";
   action: STATE_SET "default" 0.0;
   transition: LINEAR 3.0;
   target: "image";
}
The ACTION_STOP stops the program specified by "target".
program
{
   name: "animate_stop";
   signal: "animate_stop";
   action: ACTION_STOP;
   target: "animate_loop";
}
The previous example stops the program defined as "target" named animate_loop. This program runs on the animate_stop signal.
The SIGNAL_EMIT emits a signal that is used to communicate with the application directly from the theme.
The following example emits a signal frame_move "start" when it receives the signal mouse,down,* from the video_over part. In other words, it sends the signal frame_move "start" when the mouse is pressed in the video_over part.
program
{
   name: "video_move_start";
   signal: "mouse,down,*";
   source: "video_mover";
   action: SIGNAL_EMIT "frame_move" "start";
}
Transitions
The transitions available are:
- LIN or LINEAR: makes a linear transition and takes the duration in seconds as the parameter
- SIN or SINUSOIDAL: makes a sinusoidal transition and takes the duration in seconds as the parameter
- ACCEL or ACCELERATE: makes an accelerated transition and takes the duration in seconds as the parameter
- DECEL or DECELERATE: makes a decelerated transition and takes the duration in seconds as the parameter
- ACCEL_FAC or ACCELERATE_FACTOR: makes an accelerated transition and takes the duration and the factor as the parameters
- DECEL_FAC or DECELERATE_FACTOR: makes a decelerated transition and takes the duration and the factor as the parameters
- SIN_FAC or SINUSOIDAL_FACTOR: makes a sinusoidal transition and takes the duration and the factor as the parameters
-
DIVIS or DIVISOR_INTERP: takes 3 parameters:
- the duration
- the initial gradient start (0.0 is horizontal, 1.0 is diagonal (linear), 2.0 is twice the gradient of linear, and so on)
- an integer factor that defines how much the value swings outside the gradient to come back to the final resting spot at the end. 0.0 for the third parameter is equivalent to linear interpolation. Note that DIVIS may exceed 1.0.
-
BOUNCE: makes a bounce transition and takes 3 parameters:
- the duration
- how much the bounce decays, with 0.0 giving linear decay per bounce, and higher values giving more decay
- the number of bounces (rounded down to the nearest integer value)
-
SPRING: makes a spring transition and takes 3 parameters:
- the duration
- the decay, with the level exceeding 1.0 on the outer swings
- the number of spring swings
There are graphical representations of these effects in the Ecore_Evas section above.
Chaining Edje Programs
To define a couple of Edje programs and chain them, we can, for example, create a program to make the rectangle return to its initial state with another transition (such as BOUNCE).
Use the statement after in the first program. after takes the name of the transition to run when the program is done.
after: "animation,state0";
This is how to add the bounce animation. To return the blue rectangle to its initial position with a BOUNCE transition: it bounces with a factor of 1.8, six times. This program is only to be used at the end of the first one, so it does not have any signal statement.
program
{
   name: "animation,state0";
   source: "";
   signal: "";
   action: STATE_SET "default" 0.0;
   target: "rectangle";
   transition: BOUNCE 5 1.8 6;
}
Playing on Signals
The programs start when they receive a signal from a source. Edje handles many kind of signals, including mouse events.
| Note |
|---|
| To show the signals, use edje_player -p myfile.edj. |
For example, in another transition the rectangle is left clicked. The corresponding signal name is mouse,clicked,1.
For this transition, define a new state. This state changes the color and the position of the rectangle.
// To be placed in the "part" definition
description
{
   state: "color" 0.0;
   rel1 {relative: 0.3 0.3;}
   rel2 {relative: 0.7 0.4;}
   color: 255 0 0 255;
}
The program is as follows:
program
{
   name: "animation,color";
   source: "rectangle";
   signal: "mouse,clicked,1";
   action: STATE_SET "color" 0.0;
   target: "rectangle";
   transition: SIN 2;
}
This starts when the rectangle is left clicked.
If you want to send a signal from your application when you use signals to start transitions, create a program waiting for your own special signal. For example:
program
{
   name: "animation,menu_side,hide";
   source: "MenuButton";
   signal: "hide,sidemenu";
   action: STATE_SET "default" 1.0;
   target: "menu/side";
   transition: LINEAR 0.2;
}
This program changes the state of the target named animation,menu_side,hide to "default" 1.0. It waits for the hide,sidemenu signal emitted by a source called MenuButton.
edje_object_signal_emit(layout, "hide,sidemenu", "MenuButton");
This statement sends a signal named hide,sidemenu with a source named MenuButton to the object called layout.
The edje_object_signal_emit function emits a signal on an Evas_Object part of the application.
edje_object_signal_emit(Evas_Object *obj,
                        const char *emission,
                        const char *source)
- The first parameter is the Evas_Object, which emits the signal (layout in the example).
- The second parameter is the emission string (the name of the signal hide,sidemenu in the example).
- The third parameter is the source of the signal (the name of the source, MenuButton in the example).
If you use the Elementary in the application, you can use elm_object_signal_emit. It functions exactly the same way as edje_object_signal_emit and takes the same parameters.
| Note |
|---|
| To find a complete example, use elm_object_signal_emit in the Menu Tutorial. |
Rotate with Edje
The Edje library allows you to rotate objects, using the map statement. For example, if you want to rotate the blue rectangle on a right click, you must define a new rotate state. To enable the map on you object you must add a map part to your default state.
map
{
   on: 1;
   smooth: 1;
   perspective_on: 1;
   rotation.x: 0;
   rotation.y: 0;
   rotation.z: 0;
}
- on: 1; enables the map on the object
- perspective_on: 1, enables the perspective when rotating, even without a perspective point object
- smooth: 1; enables a smooth map rendering
- The rotation statements define the default rotation of the object on x, y, and z axes.
To add a new rotate state with a rotation around any axis, do the following.
description
{
   state: "rotate" 0.0;
   inherit: "default" 0.0;
   map.rotation.z: 120;
}
This rotate state inherits all the default state properties, but changes the value of map.rotation.z from 0° to 120°.
To set a program to run the rotate state, do the following.
program
{
   name: "animation,rotate";
   source: "rectangle";
   signal: "mouse,clicked,3";
   action: STATE_SET "rotate" 0.0;
   target: "rectangle";
   transition: LIN 5;
}
This program runs on a right click on the rectangle object.
The complete code of this example is as follows.
collections
{
   group
   {
      name: "main";
      parts
      {
         part
         {
            name: "rectangle";
            type: RECT;
            description
            {
               state: "default" 0.0;
               align: 0.0 0.0;
               rel1 {relative: 0.0 0.0;}
               rel2 {relative: 0.3 0.1;}
               map
               {
                  on: 1;
                  smooth: 1;
                  perspective_on: 1;
                  rotation
                  {
                     z: 0;
                     x: 0;
                     y: 0;
                  }
               }
               color: 0 0 255 255;
            }
            description
            {
               state: "default" 0.5;
               align: 0.0 0.0;
               rel1 {relative: 0.7 0.9;}
               rel2 {relative: 1.0 1.0;}
               color: 0 0 255 255;
            }
            description
            {
               state: "color" 0.0;
               rel1 {relative: 0.3 0.3;}
               rel2 {relative: 0.7 0.4;}
               color: 255 0 0 255;
            }
            description
            {
               state: "rotate" 0.0;
               inherit: "default" 0.0;
               map.rotation.z: 120;
            }
         }
      }
      programs
      {
         program
         {
            name: "animation,state1";
            source: "";
            signal: "load";
            action: STATE_SET "default" 0.5;
            target: "rectangle";
            transition: LINEAR 1;
            after: "animation,state0";
         }
         program
         {
            name: "animation,state0";
            source: "";
            signal: "";
            action: STATE_SET "default" 0.0;
            target: "rectangle";
            transition: BOUNCE 2 1.8 26;
         }
         program
         {
            name: "animation,color";
            source: "rectangle";
            signal: "mouse,clicked,1";
            action: STATE_SET "color" 0.0;
            target: "rectangle";
            transition: SIN 2;
         }
         program
         {
            name: "animation,rotate";
            source: "rectangle";
            signal: "mouse,clicked,3";
            action: STATE_SET "rotate" 0.0;
            target: "rectangle";
            transition: LIN 5;
         }
      }
   }
}
Elementary Animations
Elementary transitions (Elm_Transit) allow you to apply various transition effects, such as translation and rotation, to Evas objects. Elementary transitions are mostly based on Ecore animators, but provide some transition methods at a higher level of abstraction. Elementary transitions provide a simpler way of animating objects than Ecore animators or Edje animations.
To use Elementary transitions, you must create an Elm_Transit object and define the desired transitions using the methods of this object. After the transitions are registered, they will be automatically managed: their callback functions will be called for the set duration, and they will be deleted upon completion.
Use Elementary transitions only when Edje animations are not sufficient. Edje animations are better at handling transitions, have more flexibility, and can be manipulated inside themes. The only drawback is that Edje animations have their own definition language. If you want to code with the C language, use Elementary transitions.
Getting Started
The first thing you need to do when creating an transition with Elm_Transit is to build your transit object using the elm_transit_add() function:
Elm_Transit *transit = elm_transit_add();
You now have an Elm_Transit instance that will allow you to perform transitions on one or more objects. The transit object holds the information about the target objects and the transition effects that will be used. The transit object also contains information about animation duration, number of repetitions, auto-reverse, and so on. The transit object starts playing as soon as the application enters the main loop.
Adding Objects to an Animation
You can add your Evas objects to your transition using the elm_transit_object_add() function:
elm_transit_object_add(Elm_Transit *transit, Evas_Object *obj)
The first argument is the Elm_Transit instance that handles the transition. The second argument is the Evas object to animate.
| Note |
|---|
|
The Evas object can be a low-level component, such as a rectangle, but also a UI component, such as a button, image, or calendar. If you want to animate an Evas object handled by a container, such as a box, you need to either unpack the object before the animation or animate the whole container. |
If you want to know which objects are currently in your transition, use the elm_transit_objects_get() function. You will get a list of all the objects that are subject to the transition.
At any time, you can remove objects from the transition:
elm_transit_object_remove(Elm_Transit *transit, Evas_Object *obj)
The first argument is the Elm_Transit instance that handles the transition. The second argument is the Evas object to remove from the transition.
| Note |
|---|
| After you have added at least one Evas object to your transition, if the list of objects gets emptied somehow, be it because the transition has been terminated or all objects have been deleted, the transition will be automatically deleted. Otherwise, you will have to delete the transition by yourself using the elm_transit_del() function. If you delete the transit while the transition is running, the transition will stop. |
Adding Images to an Animation
If you do not want to manage UI components for animating images, Elm_Transit provides a helper function for directly manipulating images:
elm_transit_effect_image_animation_add(Elm_Transit *transit, Eina_List *images)
The first argument is the Elm_Transit instance that handles the transition. The second argument is a list of the image paths.
| Note |
|---|
| This list and its contents will be deleted after the effect ends by the elm_transit_effect_image_animation_context_free() function. |
You can now define your image transitions exactly the same way as with any Evas object.
The following example shows how to use Elm_Transit with images:
char buf[PATH_MAX];
Eina_List *images = NULL;
Elm_Transit *transit = elm_transit_add();
snprintf(buf, sizeof(buf), "%s/images/btn_default.png", PACKAGE_DATA_DIR);
images = eina_list_append(images, eina_stringshare_add(buf));
snprintf(buf, sizeof(buf), "%s/images/btn_hover.png", PACKAGE_DATA_DIR);
images = eina_list_append(images, eina_stringshare_add(buf));
elm_transit_effect_image_animation_add(transit, images);
Animation Duration
With Elm_Transit, setting the transition duration is mandatory. To set the duration, use the elm_transit_duration_set() function:
elm_transit_duration_set(Elm_Transit *transit, double duration)
The first argument is the Elm_Transit instance that handles the transition. The second argument is the duration in seconds.
| Note |
|---|
| The purpose of Elm_Transit is to abstract the low-level details of object interpolation, so you cannot create an infinite transition by specifying the duration. However, you can make your transition last forever using the repeat function. |
The following example shows how to make a complete revolution of the target Evas object in 2 seconds:
Elm_Transit *transit = elm_transit_add();
elm_transit_object_add(transit, my_evas_object);
elm_transit_effect_rotation_add(transit, 0.0, 360);
elm_transit_duration_set(transit, 2.0);
elm_transit_go(transit);
To get the duration of the transition, use the elm_transit_duration_get() function.
Animation Acceleration Mode ("Tween Mode")
Elm_Transit supports a number of built-in interpolation methods. By default, all interpolations are linear. If you want to change the animation's dynamics, use the elm_transit_tween_mode_set() function:
elm_transit_tween_mode_set(Elm_Transit *transit, Elm_Transit_Tween_Mode tween_mode)
The first argument is the Elm_Transit instance that handles the transition. The second argument is the tween mode of the transition, which can be one of the following:
- ELM_TRANSIT_TWEEN_MODE_LINEAR: The default mode.
- ELM_TRANSIT_TWEEN_MODE_SINUSOIDAL: The transition starts with acceleration and ends with deceleration.
- ELM_TRANSIT_TWEEN_MODE_DECELERATE: The transition decelerates over time.
- ELM_TRANSIT_TWEEN_MODE_ACCELERATE: The transition accelerates over time.
- ELM_TRANSIT_TWEEN_MODE_BEZIER_CURVE: The transition uses an interpolated cubic-bezier curve adjusted with parameters.
To get the current tween mode, use the elm_transit_tween_mode_get() function.
Animation Repeat
To set a transition to repeat, use the elm_transit_repeat_times_set() function:
elm_transit_repeat_times_set(Elm_Transit *transit, int repeat)
The function takes the following arguments:
- The transition you want to repeat.
- The number of times the transition repeats.
| Note |
|---|
| If the repeat argument is set to 0, the transition will not loop at all. If set to 1, the transition will run twice. If set to a negative value, the transition will repeat forever. |
To get the repeat value, use the elm_transit_repeat_times_get() function. The default value is 0.
The following example shows how to make an Evas object spin for 3 complete revolutions in 6 seconds:
Elm_Transit *transit = elm_transit_add();
elm_transit_object_add(transit, my_evas_object);
elm_transit_effect_rotation_add(transit, 0.0, 360);
elm_transit_duration_set(transit, 2.0);
elm_transit_repeat_set(transit, 3.0);
elm_transit_go(transit);
Animation Auto-reverse
Elm_Transit provides a helper function for automatically reversing the transition once it finishes:
elm_transit_auto_reverse_set(Elm_Transit *transit, Eina_Bool reverse)
The first argument is the transition you want to reverse. The second argument is the reverse state. If the reverse state is set to EINA_TRUE, this function will perform the same transition backwards as soon as the first transition is complete.
| Note |
|---|
|
Reversing the transition doubles the duration of the transition. Moreover, if the transition is set to repeat, the transition will run back and forth until the repeat count is finished. You can calculate the duration as follows if both auto-reverse and repeat are set: 2 * duration * repeat. |
The following example shows how to make an object perform half a turn and then reverse the animation to its original position in 4 seconds:
Elm_Transit *transit = elm_transit_add();
elm_transit_object_add(transit, my_evas_object);
elm_transit_effect_rotation_add(transit, 0.0, 360);
elm_transit_duration_set(transit, 2.0);
elm_transit_auto_reverse_set(transit, EINA_TRUE);
elm_transit_go(transit);
To determine whether the auto-reverse mode is enabled, use the elm_transit_auto_reverse_get() function.
Transitions
We distinguish two main transition types:
- Transitions that are applied to the properties of objects, such as position, size, angle, and color.
- Transitions from one object to another, where the first object is hidden to let the second one appear.
All transitions are based on the same principle: we set the starting and the ending values for the properties we want to animate, we then set the lifespan of the animation, and finally we inquire the preferred interpolation method (such as linear, acceleration, or bounce).
You must declare the transitions after the parent window has been created, since the transition effects make use of the geometric properties of the parent window. If the parent window does not yet exist when calculating the interpolation, the interpolation may end up being based on wrong information.
Built-in Transitions
Elm_Transit provides several built-in transition definitions that are useful for the most common cases, so you that will not have to code them from scratch.
All these built-in effects are implemented as follows:
Elm_Transit *transit = elm_transit_add();
elm_transit_effect_add(transit,
                       elm_transit_effect_translation_op,
                       elm_transit_effect_translation_context_new(),
                       elm_transit_effect_translation_context_free);
- transit: The Elm_Transit object that contains the target Evas objects and all the information needed to setup the transition.
- elm_transit_effect_translation_op: The callback function that performs the transition (resizing interpolation in this example).
- elm_transit_effect_translation_context_new(): The callback function that returns the context used in the transition for calculations. In this example, the context is the coordinates of the before and after objects.
- elm_transit_effect_translation_context_free: The callback function that frees up the memory once the transition is complete.
All the definitions above can be rewritten as follows:
Elm_Transit *transit = elm_transit_add();
elm_transit_effect_translation_add(transit, from_x, from_y, to_x, to_y);
Translation
To perform a translation on an Evas object, use the following method:
elm_transit_effect_translation_add(Elm_Transit *transit,
                                   Evas_Coord from_dx,
                                   Evas_Coord from_dy,
                                   Evas_Coord to_dx,
                                   Evas_Coord to_dy)
- The first argument is the transit object that contains (among other things) all the Evas objects subject to the translation.
- from_dx: The starting X coordinate (source).
- from_dy: The starting Y coordinate (source).
- to_dx: The ending X coordinate (destination).
- to_dy: The ending Y coordinate (destination).
The following example shows how to slide an Evas object (a rectangle) on a 45-degree diagonal, from bottom-left to top-right, at a constant speed, and in 1 second:
Elm_Transit *transit = elm_transit_add();
elm_transit_object_add(transit, rectangle);
elm_transit_effect_translation_add(transit, 0, 0, 280, 280);
elm_transit_duration_set(transit, 1);
elm_transit_go(transit);
Color Transition
Color transitions allow you to dynamically change the color of Evas objects. The first argument is the transit object, while the other arguments will be used to define the color transition using RGB colors. There is also an alpha channel that controls the opacity of the color (the background of the object, not the object itself).
elm_transit_effect_color_add(Elm_Transit *transit,
                             unsigned int from_r,
                             unsigned int from_g,
                             unsigned int from_b,
                             unsigned int from_a,
                             unsigned int to_r,
                             unsigned int to_g,
                             unsigned int to_b,
                             unsigned int to_a)
- transit: The transit object that contains (among other things) all the Evas objects subject to the translation.
- from_r: The start value for "Red".
- from_g: The start value for "Green".
- from_b: The start value for "Blue".
- from_a: The start value for "Alpha".
- to_r: The end value for "Red".
- to_g: The end value for "Green".
- to_b: The end value for "Blue".
- to_a: The end value for "Alpha".
The following example shows how to transit a rectangle from red to blue in 3 seconds:
Elm_Transit *transit = elm_transit_add();
elm_transit_object_add(transit, rectangle);
elm_transit_effect_color_add(transit, // Target object
                             255, 0, 0, 255, // From color
                             0, 0, 255, 255); // To color
elm_transit_duration_set(transit, 3);
elm_transit_go(transit);
Rotation
elm_transit_effect_rotation_add(Elm_Transit *transit, float from_degree, float to_degree)
- transit: The transit object that contains (among other things) all the Evas objects subject to the translation.
- from_degree: The start degree of rotation.
- to_degree: The end degree of rotation.
This function can be used to perform a rotation on any Evas object. It works the same way as the other transit effects and takes two arguments for the starting and ending angles. Note that if you apply a rotation on multiple objects, they will individually mill around and not act as a group. If you want several objects to revolve around a common point, you must encapsulate the objects into a single parent object and apply the rotation to the parent object. The following example shows how to achieve this:
// Parent container
Evas_Object *parent = elm_box_add(my_window);
evas_object_show(parent);
elm_box_horizontal_set(parent, EINA_TRUE);
elm_box_homogeneous_set(parent, EINA_TRUE);

// Button 1
Evas_Object *btn1 = elm_button_add(parent);
elm_object_text_set(btn1, "Btn1");
elm_box_pack_start(parent, btn1);
evas_object_show(btn1);

// Button 2
Evas_Object *btn2 = elm_button_add(parent);
elm_object_text_set(btn2, "Btn2");
elm_box_pack_end(parent, btn2);
evas_object_show(btn2);

// Make the parent container do a 360 degrees spin
Elm_Transit *transit = elm_transit_add();
elm_transit_object_add(transit, parent);
elm_transit_effect_rotation_add(transit, 0.0, 360);
elm_transit_duration_set(transit, 2.0);
elm_transit_go(transit);
Wipe Effect
The wipe effect is designed to dynamically hide or show any element on the scene.
elm_transit_effect_wipe_add(Elm_Transit *transit,
                            Elm_Transit_Effect_Wipe_Type type,
                            Elm_Transit_Effect_Wipe_Dir dir)
In addition to the Elm_Transit instance passed as the first argument, the function takes the following arguments:
-
type: The wipe type Elm_Transit_Effect_Wipe_Type defines whether to show or hide the target elements. The value can be one of the following:
- ELM_TRANSIT_EFFECT_WIPE_TYPE_HIDE
- ELM_TRANSIT_EFFECT_WIPE_TYPE_SHOW
-
dir: The wipe direction Elm_Transit_Effect_Wipe_Dir defines in which direction the target will progressively appear or disappear. The value can be one of the following:
- ELM_TRANSIT_EFFECT_WIPE_DIR_LEFT
- ELM_TRANSIT_EFFECT_WIPE_DIR_RIGHT
- ELM_TRANSIT_EFFECT_WIPE_DIR_UP
- ELM_TRANSIT_EFFECT_WIPE_DIR_DOWN
The following example shows how to make an object disappear progressively from left to right:
Elm_Transit *transit = elm_transit_add();
elm_transit_object_add(transit, my_evas_object);
elm_transit_effect_wipe_add(transit,
                            ELM_TRANSIT_EFFECT_TYPE_HIDE,
                            ELM_TRANSIT_EFFECT_WIPE_DIR_RIGHT);
elm_transit_duration_set(transit, 2.0);
elm_transit_go(transit);
Zoom Effect
Elm_Transit provides a zoom function.
elm_transit_effect_zoom_add(Elm_Transit *transit,
                            float from_rate,
                            float to_rate)
- transit: The transit object that contains (among other things) all the Evas objects subject to the translation.
- from_rate: The starting level of the zoom.
- to_rate: The ending level of the zoom.
The from_rate argument defines the scale of the target objects at the beginning of the animation. A value of 1 represents the initial scale of the objects.
Setting the value of the to_rate argument to 2 will double the size of the target objects (double the width and double the height). When using this effect, the width and height of a target object will remain proportional to one another. If you want to customize the zoom effect, use the elm_transit_effect_resizing_add() function.
The following example shows how to implement a zoom-out transition. At the end of the 2-secondstransition, the animated object will be half its original size.
Elm_Transit *transit = elm_transit_add();
elm_transit_object_add(transit, my_evas_object);
elm_transit_effect_zoom_add(transit, 1, 0.5);
elm_transit_duration_set(transit, 2.0);
elm_transit_go(transit);
Resizing Effect
The resizing effect allows you to design an interpolation of the width and height attributes of one or more target elements.
elm_transit_effect_resizing_add(Elm_Transit *transit,
                                Evas_Coord from_w,
                                Evas_Coord from_h,
                                Evas_Coord to_w,
                                Evas_Coord to_h)
- transit: The transit object that contains (among other things) all the Evas objects subject to the translation.
- from_w: The starting width.
- from_h: The starting height.
- to_w: The ending width.
- to_h: The ending height.
The from_w and from_h arguments define the size at the beginning of the animation. The to_w and to_h arguments define the size at the end.
| Note |
|---|
| If you are planning to use this method to hide an Evas object by setting one of the length attributes to zero, consider using the elm_transit_effect_wipe_add() function instead. |
The following example shows how to make a rectangle exchange its width and height properties in a 2-second transition:
Evas_Coord w, h;
evas_object_geometry_get(my_evas_object, NULL, NULL, &w, &h);

Elm_Transit *transit = elm_transit_add();
elm_transit_object_add(transit, my_evas_object);
elm_transit_effect_resize_add(transit, // Transition object
                              w, h, // Original sizing
                              h, w); // Target sizing
elm_transit_duration_set(transit, 2.0);
elm_transit_go(transit);
Flip Effect
This transition combines the target Evas objects in pairs, so that one object will show up while the other one disappears. This association relates the even objects in the transit list of objects with the odd ones. The even objects are shown at the beginning of the animation, and the odd objects shown when the transition is complete. In other words, the effect applies to each pair of objects in the order in which they are listed in the transit list of objects.
The flip effect itself is a pseudo-3D effect where the first object in the pair is the front object and the second one is the back object. When the transition launches, the front object rotates around a preferred axis in order to let the back object take its place.
elm_transit_effect_flip_add(Elm_Transit *transit,
                            Elm_Transit_Effect_Flip_Axis axis,
                            Eina_Bool cw)
The first argument is the transit object. The second argument is the preferred axis of rotation:
- ELM_TRANSIT_EFFECT_FLIP_AXIS_X
- ELM_TRANSIT_EFFECT_FLIP_AXIS_Y
The third argument is the direction of the rotation:
- EINA_TRUE is clockwise.
- EINA_FALSE is counter-clockwise.
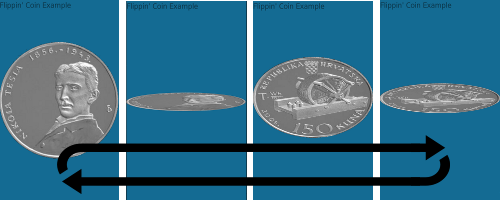
The following example shows how to create a coin that flips indefinitely. Note that we use images as Elementary UI components for demonstration purposes. You can use the elm_transit_effect_image_animation_add() function if you do not want to bother creating UI components.
// Coin Heads
Evas_Object *coin_heads = elm_image_add(ad->win);
if (!elm_image_file_set(coin_heads, IMG_DIR"/coin_heads.png", NULL))
   printf("error: could not load image");
elm_win_resize_object_add(ad->win, coin_heads);

// Coin Tails
Evas_Object *coin_tails = elm_image_add(ad->win);
if (!elm_image_file_set(coin_tails, IMG_DIR"/coin_tails.png", NULL))
   printf("error: could not load image");
elm_win_resize_object_add(ad->win, coin_tails);

// Transition definition
Elm_Transit *transit = elm_transit_add();
elm_transit_object_add(transit, coin_heads);
elm_transit_object_add(transit, coin_tails);
elm_transit_duration_set(transit, 2.0);
elm_transit_auto_reverse_set(transit, EINA_TRUE);
elm_transit_repeat_times_set(transit, -1);
elm_transit_effect_flip_add(transit, ELM_TRANSIT_EFFECT_FLIP_AXIS_X, EINA_TRUE);
elm_transit_go(transit);
Figure: Coin flip
Resizable Flip Effect
In the flip example above, we used two objects that have the same size. However, you may sometimes want to flip from one object to another object with different size attributes. The most common example would be using buttons with dimensions that depend on their contents (such as labels). If you decide to use the classic elm_transit_effect_flip_add() function, the size of the object will change at the moment one object becomes completely hidden and the other one begins to show up. If you wish to interpolate the size attributes as well, use the elm_transit_effect_resizable_flip_add() function:
elm_transit_effect_resizable_flip_add(Elm_Transit *transit,
                                      Elm_Transit_Effect_Flip_Axis axis,
                                      Eina_Bool cw)
The first argument is the transit object. The second argument is the preferred axis of rotation:
- ELM_TRANSIT_EFFECT_FLIP_AXIS_X
- ELM_TRANSIT_EFFECT_FLIP_AXIS_Y
The third argument is the direction of the rotation:
- EINA_TRUE is clockwise.
- EINA_FALSE is counter-clockwise.
This function works the exact same way as the standard flip effect function.
Fade Effect
This effect is used to transition from one Evas object to another one using a fading effect: the first object will slowly disappear to let the second object take its place.
elm_transit_effect_fade_add(Elm_Transit *transit)
This effect is applied to each pair of objects in the order in which they are listed in the transit list of objects. The first object in the pair will be the before object and the second one will be the after object.
Building on the coin flip example, the following example shows how to fade out one face of the coin while fading in the other face:
Elm_Transit *transit = elm_transit_add();
elm_transit_object_add(transit, coin_heads);
elm_transit_object_add(transit, coin_tails);
elm_transit_duration_set(transit, 2.0);
elm_transit_effect_fade_add(transit);
elm_transit_go(transit);
If you simply want to hide an object with a fade transition, consider using a transparent after object.
Blend Effect
Another transition involving at least two Evas objects is the blend effect. This transition makes the before object blurry before the after object appears.
elm_transit_effect_blend_add(Elm_Transit *transit)
The argument is the transition target of the blend effect.
Building on the coin flip example, the following example shows how to blur out one face of the coin while blurring in the other face:
Elm_Transit *transit = elm_transit_add();
elm_transit_object_add(transit, coin_heads);
elm_transit_object_add(transit, coin_tails);
elm_transit_duration_set(transit, 2.0);
elm_transit_effect_blend_add(transit);
elm_transit_go(transit);
If you simply want to hide an object with a blur transition, consider using a transparent after object.
Combining Transitions
To use multiple transitions at the same time on the same objects, simply declare the transitions one after the other.
Building on the coin flip example, the following example shows how to roll the coin on the ground using a rotation and a translation effect:
Evas_Object *coin_heads = elm_image_add(ad->win);
if (!elm_image_file_set(coin_heads, IMG_DIR"/coin_heads.png", NULL))
   printf("error: could not load image");
evas_object_resize(coin_heads, 100, 100);
evas_object_show(coin_heads);

Elm_Transit *transit = elm_transit_add();
elm_transit_object_add(transit, coin_heads);
elm_transit_duration_set(transit, 5.0);
elm_transit_effect_translation_add(transit, 0, 0, 3.1415 * 2 * 100, 0);
elm_transit_effect_rotation_add(transit, 0, 360);
elm_transit_go(transit);
Animation Chain
Now that we have listed all the effects that can be implemented using Elm_Transit, we will see how to chain transitions into sequences. To create complex, chained animations without worrying about synchronization between the transitions, use the elm_transit_chain_transit_add() function. This function takes as arguments two Elm_Transit objects and will automatically take care of the chaining for you: the second transition will start as soon as the first transition is finished.
The following example shows how to move a datetime component on a square trajectory:
Evas_Object *dt = elm_datetime_add(ad->win);
evas_object_resize(dt, 350, 50);
evas_object_show(dt);

// The first transition
Elm_Transit *t1 = elm_transit_add();
elm_transit_object_add(t1, dt);
elm_transit_duration_set(t1, 2);
elm_transit_effect_translation_add(t1, 0, 0, 100, 0);

// The second transition
Elm_Transit *t2 = elm_transit_add();
elm_transit_object_add(t2, dt);
elm_transit_duration_set(t2, 2);
elm_transit_effect_translation_add(t2, 100, 0, 100, 100);

// The third transition
Elm_Transit *t3 = elm_transit_add();
elm_transit_object_add(t3, dt);
elm_transit_duration_set(t3, 2);
elm_transit_effect_translation_add(t3, 100, 100, 0, 100);

// The fourth transition
Elm_Transit *t4 = elm_transit_add();
elm_transit_object_add(t4, dt);
elm_transit_duration_set(t4, 2);
elm_transit_effect_translation_add(t4, 0, 100, 0, 0);

// Chaining the transitions
elm_transit_chain_transit_add(t1, t2);
elm_transit_chain_transit_add(t2, t3);
elm_transit_chain_transit_add(t3, t4);

// Starting the transitions
elm_transit_go(t1);
Note that we cannot use transition chaining to make a loop animation, since the transit object is automatically destroyed as soon as the transition completes. Therefore, you cannot do something like this:
elm_transit_chain_transit_add(t4, t1);
To create a looped animation chain, you have to use low-level components provided by the Ecore and Evas transition libraries, or you can use the elm_transit_del_cb_set() function to define a callback function for when a transition gets deleted. This way, you could recreate your objects and reiterate the transition chain as soon as the last transition ends.
elm_transit_del_cb_set(Elm_Transit *transit, Elm_Transit_Del_Cb cb, void *data)
The first argument is the transition object. The second argument is the callback function to run on transition delete. The third argument is the data to pass to the callback function.
You can severe the chain relationship between two transits by using the elm_transit_chain_transit_del() function:
elm_transit_chain_transit_del(Elm_Transit *transit, Elm_Transit *chain_transit)
The first argument is the first transition in the chain. The second argument is the second transition in the chain.
To get the current chain transit list, use the elm_transit_chain_transits_get() function.
Animation Timeline
After you have defined all the properties that define your transition, start the transition with the elm_transit_go() function:
elm_transit_go(Elm_Transit *transit)
You can maintain full control over the execution process even after the transition has started. You can pause the transition by setting the paused argument to EINA_TRUE:
elm_transit_paused_set(Elm_Transit *transit, Eina_Bool paused)
You can resume the transition by using the same method but setting the paused argument to EINA_FALSE. If you want to know whether the transition is currently paused, use the elm_transit_paused_get() function.
You can remain informed about the present transition flow and get the current frame by using the elm_transit_progress_value_get() function. This function will return the timeline position of the animation, ranging between 0.0 (start) and 1.0 (end).
Custom Transition
Elm_Transit provides a standard function for defining any effect of your choosing that will be applied to some context data:
elm_transit_effect_add(Elm_Transit *transit,
                       Elm_Transit_Effect_Transition_Cb transition_cb,
                       Elm_Transit_Effect *effect,
                       Elm_Transit_Effect_End_Cb end_cb)
The first argument is the transition target of the new effect. The second argument is the transition callback function. The third argument is the new effect. The fourth argument is the callback function to call at the end of the effect.
As described earlier in this programming guide, this function embraces three callbacks that will allow you to define every aspects of your transition from its creation to its deletion. The following is an example of how to build a custom resizing animation.
First, we define a structure capable of holding the context information about resizing an Evas object:
typedef struct
{
   struct _size
   {
      Evas_Coord w, h;
   }
   from, to;
}
Custom_Effect;
We can now implement our custom resizing callback function. This function takes the following arguments:
- The context data that holds the custom properties of our transition, which are used as parameters to calculate the interpolation.
- The transit object that contains the list of our Evas objects to animate and all the information about duration, auto-reverse, looping, and so on.
- The progress (position along the animation timeline) that ranges from 0.0 to 1.0 and allows us to calculate the desired interpolation for each frame.
static void
_custom_op(void *data, Elm_Transit *transit, double progress)
{
   if (!data) return;
   Evas_Coord w, h;
   Evas_Object *obj;
   const Eina_List *elist;
   Custom_Effect *custom_effect = data;
   const Eina_List *objs = elm_transit_objects_get(transit);
   if (progress < 0.5)
   {
      h = custom_effect->from.h + (custom_effect->to.h * progress * 2);
      w = custom_effect->from.w;
   }
   else
   {
      h = custom_effect->from.h + custom_effect->to.h;
      w = custom_effect->from.w + (custom_effect->to.w * (progress - 0.5) * 2);
   }
   EINA_LIST_FOREACH(objs, elist, obj)
      evas_object_resize(obj, w, h);
}
The callback function above resizes our Evas objects in two steps. During the first half of the transition, only the height changes, while the width remains the same. During the second half, it is the other way around until we get to the desired size.
You must then define the context used by your animation:
static void*
_custom_context_new(Evas_Coord from_w, Evas_Coord from_h, Evas_Coord to_w, Evas_Coord to_h)
{
   Custom_Effect *custom_effect;

   custom_effect = calloc(1, sizeof(Custom_Effect));
   if (!custom_effect) return NULL;

   custom_effect->from.w = from_w;
   custom_effect->from.h = from_h;
   custom_effect->to.w = to_w - from_w;
   custom_effect->to.h = to_h - from_h;

   return custom_effect;
}
You must define the function that will take care of deleting all the context objects used by your custom transition and free up the allocated memory:
static void
_custom_context_free(void *data, Elm_Transit *transit __UNUSED__)
{
   free(data);
}
Finally, apply your custom transition to your Elm_Transit object:
Elm_Transit *transit = elm_transit_add();
elm_transit_effect_add(transit,
                       _custom_op,
                       _custom_context_new(),
                       _custom_context_free);
If you want to delete an effect from your effects list, use the elm_transit_effect_del() function.
Evas Map Effects
Evas Map animations allow you to apply transformations to all types of objects by way of UV mapping.
In UV mapping, you map points in the source object to 3D space positions in the target object. This allows for rotation, perspective, scale, and other transformation effects, depending on the map. In addition, each map point can carry a multiplier color, which, if properly calculated, can be used to apply 3D shading effects on the target object.
Evas provides both raw and easy-to-use functions for UV mapping. The raw functions allow you to create UV maps outside Evas and import them into your application, for example by loading them from an external file. The easy-to-use functions allow you to create UV maps directly in Evas by calculating the map points based on high-level parameters, such as rotation angle and ambient light.
Map Points
A map consists of a set of points. (Currently, only four points are supported.) Each point contains X and Y canvas coordinates that can be used to alter the geometry of the mapped object, and a Z coordinate that indicates the depth of the point. The Z coordinate does not normally affect the map, but several utility functions use it to calculate the right position of the point given the other parameters.
First, create an Evas_Map object using the evas_map_new() function. This function creates the specified number of map points (currently only up to four points). Each point is empty and ready to be modified with Evas_Map functions.
Evas_Map *m = evas_map_new(4);
If you want to get the size (number of points) of an existing map, use the evas_map_count_get() function.
To set the coordinates for each point, use the evas_map_point_coord_set() function:
evas_map_point_coord_set(Evas_Map *m, int idx, Evas_Coord x, Evas_Coord y, Evas_Coord z)
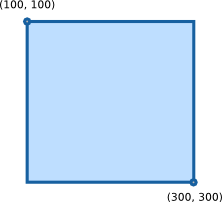
The following example shows a common way to define a map that matches the geometry of a rectangle (a square in this case):
evas_map_point_coord_set(m, 0, 100, 100, 0);
evas_map_point_coord_set(m, 1, 300, 100, 0);
evas_map_point_coord_set(m, 2, 300, 300, 0);
evas_map_point_coord_set(m, 3, 100, 300, 0);
Figure: Map
The following examples all produce the same result as the above example, but with simpler code:
-
To create a rectangle map using the starting X and Y coordinates combined with width and height, use the evas_map_util_points_populate_from_geometry() function:
evas_map_util_points_populate_from_geometry(Evas_Map *m, Evas_Coord x, Evas_Coord y, Evas_Coord w, Evas_Coord h, Evas_Coord z)
The following example creates the same map as above:
evas_map_util_points_populate_from_geometry(m, 100, 100, 200, 200, 0);
-
To create a map based on the geometry of a given object, use the evas_map_util_points_populate_from_object() or evas_map_util_points_populate_from_object_full() function. The former sets the Z coordinate of all points to 0, whereas the latter allows you to define the same custom Z coordinate for all points:
evas_map_util_points_populate_from_object(Evas_Map *m, const Evas_Object *obj)
evas_map_util_points_populate_from_object_full(Evas_Map *m, const Evas_Object *obj, Evas_Coord z)
The following example creates the same map as above:
Evas_Object *o;
evas_object_move(o, 100, 100);
evas_object_resize(o, 200, 200);
evas_map_util_points_populate_from_object(m, o);
// OR
evas_map_util_points_populate_from_object_full(m, o, 0);
You can apply several effects to an object by simply setting each point of the map to the appropriate coordinates. The following example shows how to create a simulated perspective:
Figure: Simulated perspective
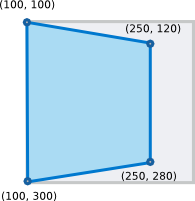
evas_map_point_coord_set(m, 0, 100, 100, 0);
evas_map_point_coord_set(m, 1, 250, 120, 0);
evas_map_point_coord_set(m, 2, 250, 280, 0);
evas_map_point_coord_set(m, 0, 100, 300, 0);
In the above example, the Z coordinate is unused: when setting points by hand, the Z coordinate is irrelevant.
If you want to get the actual coordinates of a map, use the evas_map_point_coord_get() function:
evas_map_point_coord_get(const Evas_Map *m, int idx, Evas_Coord *x, Evas_Coord *y, Evas_Coord *z)
After you have defined the map points, apply them to your map for transformation:
evas_object_map_set(o, m);
evas_object_map_enable_set(o, EINA_TRUE);
Finally, after you are done with the map, release the memory allocated to it using the evas_map_free() function:
evas_map_free(m);
The utility functions described in the next section allow you to perform the above tasks with less coding work.
Utility Functions
Utility functions take an already configured map and allow you to easily modify it to produce specific effects. For example, to rotate an object around its center, you need the rotation angle and the coordinates of each corner of the object to perform the math required to get the new set of coordinates that needs to be set for the map. Evas provides a utility function that does the math for you:
evas_map_util_rotate(Evas_Map *m, double degrees, Evas_Coord cx, Evas_Coord cy)
This function rotates the map based on the angle and the center coordinates of the rotation provided as arguments. A positive angle rotates the map clockwise, while a negative angle rotates the map counter-clockwise.
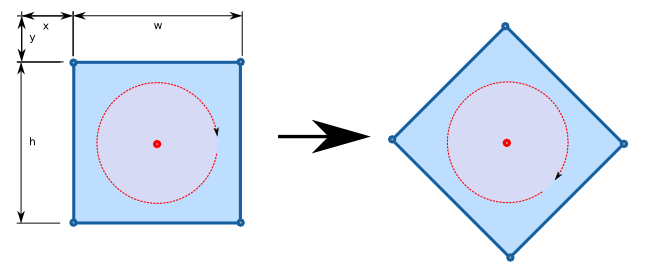
The following example shows how to rotate an object around its center point by 45 degrees clockwise. In the following figure, the center of rotation is the red dot.
evas_object_geometry_get(o, &x, &y, &w, &h);
m = evas_map_new(4);
evas_map_util_points_populate_from_object(m, o);
evas_map_util_rotate(m, 45, x + (w / 2), y + (h / 2));
evas_object_map_set(o, m);
evas_object_map_enable_set(o, EINA_TRUE);
evas_map_free(m);
Figure: Rotating around the center point
You can rotate the object around any other point simply by setting the last two arguments of the evas_map_util_rotate() function to the appropriate values:
evas_map_util_rotate(m, 45, x + w - 20, y + h - 20);
Figure: Rotating around other points
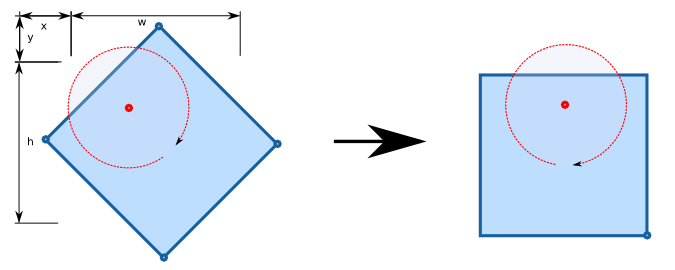
You can also set the center of the window as the center of the rotation using the appropriate coordinates of the Evas canvas:
evas_output_size_get(evas, &w, &h);
m = evas_map_new(4);
evas_map_util_points_populate_from_object(m, o);
evas_map_util_rotate(m, 45, w, h);
evas_object_map_set(o, m);
evas_object_map_enable_set(o, EINA_TRUE);
evas_map_free(m);
Zoom
The evas_map_util_zoom() function zooms the points of the map from a center point, defined by cx and cy. The zoomx and zoomy arguments specify how much to zoom in on the X and Y axes. A value of 1.0 means no zoom, 2.0 means double the size, 0.5 means half the size, and so on. All the coordinates are global canvas coordinates.
evas_map_util_zoom(Evas_Map *m, double zoomx, double zoomy, Evas_Coord cx, Evas_Coord cy)
3D Maps
Maps can also be used to achieve a 3D effect. In a 3D effect, the Z coordinate of each point is meaningful: the higher the value, the further back the point is located. Smaller values (usually negative) mean that the point is closer to the user.
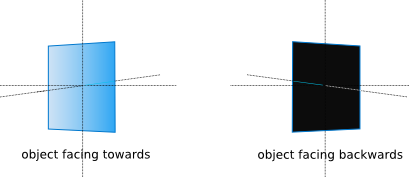
3D also introduces the concept of the back face of an object. An object is said to be facing the user when all its points are placed in a clockwise formation, as shown in the left map in the following figure. Rotating the map around its Y axis swaps the order of the points into a counter-clockwise formation, making the object face away from the user, as shown in the right map in the following figure. The back face is especially relevant in lighting (see below).
Figure: Rotating around the Y axis
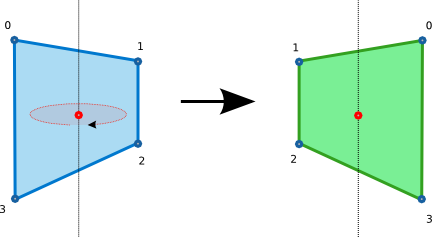
To determine whether a map is facing the user, use the evas_map_util_clockwise_get() function. This function returns EINA_TRUE if the map is facing the user and EINA_FALSE if the map is facing away from the user. This is normally done after all the other operations are applied to the map.
evas_map_util_clockwise_get(Evas_Map *m)
3D Rotation and Perspective
The evas_map_util_3d_rotate() function transforms a map to apply a 3D rotation to the mapped object. You can apply the rotation around any point in the canvas (including a Z coordinate). You can also apply the rotation around any of the three axes.
evas_map_util_3d_rotate(Evas_Map *m, double dx, double dy, double dz, Evas_Coord cx, Evas_Coord cy, Evas_Coord cz)
Starting from this simple setup, and setting the maps so that the blue square rotates around the Y axis, we get the following:
Figure: 3D rotation
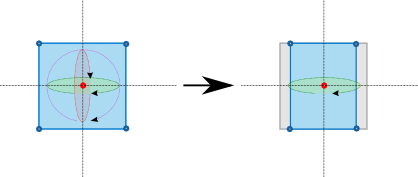
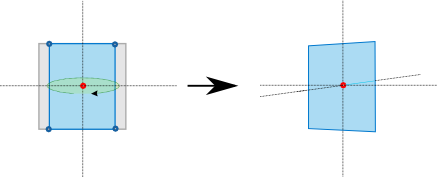
A simple overlay over the image shows the original geometry of each object and the axis around which they are being rotated. The Z axis is not shown, since it is orthogonal to the screen. To show the Z axis, that is, to add 3D perspective to the transformation, use the evas_map_util_3d_perspective() function on the map after its position has been set:
evas_map_util_3d_perspective(Evas_Map *m, Evas_Coord px, Evas_Coord py, Evas_Coord z0, Evas_Coord foc)
The result makes the vanishing point the center of each object:
Figure: Adding perspective
Color and Lighting
Each point in a map can be set to a color, which will be multiplied with the object’s own color and linearly interpolated between adjacent points. To set the color separately for each point, use the evas_map_point_color_set() function:
evas_map_point_color_set(Evas_Map *m, int idx, int r, int g, int b, int a)
To set the same color for every point, use the evas_map_util_points_color_set() function:
evas_map_util_points_color_set(Evas_Map *m, int r, int g, int b, int a)
When using a 3D effect, colors can be used to improve its look by simulating a light source. The evas_map_util_3d_lighting() function makes this task easier by taking the coordinates of the light source and its color, along with the color of the ambient light. Evas then sets the color of each point based on its distance to the light source, the angle at which the object is facing the light source, and the ambient light. Here, the orientation of each point is important.
evas_map_util_3d_lighting(Evas_Map *m, Evas_Coord lx, Evas_Coord ly, Evas_Coord lz, int lr, int lg, int lb, int ar, int ag, int ab)
If the map points are defined counter-clockwise, the object faces away from the user and is therefore obscured, since no light is reflecting back from it.
Figure: Obscured object
Mapping
Images need special handling when mapped. While Evas can easily handle objects, it is completely oblivious to the contents of images. This means that each point in a map needs to be mapped to a specific pixel in the source image. Failing to do this can result in unexpected behavior.
Let's get started with the following three images, each sized at 200 × 200 pixels:
Figure: Starting point

The following three images illustrate the case where a map is set to an image object without setting the right UV mapping for each map point. The objects themselves are mapped properly to their new geometries, but the images are not displayed correctly within the mapped objects.
Figure: Questionable result

To transform an image correctly, Evas needs to know how to handle the image within the map. You can do this using the evas_map_point_image_uv_set() function, which allows you to map a given point in a map to a given pixel in a source image:
evas_map_point_image_uv_set(Evas_Map *m, int idx, double u, double v)
To match our example images to the maps above, all we need is the size of each image, which we can get using the evas_object_image_size_get() function.
// Tux 1: Some cropping and stretch up
evas_map_point_image_uv_set(m, 0, 0, 20);
evas_map_point_image_uv_set(m, 1, 200, 20);
evas_map_point_image_uv_set(m, 2, 200, 180);
evas_map_point_image_uv_set(m, 3, 0, 180);
evas_object_map_set(tux1, m);
evas_object_map_enable_set(tux1, EINA_TRUE);

// Inverted texture for shadow:
evas_map_point_image_uv_set(m, 0, 0, 180);
evas_map_point_image_uv_set(m, 1, 200, 180);
evas_map_point_image_uv_set(m, 2, 200, 20);
evas_map_point_image_uv_set(m, 3, 0, 20);
evas_object_map_set(tux1_shadow, m);
evas_object_map_enable_set(tux1_shadow, EINA_TRUE);

// Tux 2: Make it fit to the map:
evas_map_point_image_uv_set(m, 0, 0, 0);
evas_map_point_image_uv_set(m, 1, 200, 0);
evas_map_point_image_uv_set(m, 2, 200, 200);
evas_map_point_image_uv_set(m, 3, 0, 200);
evas_object_map_set(tux2, m);
evas_object_map_enable_set(tux2, EINA_TRUE);

// Tux 3: Zoom and fit relatively to image size
evas_object_image_size_get(evas_object_image_source_get(tux3), &w, &h);
evas_map_point_image_uv_set(m, 0, 0.1 * w, 0.1 * h);
evas_map_point_image_uv_set(m, 1, 0.9 * w, 0.1 * h);
evas_map_point_image_uv_set(m, 2, 0.9 * w, 0.9 * h);
evas_map_point_image_uv_set(m, 3, 0.1 * w, 0.9 * h);
evas_object_map_set(tux3, m);
evas_object_map_enable_set(tux3, EINA_TRUE);
Figure: Correct result
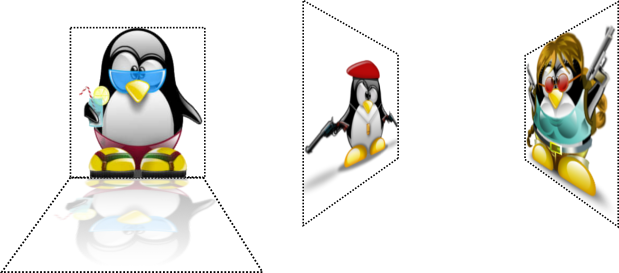
You can also set a map to use only part of an image, or you can even map the points in inverted order. Combined with the evas_object_image_source_set() function, you can achieve more interesting results still.
Lighting
Evas_Map allows you to define an ambient light and a light source within the scene. Both of these light sources have their own colors.
evas_map_util_3d_lighting(Evas_Map *m, Evas_Coord lx, Evas_Coord ly, Evas_Coord lz, int lr, int lg, int lb, int ar, int ag, int ab)
The above function is used to apply lighting calculations (from a single light source) to a given map. The red, green, and blue values of each vertex will be modified to reflect the lighting based on the light source coordinates, its color, the ambient color, and the angle at which the map faces the light source. The points of a surface should be defined in a clockwise formation if the surface is facing the user, since faces have a logical side for lighting.
To get the reflections (gradient) in the shadow of our previous example, you have to define a source of light close enough to the user and a very bright ambient light, for example:
evas_map_util_3d_lighting(m, // Evas_Map object
                          250/2, 150/2, -100, // Spot light coordinates
                          255, 255, 255, // Spot light color
                          200, 200, 200); // Ambient light color
Alpha Channel
You can also use an alpha channel on your map by enabling the alpha channel feature:
evas_map_alpha_set(Evas_Map *m, Eina_Bool enabled)
Next, set the alpha value separately for each map point:
evas_map_point_color_set(Evas_Map *m, int idx, int r, int g, int b, int a)
Alternatively, you can set the same alpha value to all map points:
evas_map_util_points_color_set(Evas_Map *m, int r, int g, int b, int a)
The following code sets the shadow transparency for the first image in the above three-image example:
// Set object transparency to 50%:
evas_map_util_points_color_set(m, 255, 255, 255, 127);

// Tux's head is almost invisible in the shadow:
evas_map_point_color_set(m, 3, 255, 255, 255, 15);
evas_map_point_color_set(m, 4, 255, 255, 255, 15);
Smoothing
To enable smoothing when rendering a map, use the evas_map_smooth_set() function:
evas_map_smooth_set(Evas_Map *m, Eina_Bool enabled)
The first argument is the Evas_Map object to apply smoothing to. The second argument sets whether to enable the smoothing:
- EINA_TRUE: Enable smoothing.
- EINA_FALSE: Disable smoothing.
If the object is of a type that has its own smoothing settings, the smoothing settings must be disabled for both the object and the map. Map smoothing is enabled by default. To check whether map smoothing is enabled, use the evas_map_smooth_get() function.


