
Menu: Adding Menus to the Application
This tutorial shows how to add menus to the application. The example code creates an application with 3 views, these views are showed by an interaction with a menu bar, placed on the top of the application. The application has also a hidden menu that appears only when the menu button is pressed.
This feature is supported in mobile applications only.
Warm-up
Become familiar with the Ecore, Elementary, and Evas API basics by learning about:
-
Defining the Application "Structure"
Define the structure of the application.
-
Defining the Application Theme
Create a theme using Basic EDC UI Application.
-
Creating the Basic UI
Create menus and toolbars.
-
Creating a Hidden Menu
Create a hidden menu in your application.
Defining the Application "Structure"
Define the structure of the application:
typedef struct appdata
{
   Evas_Object* win; // The main window
   Evas_Object* layout; // The Edje layout
   Evas_Object* conform; // The conform
   Evas_Object *nf; // The Naviframe to handle the views
   appmenu_s *menu; // The main menu
   appmenu_s *sidemenu; // The side menu
   mainview_s *main_view; // The main view (dayselector)
   calview_s *cal_view; // The calendar view
   dateview_s *date_view; // The date and time view
   settview_s *settings_view; // The settings view
   Eina_Bool sdmenu_up; // A Boolean variable to keep the side menu status
} appdata_s;
This structure contains some specific variables for the views and the menus.
Define the main view by using the structure mainview, it is composed of a box (the main container), a dayselector, an image img, and a label lb_main.
typedef struct mainview
{
   Evas_Object *box; // The main container of the view
   Evas_Object *colorselector; // A color selector
   Evas_Object *img; // An image
   Evas_Object *lb_day; // A label
} mainview_s;
The date view is very similar, it contains a box, a datetime component and a label lb_date.
typedef struct dateview
{
   Evas_Object *box; // The main container of the view
   Evas_Object *datetime; // A datetime component
   Evas_Object *lb_date; // A label
} dateview_s;
The last view is the calendar, it contains a box, a calendar and a label lb_cal.
typedef struct calview
{
   Evas_Object *box; // The main container of the view
   Evas_Object *calendar; // A calendar component
   Evas_Object *lb_cal; // A label component
} calview_s;
The last members of the application structure are the 2 menus. The main menu is fixed and visible, and the side menu is hidden on application starts. These menus are represented by the appmenu structure.
typedef struct appmenu
{
   Evas_Object *tb; // The toolbar
   Elm_Object_Item *submenu; // The submenu item
} appmenu_s;
Defining the Application Theme
After the structure is defined, define the UI. In this tutorial, Basic EDC UI Application is used.
This application structure is based on this skeleton:
Figure: Menu skeleton
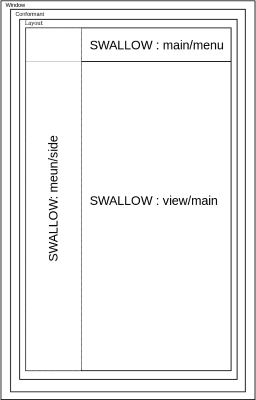
The window, the conformant and the layout are set by the Basic EDC UI Application skeleton. Setup the containers for UI components and views.
Create the main_menu SWALLOW part in the .edc file.
part
{
   name: "menu/main";
   type: SWALLOW;
   description
   {
      state: "default" 0.0;
      rel1.relative: 0.0 1.0;
      rel2.relative: 1.0 1.0;
   }
   description
   {
      state: "up" 0.0;
      rel1.relative: 0.0 0.01;
      rel2.relative: 1.0 0.18;

   }
} // End menu/main
This part has two descriptions, one for the real position named up and another out of the screen as the default position. Create these states to animate the menu on application start. The animation is run by animation,menu_main.
program
{
   name: "animation,menu_main";
   source: "";
   signal: "load";
   action: STATE_SET "up" 1.0;
   target: "menu/main";
   transition: LINEAR 0.5;
} // END animation,menu_main
For more information about animations, see the Effects tutorial.
Create another container for the views. This container is also a "SWALLOW" part.
part
{
   name: "view/main";
   type: SWALLOW;
   description
   {
      state: "default" 0.0;
      rel1.relative: 0.0 1.0;
      rel2.relative: 1.0 1.0;
   }
   description
   {
      state: "up" 0.0;
      rel1.relative: 0.0 1.1;
      rel1.to: "menu/main";
      rel2.relative: 1.0 1.0;
      color: 0 255 0 255;
   }
} // END view/main
This part has also two descriptions for animation purpose, like the main_menu part.
The program:
program
{
   name: "animation,view_main";
   source: "";
   signal: "load";
   action: STATE_SET "up" 1.0;
   target: "view/main";
   transition: LINEAR 0.2;
} // END animation,view_main
The last container is the side menu called menu/side.
part
{
   name: "menu/side";
   type: SWALLOW;
   description
   {
      state: "default" 0.0;
      rel1.relative: -0.3 0.0;
      rel2.relative: -0.3 1.0;
      color: 255 0 0 255;
   }
   description
   {
      state: "up" 0.0;
      rel1.relative: 0.0 0.01;
      rel2.relative: 0.3 1.0;
     color: 255 0 0 255;
   }
} // END menu/side
By default, this container is hidden. Clicking menu button makes it appear. The second description places the container on the left of the screen. Here is the program to run animation:
 program
{
   name: "animation,menu_side";
   source: "MenuButton";
   signal: "show,sidemenu";
   action: STATE_SET "up" 1.0;
   target: "menu/side";
   transition: LINEAR 0.2;
} // END animation,menu_side
This program runs when it receives an event called show,sidemenu from MenuButton source.
Create a program that does the opposite and starts when it receives a signal called hide,menu_side from MenuButton source.
program
{
   name: "animation,menu_side,hide";
   source: "MenuButton";
   signal: "hide,sidemenu";
   action: STATE_SET "default" 1.0;
   target: "menu/side";
   transition: LINEAR 0.2;
} //END animation,menu_side,hide

program
{
   name: "animation,menu_side";
   source: "MenuButton";
   signal: "show,sidemenu";
   action: STATE_SET "up" 1.0;
   target: "menu/side";
   transition: LINEAR 0.2;
} //END animation,menu_side
Creating the Basic UI
The view container view/main is structured like this:
Figure: Main view
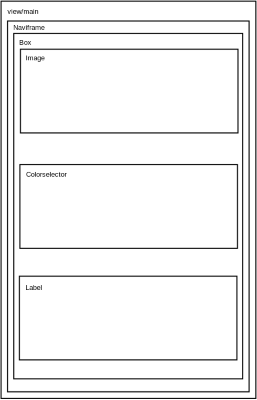
The naviframe contains and manages the boxes. For more information, see the Container programming guide. This UI component handle views. In this example each view is contained in a box and the box is contained in the naviframe.
Create the naviframe in the create_base_gui function and allocate the memory to handle the views and menus of the application.
// Memory allocation
ad->main_view = calloc(1, sizeof(mainview_s)); // Allocating memory for the main view
ad->cal_view = calloc(1, sizeof(calview_s));   // Allocating memory for the calendar view
ad->date_view = calloc(1, sizeof(dateview_s)); // allocating memory for the date view
ad->settings_view = calloc(1, sizeof(settview_s)); // allocating memory for the Settings view
// END of Memory allocation
Use app_terminate function to free the memory:
app_terminate(void *data)
{
   // Release all resources
   appdata_s *ad = data;

   free(ad->menu);
   free(ad->sidemenu);
   free(ad->main_view);
   free(ad->cal_view);
   free(ad->settings_view);
} // END of app_terminate
Create the naviframe:
Create the main menu after most of the containers are created. First create a new _build_main_menu function, it takes an appdata_s as a parameter. This function is called by create_base_gui.
static void _build_main_menu(appdata_s *ad)
{
   // Memory allocation for the main menu function
   appmenu_s *menu = calloc(1, sizeof(appmenu_s));
   // Putting the "main" menu in the application data
   ad->menu = menu;

   // Creation of the "Menu" toolbar
   menu->tb = elm_toolbar_add(ad->win);

   // Setting the "Menu" Toolbar properties
   elm_toolbar_shrink_mode_set(menu->tb, ELM_TOOLBAR_SHRINK_NONE);
   elm_toolbar_transverse_expanded_set(menu->tb, EINA_TRUE);
   elm_toolbar_homogeneous_set(menu->tb, EINA_FALSE);

   // Adding menu items to the "Menu" toolbar
   elm_toolbar_item_append(menu->tb, ICON_DIR"/home.png", "Home", _menu_item_selected_cb, ad);
   elm_toolbar_item_append(menu->tb, ICON_DIR"/calendar.png", "Calendar", _menu_item_selected_cb, ad);
   elm_toolbar_item_append(menu->tb, ICON_DIR"/clock.png", "Date", _menu_item_selected_cb, ad);
   elm_toolbar_item_append(menu->tb, ICON_DIR"/settings.png", "Settings", _menu_item_selected_cb, ad);

   // Showing the UI component
   evas_object_show(menu->tb);

   // Adding the UI component to the "menu/main" SWALLOW container defined in the .edc theme file.
   elm_object_part_content_set(ad->layout, "menu/main", menu->tb);

   // Set the default view
   elm_toolbar_item_selected_set(elm_toolbar_first_item_get(menu->tb), EINA_TRUE);
}
Create a toolbar with elm_toolbar_add. This toolbar is a child of the main window so set ad->win as parameter.
Setup the behavior of the toolbar, the display mode is set by using elm_toolbar_shrink_mode_set. The toolbar does not scroll under #ELM_TOOLBAR_SHRINK_NONE mode, but it enforces a minimum size, so that all the items fit inside it. It does not scroll or show the items that do not fit under #ELM_TOOLBAR_SHRINK_HIDE mode. Finally, it scrolls under #ELM_TOOLBAR_SHRINK_SCROLL mode, and it creates a button to aggregate items which did not fit with the #ELM_TOOLBAR_SHRINK_MENU mode.
In this example, there is only a limited number of menu elements and thus ELM_TOOLBAR_SHRINK_NONE is used.
Expand the transverse length of the item according the transverse length of the toolbar, giving EINA_TRUE as second parameter of elm_toolbar_transverse_expanded_set.
Make the menu items have the same size by setting EINA_TRUE to elm_toolbar_homogeneous_set. This activates the homogeneous mode of the toolbar.
Add menu items to the toolbar using elm_toolbar_item_append. This function takes 4 parameters:
- the target toolbar
- the icon path for the menu item
- the item label
- the function to call when the item is clicked
- the data to associate with the item for related callbacks.
For the icons, add some images in the resource directory of the application res/images and define a macro to contain this path in the application .h file. In this example it is inc/menututorial.h.
#define ICON_DIR "/opt/usr/apps/"PACKAGE"/res/images"
Use the PACKAGE macro to setup this ICON_DIR macro. This way you can add items to the toolbar using icon images placed in the resource directory of the application.
The item label is very important, it is used in the item callback function.
In this example, only one callback is created to manage all the items but there can be several callback functions. Pass the application data to the callback.
This callback is an Evas_Smart_Cb, it must have this prototype:
_mycallback(void *data, Evas_Object *obj, void *ev)
In this example, the aim of the callback is to create the view which the user has requested. It is named _menu_item_selected_cb, and in this function we recover the calling object text to call the correct view creation function.
it = ev;

// Get the menu item text
str = elm_object_item_text_get(it);

// Comparing with the possible view names
if (!strcmp(str, "Calendar"))
{
   // Build the "Calendar View"
   _build_calendar_view(ad);
   // Set the view from the application data
   view = ad->cal_view->box;
}
else if (!strcmp(str, "Date"))
{
   // Build the "Date View"
   _build_date_view(ad);
   // Set the view from the application data
   view = ad->date_view->box;
}
else if (!strcmp(str, "Home"))
{
   // Build the "Home or main View"
   _build_main_view(ad);
   // Set the view from the application data
   view = ad->main_view->box;
}
else if (!strcmp(str, "Settings"))
{
   // Build the "Settings" view
   _build_settings_view(ad);
   // Set the view from the application data
   view = ad->settings_view->box;
}
else if (!strcmp(str, "Clock"))
{
   // Build the "Date View"
   _build_date_view(ad);
   // Set the view from the application data
   view = ad->date_view->box;
}

// Show the view in the naviframe
elm_object_content_set(ad->nf, view);
The menu has views, Calendar, Date, Settings, and Home (main view). The view names are stored in the menu item label, to get the label compare the returned string with the view names. When the name matches, the view is built by calling the correct function. Store the view in the application data and set up a new content to the naviframe before exit.
This way when the user clicks a menu item, the view changes. The naviframe component destroys its content on each call of elm_object_content_set. That is why the content must be built again on each item click.
Create the functions which create the views.
static void _build_main_view(appdata_s *ad)
{
   mainview_s *view = ad->main_view;
   char buf[PATH_MAX];

   // Main box
   view->box = elm_box_add(ad->nf);
   elm_box_horizontal_set(view->box, EINA_FALSE);
   elm_box_homogeneous_set(view->box, EINA_TRUE);

   view->colorselector = elm_colorselector_add(view->box);
   elm_colorselector_mode_set(view->colorselector, ELM_COLORSELECTOR_PALETTE);
   elm_box_pack_start(view->box, view->colorselector);
   evas_object_show(view->colorselector);

   view->img = elm_image_add(view->box);
   evas_object_size_hint_weight_set(view->img, EVAS_HINT_FILL, EVAS_HINT_FILL);
   evas_object_size_hint_align_set(view->img, 0.5, 0.5);
   evas_object_size_hint_min_set(view->img, 256, 256);
   ;snprintf(buf, sizeof(buf), "%s/%s", ICON_DIR, "tizen-logo.png");
   if (!elm_image_file_set(view->img, buf, NULL))
      elm_object_text_set(view->lb_day, "Problem loading image");
   elm_box_pack_start(view->box, view->img);
   evas_object_show(view->img);

   view->lb_day = elm_label_add(view->box);
   elm_object_text_set(view->lb_day, "Main view");
   evas_object_size_hint_weight_set(view->lb_day, EVAS_HINT_EXPAND, EVAS_HINT_EXPAND);
   elm_box_pack_end(view->box, view->lb_day);
   evas_object_show(view->lb_day);
}

static void
_build_calendar_view(appdata_s *ad)
{
   calview_s *view = ad->cal_view;

   // Main box image = elm_image_add(win);

   view->box = elm_box_add(ad->nf);
   elm_box_horizontal_set(view->box, EINA_FALSE);
   elm_box_homogeneous_set(view->box, EINA_TRUE);

   view->calendar = elm_image_add(ad->nf);
   evas_object_size_hint_weight_set(view->calendar, EVAS_HINT_FILL, EVAS_HINT_FILL);
   evas_object_size_hint_align_set(view->calendar, 0.5, 0.5);
   evas_object_size_hint_min_set(view->calendar, 256, 256);
   elm_image_file_set(view->calendar, ICON_DIR"/calendar.png", NULL);
   elm_box_pack_start(view->box, view->calendar);
   evas_object_show(view->calendar);

   view->lb_cal = elm_label_add(view->box);
   elm_object_text_set(view->lb_cal, "The calendar view");
   evas_object_size_hint_weight_set(view->lb_cal, EVAS_HINT_EXPAND, EVAS_HINT_EXPAND);
   elm_box_pack_end(view->box, view->lb_cal);
   evas_object_show(view->lb_cal);
} // End of_build_calendar_view
Each function creates a view and stores it in the application data.
Creating a Hidden Menu
Add a new function called _build_side_menu to create the side Menu toolbar and add some items to it. This function takes the application data as parameter and stores the built menu in the sidemenu attribute of the structure.
static void _build_side_menu(appdata_s *ad)
{
   appmenu_s *sidemenu = calloc(1, sizeof(appmenu_s));
   ad->sidemenu = sidemenu;

   sidemenu->tb = elm_toolbar_add(ad->win);

   elm_toolbar_shrink_mode_set(sidemenu->tb, ELM_TOOLBAR_SHRINK_EXPAND);
   elm_toolbar_transverse_expanded_set(sidemenu->tb, EINA_TRUE);

   elm_toolbar_item_append(sidemenu->tb, ICON_DIR"/home.png", "Home", _menu_item_selected_cb, ad);
   elm_toolbar_item_append(sidemenu->tb, ICON_DIR"/account.png", "Account", NULL, NULL);
   elm_toolbar_item_append(sidemenu->tb, ICON_DIR"/contacts.png", "Friends", NULL, NULL);
   elm_toolbar_item_append(sidemenu->tb, ICON_DIR"/clock.png", "Clock", _menu_item_selected_cb, ad);
   elm_toolbar_homogeneous_set(sidemenu->tb, EINA_FALSE);
   evas_object_show(sidemenu->tb);
   elm_object_part_content_set(ad->layout, "menu/side", sidemenu->tb);
   elm_toolbar_horizontal_set(sidemenu->tb, EINA_FALSE);
   elm_toolbar_item_selected_set(elm_toolbar_first_item_get(sidemenu->tb), EINA_TRUE);
}
The side menu is created but hidden by default, to make it appear the use must click Home button.
By default the Basic EDC UI application creates a function keydown_cb to handle the key down events. In the create_base_gui function an ecore_event_handler_add function is called with the ECORE_EVENT_KEY_DOWN macro and with keydown_cb as callback. In this callback, the KEY_END event puts the window on the lower state.
keydown_cb(void *data , int type , void *event)
{
   appdata_s *ad = data;
   Ecore_Event_Key *ev = event;
   if (!strcmp(ev->keyname, KEY_END))
   {
      // Let window go to hide state
      elm_win_lower(ad->win);
   }

   return ECORE_CALLBACK_DONE;
}
The key name of menu button is XF86Send. Add the menu button key press handling to the keydown_cb. The menu is shown on the first press and hidden it on the second press. Use Eina_Bool sdmenu_up on the application data to store the menu status during the application execution. If ad->sdmenu_up is EINA_TRUE the menu is visible.
A program animation,menu_side is defined in the .edc theme file. This program is run when the signal show,sidemenu is received with the source MenuButton. Also the program who hides the side menu is defined and is called animation,menu_side,hide which start on signal hide,sidemenu.
Test side menu status by sending the signals using elm_object_signal_emit
if (!strcmp(ev->keyname, "XF86Send"))
{
   if (ad->sdmenu_up == EINA_TRUE)
   {
      // If the menu is visible send a "hide,sidemenu" signal
      elm_object_signal_emit(ad->layout, "hide,sidemenu", "MenuButton");
      // Store the new menu status (hidden)
      ad->sdmenu_up = EINA_FALSE;
   }
}
Now the menu appears and disappears when the menu button is pressed.
The first side menu button sends back to the main view:
// Hide the side menu if it's visible
if (ad->sdmenu_up == EINA_TRUE)
{
   elm_object_signal_emit(ad->layout, "hide,sidemenu", "MenuButton");
      ad->sdmenu_up = EINA_FALSE;
}
This way the menu disappears when the view is selected by the user.
