Notifications
PUBLISHED
An application can use notifications to keep the user informed of important information.
The main features of the Tizen.Applications.Notifications namespace include:
- Creating a notification
You can create a notification.
- Configuring the notification
- You can set notification attributes, such as the notification title, content, timestamp, and various property options.
- You can set accessory options for a notification to control how the device sound, vibration, and LED feedback respond to the notification.
- You can set styles for a notification, changing its display type and adding features, such as icons and background images.
- Posting a notification
You can post a notification using the
Post()method of the Tizen.Applications.Notifications.NotificationManager [1] class.The posted notification has a default notification icon and the application name as the title.
- Updating notification content
You can update the content of an ongoing notification using the
Update()method of theTizen.Applications.Notifications.NotificationManagerclass. - Deleting a notification
You can delete notifications when no longer needed.
- Using advanced notification features
- You can display and update the progress bar for an ongoing notification.
- You can create a template that can be reused in multiple notifications.
Notification Display Types
Tizen provides notifications by using a combination of any of the following notification display types:
- Quick panel
- Active notification
- Indicator
- Lock screen
- Status message
The notification display type determines where and how the notification message is displayed.
Quick Panel Notifications
The display area for quick panel notifications can be one of the following:
- Notification area
The notification area is the reserved space for displaying all notifications, except the on-going notifications.
- On-going area
The on-going area is the application screen area and is only used to display notifications for the currently-running application.
Figure: Notification and on-going areas

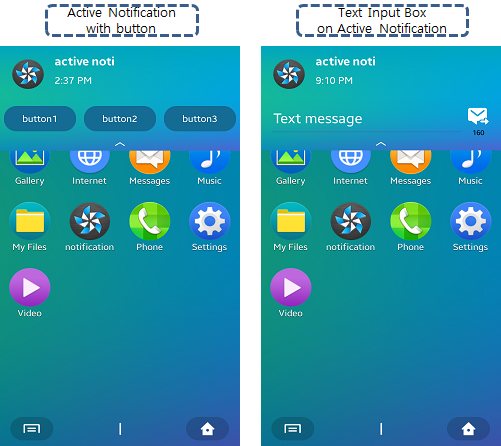
Active Notifications
An active notification is displayed on the upper side of the screen. You can add buttons for user interaction, and a text input field which the user can use to reply to the notification directly.
Figure: Active notification
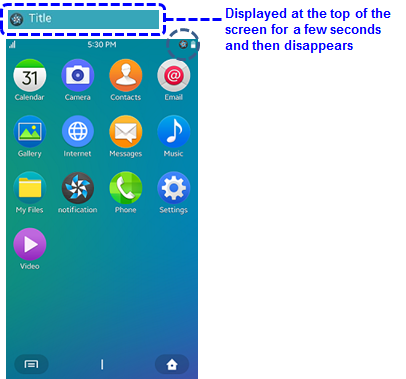
Indicator Notifications
The indicator type notification is displayed for a few seconds in the indicator area. Only a simple string and icon can be displayed.
Figure: Notification on the ticker and the indicator
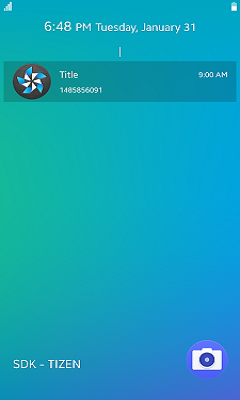
Lock Screen Notifications
You can display a notification on the lock screen. The notification content can be displayed or hidden.
Figure: Notification on the lock screen
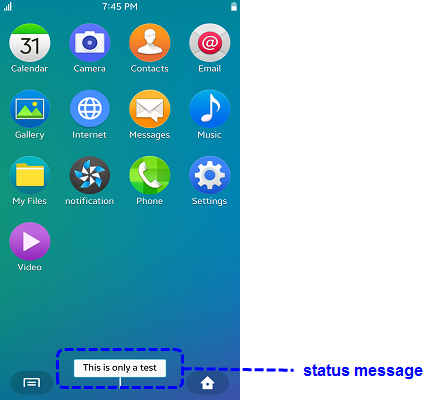
Status Message Notifications
A status message type notification can be used like a pop-up. It is displayed for a few seconds and then disappears.
Figure: Status message
Prerequisites
To enable your application to use the notification functionality:
- To use notifications, the application has to request permission by adding the following privilege to the
tizen-manifest.xmlfile:<privileges> <privilege>http://tizen.org/privilege/notification</privilege> </privileges>
- To use the methods and properties of the Tizen.Applications.Notifications [2] namespace, include it in your application:
using Tizen.Applications.Notifications;
- To follow this guide, place an image file in, for example, your application's shared resource directory. The following variables are used in the code:
DirectoryInfo info = Application.Current.DirectoryInfo;
String imagePath;
String sharedPath = info.SharedData;

imagePath = sharedPath + "imageName.png";
Creating a Notification
To create a notification, create a new instance of the Tizen.Applications.Notifications.Notification [3] class:
Notification noti = new Notification();
Setting Notification Attributes
To set notification attributes, such as title, content, icon, and timestamp, set the corresponding properties of the Tizen.Applications.Notifications.Notification [3] class instance:
Notification noti = new Notification
{
    Title = "Title",
    Content = "Content",
    Icon = imagePath,
    Count = 2,
    Tag = "tag",
    TimeStamp = time,
    Property = DisableAppLaunch
};
Setting Accessory Options
You can set accessory options for a notification to control how the device sound, vibration, and LED react to the notification being activated. Any options you do not set use the default values instead.
To set accessory options:
- Create an accessory set for the notification as a new instance of the Tizen.Applications.Notifications.Notification.AccessorySet [4] class:
Notification.AccessorySet accessory = new Notification.AccessorySet();
- Set the properties of the
Tizen.Applications.Notifications.Notification.AccessorySetinstance.The available
SoundOptionandLedOptionproperty values are defined in the Tizen.Applications.Notifications.AccessoryOption [5] enumeration.accessory.SoundOption = Notifications.AccessoryOption.Custom; accessory.SoundPath = soundPath; accessory.CanVibrate = true; accessory.LedOption = Notifications.AccessoryOption.On; accessory.LedOnMillisecond = 100; accessory.LedOffMillisecond = 100;
- To have your notification use the modified values, set the
Tizen.Applications.Notifications.Notification.AccessorySetinstance as theAccessoryproperty of the Tizen.Applications.Notifications.Notification [3] class instance:
noti.Accessory = accessory;
Setting Notification Styles
You can set a style for your notification to change how the notification is displayed, including changing the display type or icon. A single notification can only have 1 style set for it.
To add styles to your notification:
- To create an active notification:
- Create a new instance of the Tizen.Applications.Notifications.Notification.ActiveStyle [6] class and set its properties:
Notification.ActiveStyle style = new Notification.ActiveStyle();
style.IsAutoRemove = false;
style.BackgroundImage = backgroundImage;
- Optionally, you can add buttons or a reply field to an active notification.
- To add buttons:
- To add a button, create a new instance of the Tizen.Applications.Notifications.Notification.ButtonAction [7] class. You can add up to 3 buttons into a single active notification.
Notification.ButtonAction button = new Notification.ButtonAction();
button.Index = Notifications.ButtonIndex.First;
button.Text = "Reply";
button.ImagePath = imagePath;
- To create an application control to handle the results of clicking a button, create an instance of the Tizen.Applications.AppControl [8] class and link it to the button by setting it as the
Actionproperty of theTizen.Applications.Notifications.Notification.ButtonActionclass instance:
AppControl appcontrol = new AppControl();
appcontrol.ApplicationId = "org.tizen.test.tpk";

button.Action = appcontrol;
- To add the button to the
Tizen.Applications.Notifications.Notification.ActiveStyleinstance, use theAddButtonAction()method:
style.AddButtonAction(button);
- To add a button, create a new instance of the Tizen.Applications.Notifications.Notification.ButtonAction [7] class. You can add up to 3 buttons into a single active notification.
- To add a reply field and button:
- To add a reply field for the user to reply to a notification, create a new instance of the Tizen.Applications.Notifications.Notification.ReplyAction [9] class and set its properties:
Notification.ReplyAction action = new Notification.ReplyAction();
action.ParentIndex = Notifications.ButtonIndex.First;
action.ReplyMax = 160;
action.PlaceHolderText = "Send";
- The reply field requires a button for the user to send the completed reply with, and the button in turn requires an application control to handle the results of clicking the button. Create the application control as an instance of the
Tizen.Applications.AppControlclass, and the button as an instance of theTizen.Applications.Notifications.Notification.ButtonActionclass:
AppControl appcontrol = new AppControl();
appcontrol.ApplicationId = "org.tizen.test.tpk";

Notification.ButtonAction button = new Notification.ButtonAction();
button.Index = Notifications.ButtonIndex.First;
button.Text = "Reply";
button.ImagePath = imagePath;
button.Action = appcontrol;
- To link the button with the reply field, add it as the
Buttonproperty of theTizen.Applications.Notifications.Notification.ReplyActionclass instance:
action.Button = button;
- To add the reply field to the style instance, add it as the
ReplyActionproperty of theTizen.Applications.Notifications.Notification.ActiveStyleclass instance:
style.ReplyAction = action;
- To add a reply field for the user to reply to a notification, create a new instance of the Tizen.Applications.Notifications.Notification.ReplyAction [9] class and set its properties:
- To add buttons:
- Apply the new style to your notification by using the
AddStyle()method of the Tizen.Applications.Notifications.Notification [3] class:
noti.AddStyle(style);
- Create a new instance of the Tizen.Applications.Notifications.Notification.ActiveStyle [6] class and set its properties:
- To create an indicator type notification:
- Create a new instance of the Tizen.Applications.Notifications.Notification.IndicatorStyle [10] class and set its properties:
Notification.IndicatorStyle style = new Notification.IndicatorStyle();
style.IconPath = iconPath;
style.SubText = "SubText";
- Apply the new style to your notification by using the
AddStyle()method of theTizen.Applications.Notifications.Notificationclass:
noti.AddStyle(style);
- Create a new instance of the Tizen.Applications.Notifications.Notification.IndicatorStyle [10] class and set its properties:
- To create a lock screen notification:
- Create a new instance of the Tizen.Applications.Notifications.Notification.LockStyle [11] class and set its properties:
Notification.LockStyle style = new Notification.LockStyle();
style.IconPath = iconPath;
style.ThumbnailPath = thumbnailPath;
- Apply the new style to your notification by using the
AddStyle()method of theTizen.Applications.Notifications.Notificationclass:
noti.AddStyle(style);
- Create a new instance of the Tizen.Applications.Notifications.Notification.LockStyle [11] class and set its properties:
Posting a Notification
To post a notification to the database, use the Post() method of the Tizen.Applications.Notifications.NotificationManager [1] class:
NotificationManager.Post(noti);
Updating Notification Content
To update the content of a notification, use the Update() method of the Tizen.Applications.Notifications.NotificationManager [1] class. The method works for ongoing notifications only.
NotificationManager.Update(noti);
Deleting a Notification
To delete a notification from the database, use the Delete() method of the Tizen.Applications.Notifications.NotificationManager [1] class:
NotificationManager.Delete(noti);
Displaying the Progress Bar
To display the progress bar and update the progress data:
- To create a notification with a progress bar, create a new instance of the Tizen.Applications.Notifications.Notification.ProgressType [12] class. To be able to retrieve the notification handle and update the progress data later, set a notification tag with the
Tagproperty of the Tizen.Applications.Notifications.Notification [3] class.Notification.ProgressType progress = new Notification.ProgressType(Notifications.ProgressCategory.Percent, 0.0, 100.0); noti.Progress = progress; noti.Tag = "tag";
- To update the progress bar, retrieve the notification with its tag by using the
Load()method of the Tizen.Applications.Notifications.NotificationManager [1] class, and update the notification:
Notification noti = NotificationManager.Load("tag");
noti.Progress.ProgressCurrent = 10.0;
Using a Notification Template
To create a template from an existing notification, and reuse that template later to quickly create other notifications with the same pattern:
- To create a template:
- Create a notification as usual.
The following example creates an active notification with 2 buttons (Accept and Cancel), a background image, and sound, LED, and vibration feedback:
Notification noti = new Notification { Title = "Notification", Content = "Content", Icon = imagePath }; Notification.AccessorySet accessory = new Notification.AccessorySet { SoundOption = Notifications.AccessoryOption.Custom, SoundPath = soundPath, CanVibrate = true, LedOption = Notifications.AccessoryOption.On, LedOnMillisecond = 100, LedOffMillisecond = 100 }; noti.Accessory = accessory; Notification.ActiveStyle style = new Notification.ActiveStyle { IsAutoRemove = true, BackgroundImage = backgroundImagePath }; AppControl firstAppControl = new AppControl { ApplicationId = "org.tizen.test.tpk" }; Notification.ButtonAction button1 = new Notification.ButtonAction { Index = Notifications.ButtonIndex.First, Text = "Accept", ImagePath = imagePath, Action = firstAppControl }; AppControl secondAppControl = new AppControl { ApplicationId = "org.tizen.test.tpk" }; Notification.ButtonAction button2 = new Notification.ButtonAction { Index = Notifications.ButtonIndex.Second, Text = "Cancel", ImagePath = imagePath, Action = secondAppControl }; style.AddButtonAction(button1); style.AddButtonAction(button2); noti.AddStyle(style); - Save the notification instance as a template and define a name for the template, using the
SaveTemplate()method of the Tizen.Applications.Notifications.NotificationManager [1] class:
NotificationManager.SaveTemplate(noti, "CALL_ACCEPT");
- Create a notification as usual.
- To use the template when creating a new notification, call the
LoadTemplate()method:
Notification loadNotification = NotificationManager.LoadTemplate("CALL_ACCEPT");