Crop image tutorial for Native Application
PUBLISHED
1 Introduction
This tutorial talks how to implement app which perform crop of selection area of Jpeg image. To resize or move selected crop area with crop markers, momentum touch gestures are used. Image view could be rotated also on 90,180,270 degrees. So before crop operation, current image orientation is taken and crop coordinates are calculated from relative to absolute values.
Image Util class is used to perform 2 transformations (Rotation->Crop) or just 1 Crop transformation (If you do not need rotate image).
Followings are the preconditions and environments of sample application
- Target SDK: Tizen SDK 2.4.0Rev4
- Target Platform: Tizen Mobile
- Target OS: Windows 7 32/64bit
- Target Device: Samsung Z3
2 Basic GUI creation
- Basic GUI is created inside create_base_gui(ad). This Sample contains 2 screens:
- “Main screen” to change image, rotate image, select crop area and start crop transformation.
- “Result screen” to show cropped image file, which is located at: /opt/usr/media/cropped.jpg on file system of mobile device.
- EDC layouts for both screens are located in project directory ./res/edje/main_screen.edc , ./res/edje/result_screen.edc and are loaded with standard elm_layout_file_set api.
2.1 Current image
All preloaded 4 image files of jpeg format are located in ./res/images folder in project directory . Pointer to array of file names and index of current file are stored in appdata_s structure. File name of current active image is available in array of filenames like this: ad->filename[ad->cur_index].
2.2 Main Screen
Pointer to Elementary Image widget is stored in appdata_s structure. Current Image is loaded from file into SWALLOW part (named “crop_image") of “Main screen” layout like this way:
   ad->image = elm_image_add(ad->layout);
   elm_image_file_set(ad->image, ad->filename[ad->cur_index] , NULL);
   elm_object_part_content_set(ad->layout, "crop_image", ad->imagge);
3 Crop area drawing
3.1 Crop Region structure
This is basic structure which contains all information about crop area in UI representation. Setter for structure is set_crop_region() method.
typedef struct _CropRegion
{
   int x;
   int y;
   int width;
   int height;
   Evas_Object *cropRect;
   Evas_Object *resizePoint[8];
   Evas_Object *borderLine[16];
}CropRegion;
Instance of structure is created by this way globally:
struct _CropRegion crop_region;
- crop_region.x, crop_region.y, crop_region.width, crop_region.height represents the relative (on screen) dimensions of crop area. These values are changing dynamically during crop area resize/move and are used to calculate crop coordinates for real image.
- crop_region.cropRect is pointer to rectangle Evas_Object on Evas (Canvas), which is used to move whole crop area.
- crop_region.resizePoint[8] is array of pointers to small images (Evas_Object type) on Evas (Canvas). These images are used as touch points (crop markers) to resize crop area.
- crop_region.borderLine[16] array of pointers to lines on Evas (Canvas). 8 lines between touch points. But there is no way to set line thickness, so line is drawn twice (16 lines).
3.2 Image Region structure
This structure contains current image relative (on screen) dimensions. These values are not changeable until image will not be changed or rotated. And these values are used to restrict crop area and calculate crop coordinates for real image. Setter for structure is set_image_region() method.
typedef struct _ImageRegion
{
   int x1;
   int y1;
   int w;
   int h;
   int x2;
   int y2;
}ImageRegion;
Instance of structure is created by this way globally:
struct _ImageRegion image_region;
3.3 Drawing methods
Here is description of crop area drawing methods.
3.3.1 Method draw_crop_area()
Method is called every time after “Main screen” becomes active or current image has been changed or rotated. In fact, this method stretches crop area on whole image. After Image position and size is calculated with calculate_image_pos_and_size(), Crop Region / Image Region coordinates sets (both equal) with set_crop_region()/set_image_region().
3.3.2 Method calculate_image_pos_and_size()
Unfortunately there is no api to get x,y (Left-Top) coordinates for Elementary Image widget. So we should calculate them manually.
This method is called every time from draw_crop_area() and it gets relative (on screen) sizes of Elementary Image widget, and on screen geometry of Elementary Image widget like x, y, width, height .In fact, the geometry is rectangular regionwhere Elementary Image widget has been inserted. But aspect ratio for image is saved and image is centered inside the region. So one side of widget is always smaller than one side of region (geometry). In case "x,width" for Elementary Image widget is valid , "y, height" should be recalculated. And vise vera.
void calculate_image_pos_and_size(void *data, int *x, int *y, int *w, int *h)
{
   appdata_s *ad = (appdata_s*) data;
   int elm_img_w, elm_img_h;

   elm_image_object_size_get (ad->image,&elm_img_w,&elm_img_h);
   int img_geom_x, img_geom_y, img_geom_w, img_geom_h;

   evas_object_geometry_get( ad->image ,&img_geom_x, &img_geom_y, &img_geom_w, &img_geom_h);
   if( (double)elm_img_h/img_geom_h > (double)elm_img_w/img_geom_w)
   {
      *h = img_geom_h;
      *w = img_geom_h * elm_img_w / elm_img_h;
      *x = img_geom_x + (img_geom_w - *w)/2;
      *y = img_geom_y;
   }
   else
   {
      *h = img_geom_w * elm_img_h /elm_img_w;
      *w = img_geom_w;
      *x = img_geom_x;
      *y = img_geom_y + (img_geom_h - *h)/2;
   }
}
3.3.3 Method redraw_crop_area()
This method redraws all crop area objects: 1 rectangle, 8 touch points and 8 lines with new coordinates taken from Crop Region structure. This method is called every time after crop area size or position has been changed (moved/resized) with every touch gesture. It can be called every time from draw_crop_area() method as well.
Temporary variables such as rect_size, centerX, centerY , offset are added in code just for usability in below code
void redraw_crop_area()
{
   int x=crop_region.x;
   int y=crop_region.y;
   int width=crop_region.width-1;
   int height=crop_region.height-1;

   evas_object_move(crop_region.cropRect, x, y);
   evas_object_resize(crop_region.cropRect, width, height);

   int rect_size = RESIZE_TOUCH_POINT_SIZE;
   evas_object_move(crop_region.resizePoint[0], x-rect_size/2, y-rect_size/2);
   evas_object_resize(crop_region.resizePoint[0], rect_size, rect_size);

   evas_object_move(crop_region.resizePoint[2], x-rect_size/2+width, y-rect_size/2);
   evas_object_resize(crop_region.resizePoint[2], rect_size, rect_size);

   evas_object_move(crop_region.resizePoint[4], x-rect_size/2+width, y-rect_size/2+height);
   evas_object_resize(crop_region.resizePoint[4], rect_size, rect_size);

   evas_object_move(crop_region.resizePoint[6], x-rect_size/2, y-rect_size/2+height);
   evas_object_resize(crop_region.resizePoint[6], rect_size, rect_size);

   int centerX = width/2;
   int centerY = height/2;

   evas_object_move(crop_region.resizePoint[1], x-rect_size/2+centerX, y-rect_size/2);
   evas_object_resize(crop_region.resizePoint[1], rect_size, rect_size);

   evas_object_move(crop_region.resizePoint[3], x-rect_size/2+width, y-rect_size/2+centerY);
   evas_object_resize(crop_region.resizePoint[3], rect_size, rect_size);

   evas_object_move(crop_region.resizePoint[5], x-rect_size/2+centerX, y-rect_size/2+height);
   evas_object_resize(crop_region.resizePoint[5], rect_size, rect_size);

   evas_object_move(crop_region.resizePoint[7], x-rect_size/2, y-rect_size/2+centerY);
   evas_object_resize(crop_region.resizePoint[7], rect_size, rect_size);

   int offset = CROP_MARKER_OFFSET;
   for(int i=0;i<LINE_WIDTH;i++)
   {
      evas_object_line_xy_set(crop_region.borderLine[0+CROP_MARKERS_AMOUNT*i], x+offset+i, y+i, x+(centerX-offset), y+i);
      evas_object_line_xy_set(crop_region.borderLine[1+CROP_MARKERS_AMOUNT*i], x+(centerX+offset), y+i, x+(width-offset)-i, y+i);
    //...
   }
}
3.3.4 Other drawing methods
Short description of other methods:
- set_crop_region()/set_image_region() Setters for Crop area/Image Region structures.
- create_crop_objs()/delete_crop_objs() are called on app_create()/app_terminate() just to create/delete all evas objects which represents crop area (crop rectangle, touch points, lines ).
- show_crop_objs()/hide_crop_objs() are used to show/hide crop area evas objects (crop rectangle, touch points, lines ) when current screens has been changed.
4 Image Rotation
- Sample application allows change of Elementary Image Widget orientation (with appropriate UI Button click). Such orientation is stored in appdata_s structure and accessed in code as: ad->elm_image_orient. Other appdata_s structure member like ad->real_image_orient stores information about real orientation.
4.1 Image Rotation methods
Here is description of methods which perform image rotation on screen and stores real image orientation for further crop operations.
4.1.1 Method get_image_rotation_params()
This method is called every time after ”Main screen” has been loaded or current image has been changed. The method is initialaize both orientation members of appdata_s structure at first:
ad->elm_image_orient = (int)IMAGE_UTIL_ROTATION_NONE;
ad->real_image_orient = (int)IMAGE_UTIL_ROTATION_NONE;
But real jpeg image orientation could be different. Jpeg files could contain additional EXIF metadata which should be extracted with get_exif_orientation() method and considered during performing crop operation.
   int exifOrientation = (int)get_exif_orientation(ad->filename[ad->cur_index]);
   if (exifOrientation == (int)ORIENTATION_ROTATE_90 ||
       exifOrientation == (int)ORIENTATION_TRANSPOSE)
   {
      ad->real_image_orient = (int)IMAGE_UTIL_ROTATION_90;
   }
   else if (exifOrientation == (int)ORIENTATION_ROTATE_180 ||
            exifOrientation == (int)ORIENTATION_FLIP_VERTICAL)
   {
      ad->real_image_orient = (int)IMAGE_UTIL_ROTATION_180;
   }
   else if (exifOrientation == (int)ORIENTATION_ROTATE_270 ||
            exifOrientation == (int)ORIENTATION_TRANSVERSE)
   {
      ad->real_image_orient = (int)IMAGE_UTIL_ROTATION_270;
   }
4.1.2 Method get_exif_orientation()
This method gets EXIF_TAG_ORIENTATION from current jpeg file. The Tag stores orientation of the captured with camera scene. In fact, this is additional angle on which you should rotate your image. You can refer to code snippet of How To Get Exif Orientation. Exif orientation values are defined in appropriate structure.
enum EXIF_ORIENTATION {
   ORIENTATION_UNKNOWN=0,
   ORIENTATION_NORMAL,
   ORIENTATION_FLIP_HORIZONTAL,
   ORIENTATION_ROTATE_180,
   ORIENTATION_FLIP_VERTICAL,
   ORIENTATION_TRANSPOSE,
   ORIENTATION_ROTATE_90,
   ORIENTATION_TRANSVERSE,
   ORIENTATION_ROTATE_270
};
Defined ORIENTATION_FLIP_HORIZONTAL, ORIENTATION_FLIP_VERTICAL, ORIENTATION_TRANSPOSE, ORIENTATION_TRANSVERSE values tell that jpeg image should be rotated and flipped too.
But 4 preloaded jpeg images has ORIENTATION_NORMAL, ORIENTATION_ROTATE_90, ORIENTATION_ROTATE_180, ORIENTATION_ROTATE_270 values of EXIF_TAG_ORIENTATION.
4.1.3 Method on_rotate_btn_clicked_cb()
Registered rotation callback is invoked on every appropriate UI Button click. It rotates Elementary Image Widget by 90 degrees clockwise and changes ad->elm_image_orient, ad->real_image_orient accordingly. The method redraw crop area (see draw_crop_area()) which is stretched on whole rotated image
static void
on_rotate_btn_clicked_cb (void *data, Evas_Object *obj, const char *emission, const char *source){
    appdata_s *ad = (appdata_s *) data;
    ad->elm_image_orient = elm_image_orient_get(ad->image);
    if (ad->elm_image_orient == (int)IMAGE_UTIL_ROTATION_270){
       ad->elm_image_orient = (int)IMAGE_UTIL_ROTATION_NONE;
    }
    else {
       ad->elm_image_orient++;
    }
    elm_image_orient_set(ad->image,ad->elm_image_orient);

    if (ad->real_image_orient == (int)IMAGE_UTIL_ROTATION_270){
       ad->real_image_orient = (int)IMAGE_UTIL_ROTATION_NONE;
    }
    else {
       ad->real_image_orient++;
    }
    draw_crop_area(ad);
}
5 Touch Gestures implementation
5.1 Add gesture layers
Application data structure appdata_s contains pointers to gesture layer objects which are added on application create inside app_create():
   Evas_Object * move_gesture;
   Evas_Object * resize_gesture[8];
Gesture layer object for moving whole crop area is constructed and added onto rectangle Evas_Object of Crop Region structure this way :
ad->move_gesture = elm_gesture_layer_add(ad->layout);
elm_gesture_layer_attach(ad->move_gesture, crop_region.cropRect);
Array of gesture layers for resizing crop area is constructed and added onto every Resize Touch of Crop Region this way:
   for(int i=0;i<8;i++)  {
      ad->resize_gesture[i] = elm_gesture_layer_add(ad->layout);
      elm_gesture_layer_attach(ad->resize_gesture[i], crop_region.resizePoint[i]);
   }
5.2 Gesture callbacks
To detecting move event on the gesture layers, the momentum gesture ELM_GESTURE_MOMENTUM is used. You can refer to Link of Momentum Gesture tutorial.
For objects of Crop Region which has attached gesture layers(1 rectangle & 8 resize touch points), appropriate callbacks are registered. They react to moving touch events and recalculate new coordintaes to redraw crop area with new x, y, width, height.
5.2.1 Method register_gesture_callbacks()
For the momentum gestures, all callback are registered with elm_gesture_layer_cb_set() api on application start inside of app_create() by this way:
void register_gesture_callbacks(void *data)
{
   appdata_s *ad = (appdata_s*) data;
   elm_gesture_layer_cb_set(ad->move_gesture, ELM_GESTURE_MOMENTUM, ELM_GESTURE_STATE_START, momentum_start, ad);
   elm_gesture_layer_cb_set(ad->move_gesture, ELM_GESTURE_MOMENTUM, ELM_GESTURE_STATE_MOVE, momentun_move_crop_region, ad);

   for(int i=0; i<8;i++)
   {
      elm_gesture_layer_cb_set(ad->resize_gesture[i], ELM_GESTURE_MOMENTUM, ELM_GESTURE_STATE_START, momentum_start, ad);
   }

   elm_gesture_layer_cb_set(ad->resize_gesture[0], ELM_GESTURE_MOMENTUM, ELM_GESTURE_STATE_MOVE, momentun_move_resize_point_0, ad);
   elm_gesture_layer_cb_set(ad->resize_gesture[1], ELM_GESTURE_MOMENTUM, ELM_GESTURE_STATE_MOVE, momentun_move_resize_point_1, ad);
   elm_gesture_layer_cb_set(ad->resize_gesture[2], ELM_GESTURE_MOMENTUM, ELM_GESTURE_STATE_MOVE, momentun_move_resize_point_2, ad);
   elm_gesture_layer_cb_set(ad->resize_gesture[3], ELM_GESTURE_MOMENTUM, ELM_GESTURE_STATE_MOVE, momentun_move_resize_point_3, ad);
   elm_gesture_layer_cb_set(ad->resize_gesture[4], ELM_GESTURE_MOMENTUM, ELM_GESTURE_STATE_MOVE, momentun_move_resize_point_4, ad);
   elm_gesture_layer_cb_set(ad->resize_gesture[5], ELM_GESTURE_MOMENTUM, ELM_GESTURE_STATE_MOVE, momentun_move_resize_point_5, ad);
   elm_gesture_layer_cb_set(ad->resize_gesture[6], ELM_GESTURE_MOMENTUM, ELM_GESTURE_STATE_MOVE, momentun_move_resize_point_6, ad);
   elm_gesture_layer_cb_set(ad->resize_gesture[7], ELM_GESTURE_MOMENTUM, ELM_GESTURE_STATE_MOVE, momentun_move_resize_point_7, ad);
}
Note that for gesture state, ELM_GESTURE_STATE_START is used in common callback momentum_start(). This method just stores initial touch x,y coordinates inside of application data structure appdata_s:
    int prev_momentum_x2;
    int prev_momentum_y2;
5.2.2 Methods to resize crop area
There are 8 resize touch points which are drawn with redraw_crop_area() method on image . They are named momentun_move_resize_point_0(), momentun_move_resize_point_1(), etc.
Every of them has its own gesture layer with original registered callbacks which react on moving state of momentum gesture. During moving, every callback is called with new end point coordinates p->x2, p->y2.
Left-Top, Right-Top, Left-Bottom, Right-Bottom touch points allow reduce/increase crop area in any direction. 4 central points allow change of crop area only in vertical or horizontal direction.
Here is description how to work Left-Top resize touch point:
Evas_Event_Flags momentun_move_resize_point_0(void *data, void *event_info)
{
   appdata_s *ad = (appdata_s*) data;
   Elm_Gesture_Momentum_Info *p = (Elm_Gesture_Momentum_Info *) event_info;
- If more than 1 finger are pressed ( (p->n)>1 ) crop area will not be resized:
if ((p->n)>1) return EVAS_EVENT_FLAG_NONE;
- offsetX, offsetY are differences between current and previous end points. Current coordinates are stored in appdata_s structure as previous data to be calculated with new offset in next. Note that first time
ad->prev_momentum_x2, ad->prev_momentum_x2 are stored inside of momentum_start() during start of momentum gesture:
   int offsetX =p->x2 - ad->prev_momentum_x2;
   int offsetY =p->y2 - ad->prev_momentum_y2;

   ad->prev_momentum_x2=p->x2;
   ad->prev_momentum_y2=p->y2;
- crop_region.x, crop_region.y, crop_region.width, crop_region.height are newly recalculated with offsetX, offsetY coordinates of Crop Region. All comparisons here do not allow redraw crop area smaller than 120x120 pixels and bigger than image size.
   int x1 = crop_region.x+offsetX;
   if (x1 < image_region.x1) return EVAS_EVENT_FLAG_NONE;

   int y1 = crop_region.y+offsetY;
   if (y1 < image_region.y1) return EVAS_EVENT_FLAG_NONE;

   int width = crop_region.width-offsetX;
   if (width < CROP_REGION_MIN_WIDTH) return EVAS_EVENT_FLAG_NONE;

   int height = crop_region.height-offsetY;
   if (height < CROP_REGION_MIN_HEIGHT) return EVAS_EVENT_FLAG_NONE;
- redraw_crop_area() draws new resized crop area.
    redraw_crop_area();

    return EVAS_EVENT_FLAG_NONE;
}
Other touch points work similar, but logic has some difference.
5.2.3 Method momentun_move_crop_region()
If crop area is smaller than image (has been already reduced with touch points), the crop area could be moved wholly. Callback momentun_move_crop_region() is added for this on whole crop area rectangle.
It checks that x1, y1 (left-top), x2, y2 (right-bottom) crop area coordinates are valid. If one of coordinates out of image border (x1, y1 (left-top), x2, y2 (right-bottom) of image are stored in Image Region), crop area moving is forbidden and is not redrawn.
    int x1 = crop_region.x+offsetX;
    if (x1 < image_region.x1) return EVAS_EVENT_FLAG_NONE;

    int y1 = crop_region.y+offsetY;
    if (y1 < image_region.y1) return EVAS_EVENT_FLAG_NONE;

    int x2 = x1+crop_region.width;
    if (x2 > image_region.x2) return EVAS_EVENT_FLAG_NONE;

    int y2 = y1+crop_region.height;
    if (y2 > image_region.y2) return EVAS_EVENT_FLAG_NONE;

    crop_region.x=x1;
    crop_region.y=y1;
    draw_crop_area(ad);
5.2.4 Method unregister_gesture_callbacks()
All gesture callbacks are unregistered on application terminate inside app_terminate() by this way:
void unregister_gesture_callbacks(void *data)
{
   appdata_s *ad = (appdata_s*) data;
   elm_gesture_layer_cb_set(ad->move_gesture, ELM_GESTURE_MOMENTUM, ELM_GESTURE_STATE_START, NULL, NULL);
   elm_gesture_layer_cb_set(ad->move_gesture, ELM_GESTURE_MOMENTUM, ELM_GESTURE_STATE_MOVE, NULL, NULL);
   for(int i=0;i<8;i++)
   {
      elm_gesture_layer_cb_set(ad->resize_gesture[i], ELM_GESTURE_MOMENTUM, ELM_GESTURE_STATE_START, NULL,NULL);
      elm_gesture_layer_cb_set(ad->resize_gesture[i], ELM_GESTURE_MOMENTUM, ELM_GESTURE_STATE_MOVE, NULL, NULL);
   }
}
6 Transform Image
6.1 Method transform_image()
After cropped area was selected, image could be cropped with using Image Util api. UI Button “Crop” Initiate this procedure which could contain 2 transformations consequentially. Here is code snippet how to perform it - How to Rotate & Crop Jpeg file.
The method of transformation is transform_image(). Here are main points:
- This part initializes local variables and destroys previous transformation handler/media packet on start with destroy_image_transform().
void transform_image(const char* image_path, void * data)
{
   appdata_s *ad = (appdata_s*) data;
   unsigned char *img_buffer = NULL;
   int width = 0, height = 0;
   unsigned int size_decode = 0;
   void* src_ptr=NULL;

   destroy_image_transform();
- This code decodes jpeg file, store real width & height, creates transformation handle and initializes other Image Util parameters (it creates media format, media packet with allocated buffer) which are required to perform transformations:
   int ret=image_util_decode_jpeg(image_path, IMAGE_UTIL_COLORSPACE_RGB888, &img_buffer, &width, &height, &size_decode);
   if (ret != 0)
   {
      dlog_print(DLOG_DEBUG, LOG_TAG, "TransformImage: Unable to decode jpeg file");
      return;
   }
   ad->real_image_w = width;
   ad->real_image_h = height;

   image_util_transform_create(&image_transform[0].handle);

   media_format_create(&image_transform[0].fmt);
   media_format_set_video_mime(image_transform[0].fmt, MEDIA_FORMAT_RGB888);
   media_format_set_video_width(image_transform[0].fmt, width);
   media_format_set_video_height(image_transform[0].fmt, height);

   ret = media_packet_create_alloc(image_transform[0].fmt, finalize_callback, NULL, &image_transform[0].pckt);

   ret = media_packet_get_buffer_data_ptr(image_transform[0].pckt, &src_ptr);
   memcpy(src_ptr, img_buffer, size_decode);
   free(img_buffer);
- In next piece of code, real image orientation (stored in member ad->real_image_orient of appdata_s structure) is analyzed. How it is initialized and changed is described in Image Rotation section. But if real image orientation is not IMAGE_UTIL_ROTATION_NONE, rotation transformation should be done before crop transfromation (rotation on 90,180 or 270 degrees). For 90/270 degrees, rotations width and height should replace each other. Also before transformation, real crop coordinates are calculated with calculate_crop_coordinates() .
if ( ad->real_image_orient != (int) IMAGE_UTIL_ROTATION_NONE)
   {

     if (ad->real_image_orient == (int) IMAGE_UTIL_ROTATION_90)
     {
       image_util_transform_set_rotation(image_transform[0].handle, IMAGE_UTIL_ROTATION_90);
       ad->real_image_w  = height;
       ad->real_image_h  = width;
     }
     else if (ad->real_image_orient == (int) IMAGE_UTIL_ROTATION_180)
     {
       image_util_transform_set_rotation(image_transform[0].handle ,IMAGE_UTIL_ROTATION_180);
     }
     else
     {
       image_util_transform_set_rotation(image_transform[0].handle, IMAGE_UTIL_ROTATION_270);
       ad->real_image_w  = height;
       ad->real_image_h  = width;
     }

     calculate_crop_coordinates(ad->real_image_w, ad->real_image_h);
     image_util_transform_run(image_transform[0].handle, image_transform[0].pckt , (image_util_transform_completed_cb)completed_rotation_callback, ad);
   }
- If additional rotation is not required, crop transformation starts at once after real crop coordinates are calculated with calculate_crop_coordinates() .
   else
   {
     calculate_crop_coordinates(ad->real_image_w, ad->real_image_h);
     image_util_transform_set_crop_area(image_transform[0].handle, cropped_coords.x1, cropped_coords.y1,cropped_coords.x2,cropped_coords.y2);
     image_util_transform_run(image_transform[0].handle, image_transform[0].pckt , (image_util_transform_completed_cb)completed_crop_callback, ad);
   }
}
6.2 Method calculate_crop_coordinates()
Method recalculates crop area coordinates from relative (on screen) to absolute (real). It takes relative (on screen) coordinates stored in structures Crop Region / Image Region.
void calculate_crop_coordinates(int real_image_width, int real_image_height)
{
   cropped_coords.x1 = ((crop_region.x -  image_region.x1)*((double) real_image_width/image_region.w) );
   cropped_coords.y1 = ((crop_region.y -  image_region.y1)*((double) real_image_height/image_region.h) );
   cropped_coords.x2 = ((crop_region.x + crop_region.width -  image_region.x1)*((double) real_image_width/image_region.w) );
   cropped_coords.y2 = ((crop_region.y + crop_region.height - image_region.y1)*((double) real_image_height/image_region.h) );

   if(cropped_coords.x1 < 0 || cropped_coords.x1 > real_image_width)  cropped_coords.x1 = 0;
   if(cropped_coords.y1 < 0 || cropped_coords.y1 > real_image_height) cropped_coords.y1 = 0;
   if(cropped_coords.x2 >= real_image_width)  cropped_coords.x2 = real_image_width;
   if(cropped_coords.y2 >= real_image_height) cropped_coords.y2 = real_image_height;
}
Real crop coordinates are used to set for result file width & height, they are stored in this structure and:
typedef struct _CroppedImageCoords{
    int x1;
	int y1;
	int x2;
	int y2;
} CroppedImageCoords;
struct _CroppedImageCoords cropped_coords;
6.3 Method completed_rotation_callback()
This callback performs next actions:
- gets buffer with rotated image
- encode image buffer to Jpeg image in memory with image_util_encode_jpeg_to_memory()
- decode Jpeg image file stored in memory to memory buffer with image_util_decode_jpeg_from_memory()
- starts crop transformation
Code snippet how to perform 2 transformations consequentially: How to Rotate & Crop Jpeg file.
6.4 Method completed_crop_callback()
This callback is called after both (or one) transformations have been done:
void completed_crop_callback (media_packet_h *dst, int error_code, void *data)
{
   appdata_s *ad = (appdata_s*) data;
   void * ptr;
   int crop_image_w, crop_image_h;
   crop_image_w = cropped_coords.x2 - cropped_coords.x1;
   crop_image_h = cropped_coords.y2 - cropped_coords.y1;

   media_packet_get_buffer_data_ptr(*dst, &ptr);

   int ret = image_util_encode_jpeg((unsigned char*)ptr, crop_image_w, crop_image_h, IMAGE_UTIL_COLORSPACE_RGB888, 100, TEMP_CROP_FILE);
   if (ret == 0)
   {
      hide_crop_objs();
      load_result_screen_layout(ad);
   }
   else
   {
       dlog_print(DLOG_ERROR, LOG_TAG, "completed_crop_callback: Unable to encode jpeg");
   }
   media_packet_destroy(*dst);
}
This method:
- calculates width & height for result file.
- encodes result buffer which comes into callback with image_util_encode_jpeg() into file on file system. For file name ,TEMP_CROP_FILE is defined as “/opt/usr/media/cropped.jpg”
- hides crop area objects
- loads “Result screen” with cropped image this way:
elm_layout_file_set(ad->layout, edj_path, GRP_RESULT);
   elm_image_file_set(ad->image, TEMP_CROP_FILE , NULL);
   elm_object_part_content_set(ad->layout, "cropped_image", ad->image);
7 Sample application instruction
This is small instructions how to use sample app. After application has been launched, there are allowed these actions:
- Forward/backward arrows UI Buttons : changes current photo .
- Rotate UI Button changes Image orientation (rotates clockwise 90 degrees)
- Crop UI Button initiates Crop transformation and shows ”Result screen”.
- Crop area with 1 dimmed rectangle & 8 touch points allow to move/resize crop region.
- Move Image gesture (if image size > screen size): you can move visible part of photo
- H/W Back Key pressed during ”Result Screen” is active to moves app back to ”Main Screen”.
- H/W Back Key pressed during ”Main Screen” moves to background.
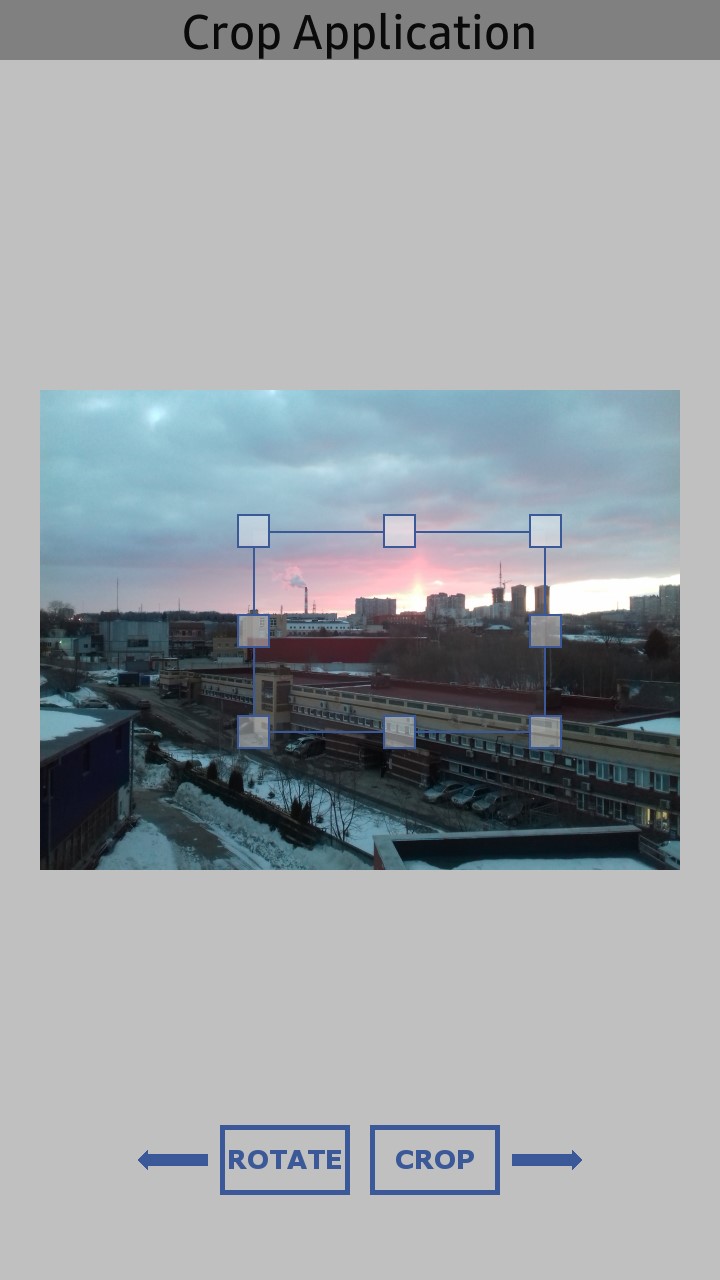
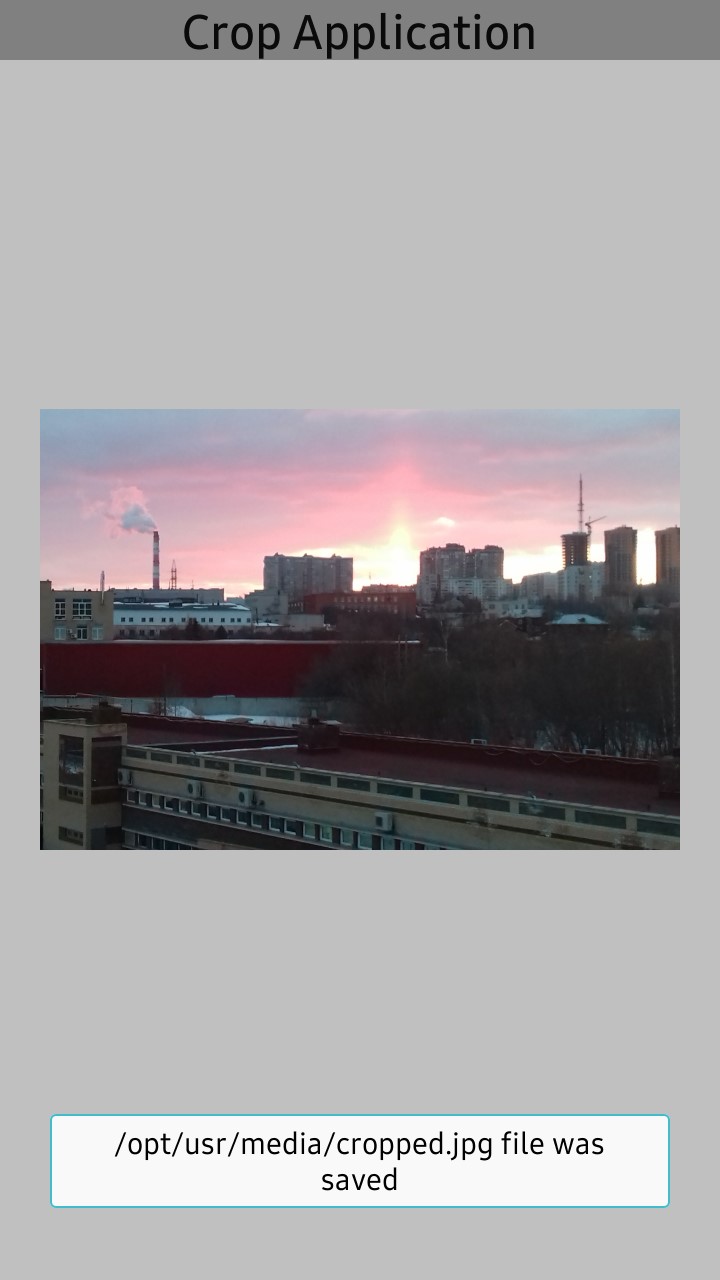
Figur 1 - Main Screen Figur 2 - Result Screen
8 Conclusion
I hope that this description help you to understand how to implement crop opertaion including below funcions in your application.
- draw UI of crop area with 8 resize points over the image
- add momentum move gesture listeners for 8 resize points and for whole crop recatngle to allow resize/move crop area
- recalculate relative (on screen) crop area and image coordinates to absolute coordinates
- perform rotate-> crop transformations with jpeg file , store result in new jpeg file and show result file on screen
References